Why Custom Pins Fail in Production: 7 Spec Traps
Why good artwork still fails on the line
Most custom pin problems do not start with bad design; they start with missing limits. A clean vector file can still produce soft edges, color bleed, warped plating, or a batch that looks fine in the sample room and fails in mass production. The root issue is usually that the buyer specified the look, but not the measurable build conditions that control it.
For enamel pins, the factory needs more than size and color count. It needs metal thickness, line width, cavity depth, plating tolerance, fill height, and acceptance criteria for defects. ZheCraft sees the same pattern across lapel pins, badges, coins, and keychains: if the RFQ does not define the failure mode, the factory will decide the standard for you.
| Spec item | Safe buyer target |
|---|---|
| Metal thickness | 1.2-1.5 mm for standard soft enamel pins |
| Minimum line width | 0.25 mm practical minimum; 0.3 mm safer |
| Enamel fill level | Flush to 0.1-0.2 mm below metal border |
| Plating thickness | 0.03-0.05 mm typical decorative range |
| QC level | AQL 2.5 major / 4.0 minor |
Failure mode 1: artwork that cannot survive tooling
The first production failure is usually geometry, not color. If the logo has ultra-thin strokes, floating islands, tight internal corners, or tiny text, the die sink or CNC tool cannot translate the art cleanly into metal. The result is broken lines, merged cavities, unreadable microtext, or a pin that looks acceptable at 100 percent zoom but not at 300 mm viewing distance.
The fix is to specify minimums before art approval, not after. For standard hard or soft enamel pins, keep critical strokes at 0.25 mm or wider, leave 0.2 mm or more between adjacent cavities, and avoid text smaller than about 5 pt unless it is engraved or stamped in relief. For 3D or cast parts, ask the factory to confirm undercut risk and tool access before finalizing the design.
- Reject artwork with hairline strokes below 0.2 mm
- Keep tiny text out of recessed fill areas
- Ask for a pre-tooling manufacturability check
- Freeze the linework before color approval
- Require a revised proof if cavity spacing is too tight
Failure mode 2: color looks right in proof and wrong in bulk
Color drift is one of the easiest ways to turn a good sample into a bad shipment. Pantone matching helps, but enamel is not ink: batch viscosity, firing temperature, and fill depth all shift the final appearance. Transparent, glitter, and glow effects amplify this risk because the base metal and cavity depth change the perceived tone.
Buyers should lock the color standard and the viewing condition. Specify a Pantone reference, an approved physical master sample, and the lighting condition for acceptance, ideally D65 or a standard white-light booth. For critical branding, require delta E tolerance if the supplier can measure it; otherwise define a visual match against the golden sample under neutral light.
| Color risk | Buyer control |
|---|---|
| Warm shift after firing | Approve under standard lighting, not phone photos |
| Batch-to-batch variation | Reference one physical master sample |
| Metal showing through translucent enamel | Specify cavity depth and fill height |
| Glitter inconsistency | Approve an effect sample before mass production |
| Darkening from overfiring | Ask for firing temperature control range |
Failure mode 3: plating that changes the whole product
Plating is not only a finish choice; it changes perceived quality, edge definition, corrosion risk, and even color contrast. A pin that looks crisp in gold can look muddy in antique brass if the recess depth is shallow or the surface texture is too busy. Thin plating can also discolor faster under humidity or handling, especially on cheaper base metals.
For decorative metal products, a typical plating layer is 0.03-0.05 mm, with better stability when the surface prep is consistent. If the product will be handled often, ask whether the finish is nickel underplate plus top finish or a single decorative coat, because that affects wear resistance. For buyers doing reorder programs, lock the exact plating code, gloss level, and antique wipe level so the factory does not reinterpret the look on the next run.
- Match plating to the cavity depth and line art style
- Specify whether antique wipe should be heavy, medium, or light
- Confirm if the finish includes nickel underplate
- Reject visible pitting, cloudy areas, and edge burn
- Use one approved master for all reorders
Failure mode 4: fill height and surface level are inconsistent
Uneven enamel fill creates a product that catches light badly and fails tactile inspection. Too low, and the color looks sunken and unfinished; too high, and the enamel domes, chips, or bridges across neighboring cavities. This is especially common in small pins with several colors, because the operator overfills one cavity and underfills another to speed up production.
The specification should define the target surface relationship, not just the existence of fill. For standard soft enamel, a practical target is enamel sitting 0.1-0.2 mm below the metal border, unless a flush finish is intentionally requested with polishing or epoxy. If the design has broad flat fields, ask for fill uniformity and polishing steps in writing, because different operators on the same line can produce different results.
| Problem | What to specify |
|---|---|
| Low fill | Minimum fill height and no visible base metal in color areas |
| Overfill | No bleed over the metal border |
| Surface waves | One polishing pass or a smoothness acceptance limit |
| Color bridging | Minimum cavity spacing and operator inspection |
| Chipping at edges | No sharp enamel meniscus |
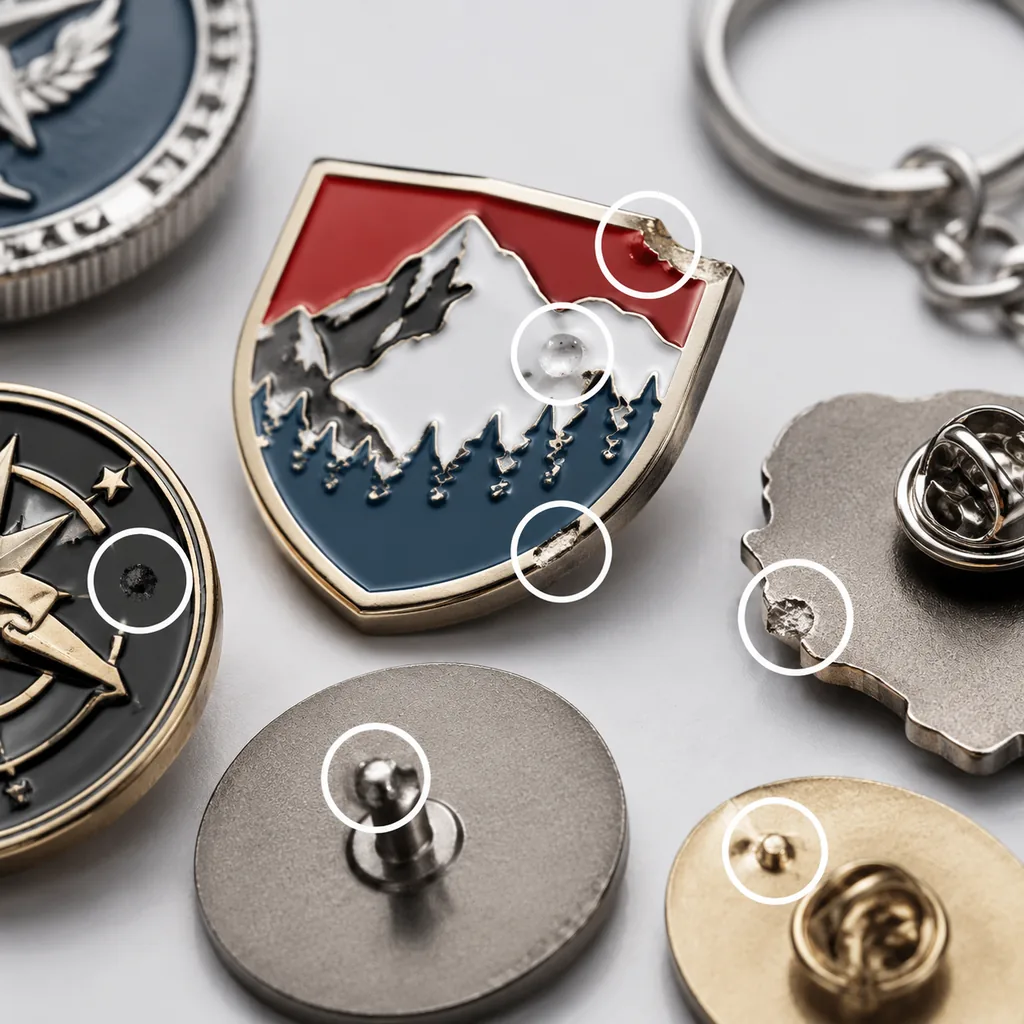
Failure mode 5: back hardware that fails after one event
A lot of customer complaints are not about the face of the pin; they are about loss, rotation, or fabric damage. If the backing is too loose, too soft, or mismatched to the pin weight, the pin leans, spins, or falls off during wear. For badges and brooches, poor hardware selection can also damage uniforms or make the item impossible to wear on thin fabric.
The buyer should match the attachment to both weight and use case. Butterfly clutches are acceptable for light promotional pins, but heavier brooch-style pieces often need rubber clutches, deluxe clutches, or magnetic backs depending on garment sensitivity. If the item is over about 10 g, ask the factory to test retention and rotation with the actual backing, not a substitute.
- State the intended garment thickness and fabric type
- Require hardware matched to finished weight
- Specify whether anti-rotation is needed
- Ask for pull and shake testing on sampled backs
- Use magnetic backs only when garment damage must be avoided
Failure mode 6: edges, burrs, and surface defects become customer returns
Most line defects are small enough to pass casual inspection and large enough to trigger returns. Burrs, sharp edges, plating pits, dust in enamel, color pinholes, scratches, and poor polishing all show up under raking light or at the first handling. In volume orders, these defects often come from inconsistent manual finishing rather than the core tooling itself.
This is where QC language matters. Do not ask for “good quality”; define acceptable defect types and sample size. A practical approach is to inspect against AQL 2.5 for major defects and AQL 4.0 for minor ones, with visible criteria such as no sharp burrs, no exposed base metal in colored areas, and no scratches longer than 1 mm on the display face. For glossy or epoxy-coated items, add a brightness-sensitive inspection under strong angled light because defects that hide on a matte sample become obvious after coating.
| Defect | Recommended response |
|---|---|
| Burr on edge | 100% edge deburr before packing |
| Dust in enamel | Rework or reject if visible at arm’s length |
| Scratch on display face | Define max length and count per piece |
| Plating pit | Reject on visible front face if clustered |
| Uneven polish | Require side-by-side comparison to the approved sample |
Failure mode 7: the reorder is worse than the first batch
The hardest production failure is not the initial sample; it is the second order. If the factory does not lock the exact artwork version, plating code, Pantone reference, hardware model, packaging spec, and tolerance range, the reorder slowly drifts until the product is no longer the same item. This is common when different sales staff, different workshops, or different seasons are involved.
To prevent reorder drift, save a reorder sheet that includes drawing number, approved photos, sample date, base metal, thickness, finish, attachment, packaging, and acceptance notes. For mixed promo programs, keep one master per product family and do not rely on names like “gold” or “black nickel” without a supplier-specific code. ZheCraft typically recommends tying the reorder spec to a physical golden sample plus a short written sheet that the buyer can reissue without interpretation.
- Assign a drawing or spec number to every approved version
- Store one physical master sample per SKU
- Record packaging and accessory details, not just the item
- Lock plating code and attachment model for reorders
- Do not change art, finish, and hardware in one revision
What to do next
If you are sourcing a new pin, badge, keychain, or coin program, start by listing the top three failure modes you want to eliminate: line breakage, color drift, hardware loss, plating wear, or reorder mismatch. Then convert each one into a measurable spec with a number, a sample, or an acceptance limit. That is the difference between a nice-looking sample and a production order that survives the factory floor.
For the next RFQ, send one approved visual reference, one dimensioned drawing, and one QC sheet with the exact tolerances you want checked. If you want, ZheCraft can help turn a concept into a production-ready spec sheet with plating, fill, hardware, and AQL controls already written in factory language.
Have a project? Send your artwork and target quantity and we’ll reply with a detailed quotation within 12 working hours.
Ready to get this made?
Send your sketch, target quantity and ship-date. Detailed quotation in 12 hours.


