When One Promo Kit Must Include Pins, Coins and Lanyards
One brief becomes four specifications if you do not control it
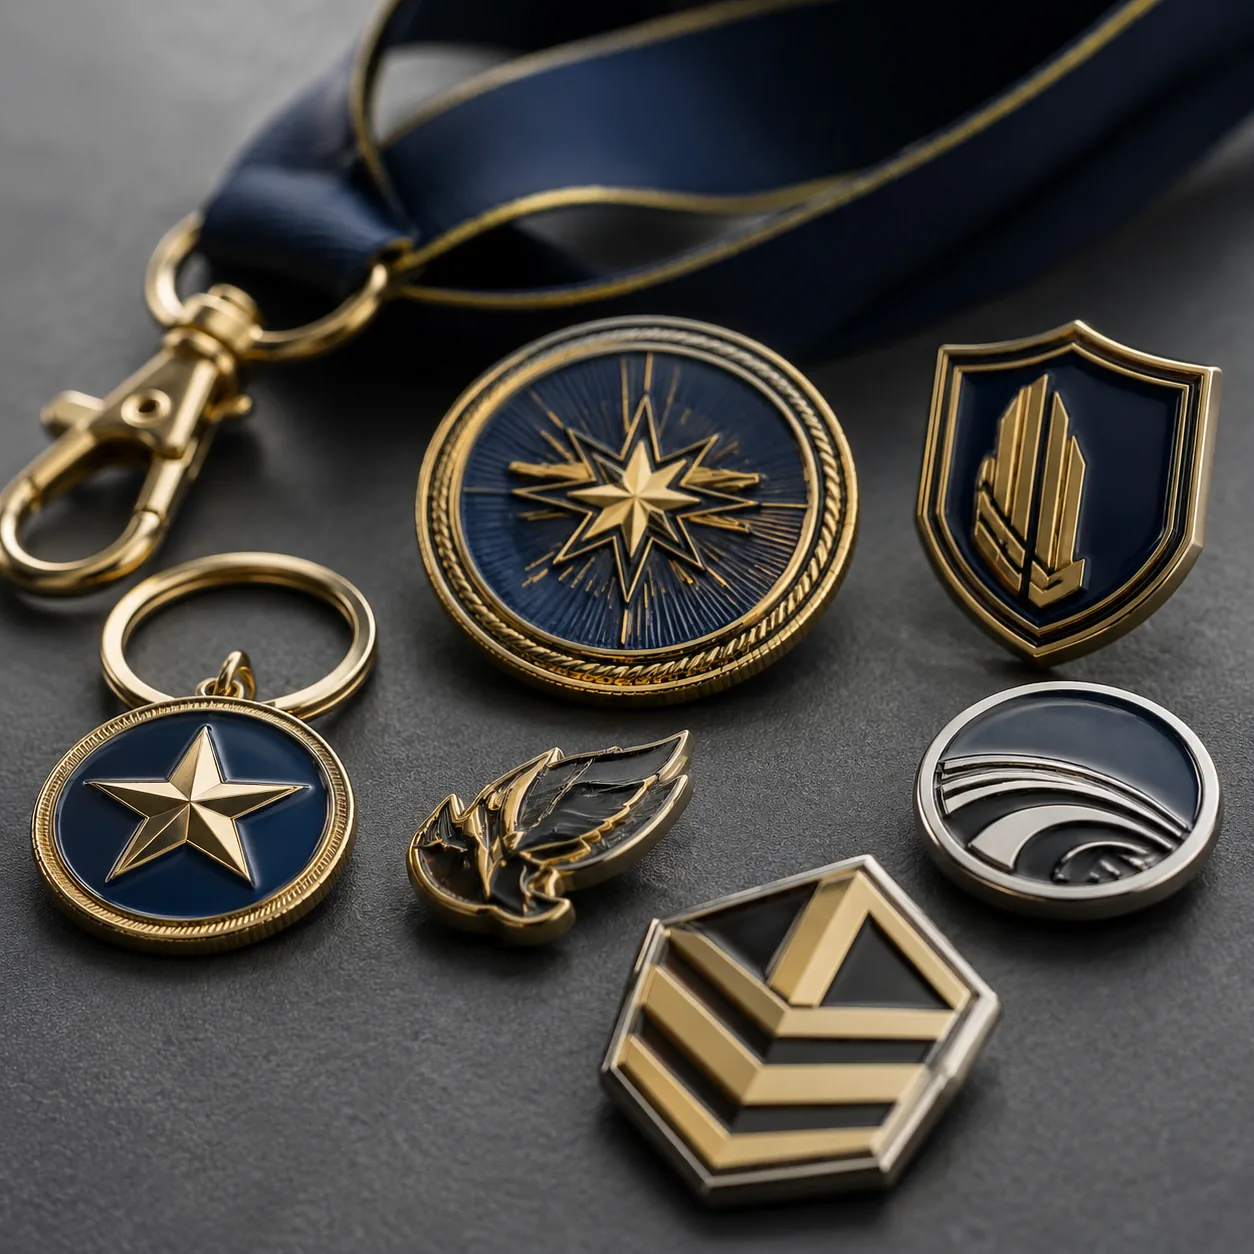
A promo kit is not one product. It is a coordinated set of metal, textile, and printed components that must look like one brand family when they land on the same table. The failure mode is familiar: the pin is matched to Pantone 286 C by eye, the coin comes back with a warmer antique brass tone, the patch thread shifts under showroom light, and the lanyard print drifts one shade cooler than the rest. Each supplier may be technically competent, but if every item is quoted and approved separately, the kit will still look assembled rather than designed.
The right way to manage the order is as a single system with one master artwork package, one color authority, one packaging plan, and one acceptance standard. That means defining which item leads the visual hierarchy, which finish family is allowed, and how far dimensions can move before the set stops fitting its insert or card. For most programs, the visual lead is a 25 to 35 mm pin, a 38 to 45 mm coin, a 70 to 90 mm patch, or a 15 to 20 mm lanyard. Those size bands are not arbitrary; they keep the set balanced without forcing one component to compete with another.
A practical starting structure is simple: one hero metal piece, one supporting textile piece, and one utility item. If you lock that structure early, sourcing becomes easier, sample reviews are faster, and reorders are much more stable. If you do not, the factory will optimize each item on its own terms and you will discover the mismatch only after physical samples arrive.
- Define the use case first: staff issue, event giveaway, premium gift, or retail set.
- Use one master artwork file and one Pantone reference for all items.
- Set a target landed cost for the whole kit, not just unit prices.
- Decide whether the set ships boxed, carded, bagged, or loose.
- Identify one visual lead item before asking for quotes.
Lock the master spec before any tooling starts
The fastest way to avoid rework is to issue one master specification sheet that applies across the kit. That sheet should list the approved Pantone values, acceptable plating family, minimum line width, minimum text height, approved backing or attachment types, and any effects that are prohibited. If the pin is matched to Pantone 286 C, the lanyard should not become a close-but-not-quite blue because one supplier decided to convert the color through a different print process.
For metal items, a buyer-safe baseline is usually 1.5 to 2.0 mm thickness for pins, 3.0 mm or thicker for challenge coins, and 1.0 to 1.2 mm for badge-style elements. Hard enamel is best when the face needs a flat, polished finish; soft enamel is better when color separation and relief matter more than a glassy surface. For premium metal pieces, ask for the plating family and the full stack, not just the finish name. On many promo items, the visible decorative layer may sit around 0.08 to 0.12 microns, but corrosion resistance depends on the entire stack, the base alloy, and whether the item is handled, bagged, or boxed.
Tolerance must be set by item type. A pin can often hold plus or minus 0.5 mm overall without visible issues, while a rigid coin intended for a foam insert may need tighter control so it sits cleanly. Lanyards are different: finished length, print registration, weave density, and hardware placement matter more than dimensional tolerance on a metal part. For artwork, avoid line work below 0.2 mm and text below 1.0 mm height unless the method has already been proven by sample.
| Spec area | Recommended buyer control |
|---|---|
| Brand color | One Pantone master; confirm method-specific proofs for enamel, print, weave, and embroidery |
| Metal thickness | Pins 1.5-2.0 mm; coins 3.0 mm+; badge-style parts 1.0-1.2 mm |
| Finish | Agree finish family and ask for plating stack, not just the color name |
| Detail limit | Avoid line work under 0.2 mm and text under 1.0 mm height |
| Tolerance | Set part-specific tolerances; do not reuse one number across all items |
Choose the build method by function, not habit
Do not assume the same construction is best for every piece in the kit. A pin that needs sharp logo edges is often better as hard enamel or soft enamel with polished raised metal. A coin that needs depth and weight is usually better as die-struck relief with antique plating or polished recesses. A patch can carry more text than a pin, and a lanyard can carry longer campaign messaging without compressing everything into a tiny metal format.
Think in roles. The pin is usually the brand icon, the coin is the premium object, the patch is the uniform-friendly item, and the lanyard is the high-visibility utility piece. If the kit will be handled heavily or worn outdoors, durability should drive the build: embroidered or woven patch backing, secure split-ring or lobster attachment, and coatings that can survive abrasion. If the order is retail-facing, cosmetic consistency and packaging quality usually matter more than ruggedness.
The trade-offs are predictable. Hard enamel gives a flat, polished face but limits texture and some special effects. Soft enamel allows more color separation but exposes recessed areas and looks less formal. Woven patches reproduce small text better than embroidery, but they do not create the same raised textile appearance. On lanyards, sublimation handles gradients and full-color graphics well, while woven or jacquard methods are cleaner for bold low-color branding but less flexible for complex imagery.
A concrete mixed-kit example: a 32 mm hard enamel pin in Pantone 286 C, a 40 mm antique nickel coin with polished highlights, an 80 mm woven patch, and a 15 mm sublimated lanyard can work together if the same blue, silver tone, and typography rules apply. If the pin is glossy soft enamel, the coin is bright polished gold, the patch uses heavy thread with a different blue, and the lanyard is saturated full-color print, the kit may still be technically acceptable but it will not read as one campaign.
Budget the full kit with tooling, setup, and freight in view
Cross-item kits look inexpensive until tooling, setup, packaging, and secondary operations are included. For planning, a 35 mm hard enamel pin commonly falls around USD 0.85 to 2.40 FOB, depending on mold complexity, color count, and plating. A 40 mm challenge coin is often USD 1.90 to 4.80 FOB. A patch usually ranges from USD 0.40 to 1.70 FOB, and a printed lanyard is often USD 0.30 to 1.20 FOB. These are realistic planning ranges, not fixed quotes, but they are good enough to size a program before sampling.
Minimum order quantities vary by process and setup burden. Typical MOQs are 100 to 300 pieces for pins, 100 to 250 for coins, 100 to 300 for patches, and 100 to 500 for lanyards, with lower numbers possible at a premium. If you need mixed SKUs in one kit, each component may still carry its own MOQ or setup fee. In practice, a single event kit is sometimes cheaper overall with a slightly higher unit price and simpler construction than chasing the lowest component quote on paper.
Tooling should be separated from unit pricing. Custom molds, dies, woven artwork setups, and print screens often add USD 40 to 180 per design, while more complex coins or multi-element artwork can cost more. Lead times stack in the same way: simple pins or lanyards may ship in 10 to 18 days after proof approval, mixed promo sets in 15 to 25 days, and custom packaging or repeated sample rounds in 20 to 35 days. If a supplier cannot explain where the time is spent, the schedule is not controlled.
| Component | Typical FOB range USD | Typical MOQ | Typical lead time days | Common risk |
|---|---|---|---|---|
| Enamel pin | 0.85-2.40 | 100-300 | 10-18 | Color mismatch between enamel and print |
| Challenge coin | 1.90-4.80 | 100-250 | 15-25 | Heavy relief or plating delay |
| Patch | 0.40-1.70 | 100-300 | 10-20 | Fine text loss in embroidery |
| Lanyard | 0.30-1.20 | 100-500 | 8-16 | Print shift or shade variation |
Approve the set as one system, not four isolated samples
The most common mistake is approving each sample in isolation. A pin may look perfect on its own, and the coin may also pass, but together they can clash because one finish is too bright or one blue reads colder under the same light. Always ask for a combined layout, ideally a photographed set with the intended packaging insert or card. That is the best way to judge hierarchy, spacing, and whether the set feels coherent at first glance.
Sample checks need to cover appearance and function. Cosmetic checks include plating consistency, enamel fill level, print sharpness, color accuracy, edge cleanliness, and logo legibility. Functional checks include clasp retention, coin edge comfort, patch backing adhesion, and lanyard hardware strength. If any item uses magnets, epoxy domes, moving parts, or special closures, test them at sample stage; mixed kits often fail because one small process step was not included in the production schedule.
A practical QC method is straightforward: compare every sample under the same neutral white light, against one master Pantone guide, one artwork file, and one packed-set layout. If one item reads warmer, darker, or more textured than the others, decide immediately whether the deviation is acceptable. Do not rely on a factory’s verbal promise that it will “match in bulk”; if it is not correct at sample stage, mass production rarely improves it.
- Inspect all items under the same neutral white light.
- Compare samples against one master Pantone and one approved artwork file.
- Check fit inside packaging, not just appearance on a table.
- Ask for a re-shoot or re-sample if one item reads warmer or darker.
- Confirm which deviations are cosmetic acceptable and which are rejectable.
Packaging is where a mixed kit feels premium or improvised
If the kit ships as one set, packaging has to be designed at the same time as production. A foam insert protects rigid metal items well, but it increases carton thickness and freight volume. A backing card is cheaper and easier to brand, but it gives less protection and can make a pin-and-coin set feel underbuilt if the card stock is too light. For kits that include patches and lanyards, the layout must also prevent bending, creasing, or hardware scratching.
The simplest packaging that still protects the set is usually the best choice. A rigid box makes sense for VIP or sales-award kits. A kraft mailer or branded sleeve works better for large event quantities. A clear bag or blister can be fine for giveaways if the item itself has enough visual impact. Ask for packed outer dimensions before approval, because freight cost and warehouse handling often depend more on volume than weight.
For a one-kit order, packaging should solve three problems at once: protect the parts, keep the brand story coherent, and avoid unnecessary cost. If the insert forces every component into its own oversized cavity, the result is usually a larger carton, higher freight, and a unit cost that no longer fits the campaign budget. That is why buyers should approve packaging layout with the product sample, not after production is complete.
If you are sourcing this kit now, start with a controlled brief
Start with a one-page master brief: artwork, Pantone references, item list, target quantities, preferred plating family, packaging style, and required delivery date. Then ask every supplier to quote against the same brief, with separate line items for tooling, unit price, packing, sample charges, and any assembly fee. If a supplier cannot quote in that structure, the spec is still too loose.
For a first order, keep the design ambitious but the process conservative. Use one primary metal finish, limit print methods to one or two, and choose packaging that has already been proven on similar orders. After the kit passes distribution and internal QC review, you can add premium inserts, special effects, or more complex finishes on the reorder. That approach is usually faster, cheaper, and safer than trying to perfect every detail in the first run.
If you want the lowest-risk path, ask for a mixed-kit sample plan with one approved master color, one packed-set photo, one pre-production sample of each item, and one final carton-pack check before mass production. That is where a capable factory separates itself from a merely responsive supplier. The goal is not to make four good products; it is to make one coherent campaign kit that arrives on time and still looks intentional when the recipient opens it.
Have a project? Send your artwork and target quantity and we’ll reply with a detailed quotation within 12 working hours.
Ready to get this made?
Send your sketch, target quantity and ship-date. Detailed quotation in 12 hours.


