Tolerance Stack-Ups in Custom Promo Sets: How to Prevent Rework
Why mixed promo sets fail at the handoff
The fastest way to turn a good promo concept into a costly rework is to order multiple items as if each one exists alone. A pin, coin, keychain, patch, and lanyard can all look correct in isolation and still fail as a set because the tolerances do not line up. The common problems are simple: badge holders that do not fit the coin, lanyard clips that are too narrow for the strap loop, pin backs that interfere with a display card, or a gift box that is 2 mm too shallow after foam insertion.
For international buyers, the issue is usually not design intent but spec language. If the RFQ says only size, material, and artwork, the factory must guess at stack-up risk. In practice, every promo set needs a shared dimensional plan: outside dimensions, usable clearance, insertion direction, thickness envelope, attachment hardware, and packing allowance. That is where most rework is won or lost.
At ZheCraft, we see this most often when brands source one item from a pin factory, another from a patch supplier, and the rest from a packaging vendor. Each supplier can hit its own target, but no one is responsible for the combined fit. The fix is not asking for tighter tolerance everywhere; it is defining where tolerance matters and where it does not.
Set the master dimensions first
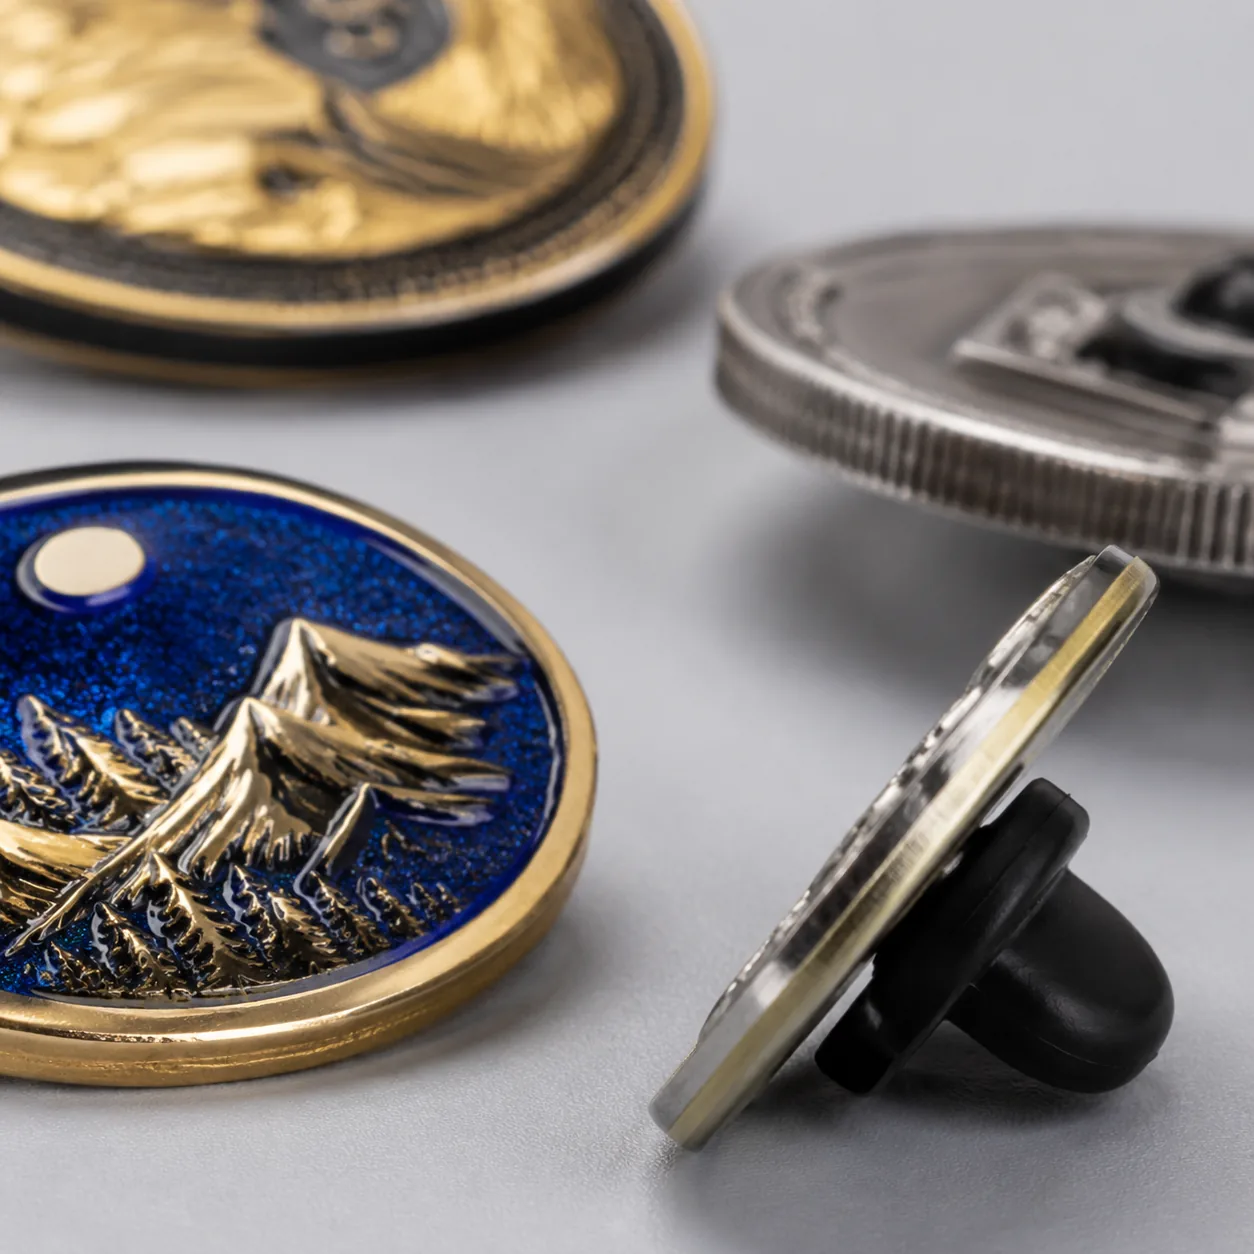
Start with a master dimension sheet for the whole set before you discuss decoration or finishing. The master sheet should define the envelope that every item must respect: maximum width, maximum height, maximum thickness, and any critical interfaces such as slots, holes, hooks, or blister cavities. If one item is the reference piece, say so explicitly and make all other items subordinate to it.
A practical rule is to protect interfaces more tightly than decorative outlines. For example, an enamel pin shape can often tolerate ±0.2 to ±0.3 mm on outer edges, but a butterfly clutch post position may need ±0.1 to ±0.15 mm if it must align with a card hole or magnetic back. Likewise, a coin can have a cosmetic rim variation, but if it must fit a presentation tray, the tray pocket tolerance should be set from the actual plated sample, not the CAD file alone.
Do not rely on nominal size only. Ask the supplier to confirm the actual measured sample, not just the drawing dimensions, because plating, enamel fill, die shrinkage, and cutting method can each move the final part. For a mixed set, the correct question is: which dimension can drift without breaking the user experience, and which one will create a packing or assembly issue if it is off by even 0.5 mm?
Use a tolerance hierarchy, not one number for everything
The most efficient way to specify a custom promo set is to separate dimensions into three classes: critical, functional, and cosmetic. Critical dimensions control fit and assembly, such as hole spacing, insert depth, clip width, and foam cutouts. Functional dimensions affect appearance and handling, such as overall size and thickness. Cosmetic dimensions are visual only, such as minor edge rounding or backing card margins.
If you assign the same tight tolerance to every feature, you will usually increase cost without improving yield. Factories may need extra tooling, slower cutting, or more sampling, and still the final set may not improve where it matters. Better practice is to specify the narrowest tolerance only on the interface points, then allow normal manufacturing variation elsewhere. This reduces inspection time and keeps the quote realistic.
For most metal promo components, the workable ranges are often around ±0.1 to ±0.2 mm on critical fit features, ±0.2 to ±0.3 mm on functional features, and ±0.5 mm or more on non-critical cosmetic items, depending on process and size. Molded parts and sewn items have different realities, so the tolerance system should be item-specific, but the set-wide logic should remain the same. A 30 mm pin and a 30 mm PVC keychain are not governed by the same process capability.
Where to spend precision and where to save it
The best place to spend precision is at interfaces that a buyer or end user directly notices. That includes gift box inserts, lanyard clips, chain loops, coin capsules, brooch pin positions, and any item that stacks with another item. If a coin sits loose in a tray, the whole set feels low quality even if the coin itself is excellent. If a lanyard clip drifts by 1 mm, the assembly line may still finish, but operators will slow down or sort parts by hand.
Where you can save precision is in purely visual details that do not affect assembly. A patch border can vary slightly more than a metal clip width, and the back side of a keychain can accept more variation than a mounting hole. That said, saving tolerance does not mean ignoring quality. It means deciding which risks are aesthetic and which risks create returns, delays, or manual rework.
If you are ordering across multiple factories, the assembly item should usually be managed by the supplier that owns the packaging. A factory making only the metal component rarely controls foam density, card thickness, or bag fold. For mixed sets, the packing vendor or final integrator should own the final fit check, because that is where stack-up becomes real.
Reference table: common interfaces and practical specs
The table below shows typical buyer-side targets for mixed promo sets. These are practical starting points, not universal standards, because final tolerances depend on process, size, and finish. Use them to frame your RFQ and to decide which item needs the strictest control.
| Interface | Typical buyer spec | Why it matters |
|---|---|---|
| Pin post to backing card hole | Hole size post diameter +0.2 to +0.4 mm | Prevents tearing and keeps insertion workable |
| Coin to tray pocket | Pocket clearance 0.3 to 0.8 mm per side | Avoids rattling while allowing hand insertion |
| Keychain ring to charm hole | Clearance 0.2 to 0.5 mm | Prevents binding after plating or coating |
| Lanyard clip to strap loop | Clip opening at least 0.5 mm larger than strap thickness | Stops forced assembly and breakage |
| Patch to garment or bag space | Finished size margin 1 to 2 mm under available area | Allows sewing or heat-press alignment |
| Gift box insert to product stack | Vertical clearance 1 to 3 mm depending on compression | Prevents lid bulge and crushed edges |
If the supplier cannot measure against these interfaces, ask for a physical fit sample or a packing mock-up. CAD-only approval is weak when one part has epoxy, one has plating buildup, and one has stitching bulk. A good sample should prove fit in the same orientation that the production line will use. That is especially important for nested sets or multi-item gift packs.
Match tolerances to process, not just product type
Stamped metal, die-cast metal, embroidered textiles, molded PVC, and printed paper do not behave the same way. A die-cast coin can be held fairly consistently on major faces, but thickness may vary a little more than a flat stamped badge. An embroidered patch can look oversized if thread density changes at the edge, and a lanyard webbing may shrink or stretch slightly after printing or heat cutting. If you do not ask the supplier which process controls which feature, you will end up over-specifying the wrong thing.
Plating and coating add their own variation. Nickel, black nickel, gold, antique finishes, epoxy dome, and soft enamel all affect final size slightly, usually at the edges and on tight fit features. A buyer who approves a pre-plate sample without allowance for finish buildup may find that the final batch no longer fits a display insert or clasp. This is why the sample plan must specify whether it is pre-finish, post-finish, or fully packed.
For buyer-side control, it helps to request the factory’s internal acceptance method in writing: caliper measurement, go/no-go gauge, visual alignment, or fit test. At ZheCraft, we often recommend a simple go/no-go check for high-risk interfaces, because it is faster and more repeatable than relying on visual judgment alone. If the factory cannot explain how it will measure the critical features, the spec is still too vague.
Checklist for RFQs and pre-production approval
Use the checklist below when you are building a mixed promo set. It will not eliminate all variation, but it will expose the points that usually cause rework, delays, or rejected cartons. The goal is not tighter specs everywhere; the goal is clear ownership of fit risk.
- Name one master reference item for the whole set
- List all critical interfaces with target clearance values
- State which dimensions are critical, functional, and cosmetic
- Specify whether tolerances apply before or after plating/coating
- Provide actual tray, box, or insert dimensions, not only artwork size
- Ask for a physical fit sample for every interface that must assemble
- Define who owns final packing fit if multiple suppliers are involved
- Require a final packed sample photo or video before mass production
Also ask for a deviation note whenever a supplier proposes a substitute process. For example, if a stitched patch is replaced with woven construction, the edge thickness and visual size may change enough to affect packaging. If a coin changes from hard enamel-like flat fill to epoxy dome, the height and edge profile will also shift. Those changes may be acceptable, but they should be approved as set-level changes, not item-level swaps.
What to do next
If you are sourcing a multi-item promo set, build the RFQ around the interfaces first and the decoration second. Start with a one-page master dimension sheet, then attach separate artwork and process notes for each item. Ask the supplier to confirm which features are measured, which are visually checked, and which are protected by fit testing. That one step usually removes more rework risk than any cosmetic revision.
If you want, the next practical move is to turn your current set into a production-ready tolerance sheet. The fastest version is a line-by-line spec for each item, plus the carton or insert drawing, plus one sample approval rule for final packing. Once those three pieces are aligned, most mixed promo orders become much easier to quote, sample, and ship without surprises.
Have a project? Send your artwork and target quantity and we’ll reply with a detailed quotation within 12 working hours.
Ready to get this made?
Send your sketch, target quantity and ship-date. Detailed quotation in 12 hours.


