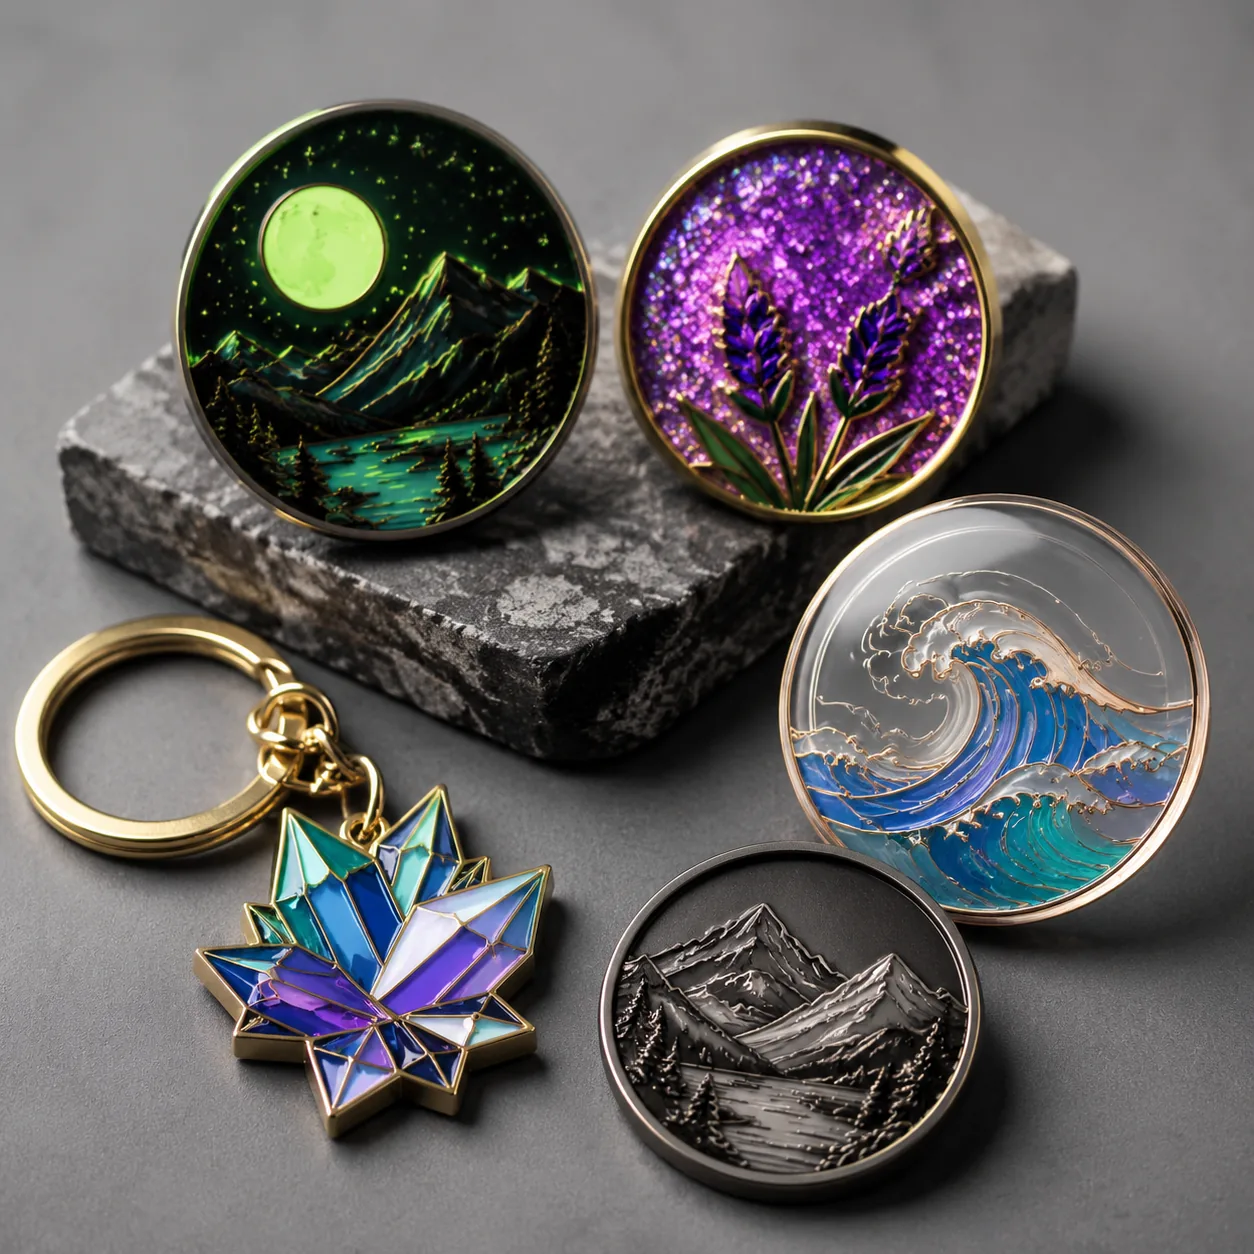
Special Enamel Effects for Pins: Glow, Glitter and Transparent Specs
Why screen-approved effects fail in bulk
Special enamel effects are usually requested after the base artwork is approved: glow eyes, glitter lettering, pearl clouds, transparent water, or a stained-glass background. These are not simple Pantone changes. Each effect changes resin viscosity, pigment loading, cure time, fill height, polish behavior and inspection criteria. A pin that looks clean in flat color can become cloudy, uneven or weak after effect particles are added.
The costly failure is rarely one rejected sample. It is a 3,000- or 5,000-piece shipment where glow output is weak, glitter density changes between trays, transparent enamel exposes polishing scratches, or pearl swirl direction looks inconsistent across a retail display. For B2B orders, lock effect type, coverage percentage, base plating, enamel process, tolerance and acceptance criteria before tooling. Changing any of these after sampling normally invalidates the approved sample.
Use special effects as controlled accents unless the design is built around them. A practical coverage range is 10-35% of the total enamel area. Above 50%, the risk of color drift, trapped bubbles and uneven surface leveling increases, especially on soft enamel pins with many small cells. Hard enamel can be polished flatter, but grinding may reduce glitter visibility or weaken glow if the remaining enamel depth is too thin.
Effect selection and workable design limits
Glow, glitter, pearl, transparent and color-shift enamel all use resin as the carrier, but their production risks differ. Glow powder needs enough pigment volume to charge and emit light. Glitter needs clearance so particles do not pile up at metal edges. Pearl pigment needs smooth flow to avoid muddy streaks. Transparent enamel requires clean plating because the metal underneath becomes part of the color.
For stamped iron, brass or zinc alloy pins, keep raised metal walls at 0.25 mm minimum for standard enamel, 0.30 mm for glow and pearl, and 0.35 mm for coarse glitter or transparent fills. Avoid effect cells narrower than 1.5 mm unless the effect is intentionally subtle. For small text under 5 pt, use solid enamel or raised metal instead of glitter or pearl, because particles reduce edge clarity.
| Effect | Best application | Minimum practical cell | Main production risk | Typical FOB surcharge |
|---|---|---|---|---|
| Glow enamel | Eyes, stars, moon icons, concert or night-event logos | 2.0 mm wide cell; 0.30 mm metal wall | Weak emission if pigment loading is too low or fill is too shallow | USD 0.04-0.12 per pin |
| Fine glitter enamel | Lettering blocks, mascots, backgrounds, fan merchandise | 1.5 mm wide cell; 0.25-0.30 mm metal wall | Uneven sparkle density at corners and narrow points | USD 0.03-0.10 per color |
| Coarse glitter enamel | Large feature panels, limited-edition badges | 2.5 mm wide cell; 0.35 mm metal wall | Particles bridge over recesses or protrude through epoxy | USD 0.06-0.16 per color |
| Pearl enamel | Shells, clouds, cosmetics, premium brooch details | 2.0 mm wide cell; 0.30 mm metal wall | Swirl direction and luster vary between fills | USD 0.05-0.14 per color |
| Transparent enamel | Water, glass, stained-glass effects, metallic overlays | 2.5 mm wide cell; 0.30-0.35 mm metal wall | Scratches, plating shade and solder marks show through | USD 0.04-0.15 per color |
| Color-shift enamel | Gaming, fantasy, anniversary or collector editions | 3.0 mm wide cell; 0.35 mm metal wall | Shift effect disappears on small or curved areas | USD 0.08-0.20 per color |
Fill depth, tolerance and artwork callouts
Soft enamel recess depth is commonly 0.30-0.50 mm. For glow and glitter, specify 0.35-0.45 mm where the design allows it, because the effect needs resin volume to suspend pigment evenly. For transparent fills, deeper is not always better: too much transparent resin can darken the color and magnify tiny polishing marks. A controlled fill of roughly 0.30-0.40 mm normally gives cleaner results.
Hard enamel is filled above the metal line and polished flush. After grinding, the remaining enamel layer should be at least 0.18-0.22 mm for glow and transparent colors. Below that, glow intensity becomes inconsistent and transparent colors can look washed out. If the pin has aggressive polishing, very thin metal walls, or a large flat transparent field, request a sample cross-check before approving mass production.
Write tolerances into the artwork approval, not only the purchase order. For pins under 35 mm, a realistic tolerance is ±0.10 mm on raised metal line width, ±0.15 mm on enamel registration and ±0.20 mm on overall size. For badges over 50 mm, brooches, cutout designs or multi-plating items, ±0.20-0.30 mm is more practical. If logo geometry requires tighter control, confirm it before tooling because it may require brass tooling, slower stamping or redesigned bridges.
Call out the smallest effect cell directly on the dieline. A note such as “transparent blue, minimum cell 2.6 mm, polished nickel base, soft enamel with epoxy” prevents the factory from treating the effect like standard color fill. Also mark whether epoxy is required. Epoxy improves surface protection and can make glitter look deeper, but it may reduce the crisp recessed look of soft enamel and can slightly mute fine pearl effects.
Metal base, plating and process choices
The same transparent blue changes visibly over nickel, gold, black nickel and antique silver. Bright nickel gives a cool glass tone. Gold warms amber, green and blue. Black nickel darkens transparent colors sharply and can make them appear smoky. Antique finishes are risky under transparent enamel because oxide in recesses can make the color look dirty or uneven. If the plating changes, the transparent color approval must be repeated.
Specify plating thickness by use case. Standard decorative lapel pins normally use 0.3-0.5 microns of plating. Keychains, bag charms and brooches exposed to more abrasion should target 0.8-1.0 microns. For transparent enamel over a large polished base, use at least 0.5 microns and request a smoother pre-polish to reduce visible grain, flow marks and tone variation. Nickel-free or low-nickel requirements should also be confirmed early because they can affect plating availability and cost.
Material selection affects both detail and price. Iron stamping is cost-effective for 20-45 mm pins and works well for glow, fine glitter and most soft enamel effects. Brass gives cleaner stamped detail and better edge definition for premium pins, but usually adds USD 0.10-0.35 per 30 mm piece depending on quantity and thickness. Zinc alloy casting is better for 3D relief, cutouts and larger badges, but cast surfaces require more polishing before transparent or high-gloss effects.
Typical base thickness is 1.2-1.5 mm for 25-35 mm lapel pins and 1.5-2.0 mm for larger badges or brooches. Very thin metal can warp during polishing and curing, making transparent fills look wavy. For large special-effect areas, a slightly thicker base and stronger post attachment often prevent later complaints about bent pins, loose posts or uneven shine.
MOQ, FOB pricing and lead-time impact
Special effects raise MOQ because the factory must mix separate resin batches, prevent pigment contamination and sometimes clean filling tools between colors. Practical MOQ is 100 pieces for one standard glow or glitter accent, 300 pieces for two or more effect colors, and 500 pieces for custom glow powder, non-standard glitter particle size, color-shift pigment or multiple plating finishes. Smaller runs are possible, but setup cost is spread over fewer units.
Lead time increases mainly during sampling, curing and inspection. A standard enamel pin sample often takes 7-10 days after artwork approval. Special-effect samples usually take 9-16 days because the effect must be mixed, filled, cured and judged under agreed lighting. Bulk production for 500-5,000 pieces is commonly 12-24 days after sample approval. Complex orders with multiple SKUs, backer cards, barcodes or retail packaging can take 20-35 days.
| Order profile | Practical MOQ | Sample lead time | Bulk lead time | 30 mm pin FOB range |
|---|---|---|---|---|
| One glow or fine glitter accent, standard plating | 100 pcs | 9-12 days | 12-18 days | USD 0.55-1.05 |
| Two effect colors with standard soft enamel | 300 pcs | 10-14 days | 15-22 days | USD 0.70-1.35 |
| Transparent enamel over polished nickel or gold | 300 pcs | 10-15 days | 15-24 days | USD 0.75-1.50 |
| Pearl or color-shift limited edition | 500 pcs | 12-16 days | 18-28 days | USD 0.90-1.80 |
| Hard enamel with glitter or glow accents | 300-500 pcs | 12-18 days | 18-30 days | USD 0.95-2.10 |
| Large brooch over 50 mm with effects and epoxy | 100-300 pcs | 12-18 days | 20-35 days | USD 1.60-3.80 |
FOB ranges assume common China factory production, standard butterfly clutch or rubber clutch, no retail backer card and typical export packing. Add USD 0.03-0.08 for printed backer cards, USD 0.02-0.06 for individual OPP bags with barcode labels, and more for custom boxes, safety pins, magnets or dual posts. Tooling for enamel pins is commonly USD 40-120 per design, higher for large molds, 3D relief or multiple mold sizes.
Sampling and approval conditions
A render cannot prove glow strength, glitter density, pearl luster or transparent depth. Approve a physical pre-production sample under controlled conditions: daylight or lightbox at about 5500K, warm indoor light around 3000K, and the buyer’s actual retail or event lighting if it is important. For transparent enamel, the sample must use the final plating, not a substitute finish.
For glow enamel, define the test method. A practical decorative standard is charging the sample under strong white light for 3-5 minutes, photographing it immediately in darkness, then photographing it again after 10 minutes. Glow naturally fades; do not promise constant brightness for hours. If the product needs functional visibility or compliance performance, decorative glow enamel is not suitable. Use certified reflective or photoluminescent materials designed for safety use.
For glitter, approve both close-up and arm’s-length appearance. On a 30 mm pin viewed from 40 cm, the sparkle field should look consistent, with no bare resin patch larger than 0.5 mm in the approved effect area. For pearl, approve the acceptable swirl range rather than expecting every piece to have identical flow. For transparent enamel, inspect the metal underneath for scratches, pits, cloudy plating and solder discoloration before signing off.
Keep one signed golden sample at the factory and one with the buyer or distributor. If color is critical, keep the approved sample in a sealed bag away from UV exposure and compare bulk goods under the same lighting used at approval. Digital photos are useful for communication, but they should not replace a physical standard for special effects.
Bulk QC standards and defect definitions
Special-effect inspection should combine normal pin checks with effect-specific criteria. For general visual inspection, many buyers use ANSI/ASQ Z1.4 General Inspection Level II with AQL 2.5 for major defects and AQL 4.0 for minor defects. Critical defects such as sharp burrs, broken posts, loose magnets, exposed sharp edges or unsafe attachments should be controlled at AQL 0.65 or zero tolerance depending on product use and market.
Define major defects before production starts. For special enamel, major defects include wrong effect color, missing glow or glitter, visible contamination in transparent areas, enamel overflow onto raised metal, large bubbles, cracked enamel, wrong plating, and uneven fill clearly visible at 40 cm. Minor defects can include isolated bubbles under 0.20 mm, slight glitter density variation within the approved range, or pearl swirl differences that match the golden sample range.
- Check 20 pieces from the first production tray before full filling continues.
- Measure overall size, metal wall width and enamel registration against the approved dieline.
- Confirm plating thickness: 0.3-0.5 microns for decorative pins or 0.8-1.0 microns for higher-wear items.
- Run tape-pull or fingernail adhesion checks on high-touch products such as keychains and bag charms.
- Inspect transparent areas over a clean white and black background to reveal scratches, bubbles and cloudiness.
- Use the approved glow test: 3-5 minute charge, immediate dark check and 10-minute fade check.
- Pack transparent, pearl and high-gloss pins in tissue, OPP bags or tray separators to reduce scuffing.
- Record defect photos by tray or carton so rework is traceable before final packing.
Packaging is part of QC for special effects. Transparent and high-gloss epoxy surfaces scuff more easily than standard recessed soft enamel. For retail programs, specify individual OPP bags, tissue interleaving or cavity trays. For export cartons, keep gross weight manageable, usually under 12-15 kg per carton, to reduce compression marks on backer cards and pin surfaces.
When to avoid special effects and how to brief an RFQ
Avoid special enamel when the artwork depends on tiny text, thin line art or exact corporate color matching. Glitter, pearl and color-shift pigments change perceived color under different light. Transparent enamel is affected by the plating color below, so it cannot be judged like opaque Pantone enamel. If brand accuracy is the priority, use solid soft enamel or hard enamel with a signed Pantone approval and a physical sample.
Do not use decorative glow enamel for safety, emergency, wayfinding or compliance marking. It is suitable for novelty, fan merchandise, event pins and collector editions, but it is not a certified safety material. Also avoid heavy glitter on formal corporate lapel pins where consistency under office lighting matters more than visual impact. A clean metal finish, restrained hard enamel or sandblasted background usually looks more professional.
Special effects are also risky on urgent schedules. If the fixed event date is within 15 days and no physical sample has been approved, choose standard enamel, reduce packaging complexity and prioritize on-time delivery. The time saved by avoiding effect sampling is often more valuable than the visual upgrade for conference badges, sponsor giveaways and staff pins.
For a production RFQ, mark every effect area directly on the artwork with effect type, Pantone target if relevant, plating finish, enamel process and epoxy requirement. Include quantity tiers at 100, 300, 500, 1,000 and 5,000 pieces; pin size and thickness; attachment; packaging; barcode or carton-label needs; delivery deadline; tooling budget; and inspection standard. Ask the factory to confirm minimum cell size, metal wall width, sample lead time, bulk lead time, effect surcharge and any design changes needed before tooling.
Have a project? Send your artwork and target quantity and we’ll reply with a detailed quotation within 12 working hours.
Ready to get this made?
Send your sketch, target quantity and ship-date. Detailed quotation in 12 hours.


