Seven QC Failures That Ruin Custom Metal Promo Orders
Why Approved Samples Still Fail at Scale
A signed sample proves a factory can make one acceptable piece. It does not prove the line can repeat that result across mold cavities, plating racks, enamel batches, hardware stations, packing shifts, and export cartons. Most failures in custom metal promo orders are not dramatic one-off defects. They are drift: a die runs hot, polishing removes another 0.10-0.20 mm from the rim, plating throws thin on high relief, enamel settles below the line, or a clutch that felt tight on the sample loosens after carton compression.
The commercial frame matters because risk rises with complexity. A simple 20-35 mm soft-enamel lapel pin commonly starts at 100-300 pcs, samples in 7-10 calendar days, and runs 15-22 production days after approval. Cast zinc-alloy keychains, bottle openers, and mid-weight badges are more realistic at 300-500 pcs, 10-14 days for sampling, and 22-30 days for production. Thick challenge coins, spinner coins, multi-part brooches, plated gift sets, and mixed-hardware programs often need 500-1,000 pcs and 30-40 production days after sample signoff. Typical FOB China pricing ranges from $0.38-$1.25 for a 25-35 mm soft-enamel pin, $0.70-$2.60 for a plated keychain, $1.35-$5.20 for a 40-50 mm coin, and $2.80-$8.50 for assembled or boxed sets, depending on brass versus zinc alloy, plating, color count, mold complexity, and packaging.
The preventable mistake is approving artwork and finish language without numeric pass/fail limits. “Premium finish” does not tell a polishing operator when to stop or an inspector when to reject. A production-ready RFQ names the failure mode, tolerance, test method, and sample size: dimensions by caliper, plating thickness in microns, enamel depth relative to the rim, attachment pull force in newtons, AQL level, carton gross weight, and drop-test requirement. Without those controls, the first serious dispute often starts after the order is plated, packed, and too expensive to repair.
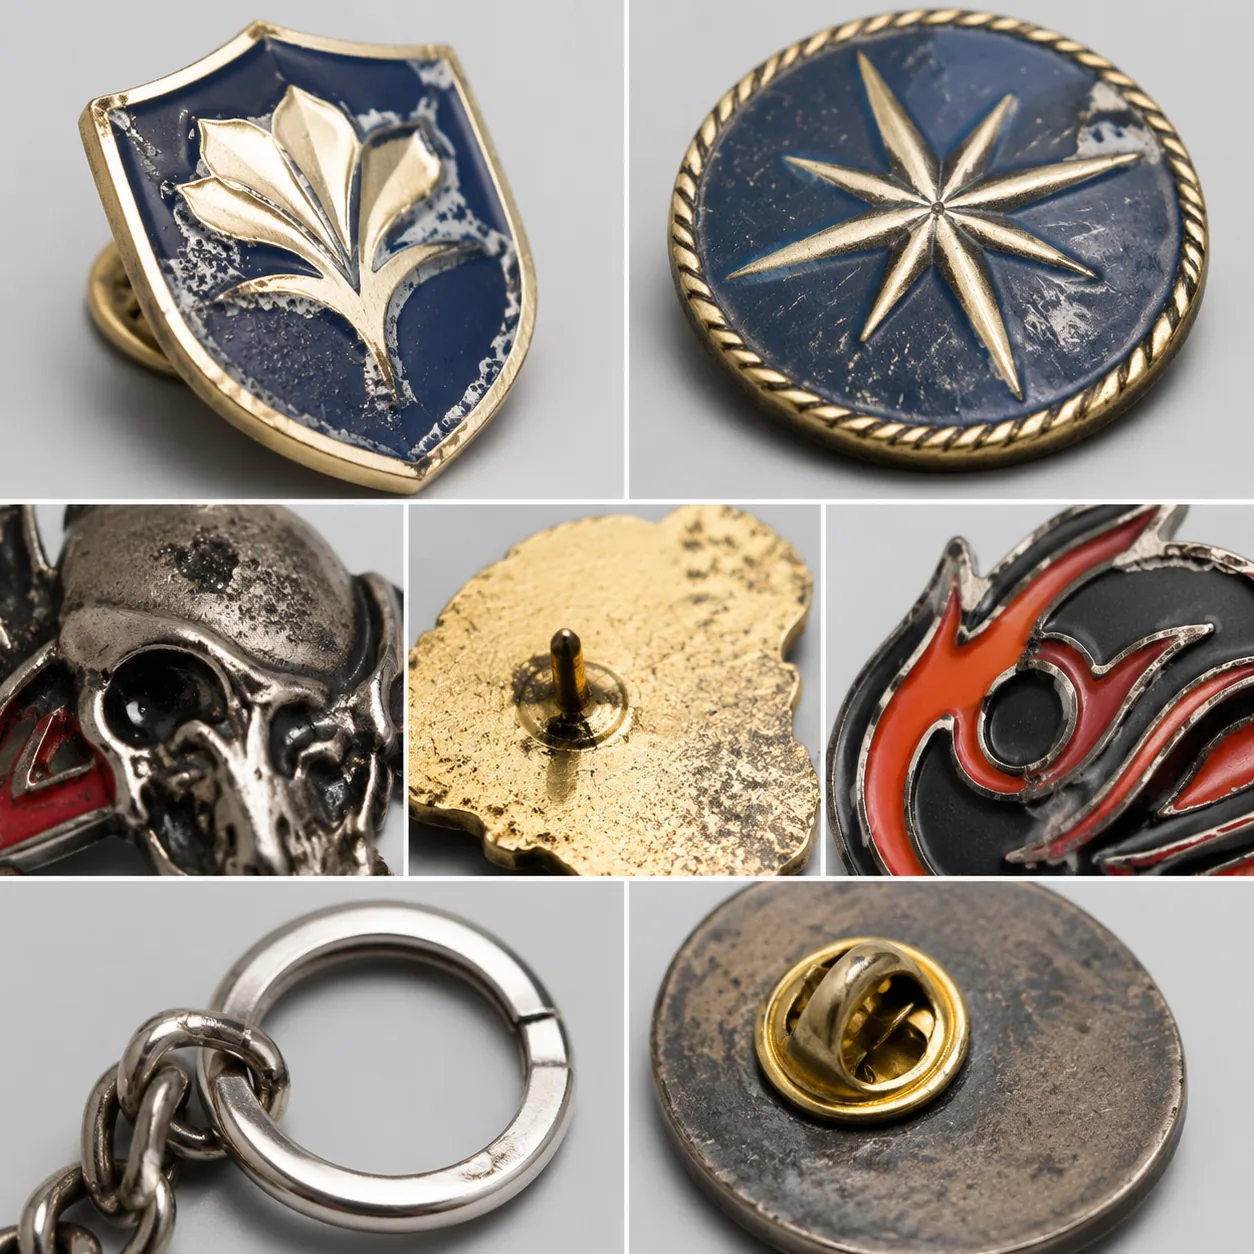
1. Geometry Drift After Tooling and Polishing
Stamped brass, die-cast zinc alloy, and iron soft-enamel parts all move between digital proof, tool approval, and finished goods. A 40 mm badge can cast 0.20-0.40 mm oversize, then lose 0.05-0.20 mm on raised edges during polishing. A 0.50 mm negative space in the proof can close after plating and lacquer. Star points, thin logo bridges, QR-like marks, and small reverse text are the first features to distort.
For decorative metal parts under 50 mm, specify critical outside dimensions at ±0.20 mm and non-critical dimensions at ±0.30 mm. For parts over 50 mm, use ±0.30 mm for critical dimensions and ±0.50 mm for general dimensions unless the item fits a tray, holder, magnet recess, or retail insert. Thickness tolerance should normally be ±0.15 mm for thin pins and ±0.20-0.30 mm for coins and cast keychains. Openwork needs minimum bridges: 0.80 mm for small pins, 1.00 mm for medium badges, and 1.20 mm for heavier castings or bottle openers.
Relief needs the same discipline. Most decorative coins and badges work well with 0.30-1.20 mm relief. Below 0.30 mm, detail disappears under plating, enamel, and clear coat. Above 1.20 mm, polishing becomes uneven and high spots can burn through antique or black finishes. For readable text, call out 1.20 mm minimum character height for simple block fonts, 1.50 mm for reversed or plated text, and 0.25-0.30 mm minimum line width. If the supplier cannot confirm these limits on the proof, the design is not ready for tooling.
2. Plating Defects Hidden by Sample Lighting
A part can measure correctly and still fail visually. Common surface defects include casting pits, drag lines, sanding marks, orange peel, dull patches, rack marks, edge burn, tarnish, fingerprints under lacquer, and thin plating on raised detail. These failures usually trace back to poor base-metal preparation, overloaded plating racks, weak copper or nickel underplate, contaminated bath chemistry, or rushed drying before clear coat.
Write plating as a measurable finish. Decorative bright nickel should normally be 4-6 microns over a clean base, with copper underplate when the casting surface needs leveling. Antique nickel often needs a stable nickel layer before oxidation and wipe-back; otherwise the finish varies from silver-gray to dirty black. Black nickel is commonly 1.0-2.0 microns; too thin and edges look smoky or brown. Gold flash at 0.10-0.30 microns is acceptable for presentation pieces but weak for daily handling. For keychains or coins handled often, specify 0.50-1.00 micron gold or add clear electrophoretic coating, accepting the extra cost and 2-5 production days.
Inspection conditions must be defined. Approve one physical reference sample and inspect production under neutral light at 500-800 lux, 30-45 cm from the eye, at normal viewing angles. Do not reject microscopic marks on the back of a low-cost pin unless the back is defined as cosmetic; do reject front-face pits, plating skips, exposed base metal, and obvious tone shifts. For indoor promotional use, 24 hours neutral salt spray is a practical baseline for nickel, antique nickel, and black nickel. For humid storage, retail programs, coastal events, or long ocean transit, raise the requirement to 48 hours and confirm whether lacquer or e-coat is included.
3. Enamel Fill, Color Shift, and Bleed
Many enamel complaints are not true color failures. They are fill-depth failures. Soft enamel should sit below the metal rim by about 0.20-0.40 mm. If fill is too low, dust collects in channels and the product feels cheap. If fill is too high, colors rub inside polybags and scratch during shipping. Hard enamel should be ground and polished flush or slightly crowned, with a practical tolerance of -0.05 mm to +0.10 mm from the metal rim.
For brand colors, specify both the color system and the viewing condition. Pantone references should be treated as targets, not magic numbers, because enamel, epoxy, and plated metal reflect differently from paper. A Delta E target of ≤2.5 under D65 lighting is reasonable for most corporate logos; ≤2.0 is tighter and may require paid color matching, one or two extra swatch rounds, and 3-7 additional approval days. Adjacent enamel colors should have at least 0.30 mm metal separation. Translucent enamel must be approved on the actual plated base because gold, nickel, antique brass, and black nickel change perceived color.
Bubbles, pinholes, bleeding, and cloudy epoxy usually come from solvent entrapment, contaminated powder, low cure temperature, rushed baking, or applying dome epoxy over uncured color. Require post-cure inspection, not just pre-cure photos. For orders above 1,000 pcs, ask the factory to pull 10 pcs per color batch or per production lot after cure and before final assembly. That timing catches defective fill while stripping, refilling, or scrapping is still possible.
4. Hardware That Looks Right but Fails in Use
The face of the piece gets the attention, but attachments cause many returns. Butterfly clutches slide off, rubber clutches split, pin posts bend, magnets rotate, jump rings open, lobster clips crack, and brooch bars loosen from weak solder or adhesive. A display pin, a backpack pin, and a daily-use keychain should not share the same hardware standard.
For lapel pins, a butterfly clutch should resist at least 4 N pull force without sliding; rubber clutches are often closer to 3 N and suit lightweight garments, not bags or jackets. Pin posts should be centered unless the design requires offset balance, with solder fully wetting the base and no sharp burr. For keychains intended to hold real keys, specify split rings with 1.2-1.5 mm wire and 20-25 mm outside diameter. Jump rings should be fully closed, double-looped, or welded for charms above 30 g. Lobster clasps and swivel hooks should be checked for spring return after 20 open-close cycles.
Magnets need a defined grade and pull force on the intended surface, not just “strong magnet.” Badge magnets often use N35-N42 material, but usable retention depends on magnet size, steel backing, adhesive area, and badge weight. For brooches, specify bar length, clasp type, pin wire diameter, and anti-rotation features. For lanyard or strap sets, define clip metal thickness, swivel function, webbing width, and stitch density, such as 8-10 stitches per inch for sewn tabs. Mixed programs need each hardware line specified separately so the factory does not build every SKU to the lightest-duty option.
5. Inspection Plans That Miss the Real Risk
A golden sample is usually hand-selected, cleaned carefully, and checked more slowly than mass-production pieces. A real control plan uses four checkpoints: pre-production sample, first-article approval, in-line inspection, and random final inspection. The first mass-production pieces are critical because they reveal cavity-to-cavity variation, plating-rack marks, actual line speed, enamel cure behavior, and assembly consistency.
For most custom metal promo orders, ANSI/ASQ Z1.4 General Inspection Level II is a practical default. AQL 2.5 for major defects and 4.0 for minor defects is common for promotional goods; use AQL 1.5 for major defects when the order is event-critical, retail-packed, or brand-sensitive. Critical defects, including sharp exposed points, broken magnets, incorrect safety hardware, lead/cadmium risk, or detached small parts on child-facing products, should be zero accepted. Inspection must include packed units, not only loose pieces, because scratches, color transfer, and bent posts often appear after bagging and carton compression.
Do not accept top-tray photos as final evidence. Ask for 20-30 first-off production pieces pulled after the line is running, not from the sample bench. Measure dimensions and thickness on at least 10 pcs from that pull, check plating tone against the signed sample, inspect enamel depth after cure, and test attachment force on assembled units. If the defect pattern changes after the first 30 pcs, pause before the full order moves to packing.
| Failure mode | Typical symptom | Spec to write | QC check |
|---|---|---|---|
| Geometry drift | Oversize edge, closed cutout, softened text | Critical dimensions ±0.20 mm under 50 mm; ±0.30 mm over 50 mm; bridges 0.80-1.20 mm minimum | First-article caliper check plus 10 pcs across cavities |
| Thin or uneven plating | Edge burn, dull patches, tarnish, visible base metal | Bright nickel 4-6 microns; black nickel 1.0-2.0 microns; gold flash 0.10-0.30 microns | Visual check at 500-800 lux and thickness test on representative pcs |
| Enamel fill error | Low fill, bubbles, bleed, scratched color | Soft enamel recessed 0.20-0.40 mm; hard enamel -0.05 to +0.10 mm; Delta E ≤2.5 | Post-cure inspection by color batch before assembly |
| Weak attachment | Loose clutch, open ring, rotating magnet, bent post | Butterfly clutch ≥4 N; split ring wire 1.2-1.5 mm; magnet pull force matched to badge weight | Pull test, bend check, cycle check, and packed-unit functional test |
| Packing abrasion | Scuffed plating, bent pins, mixed SKUs | 30-50 micron bags; inner partitions for heavy pieces; cartons under 12 kg gross for fragile plated goods | Packed-carton drop test and SKU count verification |
6. Packing Damage Mistaken for Product Defect
Many complaints blamed on manufacturing are caused by pack-out. Pins rub through thin bags, posts bend when bags are stacked face-to-back, coins strike carton corners, plated parts tarnish in humid containers, and mixed SKUs arrive out of sequence. Packing is part of the product specification because it determines what the customer receives, not only what the inspector saw on the table.
For small pins and badges, use 30-40 micron OPP or PE bags as a baseline; upgrade to 50 microns or add backing cards when the item has sharp posts, black nickel, mirror gold, or soft enamel that sits close to the rim. Coins over 35 g should use capsules, foam slots, or partitioned inner boxes instead of loose bulk bags. Keep export cartons under 12 kg gross for fragile plated goods and under 15 kg only when inner packs are rigid. For humid routes or long storage, add desiccant and seal inner cartons with a moisture barrier rather than relying on corrugated board.
Require a 1 m packed-carton drop test for fragile, retail-packed, or heavy products: one corner, three edges, and six faces. Add a shake test for inner boxes and confirm that front faces do not touch pin posts, split rings, or clasp backs. If the unboxing sequence matters, specify SKU order, label format, barcode placement, and master-carton count. Freight savings disappear quickly when a consignee rejects scuffed plating or mixed cartons at receiving.
7. RFQ Checklist Before You Scale
A strong RFQ reads less like artwork approval and more like a production control sheet. It tells the supplier what can fail, how tightly it must be controlled, and how the buyer will judge the result. That helps capable factories quote the real process and exposes weak suppliers before money is locked into tooling.
- Define item type, base metal, size, thickness, target weight, tolerance class, MOQ tier, and production lead time in days.
- Attach vector artwork and call out minimum text height, line width, bridge width, openwork limits, and relief range.
- Specify plating type, target microns, underplate if required, salt-spray target, lacquer or e-coat, and approved finish sample.
- Set enamel or epoxy requirements: Pantone or swatch, Delta E target, fill depth, cure inspection, bubble limit, and bleed limits.
- Name each hardware component with pull force, wire diameter, magnet grade, clasp type, cycle test, stitch density, or adhesive requirement.
- Choose inspection standard, AQL levels, first-article quantity, measurement sample size, photo requirements, and packed-unit checks.
- Define pack-out: bag thickness, backing card, inner box, carton gross weight, drop test, labels, barcode position, and SKU order.
For a new supplier or new construction, start with a pilot order instead of jumping straight to a 5,000 pc rollout. A 100-300 pc pilot is usually enough for a simple pin or badge; 300-500 pcs is safer for cast keychains, dark plating, epoxy doming, magnets, custom cards, or retail boxes. Scale only after the pilot confirms dimensional repeatability, finish stability, hardware strength, and packing survival.
If the factory controls design engineering, tooling, polishing, plating, enamel, assembly, and packing in one facility, use that advantage before tooling starts. Ask engineering to flag manufacturability risks, minimum feature widths, plating limitations, and packing hazards on the proof. The goal is not a heavier document. The goal is to make each likely failure visible, measurable, and expensive to ignore before the order leaves the production floor.
Have a project? Send your artwork and target quantity and we’ll reply with a detailed quotation within 12 working hours.
Ready to get this made?
Send your sketch, target quantity and ship-date. Detailed quotation in 12 hours.


