Respec Triggers for Custom Metal Orders: A 2026 Buyer Workflow
Why approved custom metal orders still fail after RFQ
Most custom pins, badges, keychains and challenge coins do not fail because the factory lacks core capability. They fail because the first approved specification is only visually acceptable, not production-stable. A design can look correct in artwork yet become unstable once stamping pressure, die-cast shrinkage, polishing loss, plating variation, enamel fill height, solder heat and packing friction are introduced at production speed.
That is why many programs drift between sample approval and bulk release. Common failure modes include soldered posts leaning after clutch removal, soft enamel underfill in narrow recesses, black nickel shade variation in deep cavities, burrs along cutout edges, jump rings opening under torsion, or polished faces arriving with transit scuffs. None of those are solved well by relying on final inspection alone.
The better control point is a structured respec workflow between RFQ, artwork proof, pre-production sample and first bulk lot. At each gate, the buyer should decide whether a finding is acceptable process variation, an execution defect that requires remake, or a specification problem that requires revision to the drawing, BOM, finish or pack method. That distinction matters most on medium-volume orders of roughly 3,000 to 20,000 pieces, where one weak assumption can multiply quickly across multiple cavities, shifts or plating batches.
In practice, a stable order file covers six things before bulk release: geometry, material, finish, hardware, packaging and inspection basis. When those are defined with measurable limits instead of descriptive language alone, factories quote more accurately, sample loops shorten by days instead of weeks, and the first production lot is less likely to become a redesign disguised as quality control.
1. Build the RFQ around inspection points, not appearance alone
A usable RFQ should read like the document QC will later inspect against. Specify exact dimensions in millimeters, whether tolerances apply before or after plating, base material, nominal thickness, finish type, attachment hardware, unit packaging, export carton limit and defect standard. If the RFQ only says soft enamel pin, black nickel, backing card, suppliers can quote it, but they are still filling in too many process assumptions on their own.
Start with the dimensions that drive yield. For stamped iron lapel pins, call out overall size to ±0.15 mm after plating, raw thickness of 1.2 mm or 1.5 mm, and minimum metal line width of 0.25 mm for small logos and 0.30 mm for text that must remain legible. For die-cast zinc alloy keychains, define body thickness at 2.0 to 2.5 mm, split-ring OD at 25 mm or 30 mm, jump-ring wire at 1.0 mm or 1.2 mm, and minimum bridge width around cutouts at 1.2 mm. For challenge coins, specify diameter, finished thickness, edge pattern, weight tolerance if relevant, and maximum face rocking of 0.30 mm on a flat table.
The inspection basis must be stated before quotation, not after PO issue. For promotional metal accessories, a common baseline is ANSI/ASQ Z1.4, General Inspection Level II, single sampling, with AQL 2.5 for major defects and AQL 4.0 for minor defects. Visual inspection should be defined at about 30 cm under 800 to 1200 lux neutral white light. Without that shared standard, one supplier may quote against a looser cosmetic threshold and appear cheaper while carrying a higher actual defect risk.
Commercial terms also affect spec stability. Typical MOQ for custom stamped pins is 100 to 300 pieces per design; die-cast keychains and coins usually price better at 300, 500 or 1,000 pieces because tooling setup and plating runs are spread more efficiently. At 1,000 pieces FOB, a 25 to 35 mm stamped soft-enamel pin often lands around USD 0.45 to 0.95 depending on thickness, color count and carding, while a 45 to 60 mm die-cast keychain with standard split ring typically runs about USD 0.90 to 2.20. A 38 to 45 mm two-sided challenge coin with standard edge and individual polybag is commonly around USD 0.85 to 1.80 FOB at 1,000 pieces.
- Specify finished size in mm and whether tolerance applies before or after plating
- State base metal and thickness, such as stamped iron 1.5 mm or zinc alloy die cast 2.5 mm
- Define minimum line width, recess depth and bridge width for artwork that includes text or cutouts
- Call out hardware size and performance, including post count, jump-ring gauge, clutch type or magnet grade
- Set AQL level, visual inspection distance, pack method and carton weight limit before quoting
2. Use the artwork proof to identify process risk before tooling starts
The proof stage is not only for logo shape, Pantone references and spelling. It is the best point to challenge designs that are technically possible but unstable in production. Typical warning signs are isolated metal islands below 0.25 mm, unsupported bridges around internal cutouts, recessed text that is too fine to polish cleanly, long narrow badges with a single post, thin connector loops on heavy keychains, or mirror-polish planes next to deep sandblasted recesses.
This is also when the manufacturing method should be reassessed. A design that appears suitable for stamping at 1.2 mm may need to shift to die casting at 2.0 mm or more if it has irregular perimeter geometry, multiple cutouts, back cavities or 3D relief. A coin with fine radial edge detail and dual-sided sculpting may need a thicker blank, such as 3.0 to 3.5 mm instead of 2.0 mm, to preserve edge definition after polishing. A brooch wider than about 55 mm or heavier than roughly 18 to 22 g usually needs two posts or a bar-pin layout to control rotation on fabric.
Lead time should be tested at the same stage. Typical timings for standard projects are 1 to 3 days for artwork proof, 7 to 12 days for tooling, 5 to 10 days for pre-production sampling after tool completion, and 12 to 25 days for bulk production depending on quantity, plating queue and packing complexity. If the proof already shows a geometry or finish combination that is likely to trigger sampling failures, it is usually worth revising before tooling rather than absorbing another 7 to 14 days for sample remake and tool adjustment later.
| Checkpoint | Usually acceptable | Respec trigger before tooling |
|---|---|---|
| Metal line width | 0.30 mm or above on stamped soft enamel | Below 0.25 mm on small text, isolated borders or islands |
| Stamped thickness | 1.2 to 1.5 mm for pins up to about 40 mm | Below 1.0 mm on shapes above 45 mm or long narrow profiles |
| Die-cast body thickness | 2.0 to 2.5 mm for irregular keychains | Below 1.8 mm with large cutouts, long arms or heavy hardware |
| Attachment layout | Two posts or balanced anchor points on wide badges | One post on a badge wider than 45 to 50 mm with rotation risk |
| Finish choice | Bright nickel, bright gold or antique nickel for standard use | Black nickel or dyed finish on high-contact parts needing abrasion resistance |
| Packaging concept | Individual polybag, tissue wrap or carded unit | Loose bulk packing for polished plated surfaces that can rub in transit |
3. Judge the pre-production sample by function first, cosmetics second
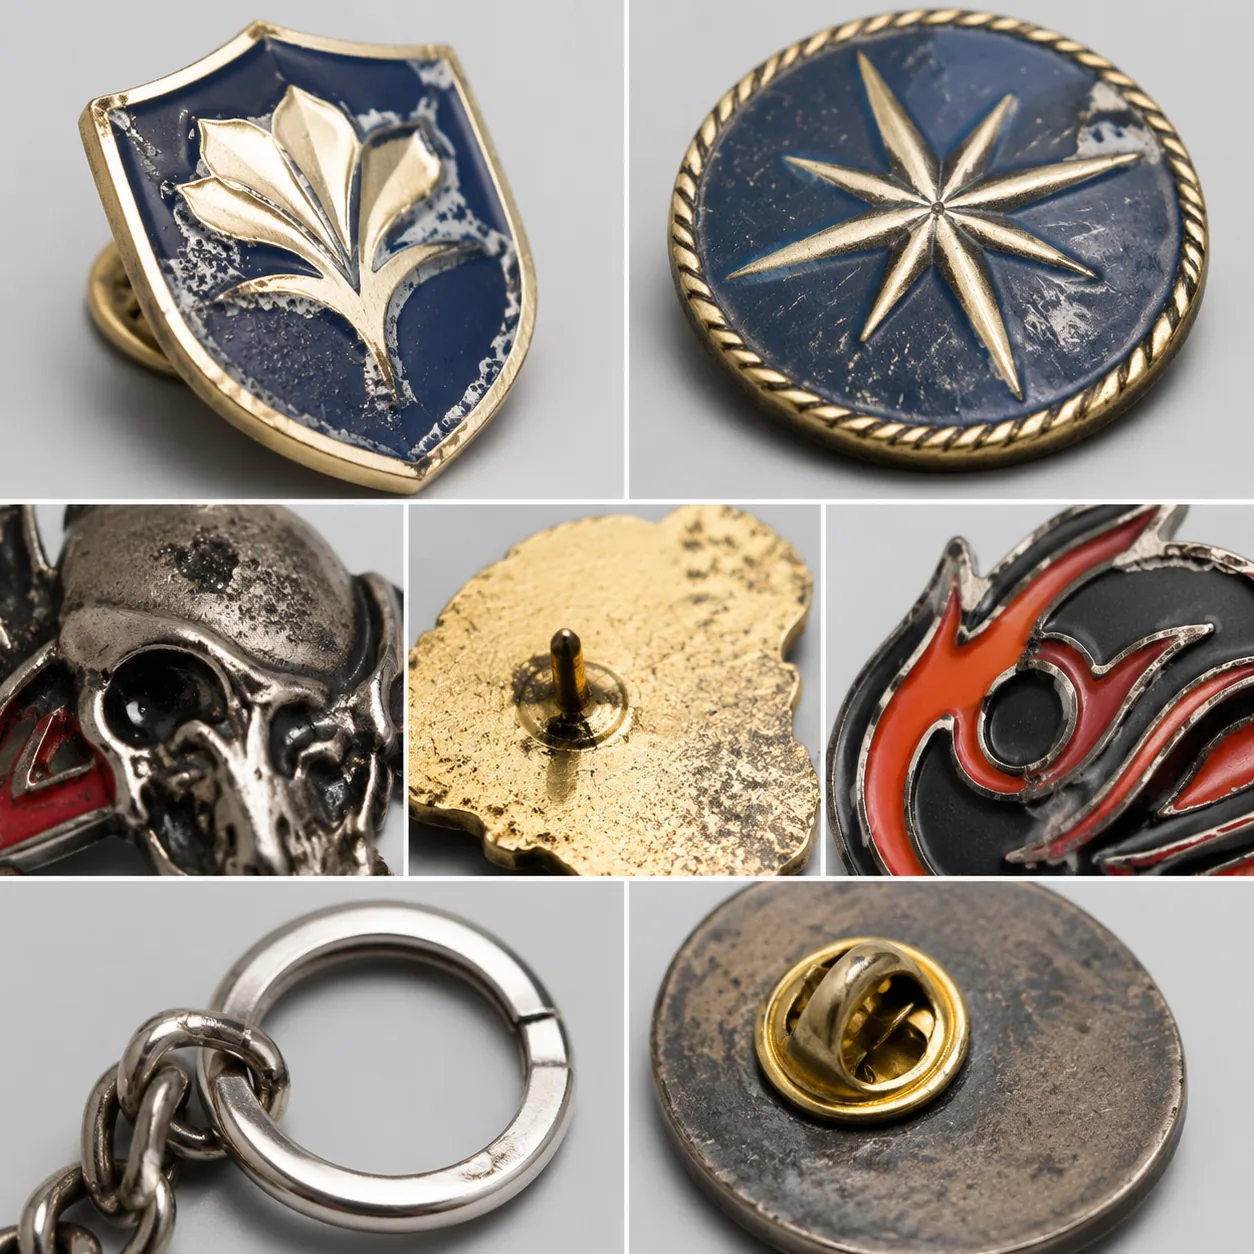
When the first sample arrives, evaluate structural repeatability before debating whether every color field is visually perfect. Confirm that posts are straight, rings close fully, swivels rotate without binding, hinges align, magnets sit flush, and the piece feels balanced in actual use. A visually attractive sample with weak hardware or marginal geometry is not ready for bulk approval.
Measure rather than estimate. Use calipers for overall length, width and thickness; a scale for unit weight; and the supplier’s plating or process record if finish durability matters. For lapel pins, check that soldered posts resist manual deflection and remain upright after at least 10 clutch on-off cycles. For keychains, open and close the split ring several times and apply light torsion to confirm the jump ring does not gap. For coins, verify edge consistency, rocking and burr level around the rim. If the sample already sits near the limit of tolerance, mass output will usually drift worse rather than better.
For finish review, inspect fill height, burrs, polishing loss and flatness. Soft enamel can vary slightly, but repeated low spots deeper than about 0.10 to 0.15 mm, overflow onto raised lines, or visible pits in corners are not minor cosmetics; they usually indicate unstable filling or polishing control. For imitation hard enamel or polished hard-enamel-style products, the top face should feel smooth and level with no sharp ridges along narrow metal bridges or around solder points.
If wear, storage life or corrosion resistance matters, verify what decorative plating thickness is actually being supplied. Many promotional metal items use decorative nickel, gold or black nickel in the range of about 0.03 to 0.08 micron. That is visually acceptable for gifts and events but not equivalent to engineering-grade plating. If the product will see repeated abrasion, pocket carry or key-bunch contact, respec the finish expectation early: use antique plating, add an epoxy dome, move to a textured surface that hides wear, or upgrade packaging to reduce initial damage.
4. Know which sample failures require a respec instead of another remake
A major source of delay is requesting remake after remake when the real problem sits in the specification. If the defect comes from geometry, finish choice, hardware gauge or packaging method, rebuilding the same sample often repeats the same failure. The practical question is whether the factory executed a sound standard poorly, or whether the approved standard itself is not stable enough for production.
For example, black nickel can look patchy on a part with deep recesses, mirror planes and heavy contrast between polished and textured areas. Another sample to the same requirement may still drift because the appearance problem is tied to part geometry and the decorative process. A stronger respec would be antique nickel, matte nickel, satin gold, or a textured background that reduces visible shade change. Likewise, if a 50 mm keychain connector opens during twist testing, the solution may be to increase jump-ring wire from 0.8 mm to 1.2 mm, switch to a welded ring, or upgrade to a heavier clasp rather than request a remake with the same weak fitting.
Packing failures follow the same logic. If polished coin faces show hairline scuffing after trial shipment, cleaner handling alone will not control it. The order should be revised to individual PP bagging, tissue wrap, EVA tray, paper sleeve or capsule depending on presentation target and FOB limit. On many medium-volume orders, adding about USD 0.03 to 0.12 per unit in protective packaging is much cheaper than field complaints, cosmetic sorting or rework.
- Respec when the same defect appears across more than one trial sample, cavity or finish variant
- Respec when failure is tied to geometry, hardware gauge, finish type, plating expectation or pack method
- Request remake only when the approved spec is sound and execution is clearly outside tolerance
- Revise the approved drawing, BOM and packaging note together so production does not run mixed instructions
- Do not release bulk on verbal promises that enamel fill, plating shade or protection will be adjusted later
5. Convert sample approval into a measurable bulk release standard
Once the sample is approved, convert that approval into a one-page release standard that production, QC and purchasing all use the same way. It should list dimensions, allowable variation, finish, hardware, packaging, visual rules and any approved concessions from the sample stage. The purpose is to turn a physical sample into an auditable production standard rather than a memory-based reference.
A practical release sheet might read as follows: finished size 38.0 mm ±0.15 mm after plating; raw body thickness 1.5 mm ±0.10 mm before plating; bright nickel decorative plating approximately 0.03 to 0.08 micron; soft enamel generally level within recess with no underfill deeper than 0.10 mm on primary logo areas; no exposed pits visible at 30 cm; epoxy dome fully contained inside edge with no overflow; two butterfly clutches positioned within ±0.50 mm of approved drawing; backing card slot centered within ±1.0 mm; no visible post lean at normal inspection distance.
Packaging belongs on the same sheet. For small metal products, export cartons are usually safer at about 8 to 12 kg gross to reduce crush and internal movement. Inner packs should be fixed by count, such as 50 or 100 pieces per bag, with desiccant if humid storage is likely. Polished, plated or epoxy-faced items should not travel loose against one another. Even on cost-sensitive jobs, individual polybagging is often the lowest-cost prevention compared with sorting scratched units after arrival.
This is also the right stage to align technical changes with schedule impact. A respec before bulk release often adds only 3 to 10 days depending on whether hardware, plating or packaging changes are involved. The same issue found after 70 percent of quantity is complete can add multiple weeks because of sorting, re-plating, reassembly or repacking. Early specification discipline is almost always cheaper than heavier downstream inspection.
6. Monitor the first bulk lot for drift, not only obvious defects
The first production lot is where process drift becomes visible. Even when the sample is acceptable, bulk output can shift because of different operators, solder temperature, polishing time, plating bath age, enamel viscosity, cure time or packing speed. Review the first lot against the written release standard, not against memory of the sample alone.
The highest-risk drift points for custom metal accessories are usually plating shade, enamel fill height, post alignment, burr level, hardware closure and pack-count accuracy. On keychains and challenge coins, also check ring closure, swivel action, edge finishing consistency and front-art orientation relative to the hardware. Those are the areas most likely to generate customer complaints, returns or social-media-visible defects.
Ask for a first-run report before full packing where possible. It does not need to be elaborate: dimensions from several units across at least one cavity or shift, front and back photos, hardware confirmation, visual check of plating and enamel, and images of the approved packaging method are often enough. For quantities above 5,000 pieces, many buyers also request an in-line check at around 10 to 20 percent completion so corrections can still be made before all units are packed.
If defect levels exceed the agreed threshold, respond based on cause. A localized execution issue may justify sorting, rework or process correction. A repeated drift tied to the approved geometry, finish or hardware should trigger a formal respec for the remaining balance and for future reorders. That turns the first bulk lot into process data instead of a one-time rescue exercise.
7. Build the reorder file from actual failures, fixes and production data
A useful reorder file is far more valuable than an archive of proofs and emails. It should record what nearly failed, what changed, and which final settings produced stable output. Capture rejected finishes, line widths that filled poorly, hardware gauges that deformed, packaging methods that caused rubbing, final approved carton counts, and the exact revision that solved the problem.
Specific records are best. Note that a 50 mm zinc alloy keychain launched with a 0.8 mm jump ring and was upgraded to 1.2 mm after torsion testing. Record that a 60 mm brooch changed from one center post to two posts to stop rotation. Record that a polished gold-plated 45 mm coin moved from bulk bagging to individual sleeves after transit trials showed hairline scuffing. Record final FOB cost, MOQ breakpoints, target lead time and actual defect pattern at incoming inspection. Those details shorten the next RFQ and reduce repeat arguments about what was previously accepted.
For buyers placing seasonal or event-driven reorders every 6 to 12 months, the reorder file should also include supplier name, tool number, approved sample date, plating finish, protective pack method, AQL standard and any waived cosmetic points. When the next order starts, the team can work from a proven manufacturing baseline instead of reopening the same technical debates.
The operating rule is simple: tighten the RFQ if tooling has not started, separate sample findings into acceptable variation, execution defects and true respec triggers if sampling is underway, and issue a measurable release sheet before bulk approval. The buyers who avoid the most expensive failures are usually not the ones who inspect hardest at the end. They are the ones who know exactly when to stop, revise the specification and scale only after the process is stable.
Have a project? Send your artwork and target quantity and we’ll reply with a detailed quotation within 12 working hours.
Ready to get this made?
Send your sketch, target quantity and ship-date. Detailed quotation in 12 hours.


