Patch Production Failures: Fray, Curl and Color Bleed Specs
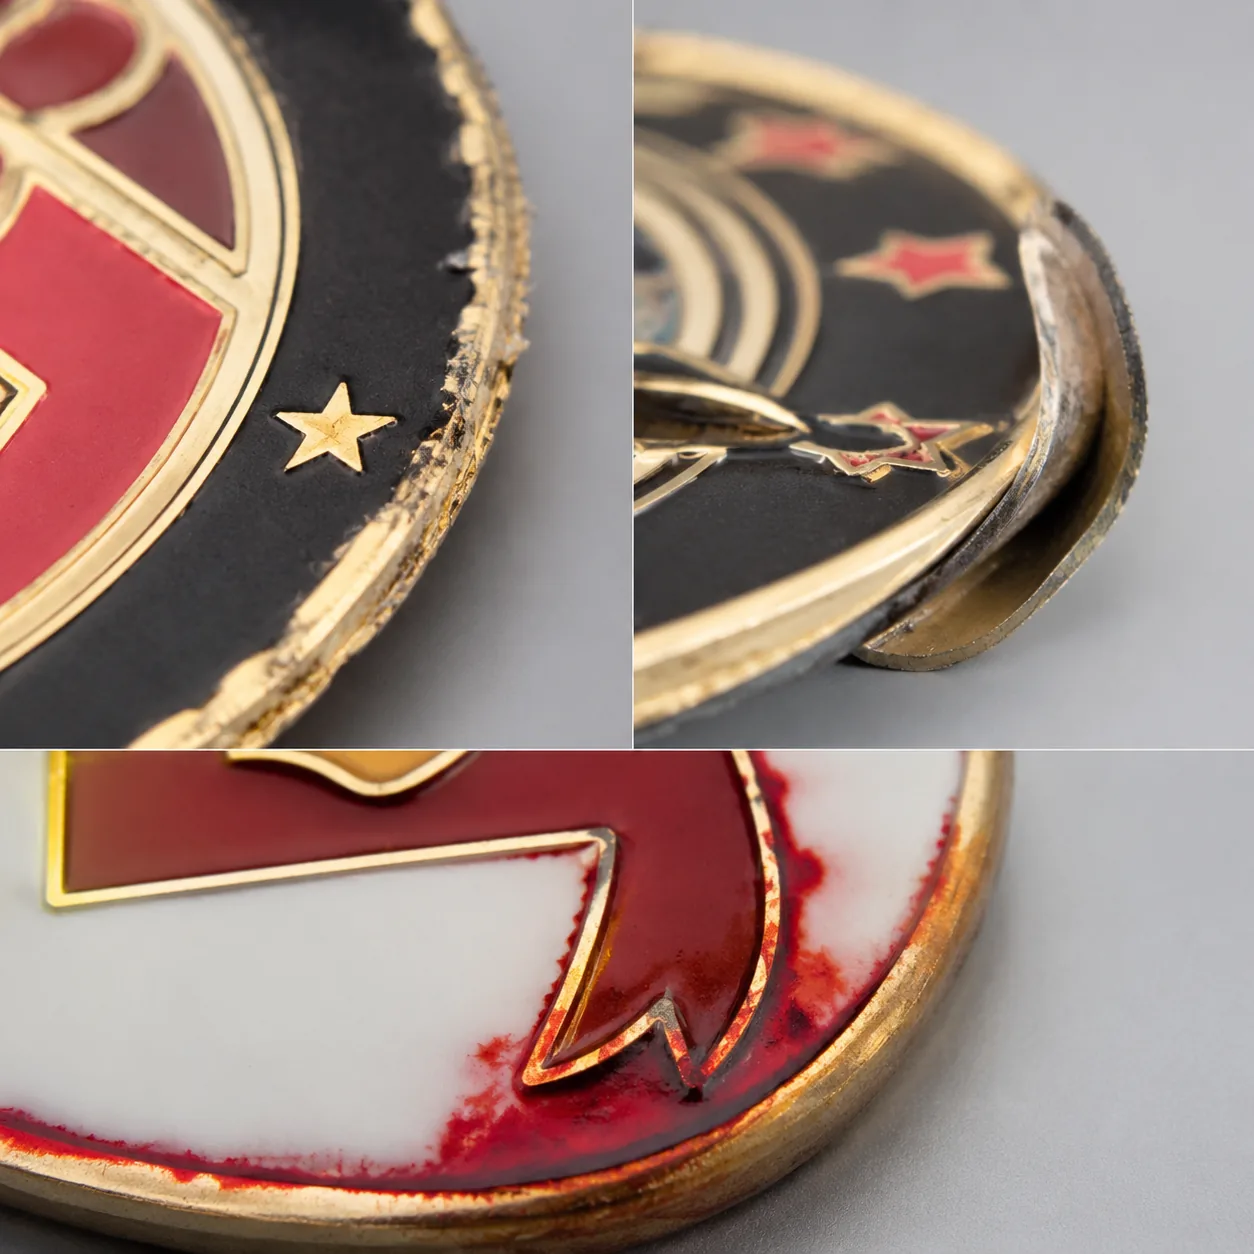
Failure 1: The Border Frays After Two Weeks of Use
The most common complaint on embroidered and woven patches is not that the artwork looks wrong on day one. It is that the edge starts shedding threads after the patch has been sewn to a uniform, backpack or cap. This usually comes from choosing the wrong border construction for the shape, or from specifying only size and color while leaving edge finishing to the supplier.
For regular shapes such as circles, shields, rectangles and ovals, a merrowed border is the safest choice. A typical merrow border is 2.5 to 3.5 mm wide, using polyester thread at around 120D/2 or 150D/2, with the stitching wrapping over the edge. For irregular die-cut shapes, heat-cut or laser-cut borders are cleaner, but they need a minimum satin stitch outline of 1.5 to 2.0 mm inside the cut edge to stop yarns from opening.
Do not specify a merrow border on sharp internal corners, narrow antenna shapes or thin text outlines. The border machine cannot turn cleanly below about a 3 mm inside radius, so the operator will either thicken the shape or leave loose thread. At ZheCraft, we normally flag any patch outline with necks under 4 mm wide or internal radii under 3 mm before sampling, because those areas are where fraying and distortion start.
Failure 2: The Patch Curls Because the Backing Is Wrong
Curling is a backing problem more often than a stitching problem. A patch may leave the factory flat, then cup upward after heat pressing, washing or weeks of storage in a polybag. The risk increases on dense embroidery, large rectangular patches, and thin woven labels with heat-seal backing.
For embroidered patches above 70 mm wide, specify a stabilizer layer instead of relying only on the embroidery thread and fabric. A common construction is twill fabric plus 80 to 120 gsm non-woven backing, then optional heat-seal film at 100 to 150 microns. For woven patches, a 0.20 to 0.30 mm TPU or EVA backing film helps hold the shape; very thin 0.10 mm film is cheaper but curls more easily on patches above 80 mm.
Heat application must also be controlled. A normal iron-on patch specification is 150 to 165°C, 12 to 18 seconds, medium pressure, then 24 hours before washing. If your end user will apply patches to nylon jackets, coated bags or performance fabrics, do not assume iron-on will work. In those cases, sew-on plus a thin backing, or hook-and-loop attachment, is more reliable than promising universal heat adhesion.
| Patch type | Common backing | Useful spec range | When it fails |
|---|---|---|---|
| Embroidered sew-on | Non-woven stabilizer | 80-120 gsm, no glue film | Too soft on large patches if under 60 gsm |
| Embroidered iron-on | Heat-seal film plus stabilizer | 100-150 micron film, 150-165°C application | Peels on coated nylon, silicone finishes or low-pressure home irons |
| Woven patch | TPU or EVA film | 0.20-0.30 mm total backing | Curls if film is too thin on patches over 80 mm |
| PVC patch | Molded PVC base | 2.0-3.0 mm thickness typical | Too heavy for thin garments; may sag |
| Hook-and-loop patch | Hook or loop sewn to back | 0.8-1.2 mm hook/loop tape | Peels if only glued, not stitched around perimeter |
Failure 3: Small Text Fills In or Disappears
Patch artwork often starts as a vector logo made for print or screen use. That file may include 0.2 mm strokes, 3 mm text and subtle gaps between letters. Embroidery and weaving cannot reproduce those details the same way as paper printing, so the failure appears as blocked counters in letters, unreadable slogans or outlines that merge into the background.
For embroidered patches, keep capital letters at 5 mm high or larger, with stroke widths of at least 0.8 to 1.0 mm. For woven patches, 3.5 to 4 mm capital height can be workable because the yarns are finer, but the buyer should still allow a line tolerance of plus or minus 0.3 mm. PVC patches can hold raised lines around 0.5 to 0.7 mm depending on mold depth, but very tight negative space will trap dust and look rough.
The factory should redraw the artwork into a stitch file or production file, not simply scale the original logo. In ZheCraft sampling, we mark any text below recommended size and ask whether to enlarge, simplify or change to printed detail. That conversation before the first sample is cheaper than remaking a mold, re-digitizing stitches, or accepting patches that pass color approval but fail readability.
- Set embroidered text at 5 mm minimum capital height; 6 mm is safer for uniforms viewed at arm length.
- Set woven text at 3.5 to 4 mm minimum capital height, with simplified fonts and open counters.
- Avoid negative gaps under 0.5 mm on woven patches and under 0.8 mm on embroidered patches.
- Do not use embroidery for QR codes or micro legal text; use woven, printed fabric or a separate label.
- Ask for a 1:1 stitch simulation and a physical pre-production sample for any logo with small lettering.
Failure 4: Colors Bleed, Shift or Look Dirty
Color complaints on patches usually have three sources: thread shade limits, dye migration from backing fabric, and visual mixing caused by stitch direction. A Pantone number is useful, but thread is not liquid ink. Polyester embroidery thread and woven yarn come in fixed shade cards, and the nearest commercial shade can be visibly different from a coated-paper Pantone chip.
For embroidery, specify polyester thread for better colorfastness than rayon in most promotional uses. A practical color tolerance is nearest available thread shade with buyer approval by physical thread card or sample photo under D65 daylight. If the project has strict brand requirements, approve a physical sample, not only a digital mockup, because camera white balance can make red, navy and gold look acceptable when the actual thread is off.
Bleeding can occur when dark backing fabric, low-grade dyed thread or adhesive film releases color during heat pressing or washing. Ask for colorfastness to rubbing and washing checks on dark red, black, navy and fluorescent colors. For general promo patches, a simple internal test can include 30 minutes in warm water at around 40°C, white cloth rub test, and visual inspection for staining; for apparel retail programs, buyers should define the formal textile test standard they require rather than assuming the patch factory will guess it.
| Defect seen by buyer | Likely cause | Spec to add |
|---|---|---|
| Red edge stains white fabric | Low colorfastness thread or fabric dye migration | Polyester thread; wet rub and warm-water stain check on dark colors |
| Navy logo looks almost black | Nearest thread shade not approved physically | Approve thread card code or physical sample under daylight |
| Fine green line looks dull | Stitch direction changes reflect light differently | Request stitch direction review on sample, not just Pantone match |
| White area looks gray | Dark base fabric showing through low stitch density | Specify full coverage embroidery or white twill base |
| Gold varies between patch and lanyard | Different material color systems | Approve separate physical standards for thread, woven yarn and printed fabric |
Failure 5: Hook-and-Loop or Iron-On Backing Peels
Attachment failures are expensive because they often appear after distribution, not during incoming inspection. A morale patch may look perfect in the carton but detach from a tactical vest after repeated removal. An iron-on patch may pass a quick press test, then peel at the corners after washing because the adhesive never properly bonded to the garment.
Hook-and-loop backing should be stitched, not only glued. For a patch under 80 mm, specify perimeter stitching 2 to 3 mm from the edge, stitch length around 2.5 to 3.0 mm, and back-tack at the end point. For larger patches or shapes with narrow protrusions, add internal tack stitching where the hook tape would otherwise separate from the embroidered body.
For iron-on backing, specify both the adhesive type and the application condition. A useful procurement spec is heat-seal film 100 to 150 microns, activation at 150 to 165°C for 12 to 18 seconds, peel test after cooling, and no corner lift above 2 mm after manual flexing. If the buyer cannot control the end user's heat press temperature and pressure, the packaging should state that sewing is recommended for permanent attachment.
- Ask whether hook-and-loop is stitched through the full patch body or laminated only.
- Require no visible glue overflow beyond the patch edge.
- For hook patches, check that the hook side does not scratch the front face when packed in bulk.
- Test iron-on samples on the actual garment fabric, not only on cotton twill.
- Avoid iron-on claims for waterproof coatings, silicone-treated fabrics, down jackets and high-stretch knits.
Failure 6: Size Drift Makes Sets Look Inconsistent
Patch size drift is easy to miss when inspecting a single sample and obvious when patches are displayed as a set. A 70 mm badge next to a 74 mm badge looks careless, even if both are technically close to the artwork. Drift comes from fabric tension, embroidery pull, heat cutting, backing shrinkage and manual trimming.
Buyers should specify finished size tolerance, not only artwork size. For embroidered and woven patches up to 100 mm, plus or minus 1.0 mm is realistic for the main width and height. For larger patches from 100 to 180 mm, plus or minus 1.5 mm is more practical. PVC patches from a mold can often hold plus or minus 0.5 mm on main dimensions, but soft edges and flexible material still make manual measurement less exact than metal parts.
Set tolerances separately for overall size, border width and attachment position. A merrow border of 3.0 mm should not vary from 2.0 mm on one side to 4.5 mm on the other. For hook-and-loop backing, allow the backing to sit 1 to 2 mm inside the visible edge so it does not protrude, but do not allow it to be so undersized that the corners lift.
| Feature | Recommended tolerance | Inspection method |
|---|---|---|
| Overall patch width/height under 100 mm | ±1.0 mm | Caliper or ruler on flat patch, no stretching |
| Overall patch width/height 100-180 mm | ±1.5 mm | Measure 5-10 pcs per inspection lot |
| Merrow border width | ±0.5 mm from approved sample | Visual check plus ruler at four points |
| Hook-and-loop backing inset | 1-2 mm inside patch edge | Check no protrusion, no corner lift |
| Printed or woven logo center position | ±1.0 mm under 100 mm patch | Compare to approved golden sample |
Failure 7: QC Passes the Carton but Misses the Defect Pattern
Patch inspection should not be a quick count of cartons and a glance at the top layer. Defects often cluster by machine head, thread cone, cutting operator or heat-press batch. If the inspection sample is pulled only from the first carton, the buyer may miss a full carton with weak adhesive or a run of patches with wrong thread tension.
For normal B2B promotional orders, we recommend AQL single sampling with Critical 0, Major 2.5 and Minor 4.0 as a practical starting point. Critical defects include sharp foreign objects, mold contamination, wrong attachment that creates a safety risk, or completely wrong design. Major defects include unreadable logo, wrong color, peeling backing, open seams, missing hook tape, size out of tolerance or stains visible at arm length. Minor defects include small loose threads under 3 mm, slight stitch density variation, or small backing wrinkles not visible from the front.
Carton packing also affects QC results. Patches with hook backing should be paired or covered so hooks do not pull embroidery on neighboring pieces. Iron-on patches should not be compressed under heavy cartons in a hot warehouse, because adhesive films can imprint or block together. For export packing, ZheCraft normally uses inner polybags or bundle bags, moisture protection when needed, and carton weights kept around 12 to 18 kg so the bottom layers are not crushed.
- Pull inspection samples from the beginning, middle and end of production, not one carton only.
- Compare against a signed golden sample for size, color, border, backing and packing.
- Clip loose threads only if the stitch is secure; do not accept trimming that opens the seam.
- Record defects by type and carton number so the factory can isolate the machine or batch.
- For reorders, keep the previous sample and thread codes instead of relying on old photos.
What to Do Next Before You Release the PO
Before placing a patch order, convert the artwork into a defect-prevention spec. State the patch type, finished size, border type, base fabric, thread or yarn requirements, backing, attachment method, tolerances, packing and AQL level. For a typical custom embroidered or woven patch, workable MOQ starts around 100 to 300 pcs per design, with better unit pricing at 500 and 1,000 pcs; PVC patches often start around 300 pcs because of mold setup.
As a rough FOB China reference, simple embroidered patches can run about USD 0.25 to 0.90 per piece at 500 to 1,000 pcs depending on size and coverage. Woven patches are often around USD 0.30 to 1.10, hook-and-loop backing may add about USD 0.10 to 0.35, and PVC patches commonly range from USD 0.60 to 2.50 depending on size, colors and thickness. Sampling is usually 5 to 10 days after artwork approval, with mass production around 10 to 20 days for most patch orders; complex PVC molds, multiple backings or retail packaging can add several days.
Send the supplier a 1:1 vector file, Pantone references, intended garment or use case, required attachment, target quantity, delivery date and any compliance or testing requirements from your market. Ask for the factory's concerns before sampling, especially on small text, narrow shapes, iron-on claims and color matching. ZheCraft can review mixed promotional sets that include patches, pins, lanyards and metal items together, but the safest result still starts with a clear patch spec and a physical pre-production sample approved before bulk production.
Have a project? Send your artwork and target quantity and we’ll reply with a detailed quotation within 12 working hours.
Ready to get this made?
Send your sketch, target quantity and ship-date. Detailed quotation in 12 hours.


