Patch Edge Specs for Uniforms: Prevent Fraying, Curling, and Rework
Define the Failure Mode Before Approving Artwork
A uniform patch is a small engineered trim, not only a logo carrier. The same 75 mm badge may be sewn to 150 gsm cotton work shirts, heat-pressed to 280 gsm polyester softshell jackets, and stitched onto 18 oz canvas tool bags. Each substrate loads the patch edge differently. Light shirting fabric puckers when the patch is too stiff. Coated polyester may reject heat-seal film. Canvas bags abrade corners until thread tails appear.
Most patch complaints start with a vague RFQ: “embroidered logo patch” with no border width, backing, attachment method, tolerance, wash requirement, or packing method. The artwork can be correct while the production patch still curls after laundering, frays at pointed corners, or arrives too stiff for the garment panel.
For a mixed-uniform rollout, specify the patch as a component. The RFQ should include vector artwork, finished size, garment fabrics, attachment method, expected washing process, and service requirement. A useful requirement is measurable: 60°C wash, tumble dry medium, 25 cycles, no edge fray over 2 mm, no backing separation, no heat-seal edge lift over 1 mm, and no visible border distortion when viewed at 1 m under normal daylight-equivalent lighting.
Select One Construction or Split the Order
One patch construction reduces inventory, carton marking, and picking errors. It usually works when patches are 50 to 90 mm wide, sewn onto medium-weight woven garments, and have rounded edges with a border at least 2.0 mm wide. It becomes risky when one garment needs a soft sew-on patch while another needs heat-seal film, hook backing, or extra abrasion resistance.
The decision point is attachment stress. Sew-on patches can use softer backing because the perimeter stitch holds the patch flat. Heat-press patches need stable adhesive film, a validated press window, and fabric compatibility. Bag patches need a stronger edge because corners rub against benches, vehicle interiors, and tool surfaces.
For an 8,000-piece order, splitting construction is often cheaper than rework. A realistic split is 5,000 sew-on embroidered patches for shirts and canvas bags plus 3,000 woven or satin-border patches with heat-seal backing for softshell jackets after bond testing. Extra setup may add USD 35 to 120 per version. Removing failed patches from finished garments can cost USD 0.80 to 2.50 per garment before replacement, sewing, or lost production time.
| Application | Recommended edge | Backing | Typical thickness | Use caution when |
|---|---|---|---|---|
| Cotton shirt, sew-on | Merrowed border or satin stitch | 80 to 120 gsm non-woven | 1.8 to 2.5 mm | Garment fabric is under 140 gsm or stretch knit |
| Polyester softshell, heat press | Laser-cut woven edge or satin border | 0.12 to 0.18 mm TPU or PES film | 1.3 to 2.0 mm | Fabric has DWR, PU coating, membrane, or high elastane |
| Canvas bag, sew-on | Merrowed border or dense satin border | 120 to 160 gsm non-woven | 2.0 to 3.0 mm | Patch corners sit on folds or high-rub zones |
| Tactical gear | Molded PVC rim or embroidered patch with hook | Hook backing or sew channel | 2.5 to 4.0 mm | Patch is used on light shirts where weight causes sagging |
Engineer Edge Geometry Before Sampling
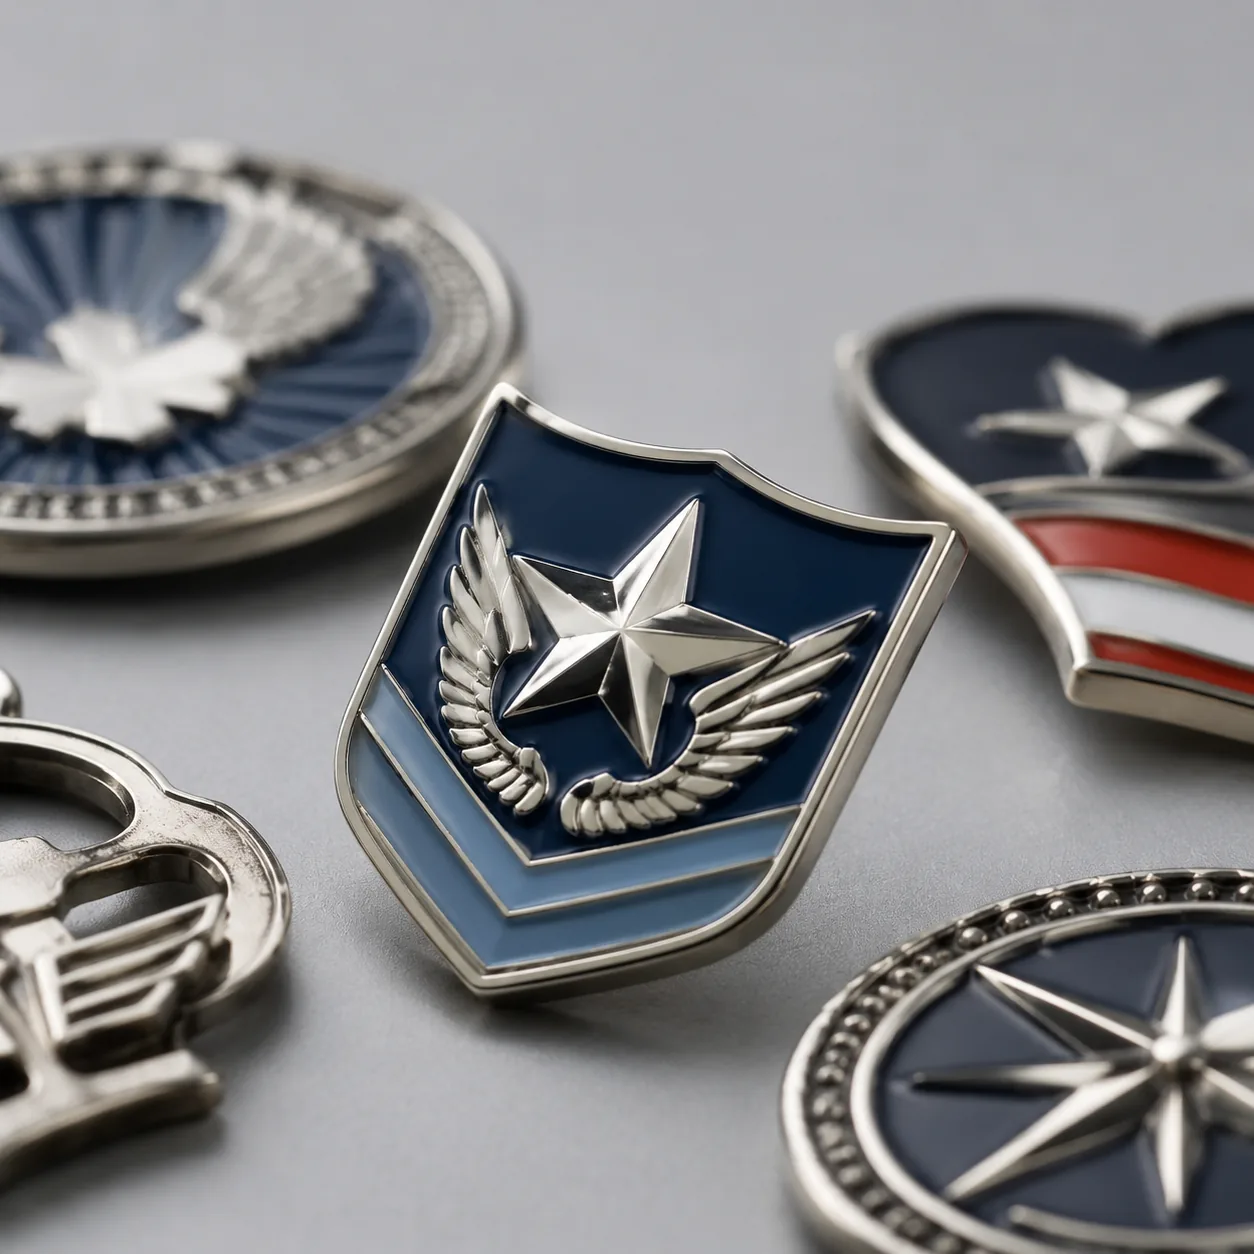
Edge geometry is where many failures are designed into the product. A shield logo with pointed lower corners, a 1.2 mm outline, and 2.5 mm-high lettering may look sharp on a PDF but fail in production. Thread needs physical space. Cutting has tolerance. Backing can shrink under heat. Adhesive film can creep if the perimeter is too narrow.
For embroidered patches, specify a finished border width of 2.0 to 3.0 mm. Merrowed borders usually need 2.5 to 3.5 mm because the wrapped yarn must cover the cut perimeter. Satin-stitched borders can be narrower, but below 2.0 mm they become sensitive to needle deflection, thread tension, and density variation. For woven laser-cut patches, keep critical artwork at least 1.5 mm inside the cut line. For embroidered borders, keep text and fine details at least 2.0 mm inside the stitch line.
Cutting tolerance should be written into the drawing. Laser-cut woven patches on simple shapes are commonly held to ±0.5 mm. Embroidered patches under 100 mm are more realistically held to ±1.0 mm because base fabric, stitch density, and backing tension influence final size. Patches over 120 mm often require ±1.5 mm. Inside corners should have a minimum 1.5 mm radius, and narrow tails or spikes should not be below 2.5 mm finished width.
For the sample shield, the improved revision is specific: increase the outer border from 1.2 mm to 2.4 mm, round the two lower points to a 1.5 mm radius, enlarge embroidered text to at least 3.0 mm cap height, or 2.0 mm for woven construction, and hold all critical artwork 2.0 mm away from the finished edge.
- Name the edge construction: merrowed, satin-stitched, laser-cut woven, heat-cut embroidered, or molded PVC rim.
- State border width in millimeters instead of relying on artwork scale.
- Keep critical details at least 1.5 mm from laser-cut edges and 2.0 mm from sewn borders.
- Avoid merrowed borders on deep notches, sharp internal corners, and spikes below 2.5 mm wide.
- Request an edge cross-section photo during sample review for heat-seal and hook-backed patches.
Specify Backing and Attachment as One System
Backing controls stiffness, wash behavior, sewing stability, and heat-press performance. A patch that lies flat on the inspection table may curl after laundering if the backing shrinks more than the embroidered face or if heat-seal film is applied unevenly. Backing should be approved with the edge construction, not treated as a late accessory.
For sew-on uniform patches, 80 to 120 gsm non-woven backing is a common starting point. It stabilizes embroidery without making the patch board-like. Heavy canvas bag patches may use 120 to 160 gsm backing, especially when embroidery coverage exceeds 70%. For heat-press patches, TPU or PES film in the 0.12 to 0.18 mm range is typical. Trial press conditions often start at 150 to 165°C, 3 to 4 bar pressure, and 12 to 18 seconds dwell, followed by a peel check after 24 hours.
Those settings are not universal. DWR finishes, PU coatings, softshell membranes, ribbed knits, and high-spandex fabrics can reduce bond strength. A practical validation is to press three samples to actual garment fabric, condition for 24 hours, wash five cycles at the intended temperature, and inspect for edge lift over 1 mm, adhesive bleed, staining, fabric shine, or a hand-feel change that makes the uniform panel too rigid.
| Backing option | Typical MOQ | FOB price impact | Lead-time impact | Main control point |
|---|---|---|---|---|
| No backing, sew-on | 300 to 500 pcs/design | +USD 0.00 to 0.02/pc | 0 days | Use only when embroidery is stable and garment fabric does not distort |
| 80 to 120 gsm non-woven | 300 to 500 pcs/design | +USD 0.01 to 0.04/pc | 0 days | Confirm stiffness against signed sample |
| 0.12 to 0.18 mm heat-seal film | 500 pcs/design | +USD 0.04 to 0.10/pc | +1 to 2 days | Test bond on actual garment fabric |
| Hook backing | 500 pcs/design | +USD 0.08 to 0.18/pc | +2 to 4 days | Hook should follow patch shape within 1.0 mm |
| Temporary pressure-sensitive adhesive | 500 pcs/design | +USD 0.05 to 0.12/pc | +1 to 2 days | Use only for positioning; not permanent or washable |
Sample Against Measured Acceptance Criteria
A flat sample photo is not enough for approval. The buyer should approve measured size, border regularity, thread color, backing stiffness, edge durability, and attachment behavior. For a mixed-fabric order, request at least six pre-production pieces: two retained by the buyer, two retained by the factory, and two used for application testing on actual garments.
Typical sample lead time is 5 to 8 days for embroidered or woven patches after artwork approval. PVC patches usually require 7 to 10 days because of mold setup. Mass production for 8,000 embroidered patches is commonly 12 to 18 days after signed sample approval. Woven patches are often 10 to 16 days. PVC patches usually need 15 to 22 days depending on color count, mold size, backing, and curing time.
Price planning should be done by construction, not by patch name alone. A 75 mm embroidered patch at 8,000 pieces is commonly USD 0.28 to 0.65 FOB per piece. A woven patch of similar size may be USD 0.24 to 0.55 FOB. A PVC patch is often USD 0.55 to 1.20 FOB because of material weight and molding time. Dense embroidery above 80% coverage, metallic thread, hook backing, individual barcoding, or special allocation packing can move the price outside these ranges.
The approval form should list measurable acceptance points: finished width 75 mm ±1.0 mm, border width 2.8 mm ±0.5 mm, no loose thread over 2 mm, no backing delamination after 10 manual edge bends, and color matched to the approved thread card or Pantone reference under D65 or equivalent daylight lighting.
- Measure finished width and height on the physical patch, not from the artwork file.
- Check the narrowest border point with a ruler or caliper.
- Bend each edge 10 times to detect backing cracks, adhesive separation, or thread lift.
- Apply one sample to actual garment fabric before bulk approval.
- Keep one signed golden sample at the factory and one duplicate with the buyer.
Set Production Tolerances and AQL Defect Classes
After sample approval, freeze the variables that affect bulk consistency: thread brand and color code, base fabric, backing type, edge method, finished size, packing unit, and lot label format. A mid-run backing change can make the last 4,000 pieces feel stiffer than the first 4,000 even when the artwork is unchanged.
For embroidered patches under 100 mm, a realistic finished-size tolerance is ±1.0 mm. For patches over 120 mm, ±1.5 mm is more practical. Border position tolerance is usually ±0.5 to 0.8 mm, depending on shape complexity. Heat-seal film should not protrude beyond the edge. A practical rejection point is visible film exposure over 0.5 mm or any adhesive that can contact the heat press plate.
Many uniform buyers use ANSI/ASQ Z1.4 general inspection level II with AQL critical 0, major 2.5, minor 4.0. For an 8,000-piece lot, general level II commonly leads to sample code L, or 200 sampled pieces, under standard single-sampling tables. Exact accept and reject numbers should follow the edition named in the PO. Defect classes must be agreed before production, not negotiated after a claim.
| Defect | Classification | Acceptance guidance |
|---|---|---|
| Wrong logo, shape, or department version | Critical | Reject affected units; branding errors cannot be repaired reliably |
| Wrong backing or missing heat-seal film | Critical | Reject if construction differs from PO or signed sample |
| Edge fray over 2 mm | Major | Reject, especially for wash uniforms and canvas bags |
| Finished size outside tolerance | Major | Reject if sewing templates or placement guides are affected |
| Border offset over agreed tolerance | Major | Reject when visible at arm’s length |
| Loose thread under 2 mm | Minor | Accept or trim if edge strength is not affected |
| Backing wrinkle not visible after sewing | Minor | Accept if attachment performance remains unchanged |
Pack for Decorators and Lot Traceability
Uniform patches rarely need retail packaging. They need packing that keeps edges flat, supports counting, and prevents department mix-ups at the decorator. Loose bulk packing can deform merrowed edges. Over-compressed cartons can crease heat-seal patches or mark PVC surfaces. Poor carton labels can send the wrong badge to the sewing line.
A practical export pack is 50 or 100 pieces per inner polybag, then 2,000 to 4,000 pieces per carton for 75 mm embroidered patches, depending on thickness and backing. Keep carton gross weight below 15 kg where possible to reduce compression damage and handling risk. Each inner bag should show design code, version, backing type, quantity, PO number, production lot, and inspection status.
If patches are distributed to multiple garment suppliers, regions, stores, or departments, provide the allocation list before final packing. Sorting after cartons are sealed adds labor, delays shipment, and increases the chance of mixed lots. For similar-looking department badges, add a printed carton mark and an inner-bag color sticker so decorators can verify the version before sewing or pressing.
Write the PO So the Factory Builds the Same Patch Twice
The purchase order should specify the approved construction, not just “custom embroidered patch.” A clean line item reads: 75 mm wide embroidered uniform patch, merrowed border 2.8 mm ±0.5 mm, finished size tolerance ±1.0 mm, 80 to 120 gsm non-woven backing, sew-on construction, thread colors per signed sample, no loose thread over 2 mm, packed 100 pieces per labeled polybag, inspected to ANSI/ASQ Z1.4 general level II, AQL critical 0, major 2.5, minor 4.0.
For heat-seal patches, add the tested press window and fabric limitation: TPU heat-seal film 0.15 mm nominal, validated on buyer-supplied polyester softshell at 160°C, 15 seconds, medium pressure, no edge lift over 1 mm after five wash cycles. If the garment supplier changes fabric, coating, press equipment, or wash process, require a new application test before release.
Before releasing the 8,000-piece order, send the factory the final vector file, target size, Pantone or thread references, garment fabric details, attachment method, wash requirement, packing allocation, and inspection standard. If fabric compatibility is still uncertain, approve an engineering sample before bulk production. The extra 5 to 8 days is usually less expensive than removing failed patches from finished uniforms.
Have a project? Send your artwork and target quantity and we’ll reply with a detailed quotation within 12 working hours.
Ready to get this made?
Send your sketch, target quantity and ship-date. Detailed quotation in 12 hours.


