How to Specify Packaging Inserts That Protect Promo Products
Why inserts fail in real shipments
Most packaging failures start inside the pack, not outside the carton. A pin that can travel 2 to 3 mm, a coin that can rotate in its cavity, or a keychain ring that touches the decorated face under vibration will usually show rub marks, edge dents, or bent hardware long before the outer box looks damaged. In practice, the problem is almost always excess internal movement combined with a hard contact point.
For promo products, the insert has to do three things at once: immobilize the item, present it cleanly, and survive transit compression, humidity, and repeated handling. If the insert is underspecified, the factory will default to the fastest and cheapest structure that meets the drawing at a glance. That is why a product can pass photo approval and still fail in bulk freight.
We see the same pattern across pins, challenge coins, keychains, magnets, and lanyards: the product spec is detailed, but the packaging spec is vague. Buyers define plating, fill, backing, and artwork, then leave cavity depth, foam density, surface finish, and retention force open. That gap becomes damage, rework, and avoidable freight claims.
Start with the product envelope, not the outer box
The insert should be designed around the product’s real envelope, including protrusions and fragile edges. A flat nominal size is not enough. A 38 mm challenge coin with a raised rim and a protective capsule needs a different cavity than a 38 mm coin with a flat edge. A 32 mm enamel pin with a 10 mm post and butterfly clutch needs rear clearance so the post does not bottom out and emboss the card or foam.
Write the spec around four measurements: finished size, maximum thickness, highest protrusion, and the most sensitive contact surface. For most small promo items, a controlled clearance of 0.5 to 1.0 mm per side is a practical starting point for rigid trays. For delicate plated surfaces or polished epoxy, keep the contact points smooth and avoid sharp die-cut edges inside the cavity.
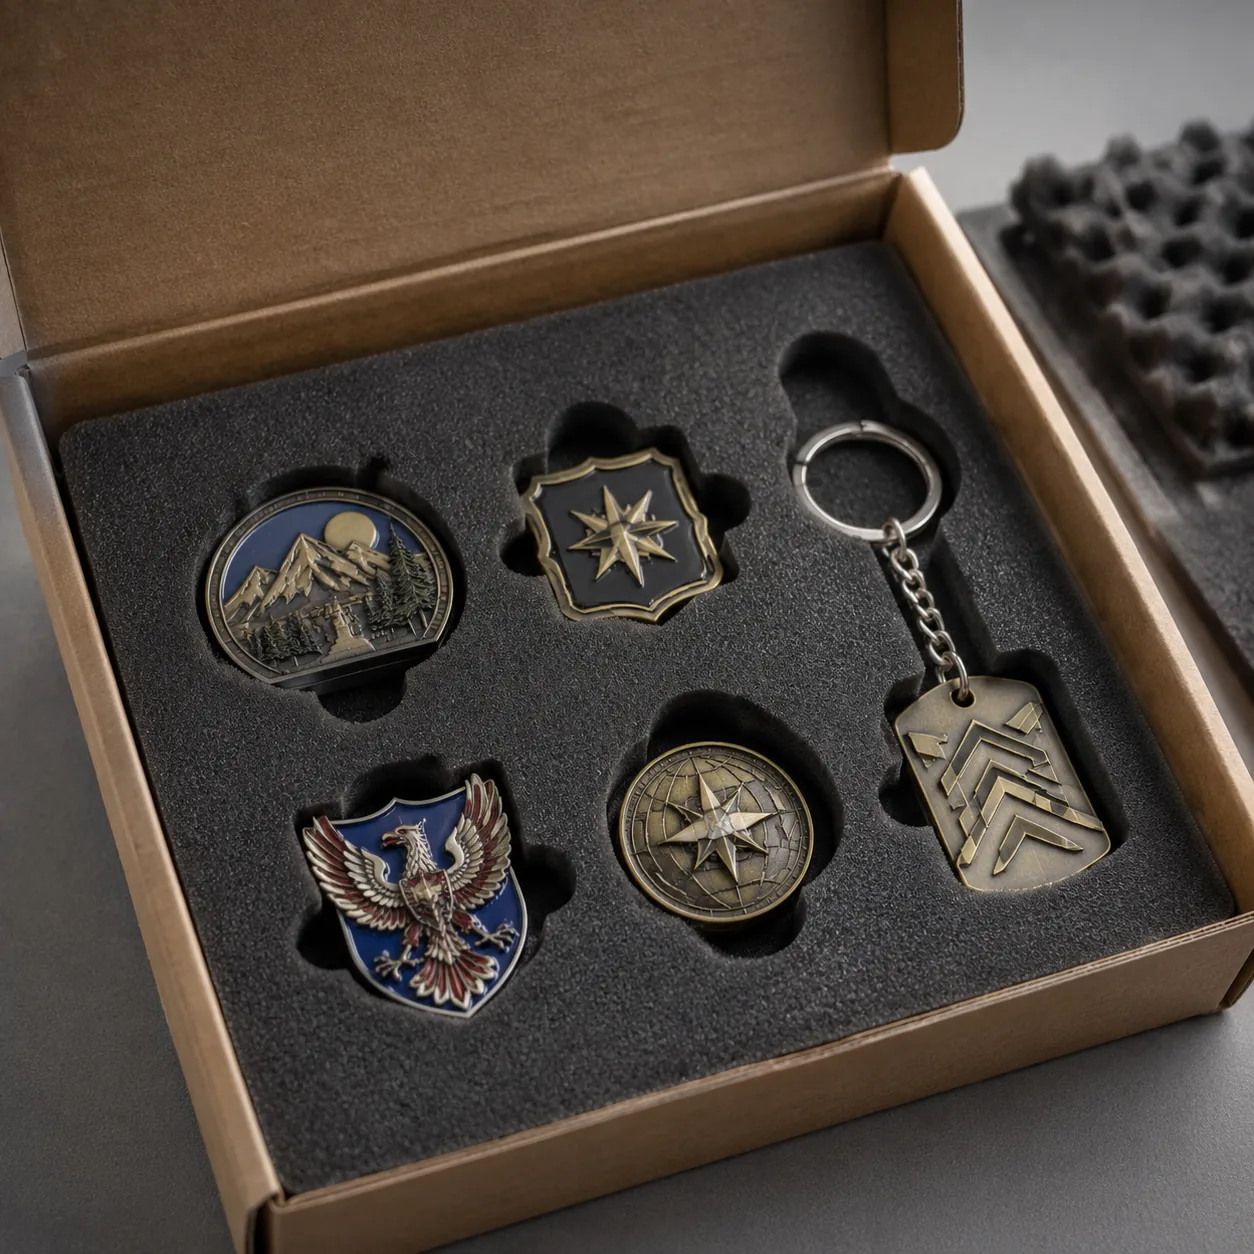
Use product-specific cavities for mixed sets. A pin, coin, and keychain can share one outer box, but they should not share one undivided pocket unless their height, weight, and finish are nearly identical. Shared cavities are where ring hardware scratches a mirror finish and where small items migrate during transit. If one insert must hold multiple items, separate them with partitions or a two-layer structure.
A concrete example: a 45 mm coin set in a rigid presentation box may use a cavity of 45.6 to 46.0 mm, with a depth allowance of 3.5 to 4.0 mm for the coin plus any capsule lip, and a smooth retention lip that limits lateral movement to under 0.5 mm. A 20 x 25 mm pin card may only need a shallow die-cut window and a rear backing card, but the post area still needs a protected recess.
Choose the material by protection, appearance, and route
The right insert material depends on how much shock control, surface protection, and presentation quality the item needs. Paperboard is suitable for lightweight cards and low-cost display packs. EPE foam handles anti-rattle protection well. EVA gives cleaner edges and better dimensional stability. Molded pulp works when recycled content and lower tooling cost matter more than precision. For premium retail sets, flocked board or velvet-laminate board gives the cleanest appearance but raises unit cost and moisture sensitivity.
For plated metal products, surface softness matters as much as fit. A hard pocket that holds the item tightly can still scratch if the cavity edge is rough, compressed, or laminated poorly. If the product has mirror plating, domed epoxy, or polished enamel, specify a smooth contact skin and avoid exposed kraft fibers inside the cavity. On long ocean routes, especially into humid climates, thin paperboard can warp enough to loosen retention, so a more stable foam or laminated board is often the safer choice.
Material choice also changes the production method. Die-cut board is fast and inexpensive. Foam inserts need cutting tools or hot-mold tooling, depending on geometry. Molded pulp usually requires a molded shape and more tolerance room. If the item is for a gift set or retail display, appearance can justify higher unit cost. If it is a giveaway pack, the cheapest structure that still meets drop performance is usually the right answer.
| Insert material | Typical thickness / build | Best use | Typical FOB impact | Main trade-off |
|---|---|---|---|---|
| Paperboard 300-400 gsm | 0.35-0.55 mm | Backing cards, sleeves, light display | USD 0.02-0.08/unit at 5,000+ pcs | Low shock protection |
| EPE foam | 1.5-3.0 mm | Pins, magnets, light coins | USD 0.04-0.15/unit at 3,000+ pcs | Less premium appearance |
| EVA foam | 2.0-5.0 mm | Coins, keychains, mixed sets | USD 0.10-0.35/unit at 3,000+ pcs | Higher tooling and material cost |
| Molded pulp | 0.8-1.5 mm wall | Eco mailers and value-driven kits | USD 0.08-0.22/unit at 5,000+ pcs | Less precise fit |
| Flocked board / velvet card | 0.8-2.0 mm build | Premium retail presentation | USD 0.20-0.60/unit at 1,000+ pcs | Moisture sensitivity and higher cost |
Set cavity depth and retention so the item cannot drift
The most common failure is a cavity that is either too shallow or too deep. Too shallow and the product is crushed or bowed; too deep and it rattles. For rigid metal goods, start with 0.5 to 1.0 mm side clearance, then add a retention feature that controls movement without scuffing the finish. That retention may be a die-cut slit, a stepped pocket, a top card layer, or a molded lip.
Depth must account for protrusions, not just face thickness. A pin with a 10 mm post may need a rear recess or foam relief so the hardware never bottoms out. A keychain with a split ring needs a side channel or dedicated hardware pocket so the ring does not scrape the decorated face. For lanyards, the folded strap radius and clip orientation matter more than the printed strap width; if the fold is too tight, the crease becomes permanent and the bundle looks sloppy at unpacking.
The practical target is controlled restraint, not a vise grip. A good retail insert usually allows removal with one hand while still keeping movement under 1 mm in transit. If the item must be pried out, the cavity is too tight. If it falls out when the carton is inverted, the cavity is too loose. Ask the supplier to show the item surviving a 1 m drop, then check for rub marks and hardware shift after the test.
For example, a 38 mm coin in a velvet board tray might use 0.3 to 0.6 mm side clearance, 3.5 mm cavity depth, and a centered thumb notch that prevents edge bending during removal. A 40 mm acrylic magnet with a print face might need a flat support area, a 1.0 mm perimeter gap, and no exposed corner pressure points at all.
Use measurable tolerances, not generic “fit well” language
Insert dimensions need tolerances just like the product itself. If you only specify the nominal cavity size, the cutter or mold supplier can drift enough that one batch fits snugly and the next batch is loose. For paperboard die-cuts, a practical target for critical cavity dimensions is often ±0.5 mm, with ±0.3 mm preferred on premium or heavy items. For foam, ±0.2 to ±0.4 mm is realistic when the tooling is controlled and the foam density is stable.
You should also define allowable movement. A useful way to write the spec is: no free lateral movement greater than 1 mm, no axial lift greater than 0.5 mm, and no contact between the decorated face and hard edges during a 1 m drop test. If the item is heavy or has a polished edge, tighten those numbers. A 70 g coin or a keychain bundle can create enough momentum to bruise the cavity edge even if the movement looks small in the sample.
AQL matters as well. For packaging inserts, many buyers use AQL 2.5 for major defects and AQL 4.0 for minor defects, with a separate zero-tolerance list for cracked boards, open seams, missing cavities, wrong print, or excessive warpage. If the insert is cosmetic and retail-facing, some programs tighten major defects to AQL 1.5. The point is to define what fails inspection before mass production starts.
The table below gives starting points for common promo products. Treat these as engineering baselines, not universal rules. The item weight, plating hardness, carton size, and shipping route still matter.
| Product | Recommended insert approach | Starting fit target | Typical FOB range |
|---|---|---|---|
| Enamel pin 20-40 mm | Flocked card or foam pocket | 0.5-1.0 mm side clearance, 0.3-0.5 mm movement max | USD 0.03-0.12/unit |
| Challenge coin 38-45 mm | Foam or rigid tray cavity | 0.3-0.8 mm side clearance, 0.5 mm lift max | USD 0.08-0.28/unit |
| Keychain set | Foam tray with hardware channel | Separate face and ring zones, no face contact | USD 0.10-0.35/unit |
| Fridge magnet | Paperboard or foam window | Flat support, no edge curl, no corner lift | USD 0.02-0.10/unit |
| Lanyard bundle | Sleeve or folded board insert | Controlled fold radius, strap shift under 2 mm | USD 0.03-0.15/unit |
Build for assembly speed and realistic MOQs
A good insert must work on the line, not just in CAD. If it takes too long to load, the factory will improvise: it may skip the retention layer, overfill the cavity, or replace a formed insert with loose filler. That is where sample quality and bulk quality diverge. The best packaging design is the one the line can repeat at speed without operator judgment calls.
Think in terms of loading method. Hand-loading can support more complex shapes and premium presentation, but labor rises quickly above 1,000 to 3,000 sets. Machine-loading favors simple geometry, fewer orientation steps, and larger lead tolerances. For many promo programs, the MOQ for a basic die-cut board insert starts around 1,000 to 3,000 pcs, while custom foam or molded pulp often starts at 3,000 to 5,000 pcs because tooling and setup need to be spread across volume.
Typical lead times also vary by structure. Simple printed cards or sleeves can often be sampled in 5 to 7 days and mass-produced in 12 to 18 days after approval. Custom foam trays or multi-part rigid inserts usually need 7 to 10 days for sampling and 18 to 30 days for production, depending on tooling complexity and print finishes. If the order includes special lamination, flocking, or metalized film, add a few days for material procurement and drying.
A practical approval set should include one physical pre-production sample, one packed transit sample, and one bulk reference sample signed off by both buyer and factory. If the sample looks good but cannot be loaded consistently, the structure is not ready. A good spec should let the line achieve at least 95% first-pass packing without rework.
Know the cost drivers before you approve the final structure
Insert cost is driven more by geometry, finish, and labor than by raw material alone. A simple printed backing card can cost only a few cents per unit at volume, while a multi-cavity EVA tray with a printed top layer can add meaningful cost to the FOB price. If the product itself is low value, the insert can easily become the largest packaging line on the quote.
As a working range, a basic card sleeve or backing card may add USD 0.02 to 0.08 per unit at 5,000 pieces or more. Custom foam or rigid presentation trays often land around USD 0.10 to 0.35 per unit at 3,000 pieces, while more elaborate gift-style structures can reach USD 0.40 to 0.80 per set if they require manual assembly, special lamination, or multiple components. These are FOB ranges before inland freight, cartonization, and any special QC labor.
Tooling is another hidden cost. Die-cut board usually has low setup cost and faster changeovers. Foam tooling, molded pulp tooling, and rigid specialty trays can require dedicated dies or molds, which should be amortized over the program length. If you expect reorders, lock the cavity drawing, material grade, and print spec early so the factory does not quietly substitute cheaper stock on the next run.
For concrete sourcing, ask for a quote that separates material, tooling, printing, assembly, and packing labor. That makes it easier to compare suppliers and to see whether a lower unit price is really a thinner material or a looser fit. A good quote should also state the defect standard, not just the price.
Approve with a physical checklist, not a render
Before production, confirm the insert the same way you confirm artwork or plating: with a physical sample that has been packed, shaken, dropped, and reopened. A render cannot show fiber roughness, cavity rebound, or how the hardware behaves after vibration. Ask for a sample built to final material thickness, final print method, and final assembly method, then test it under realistic handling conditions.
- Confirm finished product size, maximum thickness, highest protrusion, and surface sensitivity.
- Specify insert material, board thickness or foam density, and visible surface finish.
- Define cavity size, depth, allowable movement, and retention method in millimeters.
- State tolerance targets and the defect standard, such as AQL 2.5 major / 4.0 minor.
- Request a packed physical sample, not only artwork or a 3D render.
- Run drop, shake, and carton-compression checks before approval.
- Lock the approved spec for reorders so the factory cannot substitute materials silently.
If you want the safest buying path, treat the sample like a shipment, not a showroom prop. Build it exactly as bulk production will be packed, inspect it after handling, and reject any structure that scratches, loosens, or slows the line. That discipline usually costs far less than one damaged inbound lot.
Have a project? Send your artwork and target quantity and we’ll reply with a detailed quotation within 12 working hours.
Ready to get this made?
Send your sketch, target quantity and ship-date. Detailed quotation in 12 hours.


