How to Specify Packaging Inserts for Custom Promo Products
Why inserts cause more damage than the outer box
A lot of promo-product buyers treat the insert as decoration, but in practice it controls movement, surface contact, and first impression. If a pin, coin, keychain, or set can shift inside the package, you get edge wear, plated-surface scuffs, resin scratches, and transit noise. Even when the outer carton survives, loose packaging makes a premium item feel cheap the moment the box is opened.
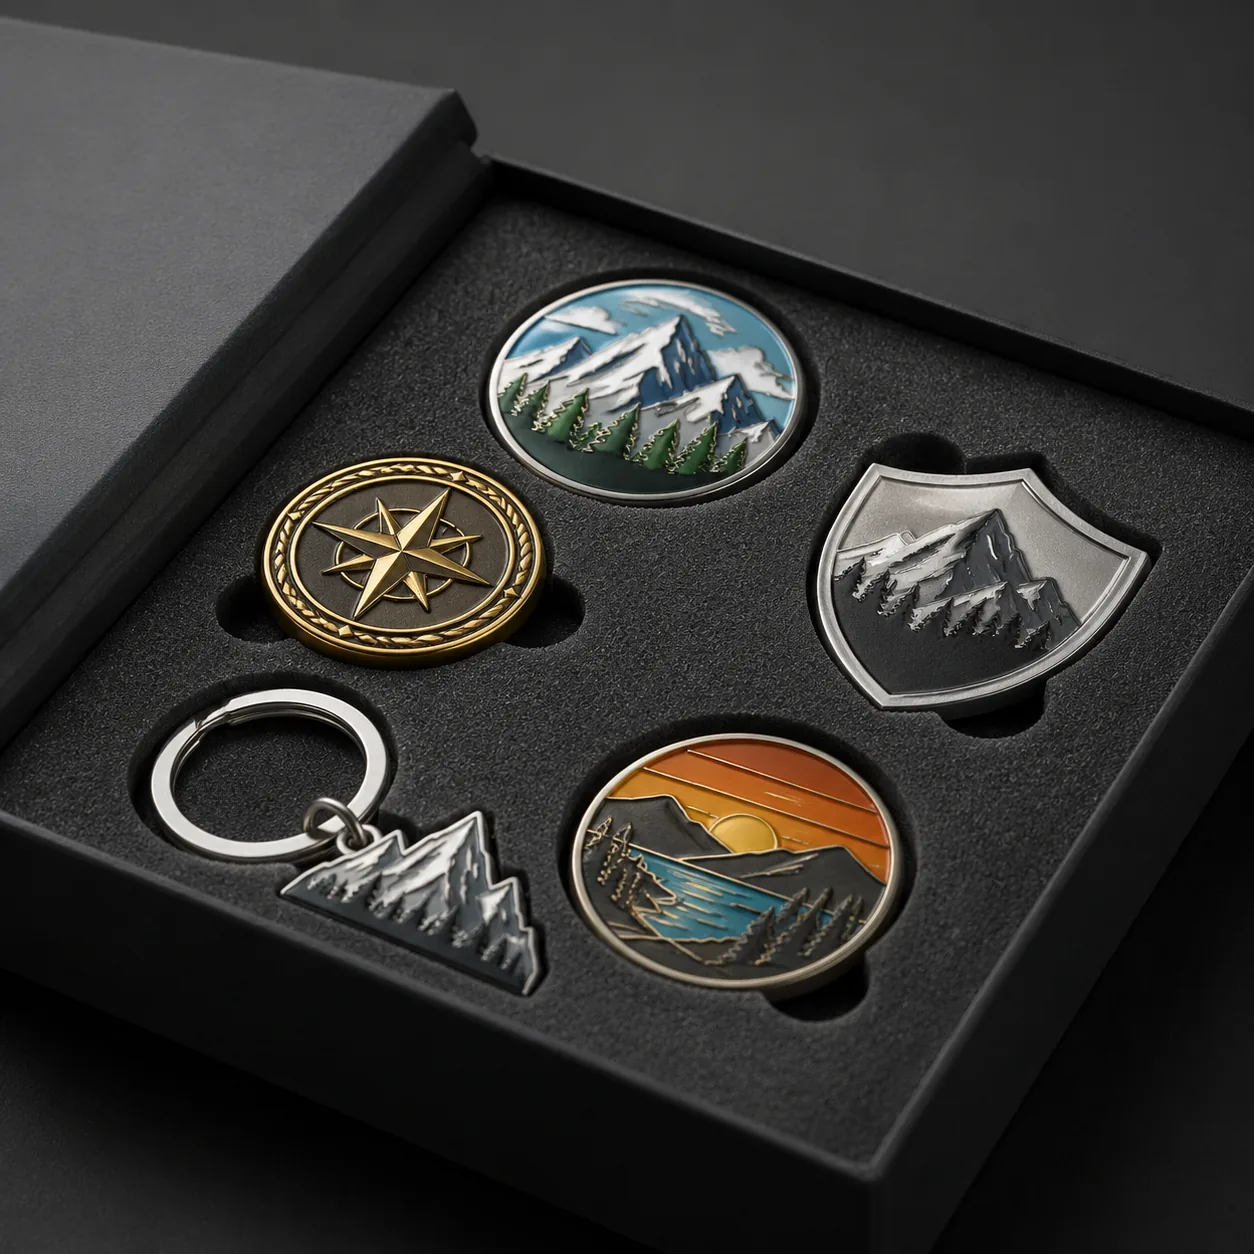
The most common mistake is assuming one insert style fits every SKU. A 30 mm enamel pin with a butterfly clutch needs a different cavity than a 45 mm challenge coin in a velvet tray or a two-piece set with a lanyard and badge. The insert has to match the item’s mass, thickness, attachment points, and opening direction; otherwise you are paying for packaging that looks custom but performs like filler.
For international buyers, this is not only a presentation issue. Insert specs affect carton utilization, packing speed, and rework risk, especially when you ship mixed SKUs or reorder months later from a different production slot. At ZheCraft, we treat the insert as part of the product spec, not an afterthought, because a well-locked item reduces claims more reliably than upgrading the outer carton alone.
Choose the insert material by product type
The right material depends on whether the item needs cushioning, positioning, or both. Paperboard inserts work well for light items such as single pins and flat keychains when the cavity is tight and the package will not see heavy compression. EVA foam is better for rigid positioning and deeper pockets, while flocked paper or velvet-lined trays are used when the buyer wants a more gift-like presentation and can accept higher cost.
For heavy or polished metal items, low-friction contact surfaces matter. Bare corrugated die-cuts are acceptable for freight protection but poor for presentation because they can abrade plating and collect dust. A thin velvet or flock layer, usually 0.5 to 1.0 mm on the face, improves appearance, but it must be cut cleanly or fibers will shed into the cavity. Ask for a fiber-shed limit of no visible loose lint after one tap test, and keep flock density consistent across the sheet so the cut edge does not fray.
If the package will travel through humid climates, avoid inserts that absorb moisture too easily. Standard greyboard and some low-grade paper foams can warp, which opens gaps and allows movement after packing. For export programs, common starting points are 800 to 1200 gsm paperboard for light items, 1.5 to 3.0 mm EVA for moderate protection, and laminated chipboard or molded trays for multi-item sets that need repeatable positioning. When the product is plated or painted, ask for a contact-surface tolerance of plus/minus 0.3 mm on foam thickness so the cavity does not change shape after compression.
Use fit dimensions that stop movement
Insert cavities should not be measured by product name; they should be measured by the actual outer envelope of the finished item. A 25 mm enamel pin may need a 27.0 to 27.5 mm cavity when you include clutch tolerance, plating buildup, and resin edge variation. A rigid coin capsule may need a tighter diameter but a deeper seat. The goal is controlled compression, not a loose pocket that rattles during vibration or a crush fit that marks the face.
As a rule, allow 0.5 to 1.0 mm lateral clearance for rigid metal items when the insert material has enough grip, and 1.0 to 1.5 mm when the cavity is paper-based and less precise. Depth tolerance matters too. If the item sits too high, the lid can press on enamel, epoxy domes, or printed surfaces. If it sits too low, the item shifts and the visual centerline is lost. For mixed sets, specify each cavity depth separately rather than asking for one universal recess.
The closure method also changes fit. A magnetic box can tolerate slightly more pocket tolerance because the lid compresses the insert, while a tuck box or sleeve needs the insert to lock the contents before closing. If you are shipping keychains with chains, rings, or lobster clasps, leave controlled space for the hardware so it does not create pressure points against plated faces or resin domes. For multi-piece sets, ask the supplier to define the cavity based on the thickest item plus 0.5 mm clearance, then shim lighter items with paperboard or foam bridges rather than oversizing the whole tray.
Buyers should also specify dimensional acceptance, not just a drawing. For die-cut paperboard, a practical tolerance is plus/minus 1.0 mm on outer size and plus/minus 0.5 mm on cavity location. For EVA or molded inserts, plus/minus 0.5 mm on cavity location and plus/minus 0.3 mm on depth is a better target. If the item is highly polished, ask for a sample that passes a 30-second vibration shake without visible lateral movement and without surface rub marks.
Compare common insert constructions
Different insert constructions solve different problems, and the cheapest one is not always the lowest-risk choice. The table below is a practical buyer comparison for common promo-product programs. It focuses on how each insert behaves in production, shipping, and presentation rather than retail-style marketing language.
| Insert type | Typical use | Main trade-off |
|---|---|---|
| Die-cut paperboard | Light pins, flat badges, simple sets | Lowest cost but weaker cushioning and a less premium feel |
| EVA foam | Pins, coins, keychains, rigid sets | Better hold, but higher tooling and material cost |
| Flocked paper / velvet-lined tray | Gift-style presentations, premium coin sets | Looks strong, but moisture and fiber control matter |
| Vacuum-formed tray | Multi-item kits, repeat orders | Excellent repeatability, but higher mold cost |
| Corrugated insert | Bulk shipping protection | Good for transit, poor for display and fine finishes |
For most B2B promo programs, paperboard and EVA cover the majority of needs. Vacuum-formed trays become attractive when the same set is reordered many times because cavity shape stays consistent and packing speed improves. Velvet-lined trays should be reserved for launches, awards, and executive gifts where the unboxing moment justifies the extra cost and handling discipline. If the item has a mirror finish, coin frosting, or soft enamel, specify a non-abrasive contact layer and reject any rough die-cut edge that can catch plating.
In practical factory terms, paperboard inserts are usually the best option when the product weighs under 40 g and the cavity depth is shallow. EVA is more reliable when the item is 40 to 120 g, has sharp edges, or includes hardware that can swing. Vacuum-formed PET or PVC trays fit best when the SKU is stable, the order quantity is repeated, and the buyer wants the same seat geometry every time. For export programs above 5,000 units, repeatability matters more than a low sample cost.
Specify print, color, and branding details clearly
The insert often carries the first brand impression before the item itself is even touched. If you want a logo, slogan, QR code, or campaign line printed on the insert, specify the print method, artwork placement, and acceptable color variance just as carefully as you would for the product. A generic note like “print logo on insert” leaves too much room for supplier interpretation, especially when the artwork sits near a fold, cut edge, or glue zone.
For paper inserts, ask for CMYK print unless you need exact spot-color matching on a brand-critical campaign. If the insert is small, keep text at least 5.0 to 6.0 mm high so it remains legible after lamination or die-cutting. On dark or textured materials, white underprint may be needed to stop the logo from sinking into the background, but that adds cost and can extend lead time by 2 to 4 days.
If the package includes a backing card or certificate, treat it as a separate component with its own size and finish spec. Many buyers overlook the fact that a glossy card can reflect light and make the item appear misaligned in photos, while matte stock hides fingerprints and is more forgiving for manual packing. For high-volume launches, keep insert artwork fixed across replenishment orders so you do not create mismatched reorders later. A useful print spec includes bleed, safe zone, paper weight, finish, and a clear file version number so the factory does not remix old artwork into a repeat run.
When branding matters, define acceptable color variance in practical terms. For most non-retail promo work, a Delta E of under 3.0 is usually acceptable on a standard matte stock, while spot-color critical programs should request a signed approval sample. If the insert sits under a clear lid, ask for glare-safe inks or a matte laminate; otherwise the package may photograph well in person but look uneven in ecommerce images.
Lock production specs before you approve samples
Before mass production, the sample should confirm not just appearance but seating force, release behavior, and pack-out consistency. The insert should hold the item through a simple shake test without visible movement, but it should not require excessive force to remove, or the packer will distort the tray and slow line speed. A good sample is one where the product can be inserted and removed cleanly at least 10 times without tearing, fraying, or losing shape.
Use a sample checklist that forces the factory to prove the fit, not just show a pretty mockup:
- Measure finished product dimensions, not nominal design sizes
- Specify cavity width, depth, and acceptable clearance
- Confirm whether the insert must hold one item or a full set
- State the required print method and exact artwork version
- Request a packed sample with outer carton if shipping damage matters
- Define the pack-out test: shake, drop, and compression checks
- Approve one golden sample for every SKU or packaging family
If your order contains multiple styles, approve the hardest-to-pack item first. The largest coin, thickest pin, or bulkiest keychain usually determines the insert geometry, and the rest of the set can be shimmed or nested around it. That approach reduces the chance of approving a beautiful insert that fails once the actual hardware arrives in bulk.
For acceptance testing, a simple buyer standard works well: one 60-second vibration test, one 80 cm corner-drop test on a packed sample, and a compression check that simulates stacking under 10 to 12 kg of carton weight. If the item shifts, marks the lining, or changes orientation after those tests, the cavity is too loose or the contact material is too soft. Put that standard in the RFQ so the factory knows the pass/fail criteria before tooling starts.
Control cost without weakening protection
Packaging inserts have a clear cost ladder, but the cheapest option can become expensive if it drives defects or customer complaints. A simple paperboard insert might add only a few cents per unit at FOB, while EVA or velvet-lined constructions can push cost higher depending on size, cut complexity, and print coverage. For low-value giveaways, over-specifying the insert is wasteful; for premium sales kits, under-specifying it usually costs more in claims and remakes than the upgrade would have cost upfront.
Lead time is another hidden cost. Simple die-cut inserts can often be produced within 5 to 10 days after artwork confirmation, while vacuum-formed trays, laminated structures, and custom tooling may extend to 12 to 20 days depending on sample approval and material availability. If your campaign date is fixed, ask suppliers to separate insert tooling time from product production time so packaging does not become the critical path.
Use the table below as a rough buyer guide for common FOB bands and production considerations. These ranges are practical working estimates for standard export orders, not promises for every factory or every city.
| Insert setup | Typical FOB add-on per unit | When it makes sense |
|---|---|---|
| Paperboard die-cut | USD 0.03 to 0.10 | Single pins, flat badges, simple promo giveaways |
| EVA foam insert | USD 0.08 to 0.25 | Rigid items that must not move in transit |
| Flocked / velvet tray | USD 0.20 to 0.60 | Gift sets, awards, premium presentation |
| Vacuum-formed tray | USD 0.15 to 0.40 after tooling | Repeat programs with stable SKUs |
MOQ also changes the economics. Paperboard inserts are often practical from 500 to 1,000 pieces per artwork version, EVA from 300 to 500 pieces depending on cut size, and vacuum-formed trays usually need 1,000 to 3,000 pieces to amortize tooling. For small pilot runs, a flat die-cut or one-piece foam insert often beats a molded tray even if the unit price is slightly higher, because it avoids mold cost and schedule risk. If a supplier quotes a very low MOQ on a complex tray, ask whether they are charging the tooling separately or quietly using a generic cavity.
A useful procurement tactic is to compare total landed cost, not FOB insert cost alone. A 5-cent insert that causes 3 percent rework, 2 percent claims, or extra manual packing can be more expensive than a 20-cent insert that runs cleanly at line speed. For programs shipping 10,000 units, even a 1-second reduction in pack time per unit can offset the higher insert cost if labor is the bottleneck.
What to do next
Start by listing every item that will share the package, then measure the finished dimensions of the heaviest and most fragile piece. Choose the insert material based on how the item needs to be held, not on how premium the packaging sounds in a catalog. Then ask your supplier for a sample that includes the exact cavity size, print version, and pack-out method, because that is where most hidden problems appear.
If you are sourcing pins, coins, keychains, patches, or lanyards together, keep the insert spec in the same RFQ as the product spec. That gives the factory one reference point for product sizing, cavity depth, artwork placement, carton count, and acceptance criteria, which reduces rework across the whole set. At ZheCraft, we can build the product and the insert together so the cavity, fit, and packaging all match the final production dimensions instead of the drawing only.
Have a project? Send your artwork and target quantity and we’ll reply with a detailed quotation within 12 working hours.
Ready to get this made?
Send your sketch, target quantity and ship-date. Detailed quotation in 12 hours.


