How to Specify Mixed Finish Promo Sets Without Mismatched Results
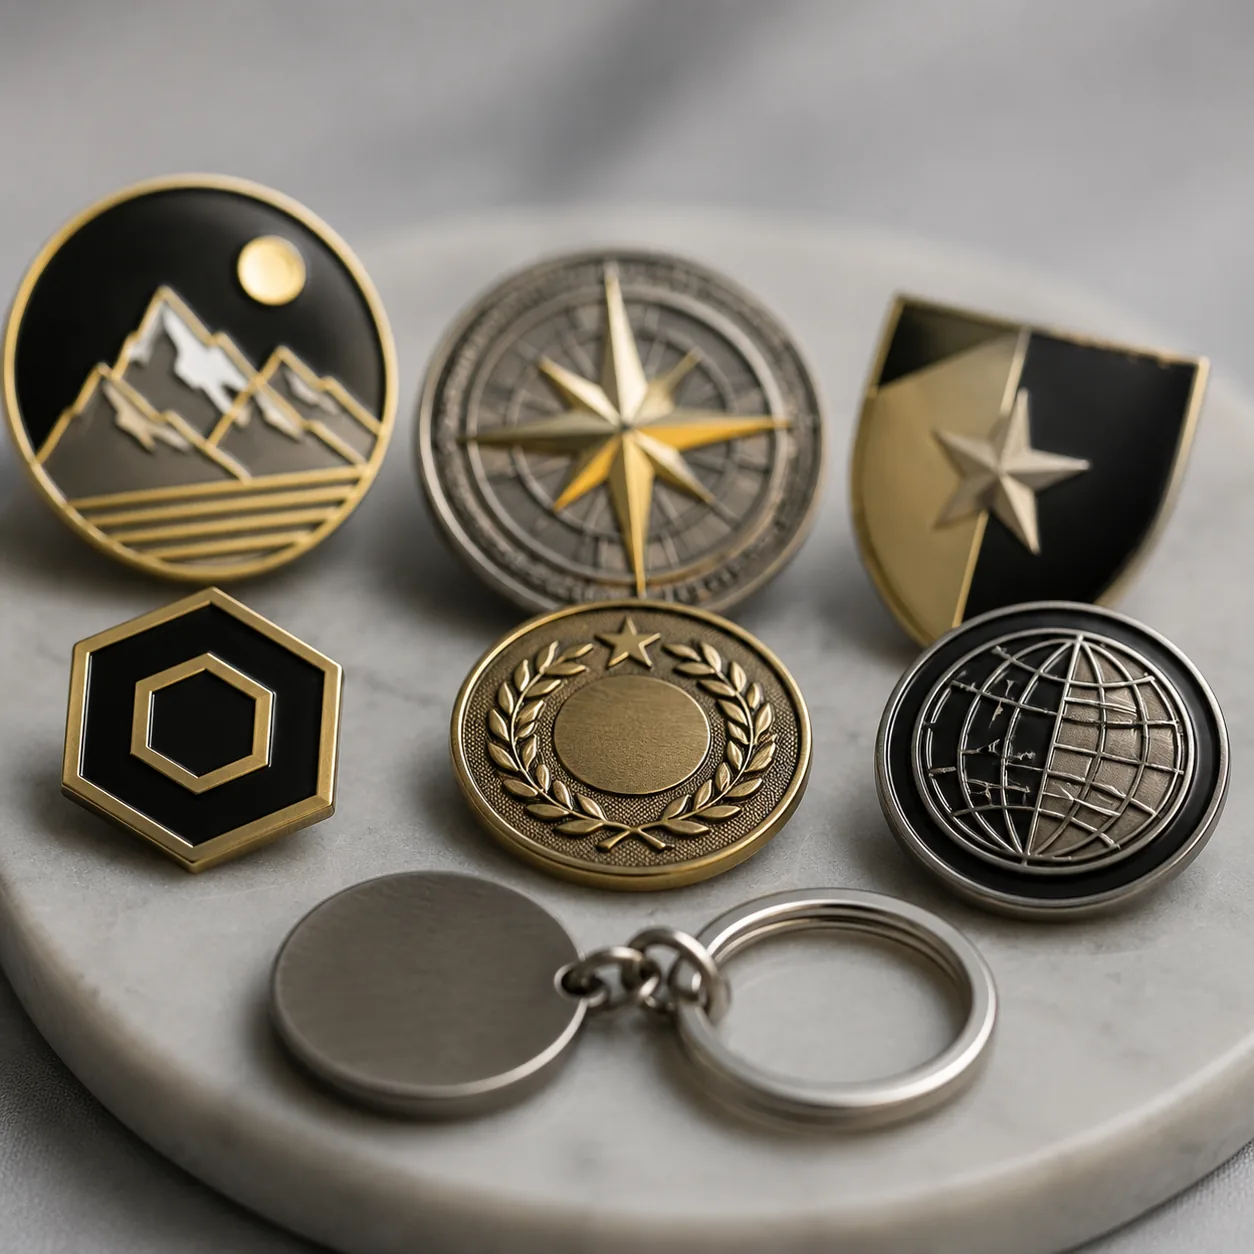
Why mixed promo sets go wrong
The main failure mode in mixed promo sets is not one weak supplier. It is a fragmented spec sheet that treats a pin, patch, keychain, and lanyard as unrelated items instead of parts of one visual system. When buyers approve each SKU in isolation, they often miss the real problem: the items do not read as one collection under the same lighting, at the same distance, and inside the same package.
A kit can fail even when every component passes basic inspection. A nickel pin may be technically correct, a lanyard print may be on-register, and a patch may hit the Pantone target on paper, but the set still looks inconsistent if the gloss levels, black density, and metallic warmth do not align. In promo work, visual coherence is a quality requirement, not a styling preference.
Start with one master visual standard
Before you request quotes, define one master reference for the whole program. That should be a physical approved sample, not only a digital file. For most mixed sets, one master board with printed color chips, finish notes, and a labeled set photo is more useful than separate approvals for each item. If the design uses a brand red, dark text, and metallic hardware, those three elements should be named once and carried across every SKU.
- Lock one master Pantone reference for every color-bearing component.
- Choose one plating family for all metal parts: polished nickel, matte silver, black nickel, antique brass, antique silver, or gold.
- Define one gloss family for the full kit: high gloss, satin, or matte.
- State which surfaces may use print, fill, embroidery, woven thread, or enamel.
- Specify packaging sequence, insert position, and whether items may be swapped only with written approval.
If the set includes mixed substrates, do not demand identical appearance in a literal sense. A woven patch and hard enamel pin will never reflect light the same way, but they can still share the same color temperature, contrast level, and brand hierarchy. The target is consistent perception at normal viewing distance, not material sameness.
Use a single master spec sheet for all SKUs
The most reliable RFQ format is one master sheet with a common program header and a line item for each product. That sheet should list the shared visual rules first, then the item-specific geometry. For metal products, include substrate, plating build, topcoat, and visible finish. For printed or textile items, include art method, thread count or print resolution, and the approved sample condition. Avoid vague phrases like "good quality" or "match existing"; those terms do not survive production handoff.
For metal promo items, typical decorative plating thickness is usually in the 0.1 to 0.5 micron range for appearance layers over a strike or barrier layer, depending on base metal, wear expectations, and chemistry. Small stamped details often need tighter visual control than large flat fields, with practical dimensional tolerances around ±0.2 mm to ±0.3 mm on compact parts and ±0.5 mm on larger outlines. If the factory proposes looser limits, ask how the artwork will still align visually once the items are assembled into one kit.
| Spec area | What to lock | Practical control target |
|---|---|---|
| Color | Physical master sample plus Pantone reference | Delta E ≤ 2.0 against approved master for print, enamel, or fabric where feasible |
| Plating | Family, sheen, and decorative thickness | Same visible tone across all metal parts; decorative layer typically 0.1–0.5 µm |
| Texture | Gloss, satin, matte, grain, woven density | Match at 1 m viewing distance; no unintended shine shift between items |
| Size | Finished width, height, and thickness | ±0.2 mm to ±0.5 mm depending on item size and tooling |
| Packaging | Insert layout, item order, and label placement | Zero substitution unless pre-approved in writing |
Match color across different materials
Color control gets harder as soon as the program crosses material families. Enamel, printed PVC, woven polyester, silicone, and coated metal all render the same brand color differently. The fix is not to chase a single numerical value on every substrate; it is to set one master visual target and then specify how each material should reproduce it. For example, an enamel pin may be approved against a physical chip under neutral light, while a lanyard is approved against the same chip but with a slightly wider acceptable visual range because the weave absorbs ink differently than a flat print surface.
Concrete example: if the brand uses Pantone 186 C, a hard enamel pin may hold the color tightly, while a woven patch may need a darker thread selection to appear visually equivalent under indoor light. In that case, the spec should say the patch must match the master board at arm’s length, not that its thread must numerically equal the enamel formula. If you need transparent, glitter, glow-in-the-dark, or textured effects, isolate them to one hero piece and keep the supporting items on standard finishes. Special effects change how color is perceived even when the base pigment is correct.
Quote finish families before you commit the order
Finish is where mixed sets most often drift. Two parts can share the same artwork and still look wrong if one is bright and mirror-like while the other is muted. Buyers should compare finish families before they compare unit price, because sheen, warmth, and reflectivity affect the entire presentation. A polished nickel item beside a matte-printed insert usually looks cleaner than a black nickel item beside a low-contrast dark print, even if both are technically within spec.
| Finish choice | Best use | Typical FOB price range |
|---|---|---|
| Polished nickel | Corporate sets, crisp logos, clean presentation | USD 0.28–0.95 per piece for basic promo hardware |
| Antique brass | Heritage branding, vintage-themed kits | USD 0.30–1.05 per piece |
| Black nickel | Gaming, tech, premium dark concepts | USD 0.35–1.20 per piece |
| Matte silver | Minimal, contemporary programs | USD 0.26–0.90 per piece |
| Antique silver | Low-glare classic sets | USD 0.28–1.00 per piece |
Pricing varies by size, molding, process complexity, and add-ons, but those FOB ranges are realistic for simple promotional hardware at MOQ-friendly volumes. For mixed sets, expect small-line-item premiums if any piece needs special masking, dual plating, doming, or multiple print passes. The cheapest unit price is not always the best order structure if it creates a visibly inconsistent kit.
Set tolerances that stop one-off mismatches
The goal of tolerance language is not to over-engineer the order; it is to prevent a factory from treating each item as a separate aesthetic problem. Use tolerances that are measurable and tied to the way the set is seen in the real world. A pin that is 0.3 mm short may be acceptable if the package still reads cleanly, but a logo offset of 0.8 mm on the front-facing piece can break the visual balance of the whole kit.
- State the shared logo height or width across all items.
- Define the smallest printable or stitchable line width, not the largest artwork area.
- Require a fixed centerline or offset from the edge for every like-positioned logo.
- Specify acceptable color coverage under neutral light and warm indoor light.
- Reject any substitution in base material, plating, thread, ink, or coating without written approval.
For textiles, thread count, stitch density, and print registration matter more than a strict caliper tolerance. A woven patch may be controlled by stitch density per centimeter, while a lanyard may be controlled by print registration and edge tolerance. Common practical checks are 1.5 to 2.5 mm stitch edge tolerance on small embroidered items, and registration within 0.3 to 0.5 mm on well-controlled printed components. If a supplier promises impossible precision on soft goods, ask them to show how they will inspect it visually and not just on paper.
Approve samples as a set, not as separate SKUs
Sample control is where most mixed orders are won or lost. Inspect the entire set together first: place all items on a neutral surface, under the same lighting, with the same background. Look for shared color, finish tone, hardware color, edge quality, and package arrangement. If each item looks acceptable alone but the group looks uneven together, the production spec is not tight enough yet.
A good approval workflow uses one physical master sample, one side-by-side set photo under daylight-equivalent lighting, and one indoor-light photo that reflects the customer’s actual use case. Save both images with the PO and artwork file. That gives the factory a repeatable reference for reorders and reduces arguments about whether a later batch is "close enough." For programs with multiple reorders, ask for a retained golden sample from the first approved lot so plating and print drift can be compared against a real baseline.
Useful sample controls also include size checks and packaging checks. Confirm the carton insert keeps the items in the intended left-to-right or top-to-bottom sequence. In kits with a hero item and support items, the hero should not be visually buried by brighter hardware or heavier placement. If the packaging makes one piece dominate the presentation, the kit will feel mismatched even when every component meets its own spec.
When to split production into separate tracks
Keep the order unified when the materials, finish family, and artwork method are straightforward. Split the order when the substrates are very different, when one item uses special effects, or when one SKU has tight registration risk that could delay the whole launch. For example, a metal pin, woven patch, and lanyard can often share one program spec, but a glow enamel pin plus embossed PVC patch plus full-bleed sublimated lanyard is safer when run as coordinated but separate production tracks.
Splitting tracks usually adds 3 to 7 days to sample coordination and approval, but it can save more time by reducing remake risk. A simple same-finish kit may be ready for pre-production sample approval in 7 to 12 days, while mixed-material programs commonly need 10 to 18 days depending on tooling and artwork complexity. Typical factory lead time after approval is about 12 to 20 days for low-MOQ orders and 20 to 35 days for larger mixed programs. MOQ tiers often start at 100 to 200 pieces per SKU for basic promo hardware, 300 to 500 pieces for custom woven or printed soft goods, and 500+ pieces when multiple processes or special finishes are involved.
| Decision | Keep unified | Split into tracks |
|---|---|---|
| Simple same-finish kit | Yes | Usually unnecessary |
| Mixed substrates | Sometimes | Often better |
| Special effects | Rarely | Recommended |
| Tight launch date | Only with strong sample control | Safer if one SKU is high risk |
| High-value corporate gift | Yes, if one master set exists | Yes, if visual risk is high |
A buyer checklist for consistent promo sets
- Prepare one master board with color chips, finish notes, and a labeled set photo.
- Write one consolidated spec sheet with shared rules and item-specific dimensions.
- Ask for a pre-production sample of the whole kit, not only isolated SKUs.
- Inspect samples under daylight-equivalent and indoor lighting.
- Record approved plating family, Delta E target, and tolerance limits in the PO.
- Confirm MOQ, FOB price, and lead time for each SKU before approval.
- Save golden sample photos and keep one retained physical sample for reorders.
If you want fewer surprises, specify the shared visual rules first and quote each item against that master. Then confirm the sample as a kit, not as a pile of acceptable parts. That simple discipline is what keeps mixed promo sets looking like one program instead of a collection of near-matches.
Have a project? Send your artwork and target quantity and we’ll reply with a detailed quotation within 12 working hours.
Ready to get this made?
Send your sketch, target quantity and ship-date. Detailed quotation in 12 hours.


