How to Specify Backing Cards That Actually Sell Pins
Why Backing Cards Decide Shelf Performance
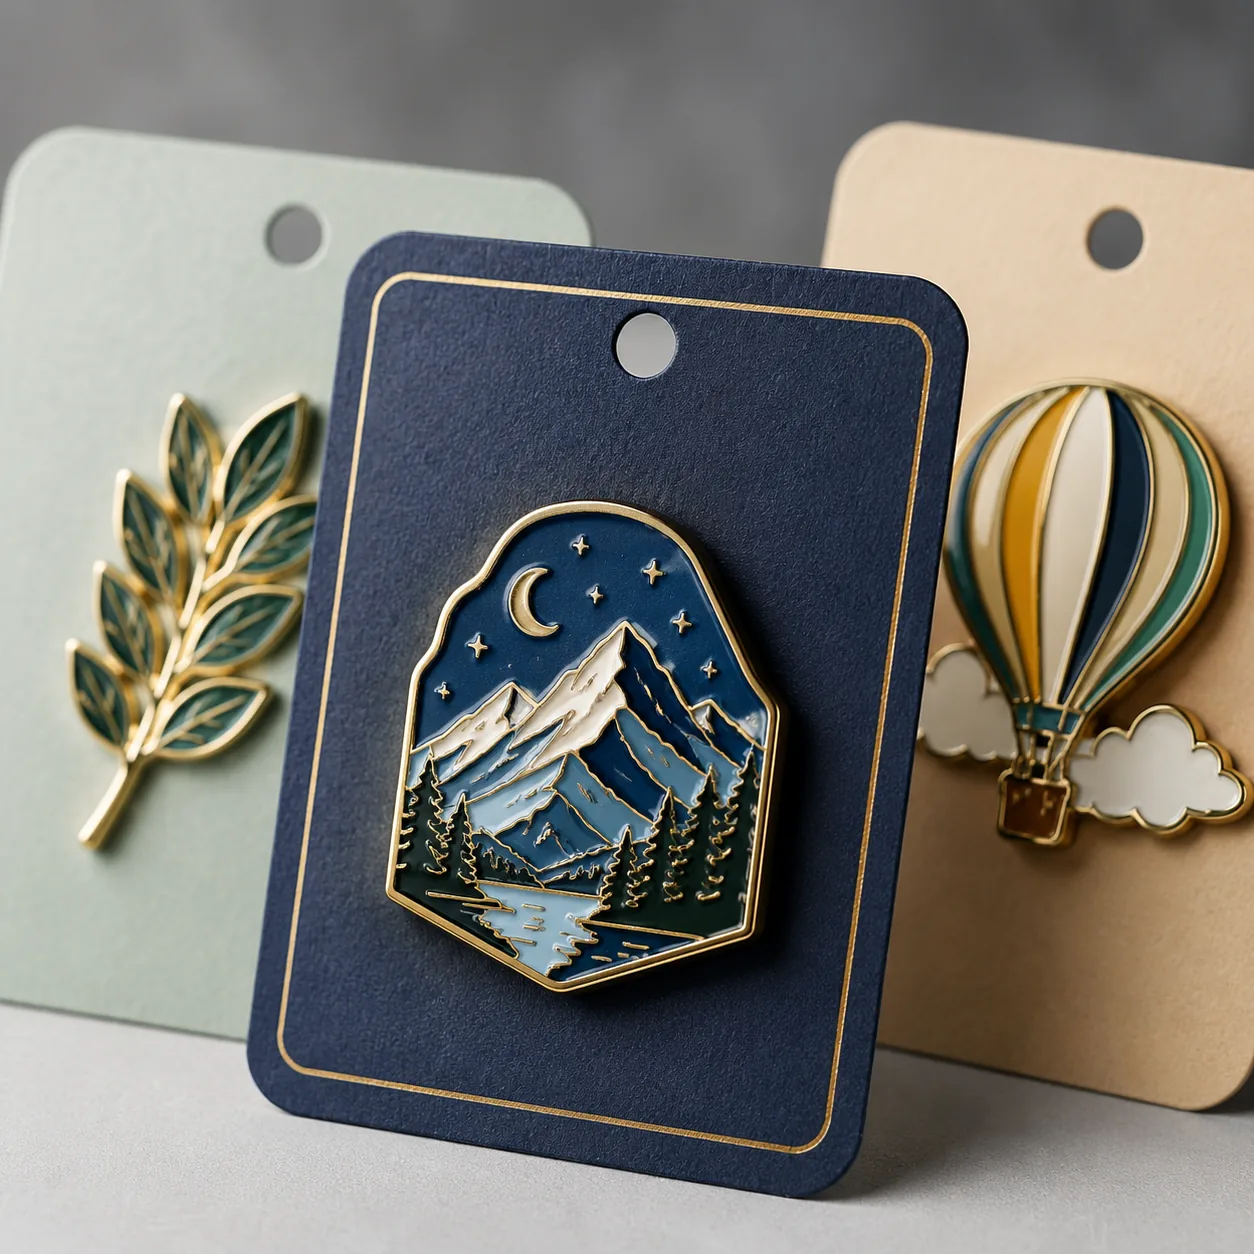
A backing card is not just a paper insert behind a pin. In retail, museum shops, event merchandise, fan launches, and corporate resale programs, it is the smallest merchandising surface in the package. It has to hold the pin securely, survive handling, carry the brand, scan at checkout, and look consistent across a peg wall. If the card bends, tears around the post, hides the enamel color, or makes the barcode hard to scan, the pin looks lower value before the customer touches it.
The card is also one of the most cost-efficient ways to raise perceived value without changing the metal pin. Moving from a thin 250 gsm card to a 350 gsm matte-laminated card with a clean hang hole often improves shelf presence more than adding another enamel color. The reverse is also true: a premium die-struck pin can look cheap if it is attached to a warped card with crowded artwork and inconsistent hole placement.
For B2B orders from 500 to 20,000 units, the card should be treated as part of the product specification. It affects assembly speed, carton volume, freight cost, retail compliance, and reorder consistency. The best results come from specifying the card around the sales channel first, then matching the paper, finish, insertion method, and tolerances to the pin hardware.
Start With the Sales Channel
A backing card for a convention giveaway has different requirements from one going into a national retail chain. A booth giveaway may only need a compact 50 x 70 mm card with a logo, QR code, and one clean post hole. A retail peg product may need an 80 x 100 mm card with a euro slot, product name, barcode, legal copy, country-of-origin marking, and enough blank area to make the pin readable from 1 to 1.5 meters away.
Before artwork begins, confirm how the product will be displayed. Single-prong peg hooks usually work with a round hole or sombrero/euro slot, while slatwall and larger retail fixtures often prefer a reinforced euro slot centered 8 to 12 mm from the top edge. If the card will sit in a counter basket or ship inside a gift box, a hang hole may not be necessary, and the top area can be used for branding instead.
Direct-to-consumer packs have another priority: transit protection. A 70 x 90 mm or 80 x 100 mm card gives more surface area for story copy and reduces bending when the pin has two posts. If the pin ships in a polybag, choose a card stiff enough to resist corner crush and post tear-out. If it ships in a rigid mailer or gift box, the card can be thinner because the outer pack carries more of the load.
Size and Stock by Pin Weight
Card dimensions should be selected from the pin size, pin weight, number of posts, and display method. Small enamel pins under 25 mm usually sit well on 50 x 70 mm or 60 x 80 mm cards. Standard retail pins from 30 to 45 mm are usually better on 70 x 90 mm or 80 x 100 mm cards. Larger brooches, multi-pin sets, and heavy die-cast items may need 90 x 120 mm cards or a rigid insert, but oversizing can make a small pin look lost if the design does not use the space carefully.
Paper weight should match the load. For lightweight soft enamel or hard enamel pins under about 8 g, 300 to 350 gsm coated art paper is usually adequate. For heavier zinc alloy pins, die-cast badges, spinner pins, or magnet-backed items from 10 to 25 g, 350 to 400 gsm is safer, especially if the card hangs exposed on a peg. For premium boxed sets or collector pins, 0.5 to 0.8 mm laminated greyboard gives stronger flatness and a more rigid hand feel, but it increases packing thickness and carton cube.
Paper thickness is not identical across mills, but common ranges are useful for RFQs. A 300 gsm coated card is often about 280 to 330 microns thick; 350 gsm is typically 330 to 390 microns; 400 gsm is roughly 380 to 450 microns. If the buyer needs a minimum stiffness or flatness, specify thickness in microns as well as gsm. For retail cards with hang holes, request grain direction parallel to the long side where possible, because it reduces curl and improves peg stability.
| Specification | Recommended range | Why it matters |
|---|---|---|
| Small pin card | 50 x 70 mm to 60 x 80 mm | Keeps low-weight pins centered without wasting display space |
| Standard retail card | 70 x 90 mm to 80 x 100 mm | Allows branding, barcode, and peg display area |
| Paper stock | 300-400 gsm coated art paper | Balances stiffness, print quality, and unit cost |
| Rigid board | 0.5-0.8 mm laminated greyboard | Improves flatness for heavy or premium packs |
| Card thickness | 280-450 microns for paper card | Useful when gsm varies by mill or coating |
| Bleed and safe zone | 3 mm bleed, 2 mm text safe zone | Prevents white edges and trimmed copy |
| Post placement tolerance | ±0.5 mm critical, ±1 mm general | Controls pin angle and repeat order consistency |
Print and Finish Choices That Add Value
Most backing cards use offset printing once volume reaches 1,000 pieces because it gives better color control, sharper small text, and lower unit cost than digital printing at scale. Digital print is useful for samples, short runs, variable SKU art, or test launches below 500 to 1,000 pieces. For retail, specify CMYK offset with a target color proof; for brand-critical colors, provide Pantone references and accept that coated and uncoated stocks will shift differently.
Matte lamination is the safest finish for most pins. It reduces glare under shop lighting, photographs well, and hides fingerprints better than gloss. Gloss lamination can make colors pop, but it also reflects light and can make small text harder to read. Soft-touch lamination feels premium but scuffs more easily in bulk packing, especially when metal pin edges rub against stacked cards.
Foil stamping, spot UV, embossing, and debossing should be used selectively. A 15 x 25 mm foil logo near the top of the card can help a gift item feel premium. A full-card foil pattern usually adds cost without improving conversion and can scratch during assembly. Spot UV works best as one focal point, such as a brand mark or pattern behind the pin, not as a heavy coating over the entire card.
For most distributor price points, one premium treatment is enough. A 350 gsm matte-laminated card with precise post holes and clean typography usually sells better than a busy card with foil, UV, gradients, and too much copy. The pin should remain the hero; the card should frame it and make the retail decision easy.
Match Insertion to Pin Hardware
Insertion style should be engineered around the hardware, not chosen from a generic template. A single-post pin can use one round punch, cross slit, or small horizontal slit. Two-post pins need two accurately spaced holes or slits to stop rotation. Pins with safety pins, brooch backs, magnets, or clutch sets need different retention methods, and the card should be sampled with the exact hardware before mass production.
Round holes are the lowest-cost option and work well for simple one-post pins when the clutch sits behind the card. Common post-hole diameters are 1.5 to 2.0 mm for lapel pin posts, with a 0.2 to 0.3 mm clearance allowance depending on coating and punch quality. For rubber clutches or butterfly clutches, check the rear clearance so the clutch does not bend the card or cause the pin face to tilt forward.
Slits and custom die cuts improve presentation but require tighter control. A horizontal slit can hide the post and keep the pin face flatter, but poor slit length causes tearing during assembly. For a 1.0 mm post, a 3 to 5 mm slit is typical; heavy pins may need a reinforced tab or foam spacer. Two-post designs should use the exact center-to-center distance from the approved pin sample, not the artwork file, because plating and post welding can shift real-world spacing.
For magnets, do not assume the magnet will hold through the paper without testing. A strong magnet may still slide on a laminated surface during transit. Options include a hidden steel washer, a recess in a foam pad, a belly band, or a blister outer pack. Each adds cost, but it prevents returns caused by loose pins inside the package.
MOQ, Lead Time, and FOB Cost Ranges
Backing cards look inexpensive per piece, but small specification changes can move cost and lead time quickly. A standard rectangular 300 to 350 gsm printed card is usually economical because it uses common paper, standard cutting, and fast manual assembly. Custom shapes, foil stamping, soft-touch lamination, rigid board, and special inserts require tooling, setup waste, and slower packing.
As a practical China FOB range, simple printed cards often add USD 0.03 to 0.08 per piece at 3,000 to 10,000 units and USD 0.06 to 0.12 at 500 to 1,000 units. Matte lamination with a standard hole or slit is commonly USD 0.07 to 0.16. Foil, spot UV, embossing, or custom die cuts usually move the card to USD 0.10 to 0.28. Rigid laminated board, foam pads, or magnetic retention can reach USD 0.18 to 0.45 depending on size and labor.
MOQ is usually driven by printing setup and finishing, not the paper itself. Basic print-only cards may be accepted at 500 pieces, although 1,000 pieces is more common. Foil, embossing, special die cuts, and rigid board usually make sense from 1,000 to 3,000 pieces. If the card is bundled with pin assembly, confirm whether the MOQ applies to each artwork, each SKU, or the total order.
| Backing card option | FOB unit range | Typical MOQ | Production lead time |
|---|---|---|---|
| Printed 300-350 gsm rectangular card | USD 0.03-0.12 | 500-1,000 pcs | 5-8 days |
| 350-400 gsm matte laminated card with post holes | USD 0.07-0.16 | 1,000 pcs | 7-12 days |
| Foil, spot UV, or embossed retail card | USD 0.10-0.28 | 1,000-3,000 pcs | 10-15 days |
| Custom die-cut shape or reinforced euro slot | USD 0.12-0.30 | 1,000-3,000 pcs | 10-18 days |
| Rigid laminated board or foam-retention insert | USD 0.18-0.45 | 1,000-3,000 pcs | 12-20 days |
Lead time should be counted after artwork approval, not from RFQ date. Add 2 to 4 days for pre-production samples if the card has foil, die cuts, unusual stock, or exact post spacing. For urgent launches, use a standard rectangle, matte lamination, and simple punch holes; it is faster to execute and easier to quality check.
Artwork, Barcode, and Compliance Details
Most reprints happen because artwork was built without the final die line. Start with a production die line showing trim, bleed, hole location, post location, barcode zone, and pin outline. Use 3 mm bleed on all sides and keep important text, logos, QR codes, and legal copy at least 2 mm inside the trim line. For hang holes, keep graphics at least 3 mm away from the hole edge to avoid weak spots and visual misalignment.
Small text needs realistic limits. On coated stock, 5 pt can print, but 6 to 7 pt is safer for care copy and legal text. Avoid reversed-out white text below 7 pt, especially on matte lamination, because fill-in and registration shift reduce readability. For QR codes, keep the printed code at least 18 x 18 mm for reliable scanning; for dense URLs or tracking links, 20 to 25 mm is safer.
Retail barcodes need quiet zones and contrast. UPC-A or EAN-13 should be printed black on a white or very light background, with no lamination pattern or foil crossing the code. A common retail-safe barcode size is 30 to 38 mm wide, depending on magnification and retailer requirements. Always test the barcode from the printed proof, not only from the PDF.
- Use the approved die line before placing artwork
- Specify 3 mm bleed and at least 2 mm text safe zone
- Keep hang holes and post holes clear of key graphics
- Set legal copy at 6-7 pt minimum for reliable readability
- Print barcodes in black on a light background with quiet zones
- Scan QR codes and barcodes from a physical proof
- Check pin contrast against the final card color and finish
Quality Control and Production Approval
A complete backing card spec should read like a factory instruction: card size, paper gsm and micron range, print method, finish, hole type, post-hole spacing, hang-hole size, corner radius, tolerance, packing method, and inspection level. If those details are missing, the factory will use defaults, and defaults vary widely by supplier.
For inspection, use measurable criteria. General trim tolerance can be ±1 mm, while post-hole spacing and barcode location should be held to ±0.5 mm when the pin position is visible. Color variation should be checked against an approved proof under consistent lighting; for brand-critical jobs, request a Delta E target, such as ΔE under 3 to 5 for key colors, acknowledging that paper and lamination affect the result. For surface defects, inspect for scratches, foil breaks, delamination, oil marks, dirty edges, and cracked corners.
AQL levels should match the customer risk. For standard promotional cards, many importers use AQL 2.5 for major defects and 4.0 for minor defects. For retail chain orders or premium collector products, use AQL 1.5 major and 2.5 minor, with clear definitions. Major defects include wrong artwork, unreadable barcode, incorrect hole position, torn card, delamination, or pin rotation that hides artwork. Minor defects include small scuffs, light corner pressure, or slight color variation within the approved range.
Do not approve mass production from a flat PDF alone. Review one assembled sample using the final pin, final card stock, final finish, and intended clutch or magnet. Hang it on the intended peg for at least 24 hours if it will be sold on a retail wall. If the card curls, tears, tilts, or slows assembly, correct it before the full run.
Lock the Spec Before Reorders
For repeat orders, keep the backing card specification separate from the pin specification so either item can be reordered or revised without ambiguity. Record the supplier paper name or equivalent, gsm, micron range, lamination, die line version, hole diameter, post spacing, color proof, packing sequence, and carton quantity. Include photos of the approved assembled sample from the front, back, and side.
Packing should be specified as clearly as the card itself. Common options include pin on card into individual OPP bag, pin on card into biodegradable bag, carded pin into retail blister, or carded pin into gift box. State whether clutches are attached to the pin, placed in a small bag, or fixed behind the card. These choices affect labor, damage rate, and customer experience.
If the factory controls both pin production and card packing, alignment is easier because post welding, card punching, assembly, and final packing can be checked together. That is especially useful for two-post pins, multi-pin sets, magnets, or retail cards with tight barcode and hang-hole requirements. The goal is simple: the card, pin, and outer pack should function as one finished retail unit, not three separate components forced together at the end.
Have a project? Send your artwork and target quantity and we’ll reply with a detailed quotation within 12 working hours.
Ready to get this made?
Send your sketch, target quantity and ship-date. Detailed quotation in 12 hours.


