How to Specify Backing Cards for Custom Pins That Sell
Why backing cards matter more than most buyers think
A custom pin can be mechanically perfect and still underperform at retail if the backing card is weak, oversized, or hard to merchandize. For gift shops, brand programs, museum stores, and event giveaways, the card is not filler; it is the display surface, barcode carrier, compliance panel, and the first surface a buyer handles. If it flexes, tears, curls, or hides the pin, the product looks cheaper even when the metal work is strong.
The most common mistake is treating the card as an afterthought in the RFQ. That usually creates mismatched dimensions, vague board specs, and artwork changes that push production back 3 to 5 days. A better spec reduces rework, lowers packing damage, and makes the product easier to hang, shelve, or ship in retail-ready format.
In production, the same failure pattern shows up repeatedly: a well-made pin paired with a card that is too thin for a hang slot, too small for SKU and warning text, or too glossy for handwriting and sticker labels. The right card depends on how the pin will be sold, not just how it will look in a render.
- Use the card as a merchandising tool, not filler
- Specify the card before artwork starts
- Match board stock to packaging method and freight path
- Reserve room for SKU, barcode, warnings, and brand copy
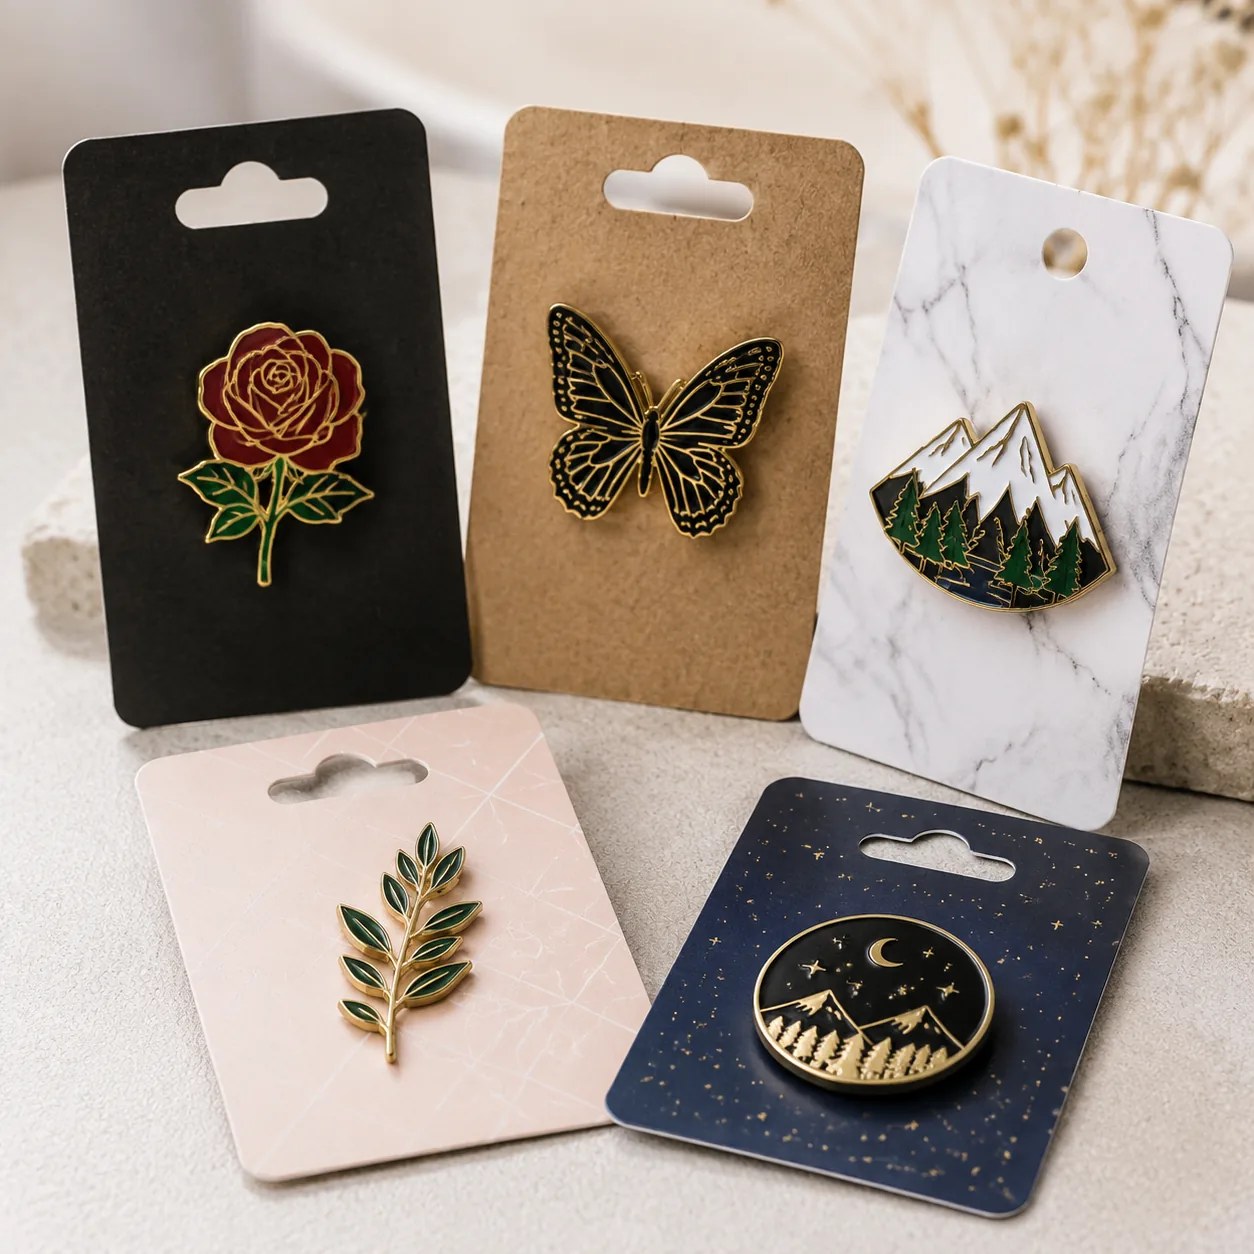
Choose the card size from the sales channel
Backing-card size should come from shelf reality, not designer preference. A 40 x 60 mm card may work for a single lapel pin in a polybag, but it becomes cramped once you add a euro-slot, barcode, and legal text. For multi-pin sets, a larger card also prevents fasteners from colliding with copy or other pins.
Typical single-pin retail cards fall in the 35 x 55 mm to 50 x 80 mm range. Two-pin sets are usually better at 70 x 90 mm or 80 x 100 mm. For premium collectible or gift-channel packaging, a custom die-cut card can improve shelf impact, but it adds tooling and sampling time. As a rule, leave at least 2 to 3 mm clearance from the pin body to the die line and at least 3 mm from any slit or hole edge to printed text.
| Application | Typical card size | Practical notes |
|---|---|---|
| Single retail pin | 35 x 55 mm to 50 x 80 mm | Enough for branding, SKU, and a short message |
| Two-pin or set | 70 x 90 mm to 80 x 100 mm | Prevents hardware crowding and gives room for copy |
| Premium collectible | Custom die-cut | Higher tooling cost, stronger shelf appeal |
| Mailer insert | A6 or larger | Best for story, barcode, and compliance text |
If the card ships inside a clear bag or blister, measure the total stack thickness before locking size. A 1.2 to 1.8 mm pin plus card and clutch can create unexpected bulge, especially with dual posts or layered artwork. For mail-order fulfillment, a slightly larger card often reduces bent corners because it resists folding during carton packing.
Pick the board stock for strength and print quality
Most backing cards use 300 to 400 gsm paperboard. For simple promo pins, 300 gsm C1S or C2S is usually enough if the card sits in a polybag and does not carry much weight. For heavier pins, dual-post items, or cards with a hang slot, 350 to 400 gsm is safer because it resists bending during packing, transit, and retail handling.
A useful procurement shortcut is to tie paper choice to pin weight. As a practical rule, pins under about 12 g can usually ride on 300 gsm stock, while pins above 12 to 15 g benefit from 350 gsm or thicker. Once the pin moves beyond about 25 g or has an irregular shape, consider reinforcement, a folded structure, or a PET support layer rather than relying on paper alone.
Uncoated board is easier to write on and fits eco-positioned brands, but it absorbs ink and usually prints less sharply than coated stock. Gloss lamination increases scuff resistance and color density, but it can reflect retail lighting and fingerprint easily. Matte lamination reads more premium and photographs better, though it raises cost and can reduce barcode contrast if the artwork is not planned correctly. For scan reliability, keep barcode contrast high and avoid textured varnish over the code area.
For freight-heavy programs, ask for a preproduction packed sample and run a basic bend and drop check before approving a full carton run. A good target is no visible corner crush after a 1 m drop onto the package face, edge, and corner, and no cracking at the crease after manual flexing. If the card fails that test, the display value in store will be lower than the render suggests.
Decide how the pin attaches to the card
The card must match the pin hardware, not the other way around. A single-post pin usually needs one clean slit or one punched hole, while a two-post pin needs accurate hole spacing to avoid forcing the posts and scuffing the finish. If the pin uses butterfly clutches, rubber clutches, or safety locks, the card cutout should allow the closure to seat without tension.
Tolerance matters on the line. A hole or slit offset greater than 0.5 mm can slow manual insertion and cause scratched plating at high volume, especially when workers are packing thousands of units per day. For repeat orders, lock the post position, hole spacing, and card thickness together so the insert layout can be reused without rework.
Typical production tolerances should be explicit in the PO. A finished-card size tolerance of ±1 mm is realistic for most paperboard jobs; a slit or hole position tolerance of ±0.5 mm is a good target for repeatable insertion; and a fold or crease should show no cracking at normal handling. For two-post pins, hole spacing should be measured center-to-center and checked on the first article, not just from the artwork file.
If the pin is oversized or oddly shaped, a folded card or dual-layer card with a hidden retention slot often works better than a flat single sheet. That reduces wobble, keeps the pin facing forward, and prevents the common complaint that the product arrives rotated inside the package. It also makes the assembly feel more intentional at retail opening.
Compare the main backing-card options
Different card constructions trade off cost, appearance, and durability. A buyer ordering 2,000 event pins does not need the same structure as a retailer launching a collectible line at 20,000 units. The right choice depends on visual priority, packing speed, and how much handling the unit will survive before it reaches the customer.
| Option | Typical spec | Best use |
|---|---|---|
| Single-layer C1S card | 300-350 gsm, one-side print | Low-cost promo pins and event giveaways |
| Single-layer C2S card | 300-350 gsm, full-color print | Retail pins with stronger front/back graphics |
| Matte laminated card | 350-400 gsm, matte film | Premium presentation with lower glare |
| Folded card | 250-300 gsm each side | Story-driven items and extra barcode space |
| Die-cut custom shape | 350-400 gsm, custom knife | Gift sets and seasonal launches |
Single-layer cards are cheapest and fastest, usually adding about USD 0.03 to 0.08 per unit at 5,000 to 10,000 pieces, depending on print coverage and punching. Folded and die-cut cards cost more because they require extra setup, knife tooling, or hand assembly; they often land in the USD 0.08 to 0.25 range at moderate volume. For very small orders under 500 sets, the setup charge matters more than the unit cost.
Common MOQ tiers for backing cards are 500, 1,000, 3,000, and 5,000 pieces, with better pricing at 10,000 or more. Simple printed cards can usually be produced in 5 to 7 days after artwork approval, while laminated or custom die-cut cards often need 7 to 12 days. If you are ordering pins and cards together, align the card spec early so the print run does not become the schedule bottleneck.
Specify artwork, print finish, and retail data
Backing cards often fail at the artwork stage, not the manufacturing stage. If the file uses too many fonts, tiny legal text, or a dark background with a black hang hole, the result becomes hard to read and hard to display. A clean layout should reserve the top third for branding, the center for the pin, and the lower area for barcode, SKU, country-of-origin text, and any care or warning copy.
For print, standard CMYK offset or high-quality digital print is enough for most jobs. Spot colors are worth specifying when brand color accuracy matters and the card is part of a larger retail program. If the card carries a barcode, keep the quiet zone clear and avoid heavy texture or high-gloss coatings over the code area. A practical barcode target is a 100% to 140% scaled EAN-13 or Code 128 symbol with a minimum quiet zone of at least 3.6 mm on each side, depending on the scanner environment.
- Keep small text at or above 6 pt where possible
- Leave at least 3 mm safe margin around the die line
- Do not place critical copy under the pin body
- Specify barcode type, size, and scan orientation
- Use one approved artwork version per SKU
For retail compliance, many buyers also specify the country of origin, batch code, and material note directly on the card. If the product is sold internationally, reserve space for multilingual warnings or importer details rather than forcing them into a tiny footer at the last minute. That keeps the card legible and reduces the chance of a rejected proof.
Know the cost and lead-time trade-offs
Backing cards are inexpensive individually, but price moves quickly once you add custom shapes, lamination, foil, or special punches. A standard printed card typically adds about USD 0.03 to 0.10 per unit at moderate quantities, while a folded, laminated, or die-cut version can move into the USD 0.10 to 0.30 range depending on quantity and complexity. If the order is small, setup charges dominate and the cheapest unit price may still cost more overall.
Lead time changes with structure. Simple printed cards are often ready in 5 to 7 days after artwork approval. Cards with lamination, special die-cutting, or extra hand assembly usually need 7 to 12 days. If you also need pin assembly, polybagging, and carton labeling, ask for a packing schedule in writing so print does not delay the finished goods date.
A good sourcing decision compares landed performance, not just unit price. Retail shelves, trade shows, direct mail, and e-commerce each punish packaging differently. A stiffer 350 gsm board may add a few cents, but it often lowers returns and improves perceived value enough to justify the spend. In many programs, the card is the cheapest way to make the same pin look more premium.
Lock the spec so reorder quality stays consistent
Once a backing card is approved, treat it like a controlled component. Record the finished size to the nearest 0.5 mm, paper weight in gsm, print side, finish, hang-hole type, and the exact pin hole or slit position. Without that data, a reorder can drift enough to slow packing or force a new insert layout.
Quality control should check print alignment, cut accuracy, corner condition, and fit with the hardware. A practical acceptance target is dimensional tolerance within ±1 mm for the finished card, slit or hole position within ±0.5 mm, and no visible cracking at the fold or crease. For packed product, check that the pin sits flat, the card does not bow, and the assembly can survive carton compression without bent corners.
If the supplier can provide a golden sample, keep it with the approved artwork file and the packaging spec sheet. That gives purchasing, QC, and the factory one physical reference for repeat orders. It also prevents the common problem where the art file stays the same but the punch layout or finish changes silently between runs.
What to do next
If you are planning a new pin program, start with the sales channel and packaging route first, then build the backing card around that use case. Decide whether the card is there to hang, tell a story, carry compliance text, or support a premium unboxing experience; one card rarely does all four equally well. After that, lock size, stock, finish, and hardware spacing before artwork is finalized.
The fastest path to a clean result is to send the supplier one complete packaging spec: pin dimensions, post type, card size, board weight, finish, print count, barcode requirement, insertion method, and packing format. For repeat programs, ask for an assembled golden sample so future production can be checked against one physical reference instead of a vague drawing. That usually shortens sampling loops and protects margin.
Have a project? Send your artwork and target quantity and we’ll reply with a detailed quotation within 12 working hours.
Ready to get this made?
Send your sketch, target quantity and ship-date. Detailed quotation in 12 hours.


