How to Specify Attachment Placement on Custom Pins and Badges
Why attachment placement drives the highest return rate
A pin can be perfectly plated, polished, and colored, then still fail in use because the attachment sits too high, too low, or off-center. Buyers usually focus on artwork and finish, but attachment placement determines whether the item hangs straight, sits flat, resists rotation, and survives repeated wear. For promotional giveaways, that matters because a crooked pin reads as low quality even when the front side is flawless.
This is especially true for multi-SKU programs where one design is turned into lapel pins, brooches, badges, and small medals. The same artwork may need different backing positions depending on thickness, weight distribution, and the way the item is worn. If the placement is not specified, the factory will usually choose a reasonable default, and that default may be wrong for your use case. In practice, most avoidable returns come from one of three issues: spin, tilt, or fabric distortion.
On small metal pins, the error may be only 1 mm or 2 mm, but that is enough to shift the visual center and create a crooked hang. On heavier products, a bad placement can also overload a clutch, cause a brooch to sag, or make a magnet slide on thin fabric. The result is not a cosmetic defect only; it is a functional defect that affects wear, comfort, and perceived value.
What placement means in factory terms
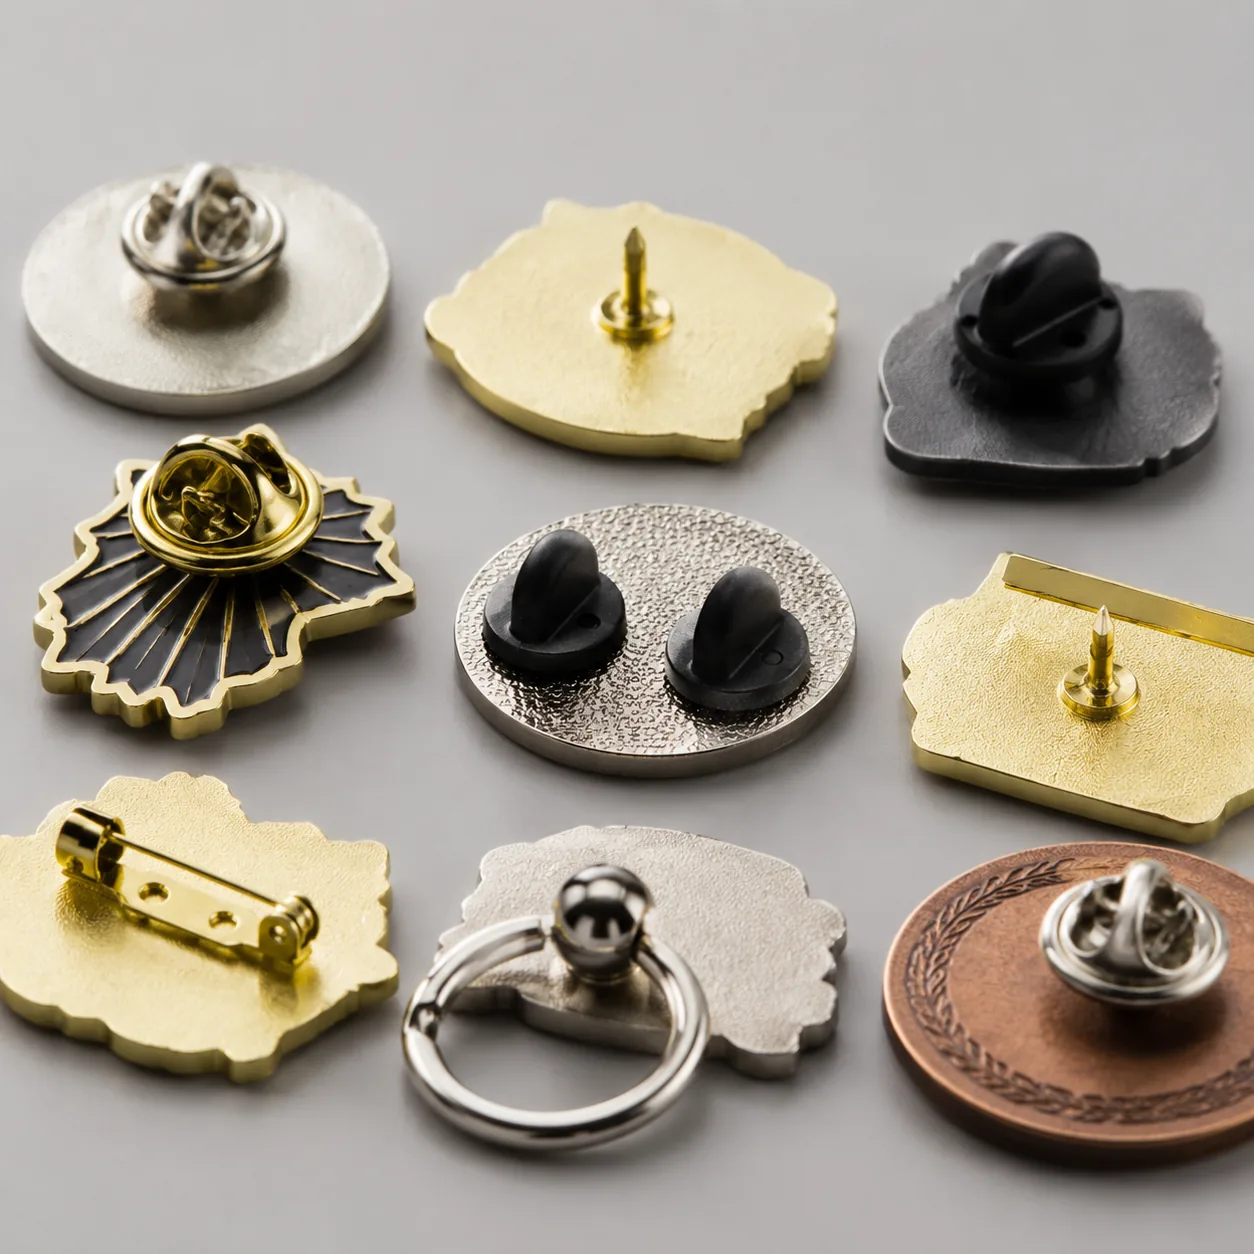
In factory language, attachment placement is the measured location of the clutch, magnet, brooch bar, safety pin, or sew-on point relative to the product outline. The practical references are the top edge, bottom edge, left-right centerline, and the visual center of mass. A proper spec should state the measuring method, not just show a loose back-view sketch. If you do not define the reference, two engineers can interpret the same drawing differently and still both be technically defensible.
For flat pins and badges, tooling position is commonly held within about ±0.3 mm to ±0.5 mm at the mold or stamping stage, while the finished assembly can shift slightly after polishing, plating build-up, adhesive cure, and manual assembly. That means the final wearable position can differ from the drawing even when the tooling is correct. For larger items such as medals or brooches, the backing hardware may be centered on the geometric center or offset upward by 1 mm to 3 mm so the item hangs visually level. The right choice depends on size, weight distribution, and whether the item is worn on a lapel, hat, ribbon, or lanyard.
A good rule is to separate three concepts in your spec: geometric center, visual balance point, and approved hardware location. Those are not always the same. Once you define them separately, the factory can quote and sample much more reliably.
Common attachment types and where they work best
Different hardware behaves differently under load, especially when the item is small or tall. A butterfly clutch is common on low- to medium-weight lapel pins around 20 mm to 35 mm, but it can rotate on narrow vertical shapes or on pieces with a top-heavy design. Rubber clutches are more comfortable and less likely to scratch skin, but they usually provide less anti-rotation support than metal clutches with tighter friction. Locking clutches offer better retention, but they add cost and can be less convenient for fast on/off use.
Magnetic backs are useful when fabric damage is unacceptable, but they add thickness and are not ideal for thick jackets, heavy wool, or multi-layer uniforms. Brooch pins work better for larger or heavier pieces because they spread the load across a wider span and reduce sagging. Safety-pin style backs are practical for ribbon medals, event badges, and textile-mounted items, but they are not the best choice for fashion products where the back hardware may show through the garment. For premium fashion brooches, the bar length and catch strength matter as much as the pin location.
| Attachment type | Best use case | Typical limits / notes | Common FOB price impact |
|---|---|---|---|
| Butterfly clutch | Small lapel pins, low-cost promos | Best for 20-35 mm pins; can rotate on tall shapes | Base option; often lowest-cost standard assembly |
| Rubber clutch | Comfort-first giveaways, school items | Softer feel; less secure for heavy pieces | Usually no change or +USD 0.03-0.08/pc |
| Magnetic back | No-fabric-damage use | Adds thickness; avoid on thick clothing | Often +USD 0.10-0.30/pc depending on magnet grade |
| Brooch pin | Heavier badges, fashion brooches | Better load spread; needs more back space | Often +USD 0.05-0.20/pc over standard clutch |
| Safety pin | Textiles, ribbons, event items | Practical for soft materials; less premium look | Usually low-cost; depends on pin length and plating |
Typical FOB pricing for custom enamel pins often starts around USD 0.35-0.90/pc for 1-inch simple soft enamel at 1,000 pcs, rising to USD 1.10-2.80/pc for hard enamel, epoxy, or more complex backing systems. MOQ tiers are commonly 100-300 pcs for sample-friendly factories, 500 pcs for standard production, and 1,000 pcs or more for best pricing. Lead time is usually 7-10 days for sampling and 15-25 days after sample approval for production, with magnetic or multi-piece assemblies sometimes adding 2-4 days.
How to specify placement without ambiguity
The most reliable way to specify placement is to describe the item like a coordinate drawing. State the front-view reference, the top edge or centerline reference, and the exact distance from each reference to the hardware center. If the shape is irregular, use a dimensioned CAD file or a marked back-view drawing rather than a freehand sketch. A factory can follow a line drawing only if the line means one thing.
For symmetric products, ask for the hardware to be centered on the visual center unless the item will hang poorly. For asymmetrical products, specify whether the attachment should follow the geometric center or the visual balance point. These are not interchangeable. A logo-heavy badge, for example, may need the hardware shifted 1 mm to 2 mm upward to compensate for a heavier lower section. That small offset often improves hang quality more than a thicker clutch would.
The most useful RFQ language is specific and measurable. Say exactly what you want, then give the allowable tolerance. If you only say ‘centered,’ you are asking the factory to interpret your intent. If you say ‘back attachment center 6.0 mm from the top edge and 0.0 mm from the horizontal centerline, tolerance ±0.5 mm,’ you are giving the factory a measurable target.
- Define the reference face: front view, back view, or section view
- State the attachment center in millimeters from the top, bottom, and side references
- Call out whether the point is geometric center or visual balance point
- Specify allowable tolerance, such as ±0.5 mm for small pins
- Request a pre-production sample for irregular shapes, magnets, or heavy items
Placement rules by product type
Small enamel pins under 30 mm usually need the attachment slightly above center so the piece hangs visually level. A common starting point is 1 mm to 2 mm above the geometric center for tall shapes. For short and wide shapes, true center placement often works better because the item already has a low center of gravity. If the design is top-heavy, offset the backing toward the heavier side rather than simply centering it by rule.
For badges and brooches in the 35 mm to 60 mm range, the attachment should be chosen together with the body thickness. A 1.2 mm to 1.5 mm zinc alloy badge with a single butterfly clutch may be fine for light daily wear, but a larger or heavier piece often needs a dual-point brooch bar or a stronger magnetic assembly. If the visible face includes raised 3D relief, thick epoxy, or asymmetric enamel fill, the center of gravity may shift enough to require a 0.5 mm to 2 mm adjustment after sample testing.
Challenge coins usually need a separate decision because they are not always worn. If the coin is for presentation only, the ‘attachment placement’ may really mean a display accessory, capsule, or ribbon loop. If it is wearable, define whether the back fitting should be centered for a single-point wear or offset to match a lapel. For lanyard badges and conference name holders, top-center placement is usually better because the product hangs vertically and should not twist.
For soft PVC or embroidered patches, placement is constrained by the backing style: hook-and-loop, iron-on, sew-on, or adhesive. In those cases, specify both the attachment type and the edge offset, because a backing too close to the border can peel, pucker, or distort during use. A sew-on patch often needs at least 2.0 mm to 3.0 mm of stitching margin, while adhesive-backed patches need enough flat area to support full bond contact.
Tolerance, thickness, and load
Placement is not only a geometry issue. A heavy enamel fill, thicker plating stack, dome epoxy, or raised 3D relief changes the center of gravity and can make a technically centered attachment wear off-balance. If one side of the design is visibly heavier, moving the attachment toward that side by 0.5 mm to 2 mm can improve hang quality. The correction should be verified by a sample, not assumed from the CAD file alone.
Thickness also matters because back hardware mounted on a thin product can distort the face or leave a visible bump. Standard pin bodies often sit around 1.0 mm to 1.5 mm in zinc alloy or brass, while heavier brooch-style items may go thicker depending on size and finish. A low-profile clutch can be ideal for retail pins, but it may be too shallow for thick plated assemblies or for pieces with epoxy that rises above the edge. Ask the supplier to confirm the assembled back height in millimeters, not just the attachment name.
If you need a durability target, ask for a pull check and a rotation check on the sample. A practical factory-level target is no visible drift after normal hand pressure and no loosening after repeated fastening cycles. For premium programs, ask for 20-30 open-close cycles on the sample and a pull test appropriate to the hardware: roughly 1.5-2.5 kgf for common pin clutches and higher for brooch or magnetic assemblies, depending on size. For outerwear or event badges worn all day, test against a thicker fabric swatch, not only thin cotton.
AQL expectations should also be written down. For cosmetic and placement checks, many buyers use AQL 2.5 for major defects and 4.0 for minor defects, with a tighter custom limit on location error. A practical acceptance rule is no major placement defects and no more than 1.0 mm to 1.5 mm visible deviation on a small pin, unless the design itself allows more. That gives the factory a usable inspection target and keeps disputes from becoming subjective.
What to put in the spec sheet and sample note
The best spec sheet is short but exact. It should describe the product, the hardware, the placement reference, the tolerance, and the inspection standard in plain language. If your design has multiple variants, each variant should get its own placement line instead of one blanket note. That is especially important when one SKU uses a butterfly clutch and another uses a magnet or brooch bar.
Here is a practical comparison of how placement notes differ by use case.
| Use case | Recommended placement note | Typical tolerance | Typical MOQ / lead time |
|---|---|---|---|
| Small lapel pin | Butterfly clutch centered 1 mm above visual center | ±0.5 mm | 100-300 pcs / 7-10 days sample, 15-20 days production |
| Tall asymmetric pin | Butterfly clutch offset toward top-heavy side after sample approval | ±0.5 mm to ±1.0 mm | 300-500 pcs / 7-12 days sample, 18-25 days production |
| Heavy brooch | Brooch pin centered on visual balance point | ±0.5 mm | 300-500 pcs / 8-12 days sample, 18-28 days production |
| No-fabric-damage promo | Magnetic back centered on geometric center | ±0.5 mm | 300-1,000 pcs / 8-12 days sample, 18-30 days production |
| Textile badge | Safety pin or sew-on position marked from top edge | ±1.0 mm | 500-1,000 pcs / 7-10 days sample, 15-25 days production |
A strong RFQ note looks like this: back attachment to be positioned according to the marked back-view artwork, measured from the top edge and horizontal centerline, tolerance ±0.5 mm, subject to pre-production sample approval. If the product is top-heavy, add a note that the attachment may be shifted upward by 1 mm to 2 mm after hanging test. If the product is for outerwear, state the intended fabric thickness so the supplier can match clutch depth or magnet strength.
When to insist on a sample change
You do not need to demand sample changes for every minor shift, but you should intervene when the attachment changes how the product behaves in real wear. If the pin leans, twists, digs into fabric, or hides important artwork, the placement is functionally wrong even if the front face matches the drawing. This is one of the few areas where a small sample adjustment can save far more than it costs.
Insist on a revised sample if the item is heavier than expected, if the shape is irregular, if the front design has uneven relief, or if you are mixing finishes across one product family. Also insist when moving from a simple sample to a bulk SKU with different hardware, because a factory may reuse the same tooling position even when thickness, plating, or back type changes. That shortcut is convenient for production, but it can create inconsistent wear between SKUs and higher rejection rates at inspection.
At ZheCraft, we usually advise buyers to approve attachment placement on the first sample before locking mass production, especially for premium pins, brooches, and mixed-format promo sets. That keeps the quote stable and avoids the much more expensive problem of reworking finished inventory. For orders that mix pins, badges, and keychain-style hardware, one placement rule rarely fits all items; each product should be treated as its own wear case.
A simple buyer checklist
- Mark the back-view reference drawing before requesting quotes
- Specify the attachment center in millimeters from top and side references
- State whether the location follows geometric center or visual balance point
- Write the tolerance, AQL target, and required sample approval step
- Match attachment type to weight, fabric, and wear duration
- Ask for a revised sample if the item twists, tilts, or scratches fabric
- Confirm MOQ, FOB price range, and lead time before approving mass production
What to do next
Start by marking every product with a back-view reference drawing and one exact measurement from the top edge to the attachment center. Then decide whether your priority is balance, anti-rotation, comfort, or no-fabric-damage use, because each goal points to a different hardware choice. If the item is heavier than a standard lapel pin or has an irregular outline, ask for a revised sample rather than assuming the first placement will work.
If you want the fastest path to fewer defects, turn your current design into a one-page placement spec with dimensions, tolerance, attachment type, MOQ, and price target listed line by line. That makes it easier for a factory to quote accurately, easier for quality control to inspect, and much harder for a production run to drift.
Have a project? Send your artwork and target quantity and we’ll reply with a detailed quotation within 12 working hours.
Ready to get this made?
Send your sketch, target quantity and ship-date. Detailed quotation in 12 hours.


