How to Set Tolerance Budgets Across Promo Products
Why one loose spec can break a full promo set
Most rework in mixed promo orders does not come from one bad factory process. It comes from specs that are individually acceptable but incompatible when a pin, coin, patch, and lanyard must sit together in one kit. A pin that is 0.8 mm wider than planned, a backing card that is 1.5 mm short, and a coin capsule that assumes a tighter diameter can turn a finished set into scrap even if each item passed its own inspection. Buyers usually discover this too late, after samples are approved and tooling is already made.
A tolerance budget is the simplest way to stop that cascade. Instead of writing isolated requirements for each item, you define how much dimensional drift the whole set can absorb, then assign that allowance to each part. This matters most for gift sets, retail bundles, VIP kits, event packs, and multi-SKU programs where several factories or several production lines must match the same visual standard. At ZheCraft, we see far fewer disputes when buyers treat the set as one system rather than four separate products.
What a tolerance budget actually covers
A tolerance budget is not a vague quality target. It is a controlled allowance for variation in dimensions, thickness, color, finishing, and assembly position. The budget should cover all features that affect fit, appearance, and function: body width, overall thickness, plating build-up, printed registration, patch border width, lanyard length, and packaging clearances. If the item touches, stacks, clips, hangs, or sits inside a molded tray, tolerance matters.
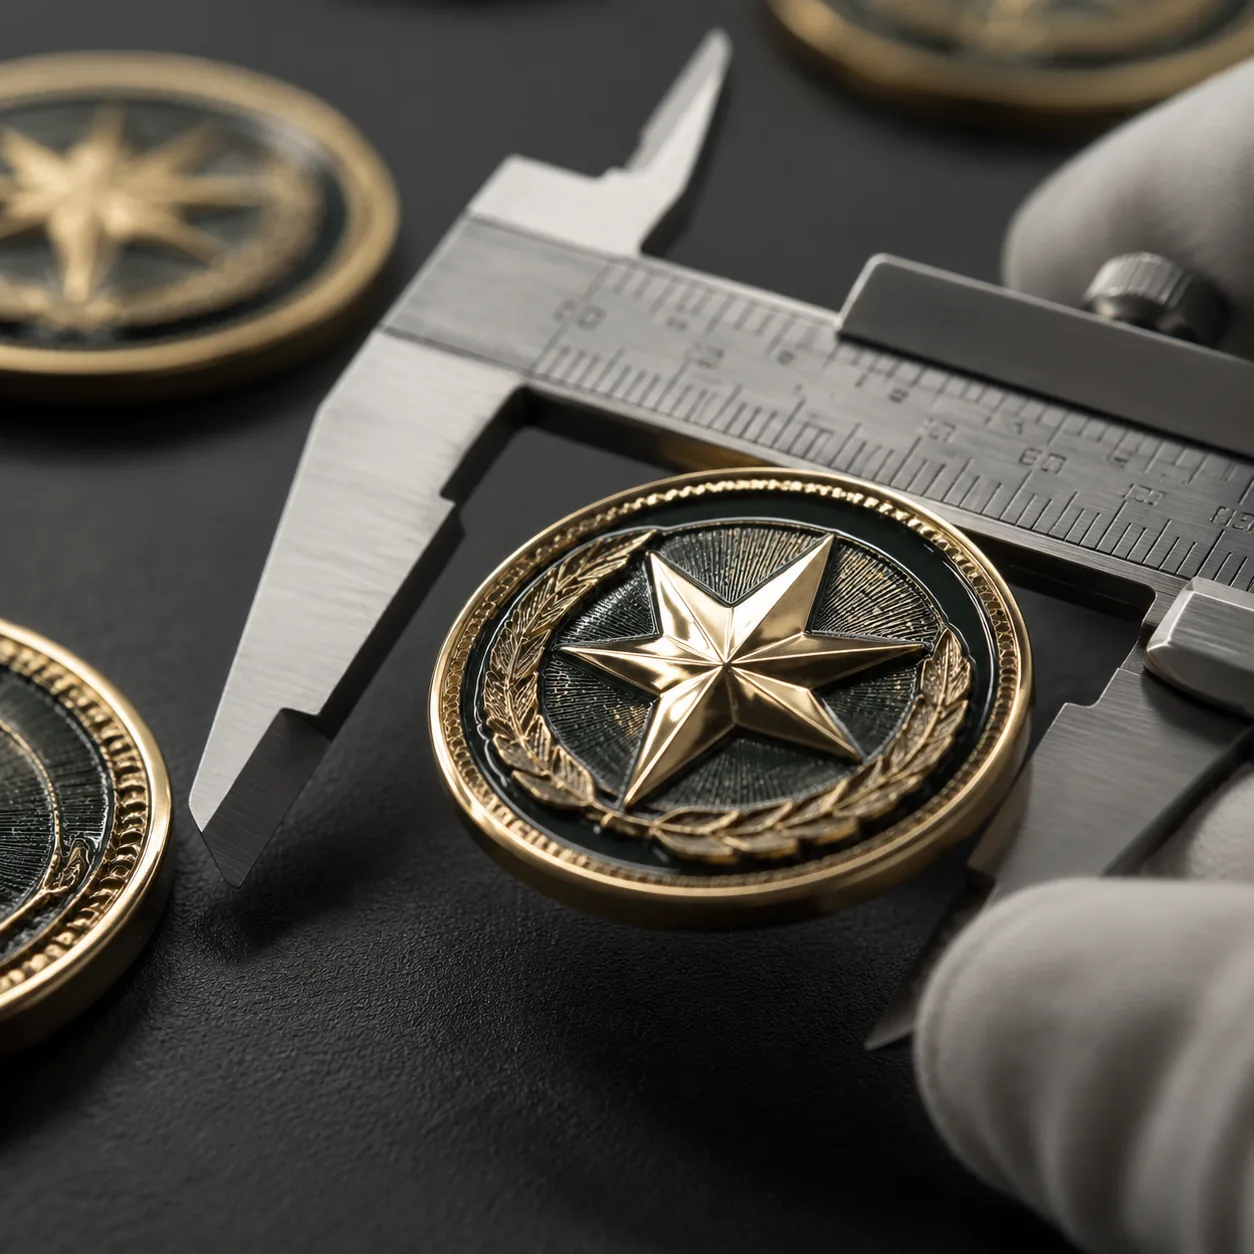
For metal promo products, the most common sources of variation are die shrink, polishing loss, plating build-up, fill shrink after curing, and post-plating edge rounding. Typical practical tolerances in Chinese factories are often around ±0.2 mm to ±0.3 mm on small pins, ±0.3 mm to ±0.5 mm on coins and badges, and ±1% to ±3% on lanyard length depending on cut-and-sew or woven construction. These are not universal guarantees; they are the range buyers should expect to negotiate and document. If the artwork has fine outlines or nested parts, the usable tolerance may be much tighter than the raw factory number.
Where to budget tolerance by product type
Different product types absorb error differently. A soft enamel pin can hide small dimensional drift because recessed fill and raised metal edges create visual tolerance, while a challenge coin with a tight capsule or custom insert tray is far less forgiving. Patches are usually more forgiving in outer shape but more sensitive to border width, stitch density, and design scaling. Lanyards appear simple, yet length, attachment position, and print repeat are common failure points when they must align with a badge reel, card holder, or printed backing.
| Product | Typical buyer priority | Practical tolerance to specify | Common failure if ignored |
|---|---|---|---|
| Soft enamel pin | Fit with backing card or display | Overall size ±0.2 to ±0.3 mm | Card slot too tight or pin appears off-center |
| Challenge coin | Tray, capsule, or display box fit | Diameter ±0.3 to ±0.5 mm | Coin rattles or will not seat properly |
| Embroidered patch | Border shape and sew-on clearance | Outer size ±1 to ±2 mm | Patch covers seam allowance incorrectly |
| Lanyard | Neck drop and printed repeat alignment | Length ±1% to ±3% | Badge hangs too high or print repeats mismatch |
| Backing card | Visual framing and retail shelf fit | Trim size ±0.5 to ±1 mm | Artwork crops or item misaligns |
The right tolerance also depends on whether the item is hand-assembled or machine-assembled. Hand assembly usually needs more allowance at fit points but stricter control of appearance landmarks. Machine assembly is better for repeatability, yet it can fail badly if you do not define lead-in space, insertion depth, or tab clearance. For any set that uses multiple components, always specify the controlling dimension first, then the acceptable range for the secondary parts.
Specs to lock before you request samples
If you ask for samples too early, the sample becomes the spec instead of the spec guiding the sample. Before tooling, define the dimensions that matter most, the acceptable variance for each, and the inspection method. For example, a pin may need a 30.0 mm body with ±0.25 mm tolerance, a 35 x 50 mm backing card with ±0.75 mm trim tolerance, and a card slot that allows at least 0.5 mm side clearance after plating. That is much easier for a factory to execute than “make it fit nicely.”
- Set the controlling dimension for each item: width, diameter, length, or thickness.
- State the assembly interface: tray, card slot, blister, clasp, jump ring, or sleeve.
- Define visual landmarks: logo centerline, print origin, and top edge alignment.
- Specify finish-sensitive allowances: plating build-up, epoxy dome height, or seam allowance.
- Require one measurement method: caliper, go/no-go gauge, or template board.
- Approve a golden sample only after all fit points are checked together.
One useful rule is to give the factory a primary tolerance and a secondary tolerance. The primary tolerance protects function, such as whether a coin fits a capsule or a pin sits centered on a card. The secondary tolerance protects appearance, such as the exact spacing between two icons or the offset from edge to logo. If the factory can only hit one of those well, prioritize the functional one and simplify the art rather than forcing a risky compromise.
How to allocate tolerance across a mixed set
A mixed set should never spend all its allowance in one area. If a lanyard is allowed to drift longer, the badge card may need a tighter top-hole position or the final pack will hang awkwardly. If a pin is allowed to run wide, the card art may need larger margins, which can make the set look unbalanced. The safest method is to assign a total acceptable deviation for the end use, then divide that budget across product, packaging, and assembly.
For example, if a gift set must fit inside a 200 x 140 mm mailer insert with no visible shifting, you might allow 1.0 mm for carton print registration, 0.5 mm for card trim, 0.3 mm for metal item size, and 0.2 mm for tray locating tolerance. None of those numbers is special by itself; what matters is that the sum does not exceed the system’s visual and physical allowance. This is also where brand teams get into trouble by approving each item in isolation. A set can look perfect as separate samples and still fail once packed together.
Inspection methods that actually catch stack-up risk
Standard AQL checks are useful, but they do not protect against system stack-up unless you inspect the assembled set as a unit. For promo sets, a practical receiving target is often AQL 2.5 for appearance defects and AQL 4.0 for minor packaging defects, with tighter criteria on any feature that affects fit. That does not replace dimensional checks. It simply means the sampling plan should include both individual parts and the finished assembly.
The most effective inspection tools are usually simple: a printed master board, a steel go/no-go gauge, a tray mock-up, and one sealed golden sample. Calipers should be used where the feature is accessible, but they are not enough for visual alignment or packed fit. For example, a backing card may measure correctly and still fail if the pin post sits 1.5 mm too high relative to the print window. Whenever possible, test the real pack-out sequence, not just the loose components.
| Control point | Best tool | Acceptable result | When to reject |
|---|---|---|---|
| Outer size | Caliper or gauge | Within stated tolerance | Beyond fit window or tray slot |
| Print alignment | Master board | Artwork centered within allowance | Logo drifts into trim or hole area |
| Assembly fit | Actual packaging | Item seats without force | Needs bending, trimming, or rework |
| Set consistency | Side-by-side comparison | No visible mismatch across items | Color, finish, or height looks uneven |
When tighter tolerance is worth the cost
Tight tolerances are not always a waste. They are worth paying for when the item is exposed in retail packaging, stacked in a presentation box, or used as a premium corporate gift where visual alignment drives perceived value. They are also worth it when a downstream partner uses automated packing or pre-made inserts. In those cases, a small cost increase in tooling, QA, or slower polishing can save far more in rejected cartons and manual rework.
The trade-off is real, though. A tighter tolerance often means more scrap, more manual sorting, slower throughput, and higher unit price. On a small run, that can raise FOB by 5% to 20% depending on complexity, especially if plating, color fill, or packaging has to be matched as a system. If the product is a giveaway with no rigid packaging, do not over-specify cosmetic tolerances that add cost without reducing customer risk.
What to do next
Start by listing every item in the set, then mark the dimensions that affect fit, alignment, and presentation. Decide which one is the controlling feature for each item, and write a shared tolerance budget for the full kit before you request samples. If you already have artwork, send the factory the packaging dieline, the tray or insert dimensions, and one annotated reference sample so they can check stack-up early. This is the fastest way to avoid silent rework.
If you are sourcing pins, coins, patches, or lanyards together, ask for one pre-production sample that is tested as a complete set, not as separate parts. ZheCraft can help translate that into production specs, then check the first sample against the actual carton, backing card, and display fit. That keeps the order practical on the factory floor and avoids expensive surprises at packing.
Have a project? Send your artwork and target quantity and we’ll reply with a detailed quotation within 12 working hours.
Ready to get this made?
Send your sketch, target quantity and ship-date. Detailed quotation in 12 hours.


