How to Build a Promo Set That Ships as One Brand
Q: What usually breaks first in a mixed promo set?
The first failure is usually not decoration quality. It is spec drift: one item is 1.5 mm thicker than planned, one color was matched to a different Pantone book, or the backing card was sized for the concept mockup instead of the assembled stack. When buyers source pins, coins, patches, lanyards, and magnets as one campaign set, the issue is rarely that each item is unacceptable on its own. The real problem is that they stop looking like one program once they are packed together.
For procurement, the goal is controlled consistency, not identical construction. A metal pin, woven patch, and polyester lanyard will never behave the same way, but they can still read as one branded set if the color logic, finish family, size hierarchy, and pack-out spec are locked early. ZheCraft sees fewer reworks when buyers define the set as one system rather than five separate SKUs.
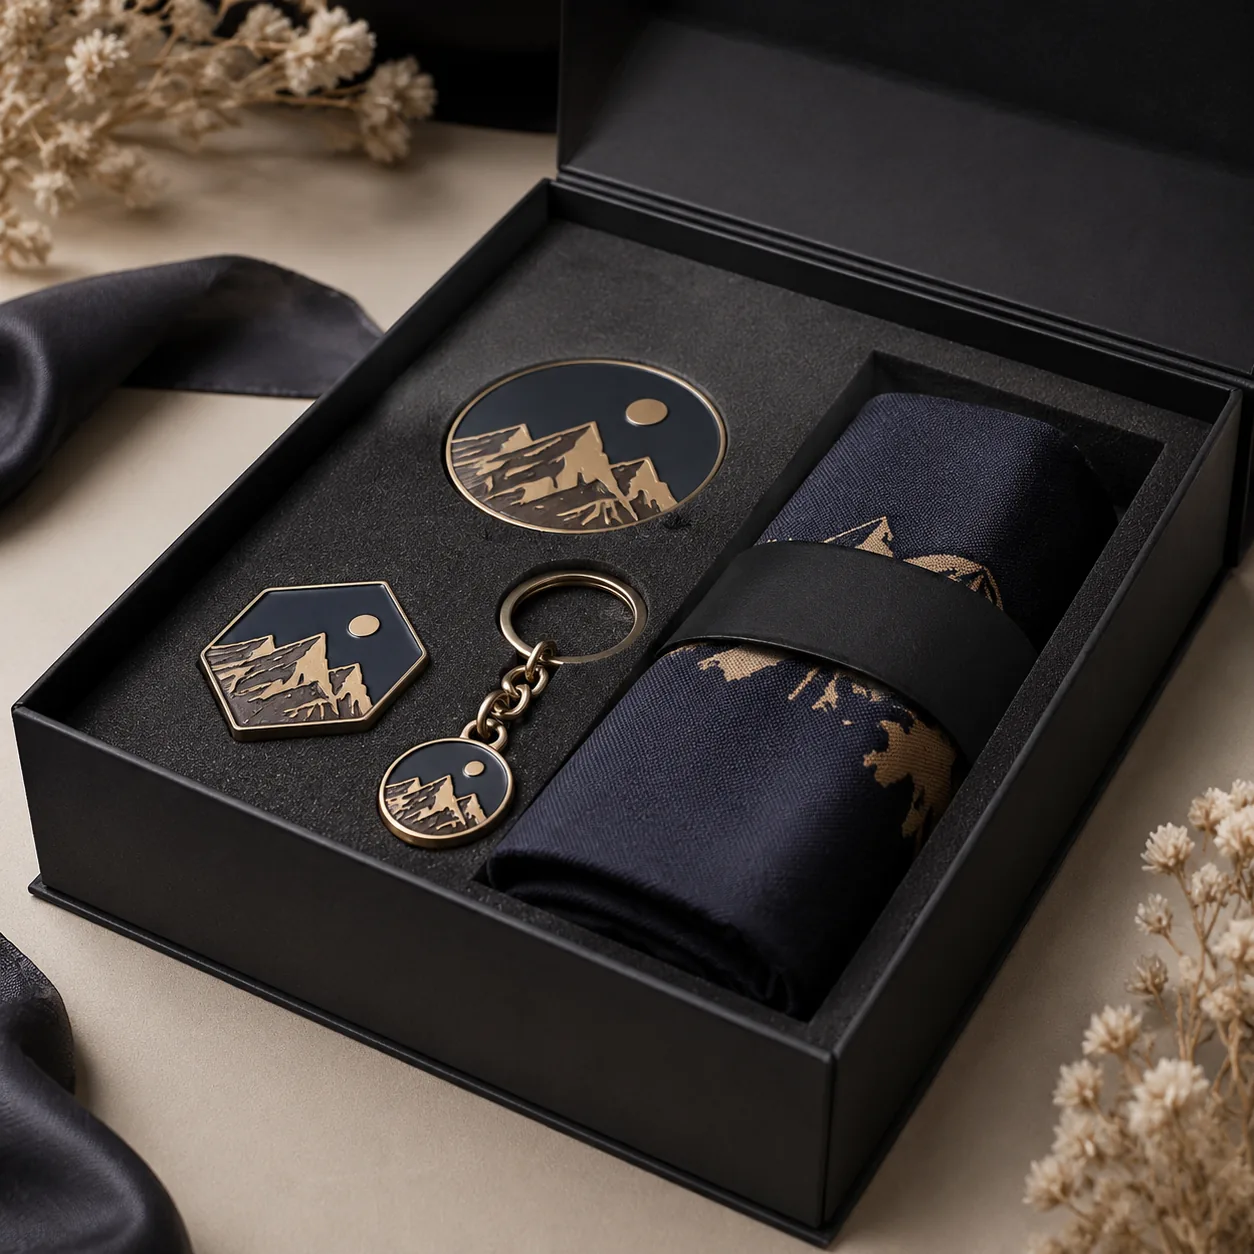
A good mixed set spec should assume normal factory variation and design around it. For example, a 25 mm pin, 40 mm coin, 70 mm patch, 20 mm lanyard, and 50 mm magnet can all work together visually if the artwork scale, plating tone, and packaging depth were planned as one package instead of five isolated quotes.
Q: Which specs must be locked before quoting?
Lock the specs that affect fit, appearance, and pack-out first. That means overall dimensions, thickness, finish, attachment style, backing card size, insert depth, carton quantity, and the target ship format. If the set includes both hard items and soft items, state whether they must align visually or only share a campaign theme. Without that, suppliers will quote to different assumptions and the landed cost will move after approval.
The strongest RFQ format uses two layers: one master campaign sheet and one line-item sheet. The master sheet defines shared rules for color references, logo placement, finish family, tolerance policy, and packaging hierarchy. The line-item sheet defines material, process, thickness, accessory, MOQ, and lead time for each component. Mixed orders fail most often at the handoff between product engineering and packing, so that handoff must be explicit.
- Define one master size system, such as pin 25 mm, coin 40 mm, patch 70 mm, lanyard 20 mm wide, and magnet 50 mm.
- Lock one finish family: bright nickel, antique brass, matte black, or soft enamel with epoxy; avoid mixing finish language.
- State one color reference: Pantone Coated or Uncoated, plus an acceptable Delta E target if the supplier measures color.
- Specify whether assembly is individual bagging, set bagging, or full kit packing.
- Confirm whether artwork is resized per item or adapted per item, not merely copied across all products.
Q: How do you keep different products looking like one campaign?
Use one visual hierarchy. The logo should appear in the same relative position across the kit, even if the shapes differ. If the pin uses a centered mark, the coin should not place the logo in a corner unless there is a deliberate design reason. Buyers often over-focus on exact size matching, but perceived brand consistency usually comes from layout, spacing, and finish family more than from identical dimensions.
For cross-item consistency, build the campaign around one dominant color, one accent color, and one neutral metal tone. If the kit mixes printed and plated items, decide which element sets the color authority before sampling. That decision affects plating selection, ink formulation, and how the set photographs in catalog or retail use. If the artwork includes gradients or shaded art, reserve that treatment for the printed components; use flatter art on pins and coins so the visual language stays coherent.
Concrete example: a sports launch kit may use matte black plating on the pin and coin, a black-and-red woven patch, and a red lanyard with white repeat text. The products are different, but the brand reads as one campaign because the color ratio and finish family are fixed. A mixed gold-and-silver tone without a clear rationale, by contrast, usually looks like a bundle of leftovers rather than a planned set.
Q: What tolerances matter most in a kit?
The most important tolerances are not tiny decorative ones. They are the fit tolerances that determine whether the items sit correctly in the box or backing card. In mixed sets, thickness tolerance is often more important than width tolerance because thickness affects blister depth, foam inserts, and bag volume. If one item exceeds stack height by even 0.5 to 1.0 mm, the set can bulge, shift, or crush during transit.
Use tighter tolerances only where the interface needs them. A badge or pin body may allow +/- 0.2 mm on critical dimensions, while a foam insert cutout may need +/- 0.5 mm to remain buildable. For plated metal items, define whether thickness is measured before or after plating. That detail matters because a supplier measuring substrate only will report a different figure from one measuring the finished part. The same logic applies to printed inserts, where paper caliper and lamination can change the final fit by 0.2 to 0.4 mm.
| Spec area | Practical buyer target | Why it matters |
|---|---|---|
| Overall size | +/- 0.5 mm for matched items | Keeps visual grouping and insert fit stable |
| Critical dimensions | +/- 0.2 mm on alignment features | Prevents offset logos and loose assemblies |
| Thickness | +/- 0.2 to 0.3 mm on interface items | Prevents box bulge and pack movement |
| Color match | Pantone reference plus approved sample | Reduces drift across different materials |
| Decorative plating | Flash plating around 0.03 to 0.05 microns; functional decorative plating often 0.1 to 0.25 microns depending on wear target | Affects tone, durability, and quote |
| Acceptance level | AQL 2.5 for minor defects, 1.5 for major defects, 0 for critical defects on packed sets | Sets a clear pass/fail rule for bulk inspection |
Q: What should the sample approval process include?
A mixed set should not be approved item by item in isolation. Approve the complete set as an assembled unit first, then approve each component against that assembly. This catches packaging errors, scale imbalance, and visual mismatches that disappear when the products are spread across separate sample bags. If the campaign is time-sensitive, request a digital assembly proof first, then physical pre-production samples for the highest-risk items such as molded inserts, printed cards, or a new die-cut box.
A strong approval package includes the Pantone callout, a plated metal chip if applicable, one signed sample of each item, and one complete packed set. If the supplier offers a golden sample, keep one signed reference on both sides and treat it as the reorder standard. Reorders often drift through finish substitutions, insert changes, or a slightly different bag size, so the master sample is more useful than a PDF.
Before release, inspect the set exactly as the end customer will receive it. Check whether the item order inside the kit is consistent, whether printed surfaces face the same direction, and whether the box closes without pressure. A good sample can still fail if the packing sequence is awkward or if the insert tolerances were approved too loosely.
- Approve the kit as one unit, not only as separate SKUs.
- Keep one signed golden sample for each campaign set.
- Check carton count, inner pack count, and set composition.
- Verify that all printed parts use the same Pantone reference.
- Require written approval for any material, finish, or packaging substitution.
- Ask for photos of finished packed sets before bulk shipment.
Q: How do MOQ and lead time change for multi-item orders?
Mixed sets usually raise complexity more than volume. A supplier may offer a low MOQ per item, but the true MOQ for the campaign is often governed by the least flexible component, such as a custom mold, sewn patch backing, or special packaging insert. Buyers often save money by increasing the shared packaging quantity even if one product line is smaller. The right question is not only “What is the MOQ?” but “Which line item sets the batch size?”
Typical MOQs in this category often fall into these ranges: 100 to 300 pieces for a simple metal item, 200 to 500 sets for a two-item campaign, and 500 to 1,000 sets for a retail-style boxed kit with custom inserts. Lead time is equally variable. A simple pin or coin may take 12 to 18 days after sample approval, a two-item set with coordinated packaging may take 18 to 25 days, and a four-item mixed kit can stretch to 25 to 35 days in peak season. Tooling changes or print reproofs can add 3 to 7 days immediately.
For pricing, request separate FOB lines for each product and for assembly. As a rough procurement benchmark, simple soft enamel pins may quote at USD 0.85 to 2.20 FOB depending on size and plating, challenge coins at USD 1.30 to 4.80 FOB, woven or embroidered patches at USD 0.35 to 1.20 FOB, printed lanyards at USD 0.30 to 0.95 FOB, and die-cut magnets at USD 0.25 to 1.10 FOB. The packaging line can add another USD 0.15 to 0.85 per set for bags, cards, trays, or boxes. The factory that separates those lines clearly is usually easier to control.
| Order type | Typical MOQ | Typical lead time | Common risk |
|---|---|---|---|
| Single metal item | 100 to 300 pcs | 12 to 18 days | Low |
| Two-item campaign set | 200 to 500 sets | 18 to 25 days | Packaging mismatch |
| Four-item mixed promo kit | 500 to 1,000 sets | 25 to 35 days | One slow component delays all |
| Retail-style boxed set | 500 sets or more | 28 to 40 days | Insert and carton rework |
Q: What packaging specs prevent the most damage?
Packaging failures in mixed sets are usually caused by stack height, friction, and weak partition design. A pin that is fine in a polybag may scratch a coin when both sit in the same pocket. A lanyard hook can deform a printed insert if the cavity is too tight. The correct approach is to design packaging around the highest-risk item, not the cheapest one.
For set packing, specify the inner bag type, insert material, cavity depth, and whether the kit ships as one master carton or with sub-pack cartons. If the items are displayed together for retail, request a physical pack-out mockup before mass production. For export buyers, carton strength matters for both transit and presentation. A common mistake is approving the product and leaving insert dimensions to the factory, which usually leads to loose movement or crushed corners.
Practical pack-out targets help. For paperboard inserts, 350 to 500 gsm is common for light sets, while EVA foam is better for stacked hard goods that need 2 to 5 mm of compression control. A cavity depth allowance of at least 1 mm is usually needed for production variation, and plated metal should be separated from other plated surfaces by tissue, film, or a tray divider to reduce abrasion marks.
- State whether each item is bagged separately before kit assembly.
- Specify insert material: paperboard, EVA, foam, flocked tray, or molded pulp.
- Give cavity depth with at least 1 mm allowance for production variation.
- Require abrasion separation between plated metal items.
- Confirm master carton count, gross weight target, and outer carton size.
- Ask for one physical pack-out sample before full shipment.
Q: When should you split the order instead of forcing one set?
Split the order when one product has a very different risk profile from the others. If a patch needs embroidery approval, a magnet needs pull-force validation, and a coin needs die polishing, it can be better to validate each line separately before combining them at packing. This is especially true when the campaign has a fixed launch date and one delayed item would hold back the whole shipment. In that case, one late component can cost more than the savings from consolidated procurement.
Split the order if the items will be used independently after the event. Kits are efficient when they stay together, but they are inefficient if the buyer will redistribute the contents separately. Then the extra packaging cost may not pay back. Another reason to split is when one line requires a different inspection standard, such as a magnet pull force of 2.0 to 2.5 kg or a printed card that must pass a 3-point rub test, while the other products do not need that level of control. In those cases, separate purchasing can reduce rework and simplify acceptance.
A practical rule: keep one set when the items share the same launch date, same brand owner, and same final recipient. Split the order when one component could be delayed, rejected, or repackaged without affecting the others. ZheCraft usually advises splitting only when it protects quality, schedule, or downstream inventory flexibility; otherwise, one set order is cleaner and easier to control.
Q: What should the RFQ package include before you send it?
Build one page that lists the shared campaign rules, then attach one spec line per item with size, material, finish, attachment, tolerance, packaging, MOQ, and target FOB price. Ask the supplier to quote each item separately and the kit assembly separately so hidden packing labor is visible. Require one assembly proof, one packed sample, and one written statement on what cannot change after approval. That single discipline prevents most mixed-set rework.
If you want the lowest-risk path, start with the riskiest item first, not the cheapest one. Once the hardest component is approved, the rest of the kit can be aligned around it. For recurring campaigns, freeze the master sample, carton spec, and insert die line together so the next reorder does not restart from zero. The best program is the one a second factory can reproduce from the paperwork alone.
Use this pre-RFQ checklist to keep the order tight and comparable across suppliers:
- One shared color standard, with approved Pantone references.
- One dimensional hierarchy for all items in the kit.
- One packaging method, with insert material and cavity depth defined.
- One AQL rule set for packed goods and cosmetic defects.
- One signed golden sample for visual and pack-out control.
- Separate FOB pricing for product, decoration, packing, and assembly.
Have a project? Send your artwork and target quantity and we’ll reply with a detailed quotation within 12 working hours.
Ready to get this made?
Send your sketch, target quantity and ship-date. Detailed quotation in 12 hours.


