How to Brief a Promo Product Factory Without Rework
What Problem Does a Good Brief Actually Solve?
Most rework starts before the factory makes anything. The brief is vague, artwork is incomplete, or the buyer assumes the supplier will infer tolerances, finish, and packaging. In promo products, that turns into extra sample rounds, missed launch dates, and disputes over whether the shipped item “matches approval.” A strong brief does not just describe the product; it locks the decision points that drive variation: size, material, surface finish, color system, attachment, packaging, and acceptance criteria.
The practical goal is simple: make the supplier quote the same thing you expect to receive. If the brief leaves room for interpretation, the factory will fill those gaps with standard assumptions, which may be reasonable but still wrong for your campaign. For custom pins, keychains, coins, patches, lanyards, and magnets, the fastest way to reduce revisions is to define what must match exactly, what can vary slightly, and what the factory may optimize. A brief that does that usually removes one sample loop and shortens production sign-off by several days.
For most promo goods, rework risk is highest when the buyer says “as per artwork” without dimensions, material grade, or acceptance rules. That phrase is not a specification. It is an invitation for the factory to choose the cheapest workable interpretation, especially when the order volume is small or the artwork includes fine detail. If you want consistent quoting across multiple factories, the brief has to read like a production instruction, not a marketing description.
What Must Be Written Down Before You Request Quotes?
If you want comparable quotes, every supplier must price the same scope. At minimum, specify product type, exact size, quantity tiers, finish or material, color count, attachment, packaging, artwork format, and required delivery window. Add end use as well: retail resale, giveaway, badge, membership item, or mailer insert. That context changes what is acceptable for tolerance, packaging cost, and quality level.
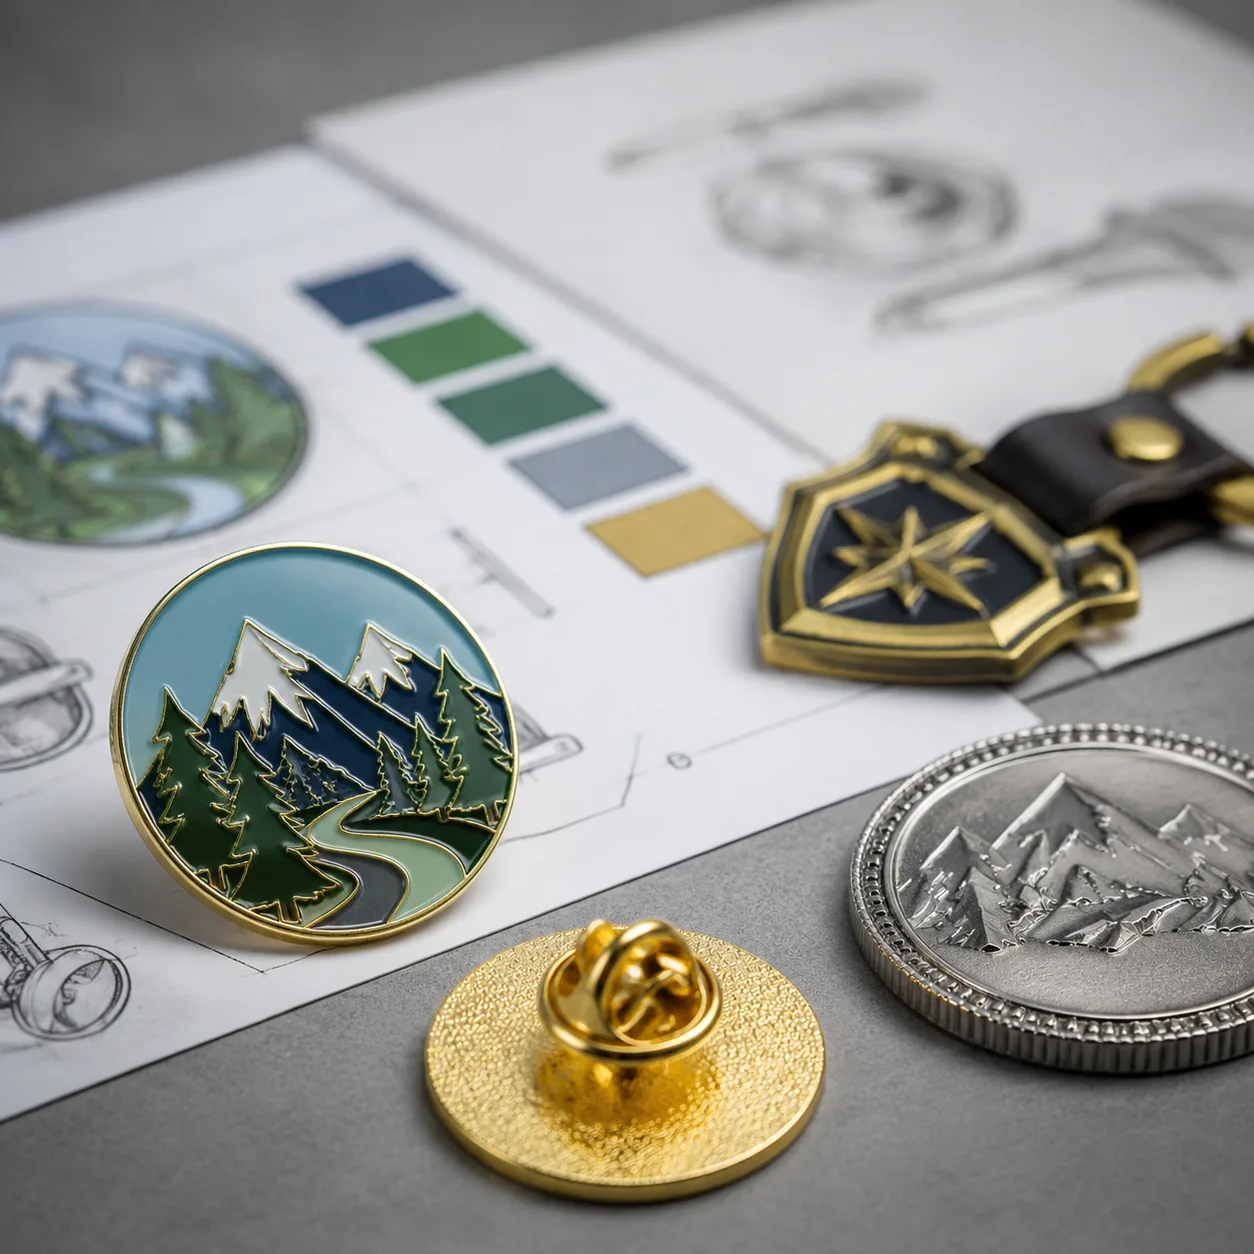
Do not leave “custom size” or “as per artwork” as your only instruction. Buyers often assume the supplier will understand intended thickness, edge treatment, and weight, but factories may choose the lowest-cost feasible construction unless you state otherwise. For example, a 30 mm soft enamel pin and a 30 mm die-struck pin can share the same artwork yet differ materially in line relief, enamel fill depth, feel, and FOB price. If you need consistency across a product family, say so explicitly in the brief rather than trying to harmonize later.
Use a fixed spec structure so every quote is comparable. A buyer-friendly brief usually includes these fields: product name, nominal size in mm, target thickness, base material, finish, color count, attachment, pack-out, artwork file type, and target ship date. If a field is unknown, state “supplier to propose” only for that one item, not for the whole product. The more fields you freeze, the fewer assumptions the factory can make.
- State exact product dimensions in mm, not only a visual reference
- Declare material and finish preference, including whether alternatives are allowed
- Specify logo colors using Pantone or an agreed factory color reference
- Name attachment type, packaging type, and any safety or compliance constraints
- Set target quantity tiers so quote comparisons are meaningful
- Attach print-ready artwork and a reference image for appearance, not as a substitute for specs
How Detailed Should Dimensions and Tolerances Be?
For small metal promo goods, dimension errors create fit and visual problems immediately, so “close enough” is expensive. A useful brief states overall length and width, thickness, opening or cutout sizes, and any critical features that interact with hardware or packaging. A coin, badge, or keychain body usually needs a tighter width/height callout than a patch or lanyard, where textile stretch and process variation are higher. If a dimension matters for wearability, display fit, or stacking, mark it as critical.
Tolerances should match the item category rather than copy-paste a generic number. For metal promo products under 40 mm, a practical buyer spec is ±0.2 mm on critical fit features and ±0.3 to ±0.5 mm on non-functional exterior dimensions. For larger metal bodies, ±0.5 mm is often acceptable for cosmetic dimensions if the part still assembles correctly. For woven labels, embroidered patches, and lanyards, width tolerance is commonly ±1 to ±2 mm depending on construction. The key is to separate what must fit, what must align, and what can float slightly without affecting use.
If the product includes layered assembly, ask the factory to confirm the build stack in the production drawing. A 2.0 mm nominal badge can end up visibly different if the base metal, epoxy dome, and backing add unexpected thickness. For clip-on items, specify the maximum allowed projection so the hardware does not interfere with packaging or wearing comfort. If the item must sit in a blister, tray, or foam cavity, the packed dimensions should be stated as a hard requirement, not an afterthought.
| Spec Item | Buyer-Useful Guidance |
|---|---|
| Overall size | State nominal size in mm and mark critical dimensions |
| Thickness | Call out body thickness separately from plated build-up |
| Hole/cutout | Specify minimum opening and acceptable burr limits |
| Attachment position | Give center-to-center or edge distance if alignment matters |
| Tolerance | Use tighter limits for fit-critical features, looser for cosmetics |
A simple rule works well in sourcing practice: if the measurement affects assembly, comfort, or retail packaging, it gets a tolerance. If it only affects appearance, it gets a broader cosmetic limit. That distinction prevents factories from overengineering noncritical areas while still protecting the features that drive rejection. It also makes inspection far easier because the QC team knows which dimensions are pass/fail and which are advisory.
Which Material and Finish Questions Should You Answer Up Front?
Material decisions drive both appearance and production method, so the brief should not stop at “metal” or “PVC.” For metal items, the factory needs to know whether you want iron, brass, zinc alloy, stainless steel, or aluminum, because each changes moldability, weight, and plating behavior. As a rule of thumb, iron is often the lowest-cost option for flat shapes, brass gives sharper detail and cleaner edges, zinc alloy suits 3D forms and deeper relief, stainless steel is used when corrosion resistance matters, and aluminum is common for lightweight tags and rulers. That choice changes the tooling, the finish behavior, and the quote.
Finish matters just as much as base material because it affects perceived quality, tarnish risk, and shelf life. If you want bright nickel, antique brass, matte black, polished gold, or brushed silver, say whether the finish is decorative only or must hold up in humid storage, frequent handling, or outdoor use. For plated metal goods, FOB pricing often moves by about 8% to 25% when shifting from standard nickel to antique, brushed, or special-effect plating. If you need a powder coat or paint fill, define gloss level as matte, satin, or high gloss, because “black” alone is not enough.
If the item is soft goods, the same logic applies. Woven, embroidered, sublimated, chenille, and PVC patch constructions all behave differently in detail resolution and edge quality. If your art includes small text below about 3 mm high, woven or printed construction is usually safer than embroidery. If the piece will be handled frequently, ask whether a clear coat, epoxy dome, or anti-scratch layer is available and whether it changes color appearance. The brief should tell the factory what to optimize for: cost, detail, durability, or premium feel.
| Decision | Common Options | When to Choose It |
|---|---|---|
| Base metal | Iron, brass, zinc alloy, stainless steel, aluminum | Iron for cost, brass for detail, zinc alloy for 3D forms |
| Plating | Nickel, gold, black nickel, antique finishes | Match brand tone, handling environment, and budget |
| Surface protection | No coating, epoxy, clear coat | Use coating when abrasion or tarnish is a concern |
| Soft-good base | Embroidery, woven, PVC, sublimation | Choose by detail level, flexibility, and volume |
For technically demanding pieces, ask for the base material thickness as well. A brass badge with 0.8 mm stock will not behave like a 1.2 mm zinc alloy badge, even if the outline is identical. Thickness affects rigidity, edge feel, and how much relief the factory can cut into the part. If the product will be worn on clothing or carried in a pocket, weight and edge comfort matter as much as appearance.
How Do You Prevent Artwork and Color Arguments?
Artwork problems usually come from mixing creative files with production files. The factory needs a clean source file, a color reference, and a rule for what happens if the design contains detail below the process limit. If a line is thinner than the manufacturable minimum, the supplier should either simplify it before sampling or flag it before tooling starts. Do not assume the operator will preserve every pixel; many designs must be adapted to process reality. For metal, tiny gaps and fine text are the first features to collapse in sampling.
A practical production rule is to call out minimum text height and minimum line width. For small promo metal items, text below about 1.0 to 1.2 mm high is often risky, and line widths under about 0.2 to 0.3 mm may not survive cleanly in die-struck or enamel builds. For printed soft goods, the limit depends on the method, but buyers should still ask the supplier to flag text that will blur or fill in. If the factory redraws any element, require a revision note so the approved artwork and the production drawing stay aligned.
Color needs the same discipline. If your brand requires exact hues, use Pantone references or another agreed standard and confirm which parts are enamel, print, thread, webbing, or molded color. Ask the supplier whether they use manual mixing, pre-colored material, or digital print, because color tolerance changes by process. A reasonable expectation for most promo products is a commercial match within a visible tolerance, not perfect spectrophotometric precision. For multi-item kits, request a master color map so the same brand red on a pin, patch, and lanyard does not drift into three different shades.
If you are ordering at scale, ask for a production proof that shows both artwork and construction notes on one page. That proof should include Pantone callouts, line thickness, text sizes, plating finish, and any factory simplification. This reduces the risk that the sales sample, the approved sample, and the mass-production file all diverge. One approved page is worth more than several email confirmations.
- Provide vector artwork and a separate reference image
- Identify mandatory colors and acceptable substitutes
- Mark all small text, thin lines, and tiny cutouts for review
- Ask the supplier to flag non-producible details before sampling
- Confirm whether spot colors, gradients, or textures are acceptable
- Require a revision note on any factory-drawn production artwork
What Packaging and Hardware Details Should Be in the Brief?
Packaging is not just presentation; it affects damage rate, labor, and the customer’s first impression of quality. If the item ships retail-ready, tell the factory whether you want a backing card, OPP bag, printed box, blister pack, or bulk pack. For high-volume giveaways, an OPP bag is usually the lowest-cost option and may add only a small amount to FOB. A custom printed box or insert card adds print cost, manual packing time, and often one to several extra days of lead time.
Hardware needs the same treatment because many returns come from attachment failures, not from the decorative front. Tell the factory exactly what backing, clasp, ring, chain, hook, or magnet assembly you want, and whether the buyer will wear, pin, hang, or attach the item permanently. For pins, common options include butterfly clutch, rubber clutch, safety pin, and deluxe clutch; for keychains, split rings are cheaper while lobster clasps or swivel hooks are more premium. If child safety, fabric damage, or anti-rotation matters, state those constraints in the brief rather than expecting the supplier to infer them.
If the product has a functional claim, ask for the relevant test method in writing. A magnet should specify pull strength if the use depends on holding force; a clasp should state the open/close cycles expected; a badge reel should state cord retraction length and cycle count. Even a simple promo item benefits from a defined failure mode: loose hardware, sharp burrs, misaligned assembly, or packaging damage. The more the brief defines the use case, the less likely the sample will pass visually but fail in practice.
Common hardware specs should be written like manufacturing requirements, not marketing language. For example, a keychain might specify a 25 mm split ring with 0.8 mm wire diameter, a 12 mm inner ID, and nickel plating; a pin might require a 10 mm butterfly clutch and no exposed sharp points after assembly. If you need the item to sit flush in a tray, include the combined product-and-pack thickness. That single number often prevents late packaging redesigns.
What Should a Buyer Check on the Sample Before Mass Production?
A sample is not only for judging beauty; it is your chance to confirm the factory understood the brief. Check dimensions against the drawing, compare finish under the intended lighting, verify color against the approved reference, and inspect attachment feel or closure force. For metal products, look closely at plating coverage in corners, cut edges, and recessed areas, because those are the first places quality issues appear. If the item includes moving parts, magnets, or layered assembly, test motion and alignment several times rather than once.
A useful sample review should separate cosmetic acceptance from functional acceptance. Cosmetic issues might include small surface marks or tiny color shifts within an agreed range, while functional issues include loose parts, misaligned attachments, or packaging that crushes the product. If the sample is acceptable only with hand-fixes, do not assume mass production will improve automatically; ask what the line will change and how the factory will control it. A sample should prove the process, not just the one-off piece.
A practical acceptance standard is to define a defect threshold before approval. Many buyers use AQL-based inspection with a typical general inspection level of 2.5 for minor defects and 1.0 or 1.5 for major defects, depending on risk. For promo goods, that means you should state whether a cosmetic scratch, off-color fill, or slightly off-center backing card is minor, major, or rejectable. Once the factory knows the threshold, sample approval becomes much faster and much less emotional.
For launch-critical orders, ask the supplier to confirm the same QC criteria on the pre-production sample, in-line checks, and final inspection. For example, a pin may require 100% visual check for plating defects, sampling for size and hardness, and carton drop-checks at the outer pack level. The sample process should mirror the production control plan, not sit apart from it. That is how you prevent one good prototype from hiding a weak process.
| Sample Check | Pass/Fail Question |
|---|---|
| Size | Does it match the signed drawing within stated tolerance? |
| Color | Does it match the approved reference in daylight and indoor light? |
| Plating/finish | Is coverage even on edges, recesses, and contact points? |
| Hardware | Does the attachment hold under repeated use? |
| Packaging | Does the item arrive protected and presentation-ready? |
| Artwork | Did the factory preserve the agreed text, lines, and symbols? |
What’s the Fastest Way to Turn This Into a Reusable Checklist?
The best procurement teams use one brief template across all promo categories and only swap the product-specific fields. That keeps RFQs comparable and makes reorder decisions faster because the factory knows exactly which specs are frozen. Keep the final approved drawing, color callouts, hardware choice, packaging spec, and any approved exceptions in one place so future orders do not restart from guesswork. This matters even more when one campaign uses pins, coins, lanyards, and patches together.
A reusable checklist also helps you decide when to spend money on a sample and when a quote is enough. If the item is simple, low-risk, and already reordered, you may only need price and packing confirmation. If the item is new, branded, safety-sensitive, or launch-critical, require a full prototype and written sign-off before production. For standard promo metal goods, sample lead times often run 5 to 10 days, while mass production commonly takes 15 to 30 days after approval depending on order size, plating steps, and packaging complexity.
- Keep one master spec sheet per product family
- Archive approved samples with date and revision number
- Record any factory-approved deviations in writing
- Freeze the artwork version before tooling approval
- Require a named approver for each milestone
- Use the same brief format for all suppliers
For sourcing, ask for tiered quotes so you can compare cost against volume and timing. A common FOB structure for promo products is lower pricing at 100, 300, 500, 1,000, and 5,000 units. Custom metal items often price around USD 0.60 to 1.20 per piece at 100 to 300 units, USD 0.35 to 0.75 at 500 units, USD 0.25 to 0.55 at 1,000 units, and USD 0.15 to 0.45 at 5,000 units, depending on size, plating, and packaging. If the supplier cannot quote by tier, it is harder to tell whether the price is truly competitive or just tied to one quantity assumption.
Tiered pricing also helps you see where tooling, plating, and packing labor are actually driving cost. If the price drops sharply at 1,000 units but barely changes after that, labor or packaging may be the bottleneck. If a special finish adds only a small premium, it may be worth paying for the improved appearance. That kind of visibility is only possible when the brief is written tightly enough for apples-to-apples quotes.
What Should You Do Next?
Take one current RFQ and rewrite it as if the supplier has never seen your brand before. Add the exact size, material, finish, color standard, hardware, packaging, tolerance, and sample acceptance rules, then remove any phrase that depends on assumption. If the product will be reordered, note which specs are frozen and which can change by campaign. That single pass usually reveals the missing details that cause the first round of rework.
If you want fewer quote loops, send your next supplier a brief built from this checklist and ask them to restate the specs in their own production drawing before tooling starts. That one step exposes misunderstandings while changes are still cheap. For mixed promo kits, keep each item’s spec sheet separate but aligned on brand color, packaging style, and delivery date. The result is not just fewer mistakes; it is a sourcing process procurement can reuse with less back-and-forth and fewer surprises.
Have a project? Send your artwork and target quantity and we’ll reply with a detailed quotation within 12 working hours.
Ready to get this made?
Send your sketch, target quantity and ship-date. Detailed quotation in 12 hours.


