How to Brief a Mixed Promo Kit Without Rework
Start with the kit as one product, not four orders
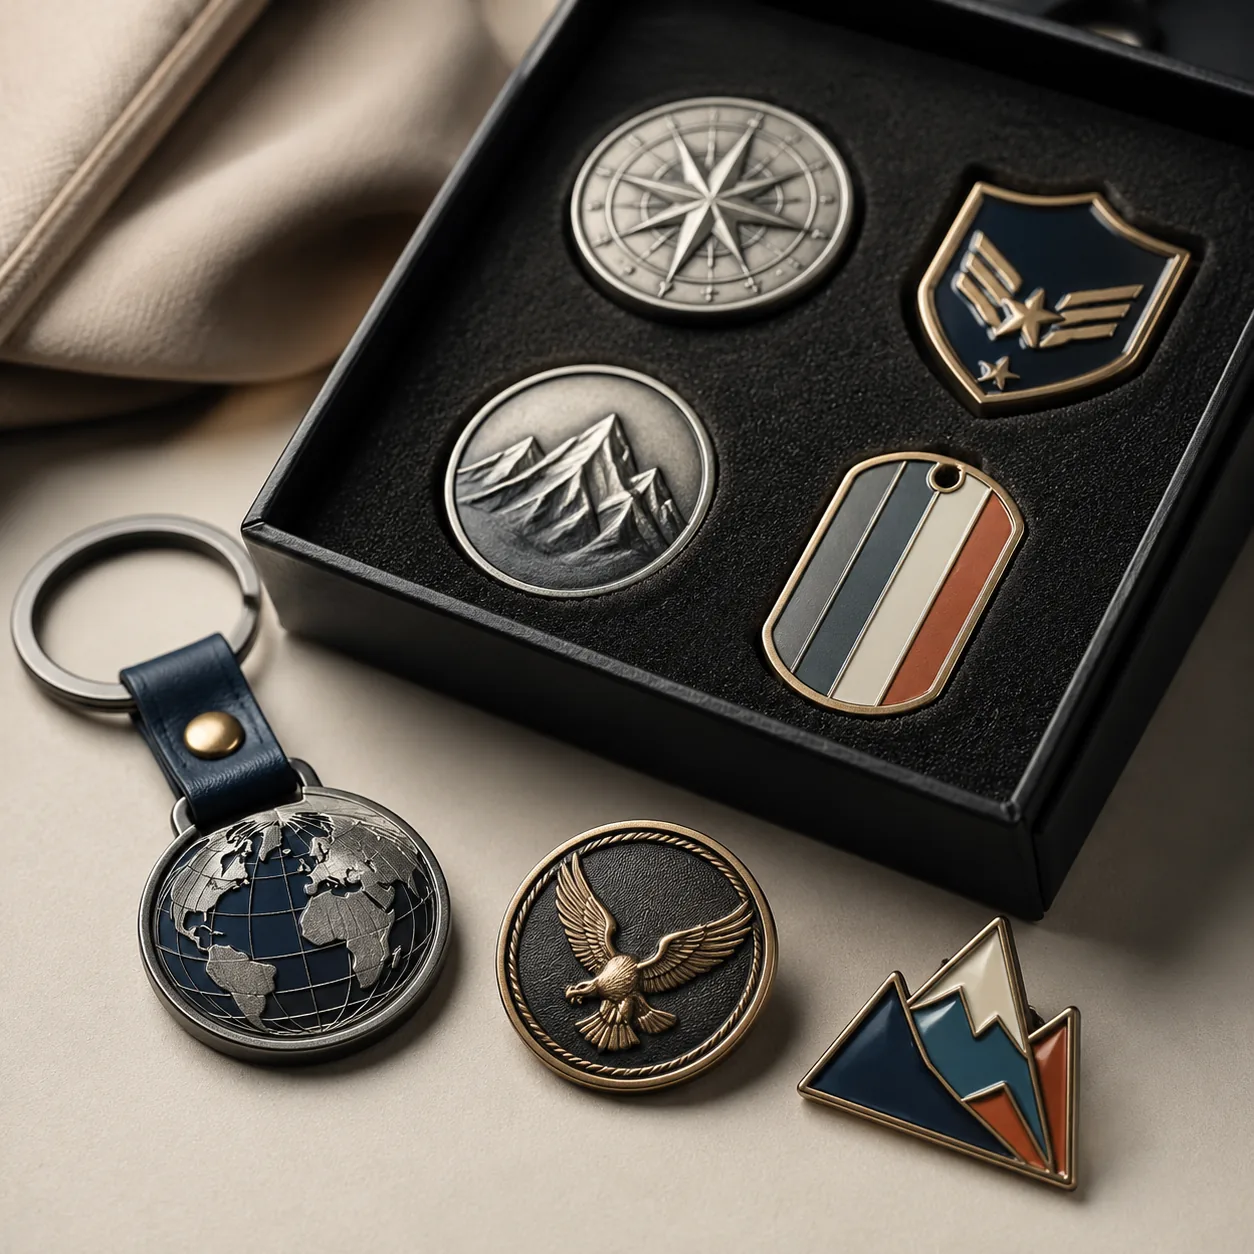
A mixed promo kit is usually bought as a single experience: a trade-show giveaway, a membership welcome set, a VIP launch pack, or a retail bundle that needs to look coherent the moment it is opened. The most common failure is treating pins, coins, patches, and lanyards as four independent SKUs. Each part may pass its own inspection and still produce a mismatched set in the tray.
The brief should define the end use before any quote is requested. Name the hero item, the shipping format, the target audience, and the visual hierarchy. If the pin or coin is the focal point, it can carry the highest polish and the most precise plating control. If the lanyard or patch is the lead brand carrier, then the metal items should support rather than compete. A strong hierarchy prevents the factory from over-engineering every part and inflating cost without improving the kit.
The other early decision is the shared constraint. Most kits are governed by one of three things: color match, pack-out thickness, or total weight. Color matters when items must read as one brand under retail lighting. Thickness matters when components sit in a common tray or folded insert. Weight matters when the kit must stay inside a mailer or shipping carton target. If no single constraint is declared, each supplier optimizes only its own part and the final kit becomes harder to assemble and more expensive to ship.
Define the visual hierarchy and the dominant spec
The safest mixed kits use one dominant spec and several supporting specs. The dominant spec is usually a plating family, Pantone target, weave density, or pack-out format. Supporting specs should stay subordinate to that choice. A polished gold hard-enamel pin can work beside a woven patch and a one-color lanyard. The same pin may look out of place beside an antique silver coin and a high-gloss printed strap unless the whole system is intentionally vintage.
Do not premium-up every component. That usually creates visual noise, adds cost, and still leaves the kit without a clear focal point. Instead, decide where the budget should be seen first. For executive kits, subdued finishes such as satin silver, black nickel, or antique brass generally coordinate better than mirror polish. For large event runs, legibility and abrasion resistance matter more than decorative complexity.
| Control item | Recommended spec range | Why it matters | Typical risk if omitted |
|---|---|---|---|
| Pin thickness | 1.2–1.5 mm hard enamel; 1.5–2.0 mm soft enamel | Keeps the pin visually aligned with the rest of the set | Pin looks too thin or too bulky next to other pieces |
| Coin thickness | 2.5–3.5 mm standard promo coin; 3.5–5.0 mm premium challenge-coin style | Controls hand-feel and tray depth | Insert and foam cutout no longer fit |
| Lanyard width | 15–20 mm for event kits; 25 mm for premium badge programs | Balances print area, comfort, and cost | Logo becomes cramped or strap feels cheap |
| Patch size | 70–90 mm for jacket or bag kits; 50–70 mm for smaller utility packs | Preserves stitch or woven detail | Artwork loses detail or looks oversized |
| Insert tolerance | ±1.0 mm for rigid insert cutouts; ±1.5 mm acceptable for folded paper inserts | Prevents rattling and misalignment | Kit shifts in transit and scratches components |
| Pantone match | Target ΔE ≤ 2.0 on critical items; ≤ 3.0 on support items | Keeps brand color consistent across substrates | Blue on fabric, print, and enamel reads as three different colors |
Choose processes that travel well together
Not every decoration method behaves the same in a mixed kit. Soft enamel tolerates handling variation better than ultra-gloss polish, but it may not carry the perceived value of a premium coin. Sublimated lanyards are light and flexible, yet they can make a metal-heavy kit feel less substantial unless the packaging adds structure. Woven patches are durable in transit, but their texture can look flat beside mirror-polished metal if the design system does not account for that contrast.
Pair finishes by perceived value, not by technical similarity. Brushed and matte metal finishes usually coordinate more naturally with woven or embroidered items than high-gloss print does. If the kit is for VIPs, antique gold, black nickel, or satin silver often reads more cohesive across substrates. If it is for mass distribution, prioritize durability, clear branding, and low fallout risk over surface drama.
Price stacking matters too. A coin at roughly $1.80–$4.50 FOB at 500–1,000 pcs and a lanyard at $0.28–$0.85 FOB at 1,000–5,000 pcs should not be paired with packaging that costs more than the visible goods. For a transit bundle, a $0.12 polybag plus a $0.35 printed insert may be enough. For a retail-ready kit, a $0.65–$1.40 rigid tray and sleeve can be justified. The quote only looks cheap when the add-ons are ignored.
A practical production range helps buyers sanity-check assumptions. Pins commonly land at $0.60–$1.80 FOB for 500–1,000 pcs depending on size, plating, and enamel fill. Patches often run $0.35–$1.20 FOB based on weave density, embroidery coverage, and backing. Lanyards typically sit at $0.20–$0.90 FOB depending on width, print method, and attachment hardware. Coins are usually the most expensive visible item, often $1.80–$6.00 FOB depending on diameter, thickness, edge treatment, and finish. For a balanced set, the packaging should support those values instead of overpowering them.
Match attachment and packaging to the use case
A mixed kit often fails at the accessory level. A magnetic backing is excellent for jackets and presentation pieces, but useless on thick conference bags or heavy coats with poor drape. A butterfly clutch is cheap and common, but repeat users often prefer a rubber clutch or locking back for retention. A brooch-style pin can damage delicate fabric if the gauge or spring force is too aggressive. Each choice has to match both the substrate and the expected wear pattern.
Packaging must be designed around the assembled kit, not around the largest item alone. A paper insert card works for a pin-and-patch duo, but once a coin and lanyard are added, the layout usually needs a deeper tray or a compartmented fold. For mail-ready sets, a rigid tray, a PE bag, and a carton insert help prevent metal from rubbing printed surfaces. Good suppliers ask for the full kit before quoting the insert because packaging often changes total cost more than one of the smaller SKUs does.
If the order will move through postal handling, specify the carton target clearly. For standard promo kits, buyers often want outer cartons to survive 1.0–1.2 m drop handling with no visible crush. Internal movement should be limited to 2–3 mm. Sharp edges should not touch printed faces. If the kit is retail-only and not postal-sorted, the packing spec can be lighter, but it still needs a controlled fit so the first unpacking looks deliberate rather than improvised.
- Use one tray size or insert format across the set where possible.
- Separate sharp metal edges from printed or coated surfaces.
- State whether the kit ships as a retail bundle or a transit bundle.
- Confirm if the outer carton must survive postal sorting or only warehouse handling.
- Request a packed sample before mass production when finishes are mixed.
- Ask for AQL levels on each component: 1.0 for hero items, 2.5 for support items, and 4.0 only for low-risk inserts.
Use one master spec sheet and short mini-specs
The cleanest RFQ is not the longest one; it is the one that makes dependencies obvious. The buyer should list every component and also name the spec that controls the rest: color, finish, size, or pack-out. If the supplier knows that the coin plating must match the pin plating, or that the lanyard blue has to read the same as the patch border, it can coordinate production before tooling begins. That usually reduces sample loops more effectively than adding another page of brand language.
The best structure is one master spec sheet plus short mini-specs for each item. The master sheet carries the shared rules: Pantone reference, finish family, tolerance target, carton format, and approval sequence. The mini-specs cover item-level details: pin diameter, coin rim thickness, patch backing, lanyard width, and any special attachment. This format keeps one error from spreading across the whole order and makes supplier comparison easier.
| Brief element | What to specify | Buyer decision it controls |
|---|---|---|
| Master color reference | Pantone code plus acceptable visual tolerance under D65 light | Whether all items read as one brand |
| Plating family | Gold, silver, black nickel, antique brass, matte nickel | How metal items coordinate visually |
| Component hierarchy | Hero item, secondary item, and support item | Where to spend on detail and finish |
| Pack-out method | Individual pouch, shared tray, or retail box | Carton size, labor, and damage risk |
| Approval route | Digital proof, pre-production sample, packed sample | How many sample rounds are likely |
Price, MOQ, and lead time move together
A low FOB quote is often incomplete, not competitive. One factory may quote pins attractively but leave out matched packaging, insert cutting, or manual assembly. Another may offer a cheap lanyard but use print consistency that does not match the rest of the kit. Buyers should compare the landed cost of the finished set, not the sum of individual line items. In mixed kits, freight and labor can shift the total by 15–30% even when the decorated items look similar on paper.
MOQ and lead time rise as process complexity rises. A simple set with one enamel pin, one woven patch, and a printed lanyard may be viable at 300–500 sets if standard components are already in stock. Custom coins, specialty backings, and retail boxes usually push the practical MOQ to 500–1,000 sets. Premium multi-piece kits with custom inserts and assembly are more realistic at 1,000–3,000 sets. Typical lead times are 12–18 days for plain or near-standard items, 18–25 days for mixed kits with shared packaging, and 25–35 days when tooling, special plating, or packed samples are required.
FOB ranges should also be read as tiers, not promises. For example, a 500-piece pin order in soft enamel with standard plating may sit near the low end, while a larger pin with hard enamel, polished edges, and custom backing moves up. Lanyards with screen print or dye-sublimation can be economical at volume, but woven or jacquard structures with metal hooks and safety breaks cost more. Coin pricing is highly sensitive to diameter, thickness, rim style, and plating count. If the quote does not separate the visible items from the pack-out and assembly, it is not yet ready for approval.
Release the PO only after the set is proven together
Before issuing the purchase order, confirm three things: the kit hierarchy, the packed sample, and the allowable variation. If those are not fixed, the first mass-production run becomes the real sample, and that is where rework gets expensive. A strong PO does not only list quantities; it states how the items must look together, fit together, and ship together.
Request one coordinated pre-production sample in final or near-final form. Check the colors under the same light source, verify the packed dimensions, and confirm whether any item shifts or scratches when the carton is shaken. If the kit contains metal and textile components, ask for abrasion checks on any printed surface that can rub against a hard edge. If the sample passes, mass production can usually proceed with fewer surprises. If it fails, it is much cheaper to correct the shared spec now than to fix four separate SKUs later.
Before release, ask the supplier to confirm these controls in writing: finish family, Pantone target, dimensional tolerance, AQL, pack-out method, and carton drop expectation. For hero items, AQL 1.0 is a reasonable target; for support pieces, AQL 2.5 is common; for low-risk inserts, AQL 4.0 may be acceptable. That short list often prevents a sample loop and avoids a delay of 5–10 days. In mixed promo kits, clarity at the brief stage is usually worth more than a lower unit price.
Have a project? Send your artwork and target quantity and we’ll reply with a detailed quotation within 12 working hours.
Ready to get this made?
Send your sketch, target quantity and ship-date. Detailed quotation in 12 hours.


