How to Brief a Factory for a Promo Set Without Rework
What usually goes wrong in mixed promo sets?
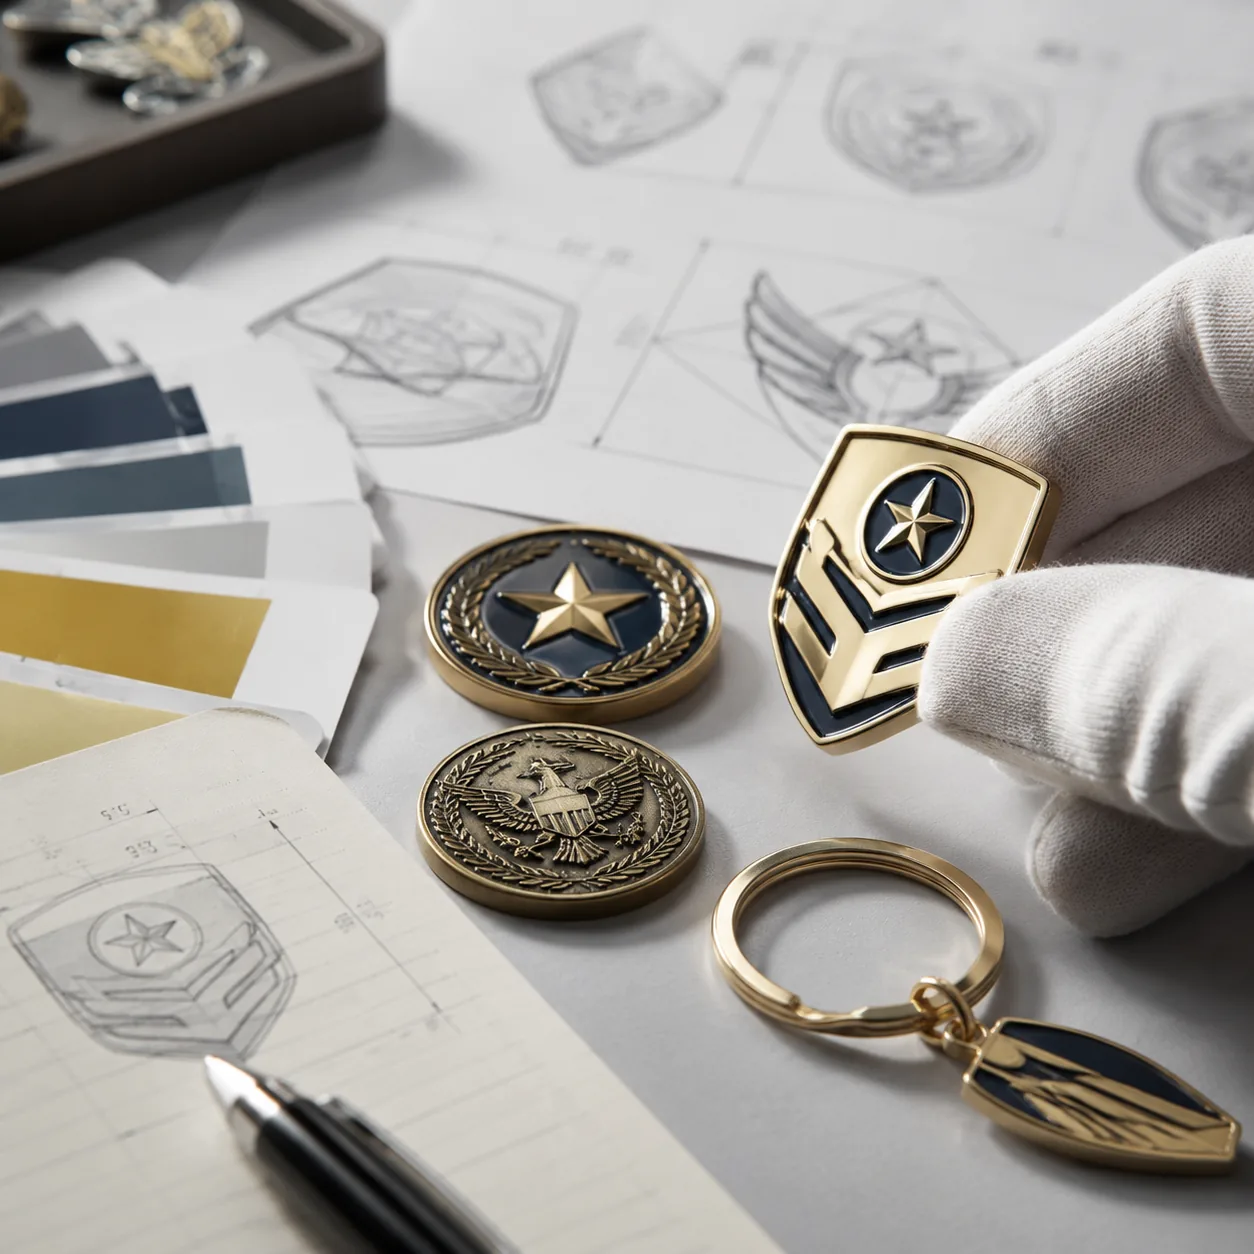
The most common failure in a promo set is not a bad pin, bad keychain, or bad patch on its own. It is the mismatch between what was quoted, what was approved, and what finally ships as one bundle. A 32 mm enamel pin may pass inspection, and a 55 mm keychain may also pass, but if the insert card is 2 mm too narrow or the pouch zipper closes over a thicker ring, the set still needs rework at packing.
Mixed sets fail because each component carries its own tolerance stack. A metal badge, woven patch, printed card, and lanyard can all be straightforward, yet they may involve different factories, different finish assumptions, and different inspection criteria. If the buyer does not define the set as one system, the supplier fills gaps with defaults: a thicker substrate, a looser color match, or packaging that only works in theory.
The cleanest projects start with one master brief that treats the set as a single production program. That brief should lock the visual standard, the pack-out order, the quantity per set, and the acceptable variance for each component. The goal is not cosmetic perfection; it is avoiding preventable mismatch at assembly, packing, and final inspection.
In practice, the biggest rework drivers are dimensional drift, missing pack-out details, and ambiguous artwork ownership. If the brief says “premium set” instead of “1 soft enamel pin, 1 woven patch, 1 350 gsm backing card, 1 matte zip pouch,” the factory will make assumptions that may be acceptable for a quote but not for delivery.
What should I define before asking for quotes?
Start with the use case, because the use case changes the spec. A retail gift set needs tighter color control, better packaging, and cleaner surface finishing than a mass giveaway. A conference handout can tolerate a simpler pouch, lighter substrate, and looser cosmetic acceptance, while a VIP gift set may need rigid packaging, die-cut inserts, and stricter defect screening.
Then define each item by the way factories actually quote it. Pins and coins are usually priced by maximum width and height in mm, keychains by overall size excluding ring, patches by widest dimension, and lanyards by width and finished loop length. For irregular shapes, include the full bounding box plus a vector outline; quote errors often start when the supplier estimates the silhouette instead of reading it from a file.
Material and finish must be practical, not vague. State base metal, alloy, plating color, enamel type, patch backing, print method, weave density, and any topcoat such as epoxy dome or anti-scratch varnish. If you leave these open, a low quote may simply mean thinner zinc alloy, lower fill depth, or a cheaper backing that changes the final appearance and feel.
Use a bill of materials, not a marketing description. A factory can quote faster, and you can compare offers more honestly, when every SKU has the same definition format. That also reduces revision churn when artwork changes late in the process.
A useful minimum brief includes the following fields:
- Exact quantity per SKU and total set quantity
- Product dimensions in mm, including the bounding box for irregular shapes
- Material, substrate, and plating or print finish
- Pantone reference and match priority by component
- Attachment hardware, backing type, and closure method
- Packaging style, insert size, and carton pack-out
- Target tolerance by component, not only by set
- Sample approval stage, revision limit, and defect threshold
Which specs belong in one brief?
A complete brief should read like a small production pack. It needs the SKU list, art file version, intended use, packaging format, carton target, compliance requirements, and the final assembly sequence. If the same brand mark appears across different materials, spell out color-matching priority because enamel, print, embroidery, and woven thread do not behave the same way under light.
Write tolerances and approval rules in the brief, not in email replies. For small metal products, a realistic dimensional tolerance is usually plus or minus 0.2 to 0.3 mm on critical features and plus or minus 0.5 mm on non-critical edges. For printed or textile pieces, a practical tolerance is often plus or minus 1 mm on cut size and 5% to 10% on color or coverage variation, depending on the process. The key is consistency across the bundle, not one item being perfect while another is allowed to drift.
If the set includes more than one decorative process, define the acceptable match method for each one. Pantone references are useful for print and paint, but plated metal, soft enamel, sublimation, and woven thread will never appear identical. Buyers should set a priority order: brand hue match, contrast clarity, or surface gloss, so the supplier knows what matters most when a full optical match is impossible.
For inspection language, be specific. A standard promo good can often be held to AQL 2.5 major and AQL 4.0 minor, but the critical point is to define what counts as a major defect for the set as a whole. A wrong color may be minor on a utility insert and major on a front-facing logo panel. Likewise, a 1 mm trim shift may be acceptable on a pouch and unacceptable on a die-cut insert card with registered graphics.
For quote and approval control, do not let suppliers substitute file names or unversioned screenshots. Require one named artwork version, one named BOM, and one named pack-out drawing. If the project later changes, you want a revision trail, not a thread of contradictory chat messages.
How do I compare quotes without getting fooled?
Quote comparison only works when suppliers are bidding on the same definition. If one factory quotes zinc alloy with soft enamel and another quotes iron with hard enamel, the price difference is not a bargain; it is a product-definition mismatch. The same problem shows up in packaging, because a clear polybag and a custom insert card can move landed cost enough to make the quote ranking meaningless.
Ask each supplier to separate the quote into unit price, tooling, packaging, inner carton, outer carton, and any setup charge. Also ask whether tooling is one-time or reusable, whether plating is included, and whether print, embroidery, or laser setup is a separate fee. For mixed sets, compare at your actual order tiers, such as 300, 500, 1,000, and 3,000 sets, because many factories price aggressively at 1,000+ but add a surcharge below that threshold.
The numbers below are typical FOB China ranges for a small mixed promo set built from standard processes, assuming moderate artwork complexity and non-luxury packaging. Actual pricing moves with finish complexity, number of colors, and whether the items share one factory or are kitted from multiple sources.
| Item | Typical MOQ | Typical lead time (days) | Typical FOB price range | Notes |
|---|---|---|---|---|
| Soft enamel pin, 30–40 mm | 300–500 pcs | 10–18 | USD 0.35–1.20/pc | Higher relief, glitter, or epoxy increases cost |
| Die-struck coin, 38–45 mm | 300–500 pcs | 12–20 | USD 0.55–1.80/pc | Antique plating and edge text add tooling time |
| PVC or woven patch, 70–90 mm | 500–1,000 pcs | 12–22 | USD 0.28–0.95/pc | Sew-on backing is cheapest; Velcro adds cost |
| Printed polyester lanyard, 20 mm x 900 mm | 300–500 pcs | 8–15 | USD 0.18–0.65/pc | Safety breakaway and metal clasp increase price |
| Custom backing card or insert | 500–1,000 pcs | 7–12 | USD 0.04–0.22/pc | Paper weight and finish drive variance |
| Simple polybag or pouch | 500–1,000 pcs | 5–10 | USD 0.03–0.40/pc | Rigid boxes can exceed USD 0.80/pc |
Use the quote to test discipline, not just price. A supplier that gives one line total without dimensions, material callouts, or pack-out details is signaling future revision risk. A slightly higher FOB quote with clearer assumptions is often the safer choice because it reduces the chance of sample loops and assembly corrections later.
If you want a realistic procurement comparison, ask for these fields in every reply: Incoterm, production days, sample days, MOQ by item, tooling cost, carton dimensions, gross weight, and whether the factory will kit in-house or ship loose components for third-party assembly. Those details often matter more than a small unit-price gap.
What sample process prevents rework?
A mixed set should never move from artwork to bulk production in one jump. The safer sequence is artwork sign-off, pre-production samples for each critical item, assembled set mock-up, and then final approval against the actual pack-out method. A pin can be perfect on its own and still fail when paired with a card, tray, or pouch that changes how it sits in the bundle.
For metal items, request pre-production samples after tooling and plating are stable, not before. For printed and textile pieces, ask for strike-offs, lab dips, or weave samples when those methods apply. If the set has multiple decorated surfaces, sample each process separately so you can compare edge quality, color density, and legibility without one process hiding another.
Do not approve bulk until the assembled sample matches the final packaging. A sample that sits loose in a pouch is not a valid reference if production will use a tight thermoformed insert. The fit, viewing angle, and friction points all change the presentation. For bundle jobs, a single golden sample is usually the best control document because it shows the real assembly order, the exact arrangement, and the final closure method.
A practical approval limit is one or two revision rounds per critical component. Beyond that, the project is usually drifting because the brief is incomplete. Every new sample should answer one question: did the last revision close the gap, or did it create another variable?
Build sample checkpoints around measurable evidence, not just photos. Ask for caliper shots on key dimensions, a side view of the final stack height, and a close-up of any registered print or stitching. When the supplier cannot show these basics, the risk of hidden variance rises sharply.
How should I set inspection and acceptance rules?
Inspection rules should be written for the set, not just the components. Many buyers use AQL 2.5 for major defects and AQL 4.0 for minor defects on promotional goods, but the more important rule is whether the bundle functions as one finished item. If the pin is acceptable but the keychain ring is loose, the set still fails in use.
Define defect categories by impact. Major defects include wrong Pantone match beyond tolerance, missing parts, broken attachments, wrong count per set, or packaging that cannot close properly. Minor defects can include slight surface marks, tiny fill variation, or minor edge shadowing, but only if they do not affect branding, safety, or fit. If a defect changes how the set presents on shelf or in hand, it should be classified as major.
Set a count check at the set level before carton sealing. For promo sets, the factory should verify one-to-one completeness at the kitting stage, then again during carton sampling. If there is any risk of component mixing, require labeled trays, lot segregation, or in-factory kitting rather than leaving assembly for the buyer’s warehouse.
A practical acceptance package should include approved photos, a signed golden sample, the AQL level, the sample size, and the exact packaging count per carton. If the buyer expects 50 sets per inner box and 200 sets per master carton, that must be written down. Otherwise, the supplier may optimize for shipping efficiency and unintentionally change the presentation standard.
For dimensional acceptance, do not rely on a single general tolerance across all components. A 0.25 mm drift may be fine on a metal edge but unacceptable on a fitting tab; a 1 mm variance may be acceptable on a printed sleeve but not on a die-cut insert that controls positioning. Match the tolerance to the function.
What packaging details matter most?
Packaging is where mixed sets often fail quietly. The products may be correct, but the presentation, protection, and shipping volume do not work together. Measure the internal cavity first, then choose the insert or pouch around that cavity, instead of trying to force a packaging style to fit after the fact.
If the set is gift-oriented, request a physical mock-up using real product thickness, not just flat artwork. A backing card that looks fine on screen may warp once a heavy coin or metal keychain is attached. For event giveaways, a clear polybag with a printed card insert is often the better cost-control choice than a rigid box, especially below 1,000 sets where box tooling and freight volume can dominate the budget.
The packaging format should match the product weight and handling risk. A 20 mm lanyard with a pin and patch can often ship in a reinforced polybag or sleeve, while a three-piece set with metal components may need a blister, tray, or small rigid box to prevent scuffing. If the parts can contact each other during transit, add separators, film sleeves, or cavity inserts rather than assuming the carton will protect them.
Compare packaging options on four variables: shelf impact, protection, shipping volume, and assembly labor. A pouch may look premium but add manual packing time; a rigid box may improve perception but increase cubic meters per carton. The best packaging is the one that fits the sales channel, not the one that looks most expensive in isolation.
Typical packaging choices buyers compare:
- Polybag: lowest cost, weakest presentation, best for bulk giveaways
- Backing card: strong branding surface, moderate cost, needs exact fit
- Pouch: better perceived value, higher unit cost, more carton volume
- Rigid box: strongest gift presentation, highest cost, most freight impact
Add packaging tolerances to the brief as well. If a pouch opening is only 1–2 mm wider than the finished stack, the factory may need to slow packing or reject units that would have been fine in a looser format. A packaging spec with 3–5 mm of practical clearance is usually safer for manual kitting, unless the design intentionally relies on a snug presentation.
When does a set need engineering review?
Any set with moving parts, mixed metals, magnets, or tight visual alignment should get an engineering review before production. This is especially true when one item can scratch another during transit. A plated coin can mark a soft enamel pin if the insert allows rubbing, and a metal keychain can dent a printed lanyard if the pack-out is loose or the carton flexes in transit.
Engineering review is also needed when the buyer wants one brand to appear across different surfaces and expects the color to look identical everywhere. That is rarely realistic without test standards, because plating, enamel fill, printed polyester, and woven thread reflect light differently. The correct objective is controlled consistency: the same brand family, the same visual weight, and the same tone direction under similar lighting.
For bundle jobs, the factory should review stack height, contact points, corner radii, and carton compression before sampling. If a keychain ring sits 3 mm higher than the card recess, or a metal edge presses against a printed area, the set may fail even when each item meets its own spec. This is why a simple line drawing is not enough; the factory needs a true assembly view.
A practical engineering check can catch issues early: if the total thickness of the bundled items plus insert exceeds the cavity by more than 1.5 mm, revise the packaging instead of forcing the fit. That small gap becomes a major problem once humidity, carton compression, or operator variation enters the line.
For mixed-material sets, also check corrosion risk, coating compatibility, and abrasion. Soft-touch coatings can mark under pressure, matte black plating can show scuffing faster than polished nickel, and adhesive-mounted components may need 24–48 hours of cure time before pack-out. These are small details, but they are often what separate a stable run from a repeated sample loop.
What should I do next?
Turn the project into one master brief and one approval trail. Send the same spec sheet to every supplier, require itemized pricing, and insist on an assembled sample before bulk payment. If the supplier cannot explain how the set will be packed, inspected, and kitted, the quote is not ready for comparison.
For China sourcing, ask for a line-by-line offer with dimensions, materials, packaging, lead time in days, MOQ, and inspection method written beside each SKU. That document is more useful than a polished sales reply because it exposes hidden assumptions, makes revisions faster, and gives you a better reorder record. Once the standard is locked, the second run is usually smoother than the first.
A final buyer-side checklist helps prevent late surprises:
- Confirm one master brief with all SKUs and pack-out order
- Require FOB pricing at 300, 500, 1,000, and 3,000 set tiers
- Approve one assembled golden sample before bulk payment
- Lock tolerances, AQL, and defect categories in writing
- Verify insert dimensions against real product thickness
- Name the owner of tooling, artwork, and packaging files
- Ask for a carton spec with net weight, gross weight, and carton dimensions
Have a project? Send your artwork and target quantity and we’ll reply with a detailed quotation within 12 working hours.
Ready to get this made?
Send your sketch, target quantity and ship-date. Detailed quotation in 12 hours.


