How to Approve a Custom Promo Sample Without Rework
What Problem Does Sample Approval Actually Solve?
Most rework on custom promo products starts with one bad assumption: that a sample is only for visual approval. In practice, the sample is the last controlled checkpoint before tooling, plating, printing, stitching, packing, and cartonization are locked in. If you approve from photos alone, you can miss the details that create the highest failure rate in production: plating tone, enamel fill height, print registration, clasp fit, seam strength, and package clearance.
A proper approval process answers three questions at once: does the sample match the artwork and spec, does it survive basic handling, and can the factory reproduce it consistently at the agreed price and lead time. For small-batch promo items, that means reviewing dimensions, materials, finish, and packing as one system, not as isolated checks. On items like enamel pins, challenge coins, woven patches, lanyards, and keychains, a well-run sample review prevents the most expensive kind of defect: 5,000 pieces that are technically made correctly to a vague approval note.
For procurement teams, the sample is not a courtesy step. It is a production gate. Treat it that way and you reduce disputes, returns, and last-minute airfreight corrections.
Q: Which Sample Type Should I Approve?
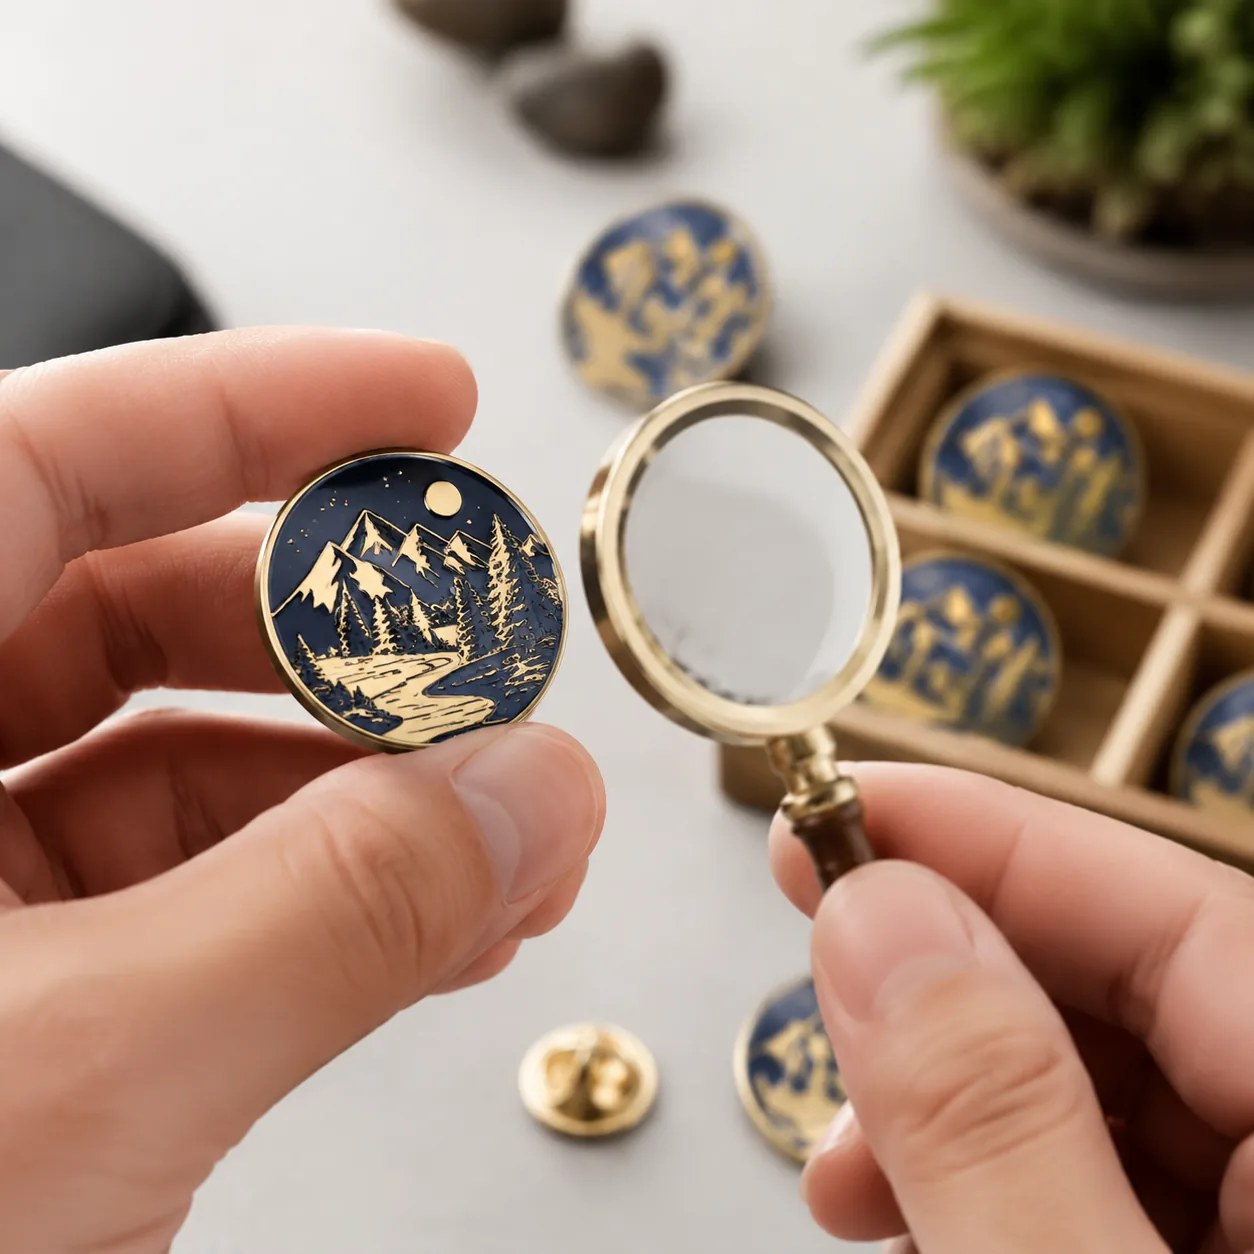
Not every order needs every sample type, but every order needs the right one. A color chip confirms appearance only. A white sample confirms size and structure only. A pre-production sample is the closest match to mass production and is the correct point for final sign-off on color, plating, hardware, print, and packaging. A golden sample is the retained reference used for reorders and future batch comparison.
| Sample type | Best use case | Typical risk | Typical timing |
|---|---|---|---|
| Color chip | Pantone or plating confirmation | High for fit, hardware, and assembly | 3-5 days |
| White sample | Size, structure, packaging fit | High for color and finish | 4-7 days |
| Pre-production sample | Final production sign-off | Low if specs are complete | 7-14 days |
| Golden sample | Repeat-order reference | Low for future batches | Kept after approval |
For stable, simple products, a white sample plus a plating chip may be enough. For complex designs, insist on a full pre-production sample. That applies when line widths are below 0.25 mm, when the item uses mixed plating, epoxy dome, dual backing, moving parts, or when packaging clearance is tight. If your lead time is under 20 days, build the sample window into the schedule before you release deposit, because approval delays are often the real bottleneck.
Practical buying ranges help set expectations. Typical minimum order quantities are about 100-300 pieces for simple printed lanyards, 300-500 pieces for patches, 500 pieces for many soft enamel pins, and 500-1,000 pieces for coins and complex hard-enamel items. Sample development usually adds 7-14 days to the order clock, and production commonly runs 10-20 days after approval depending on finish and quantity. For FOB pricing, simple printed lanyards often land around USD 0.40-1.20 each, woven patches around USD 0.70-2.50, soft enamel pins around USD 0.80-2.20, and challenge coins around USD 1.80-6.50 depending on size, plating, and packaging.
Q: What Must I Measure on the Sample?
Measure against the drawing, not against memory. The most common misses are overall width, thickness, internal cutout clearance, hole position, edge radius, and attachment location. For most metal promo items, a practical tolerance target is ±0.3 mm on overall dimensions and ±0.2 mm on critical features such as pin post position, magnet pocket, clasp center, chain hole, or hinge alignment. For soft materials like patches and lanyards, allow slightly wider tolerance on finished size, commonly ±1-2 mm depending on construction and cut method. If the factory cannot state a tolerance, the drawing is not complete enough for approval.
Do not stop at dimensions. Check whether the finish matches the production method you ordered. A recessed soft-enamel badge should have clean metal walls and even fill, while a hard-enamel badge should be flush or nearly flush with the metal border after polishing. Printed items need clean edge registration and no banding. For embroidery, check stitch density, backing stability, and border trim. For magnet products, verify pole direction and bonding depth. For products that will be worn or handled repeatedly, basic abrasion and rust resistance matter more than a perfect first glance.
- Confirm overall size, thickness, and any cutout width against the drawing.
- Check critical features: post position, magnet location, hole spacing, clasp fit, or hinge alignment.
- Verify plating color, gloss level, and edge coverage under daylight and warm light.
- Inspect enamel fill, print registration, stitch density, or epoxy dome height.
- Test attachment function: clasp hold, chain movement, magnet pull, or sew-on stability.
- Review packaging fit, insert size, and carton count before mass production.
Q: How Do I Judge Color and Finish Without Guessing?
Color is one of the easiest areas to approve badly because people compare a sample to a screen instead of a standard. For enamel or print, the reference should be a physical Pantone chip, a sealed color board, or a previously approved golden sample. For plating, specify the finish in industry terms such as bright nickel, black nickel, antique brass, matte gold, or brushed silver, and make the finish do the work instead of vague language like “nice gold.”
If you need a quantitative expectation, ask the factory how they control finish thickness and appearance. Decorative electroplating on promo items is often in the rough range of 0.03-0.08 microns for cosmetic coatings, while wear-resistant functional coatings may be specified thicker depending on process and base metal. That number should be written into the spec only if the factory can measure and repeat it. For antique finishes, a clear coat can improve wear resistance, but it also changes gloss and can slightly mute contrast.
Lighting changes the apparent color of both enamel and plating. A glossy hard-enamel badge will make blue read darker than the same blue on a matte print. Antique plating lowers contrast on tiny text. If the product will be sold at events, under indoor retail lighting, or outdoors, review the sample under those conditions before approving it. For outdoor use, ask about UV stability up front, because not all inks and clear coats are suitable for prolonged sun exposure.
| Feature | What to approve | Common mistake | Safer spec |
|---|---|---|---|
| Enamel color | Physical swatch match | Screen-only approval | Pantone chip or golden sample |
| Plating tone | Visual finish and edge coverage | Accepting vague gold/silver | Named finish plus reference sample |
| Print density | Opacity and registration | Ignoring thin ink on dark base | Two-pass print or higher opacity |
| Clear coat | Gloss and scratch resistance | Skipping abrasion check | Light rub test before sign-off |
For printed artwork, ask for a register tolerance and minimum line weight. A sensible target for small print on promo hardware is at least 0.2-0.25 mm line weight, while very fine type below 4 pt often becomes unreadable after plating or coating. If the artwork depends on tiny text, simplify it before approval. The sample cannot rescue an over-detailed file.
Q: Which Hardware and Assembly Points Need a Checklist?
Hardware is where many samples look fine and then fail in use. For pins, check the clutch type, pin post length, and whether the post is centered enough to reduce rotation. For keychains, inspect ring gauge, split-ring tension, and whether chains or jump rings are soldered or merely closed. For lanyards, confirm clasp force, breakaway function, stitching at the neck and clip ends, and print legibility across the full length.
If the item has moving parts, magnets, or layered assemblies, test them three ways: hand movement, light pull, and repeated open-close cycles. Many assembly issues do not show up until the part is cycled 10-20 times, especially weak rivets, loose hinge pins, or under-crimped joints. For challenge coins and similar medallion products, inspect rim depth, recessed text, and relief height so the strike remains crisp and readable. A sample note should say what passed, not just that it “looked fine.”
A useful rule is that the more functional the item, the more you should treat the sample like a product test rather than a design review. A lanyard clip that opens too easily or a pin back that twists under fabric load will create complaints even if the artwork is perfect.
- Pin back: post alignment, clutch grip, rotation risk, and fabric damage.
- Keychain: ring closure, chain length, and pendant swivel strength.
- Magnet products: pull force, pole direction, and pocket bonding.
- Patches: border trim, stitch density, backing adhesion, and cut edge clean-up.
- Lanyards: print clarity, seam strength, breakaway fit, and clip action.
Q: When Should I Reject a Sample Instead of Asking for Tweaks?
Reject the sample when the defect is structural, not cosmetic. If the thickness is outside tolerance, the attachment is mispositioned, the mold detail is too soft, the stitch count is too loose, or the packaging cannot physically fit the product, a tweak may hide the issue for one batch but will not solve the root cause. The sample exists to expose those errors before tooling and line setup are locked.
Ask for a revision when the issue is local and measurable, such as a slightly weak enamel fill, a plating tone shift within a recoverable range, or a packaging insert that needs a tighter cutout. Separate opinion from requirement. “Blue is too dark” is weak; “Pantone 2945 C reads one shade darker than the approved chip under daylight” gives the factory a clear target. The more precise your rejection note, the less likely the next sample will drift in a different direction.
If the defect affects function, approve nothing until it is corrected. If it affects appearance only, decide whether the item is still acceptable for the channel it will be sold in. That judgment should be made against your campaign standard, not against the supplier’s best case.
What Does a Strong Approval Record Look Like?
A strong record is short, specific, and hard to misread. It should include the sample date, item name, SKU, revision number, quantity, finish method, agreed dimensions, color reference, hardware spec, and packaging configuration. Add photos of the physical sample beside a ruler or caliper, and keep the approved unit as the golden sample. If the order has multiple SKUs, store the approval record per SKU rather than in one combined note.
This matters because many production disputes are really documentation disputes. If the mass batch matches a weak record, the factory can argue it met approval even if the buyer expected something else. A clean approval file reduces that risk and makes reorder discussions much easier. In repeat business, the golden sample often matters more than the artwork file because it captures the practical decisions that do not live in design software.
| Record item | Minimum content | Why it matters |
|---|---|---|
| Approved sample ID | Date, SKU, revision | Prevents version confusion |
| Size record | Width, height, thickness, tolerance | Locks dimensional expectations |
| Color record | Pantone, plating name, finish | Reduces subjective disputes |
| Assembly record | Attachment, hardware, packing | Prevents line-side mistakes |
A useful approval packet also includes the shipping mark, carton count, master carton dimensions, and any retail pack insert. For example, a 50-piece inner box inside a 200-piece export carton needs to be approved as a pack system, not as a product alone. Packing mistakes are often invisible at sample stage unless you check them deliberately.
What Should I Do Next Before Mass Production?
Use the approved sample to build the final production checklist and send it back in writing. Reconfirm artwork revision, quantity, plating, color reference, packaging count, carton marks, and ship date. If anything changed after approval, issue a new revision number instead of leaving the factory to guess which file is current. That single habit prevents a large share of avoidable rework.
If you are sourcing multiple promo items for one campaign, approve them in the same order they will be packed and distributed. Mixed-set errors often happen when each item is approved separately but the final bundle is never checked as a system. For example, a pin, patch, and lanyard set can all be correct individually and still fail when the insert card is too small or the tray layout shifts the pieces. The next step is simple: lock the sample record, then release mass production only after every line item matches it.
Before release, ask for a final pre-production photo set if the order is large, urgent, or visually sensitive. That extra checkpoint is usually cheaper than correcting 3,000 units after production starts.
Have a project? Send your artwork and target quantity and we’ll reply with a detailed quotation within 12 working hours.
Ready to get this made?
Send your sketch, target quantity and ship-date. Detailed quotation in 12 hours.


