Failure Modes in Custom Enamel Pin Production
Why pin orders fail after artwork approval
Most custom enamel pin failures begin after the buyer assumes the design is “locked.” Artwork approval only confirms the graphic intent; it does not define the process controls the factory needs to make the piece repeatable. If the RFQ does not specify finished size, tolerance, minimum line width, enamel system, plating finish, post layout, and packing method, the supplier will fill in the gaps with whatever is easiest on the shop floor.
That gap between visual approval and manufacturable specification is where good designs drift. A file that looks balanced on screen may still fail in tooling if the border is too thin, the open areas are too small, or the color cavities are too dense to fill cleanly. The result is usually one of three outcomes: softened detail, broken geometry, or a sample that looks acceptable but a mass run that varies because no measurable acceptance standard was written down.
The fix is to treat the pin as a controlled metal product, not a graphic concept. A useful spec sheet should state exact size in millimeters, tolerance, minimum wall thickness, minimum gap, enamel type, plating, backing, and packaging. For a factory like ZheCraft, the difference between a stable order and a risky one is usually not the artwork itself but whether the buyer has converted the artwork into a process specification the shop can follow.
Fine detail that cannot survive tooling
Fine-line loss is one of the most common failure modes in pin production. A line that looks elegant in Illustrator may be too narrow to survive die striking, polishing, and filling. For die-struck or soft enamel pins, a practical minimum metal line width is 0.25 mm, with 0.30 mm preferred for curved paths, small text, and designs with many cavities. Gaps below about 0.20 mm are high risk because enamel bridges them during fill or the metal collapses during polish.
The same issue scales with part size. A 20 mm pin should not carry the same detail density as a 50 mm pin. Once the design drops below about 25 mm, text should stay simple and the stroke height should generally be no smaller than about 1.2 mm if the lettering must remain readable after plating. If the brand mark depends on micro-lettering, a printed insert, laser engraving, or a larger badge format is usually a better answer than forcing tiny detail into enamel.
Buyers often approve a sample because it is still recognizable, then discover the production run is less crisp once polishing pressure or plating thickness changes. That happens because the sample was made slowly, while the run was made at production pace. To prevent that drift, lock the minimum stroke width, minimum gap, and simplification rules before tooling starts. The factory should not have to decide later what level of detail loss is acceptable.
| Spec item | Practical target | Why it matters | Typical risk if omitted |
|---|---|---|---|
| Minimum metal line width | 0.25 mm minimum, 0.30 mm preferred | Keeps borders and text intact after polishing | Lines bridge, blur, or disappear |
| Minimum gap between islands | 0.20-0.25 mm | Prevents enamel crossover | Colors merge during fill |
| Finished size tolerance | ±0.3 mm for most small pins | Protects artwork proportions and packaging fit | Logo shifts or card fit fails |
| Detail density | Lower on pins under 25 mm | Matches manufacturability to size | Artwork must be simplified late |
One practical example: a 22 mm lapel pin with a script logo and four enamel colors may look fine in vector form, but the loops in the script can collapse at the die stage if the thinnest stroke is under 0.25 mm. In that case, the cleanest fix is not a “better” plating or more skilled fill work; it is a redraw that removes the micro-loop and widens the critical strokes before tooling.
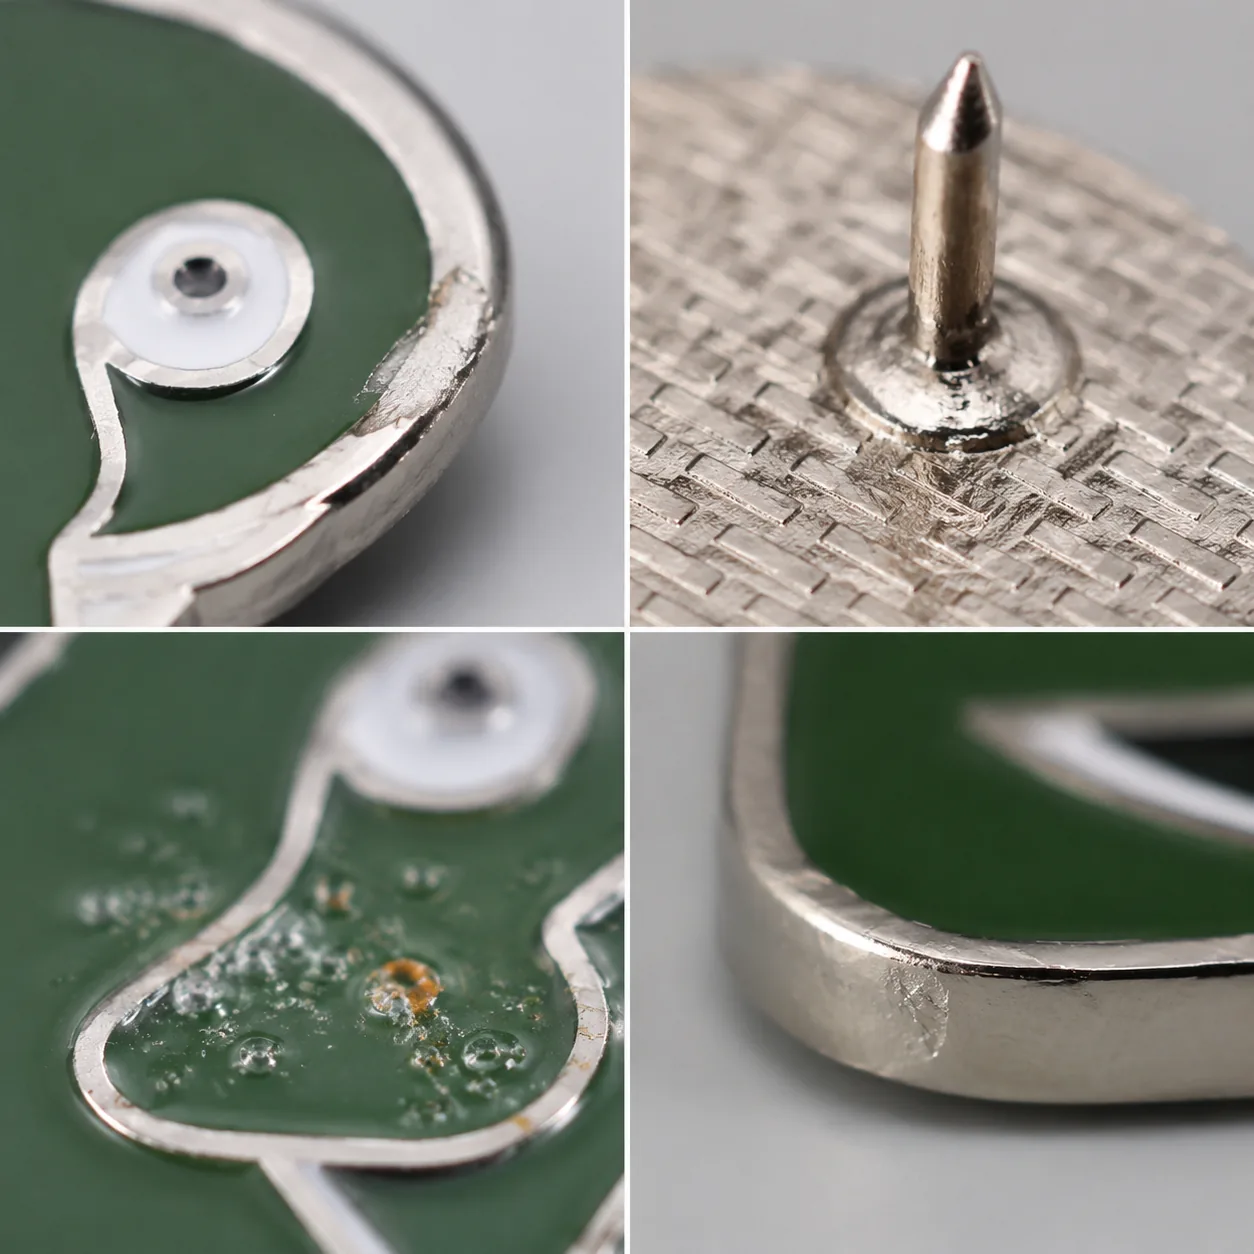
Enamel fill height and surface flatness
Uneven fill is the defect buyers notice fastest because it changes both appearance and touch. In soft enamel, the color should sit slightly below the metal rim, usually about 0.10 to 0.20 mm lower. In hard enamel, the surface is built up and then polished flush after firing. If the fill is too low, the pin looks underfilled and cheap; if it is too high, the color can chip, dome unevenly, or interfere with backing attachment and blister-card packaging.
The core mistake is approving only a single sample by eye. One sample may be filled by an experienced operator working slowly, while later batches are filled faster to meet schedule. That is why the order must state the enamel system explicitly. Soft enamel, imitation hard enamel, and true hard enamel are not interchangeable. Each has a different surface target, polishing behavior, and acceptable gloss level.
For more consistent gloss and a flatter face, hard enamel is the more controlled option, but it also reduces relief depth and can soften tiny recessed details. Epoxy coating can improve scratch resistance and hide minor surface variation, but it changes the tactile profile and is not the right choice if the brand wants a pure metal-and-enamel finish. A buyer should choose the coating based on the required look, not on the assumption that more finishing is automatically better.
A practical spec set for surface control is straightforward: name the enamel type, define the acceptable recess depth for soft enamel, and ask for a polished sample under the same light temperature used for approval. For most commercial pins, a finish that is visually uniform at 5000-6500K lighting and within the approved recess depth is a stronger target than vague language like “smooth” or “premium.”
Plating finish drift and color inconsistency
Plating is not just a cosmetic choice. It changes the production risk profile because nickel, black nickel, gold, antique brass, and gunmetal respond differently to cleaning, rack position, bath control, polishing, and storage. Decorative plating thickness on pins is usually thin enough that appearance depends far more on surface prep and bath stability than on chasing a large micron number. For most buyers, color consistency and anti-tarnish control matter more than nominal thickness alone.
The most common problem is not total plating failure but uneven tone: bright edges, darker recesses, patchy contrast, or early tarnish on contact points. That typically comes from inconsistent degreasing, poor rack placement, or skipped anti-tarnish treatment. If you only ask for “gold plating,” the factory may choose a finish that looks close in a photo but behaves differently after handling, packaging, or transit.
Mixed-finish programs raise the risk again. A shiny gold pin and a black nickel pin can look matched on day one but diverge after storage or light abrasion. For a multi-SKU order, request a master sample under the same lighting and packaging condition, not isolated product photos. If the finish is brand-critical, the spec should include tone reference, gloss target, and whether an anti-tarnish top treatment is mandatory.
A workable plating specification also benefits from a plain acceptance rule. Example: the plated face must show no bare metal patches larger than 0.2 mm, no obvious streaking under 5000-6500K light, and no visible discoloration after 24 hours in standard inner-bag storage. That gives the factory a measurable target instead of a subjective request for a “clean” or “premium” finish.
| Plating finish | Typical use case | Common failure | Buyer control to specify |
|---|---|---|---|
| Shiny nickel | Corporate or clean retail look | Too-bright polish or dull patches | Gloss target, anti-tarnish, edge sharpness |
| Gold | Premium branding | Tone shift after handling | Tone reference, storage requirement |
| Black nickel | Modern contrast | Patchy light/dark areas | Master sample, bath consistency |
| Antique brass | Vintage texture | Over-dark recesses | Accepted patina range, wipe standard |
Attachment failures in real use
A pin can pass visual inspection and still fail in the field if the backing is wrong for the garment, bag, or lanyard. Butterfly clutches are compact and low cost, but they loosen more easily on thick fabric and repeated wear. Rubber clutches are softer and safer for some uses, but they can age faster and are easier to lose. Magnetic backs avoid puncturing fabric, but they are weaker on thick materials and can rotate when the contact patch is small.
For uniforms, outerwear, bags, or gifting sets, attachment should be specified with the use environment. Larger pieces above roughly 40 mm often need two posts or a brooch-style safety pin to reduce sagging and rotation. A single post can be acceptable on smaller, light pins, but once weight rises the clutch becomes a structural issue, not just a convenience issue. For child-facing or damage-sensitive applications, magnetic or safety-backed options reduce puncture risk, but they must be tested on the actual garment thickness the buyer plans to use.
A better QC question is not “does the clasp work?” but “does the piece stay centered after one hour of motion?” That catches weak springs, poor post soldering, and clutch mismatch. If the pin is heavy, define post diameter, post length, and the number of posts before tooling. Otherwise the factory may place a single post on a shape that really needs two.
A concrete example helps here: a 48 mm hard enamel pin with a thick outer border and two color fields may weigh enough that a single 3 mm post will rotate on a jacket lapel. Two posts, spaced to match the artwork mass, reduce swing and keep the front face level. If the buyer planned to clip the same pin to a tote bag strap, a butterfly clutch may still be fine, but only after testing the actual fabric thickness and wear pattern.
- Test the backing on the real garment thickness, not only on a flat board.
- Require two posts or a safety-style support above about 40 mm if the design is heavy.
- Specify post diameter and post length in the RFQ.
- Check retention after motion, not only at first snap-on.
- Match magnetic backs to the actual fabric or bag wall thickness.
Surface damage after packing and transit
Many buyers blame the factory for a bad pin when the real problem appears after finishing. Scratches, oxidation marks, dust in recesses, and rubbed plating often show up during bulk packing when pieces contact each other. If the carton pressure is wrong or the inner bag is too rough, a perfect approved sample can still arrive damaged.
That is why packing belongs in the product spec. A polished pin should not be bulk-bagged with bare metal contact if the finish is delicate, and enamel faces should not rub against rough insert cards. For export shipments, the buyer should state whether each piece is individually bagged, whether a backing card is required, the minimum OPP thickness, and whether the cartons must pass a drop test or a transit simulation before release.
For common retail packing, an OPP bag thickness of about 30-40 microns is a practical baseline; for sharper plated finishes or cards with foil print, individual bagging plus a snug insert card is usually safer than loose stacking. The goal is to avoid piece-to-piece abrasion during vibration, not simply to make the carton look neat. A glossy black nickel or mirror gold finish will show handling damage far sooner than a matte antique brass piece, so the pack method should match the finish risk.
A practical acceptance rule is to inspect packed samples, not just loose samples. If the surface is clean before packing but shows edge scuffing after carton sealing, the issue is usually pack method, not plating chemistry. This is especially common in mixed orders where the buyer tries to save a little on materials and loses more in repacking labor or customer returns.
For higher-value programs, ask for a packed master sample with the exact card, bag, insert, and outer carton that will be used in shipment. The goal is to verify the entire handling chain, not just the pin itself.
QC that catches defects before the run is lost
Final inspection alone is too late. By the time a defect appears in finished goods, tooling, plating, and labor have already been consumed. Better control points are pre-production sample approval, first-article inspection, in-line dimensional checks, and final AQL inspection before carton sealing. The point is to stop defects when they are still cheap to correct.
For custom pins and similar metal products, many buyers start with AQL 2.5 for major defects and AQL 4.0 for minor defects. That is a commercial baseline, not a law. The exact defect list matters more than the number: define major defects such as broken post, missing color, cracked enamel, off-center logo, exposed base metal, or obvious plating discoloration. Minor defects might include slight surface dust, tiny pinhole marks, or light card-print variation if the piece is still functional and brand-safe.
Dimensional checks need tolerances as well. For most small enamel pins, finished size tolerance of ±0.3 mm is common, while very small or highly complex pieces may need a wider tolerance to remain manufacturable. If you do not state tolerance, the supplier may consider a shape shift acceptable even when it changes logo proportions or causes packaging fit issues. The same logic applies to enamel depth and post placement: write the number down before production starts.
A good control set for a standard order is first-article approval on the first 5-10 pieces, in-line checks every 200-500 pieces depending on order size, and a final lot sample at the agreed AQL. Buyers should also ask for photos of rejected units before rework, because that creates a record of whether the defect came from tooling, plating, filling, or packing.
A simple defect map improves the conversation with the supplier. Major defects should be reject-or-rework items: broken post, missing clutch, color bleeding, severe underfill, major plating stain, or wrong plating finish. Minor defects should be counted but not automatically rejected unless they exceed the agreed AQL: slight dust, tiny edge burrs, or small print variation on the card. That distinction keeps both sides from arguing over cosmetic issues that do not affect function.
What to lock before you approve the order
The safest RFQ removes interpretation. Instead of asking for a nice pin, specify size, tolerance, minimum line width, enamel system, plating finish, post type, packaging, and inspection level. If the order includes multiple SKUs, each variant needs its own spec sheet so the factory does not cross-apply the wrong plating, backing, or card insert. For repeat programs, lock the reorder standard so the next batch matches the approved production sample, not just the artwork.
Commercial terms should be just as specific. For common custom enamel pins, MOQ is often 100-300 pieces per design, with better unit pricing at 500-1,000 pieces and above. Typical FOB pricing for standard 25-30 mm soft enamel pins often lands around USD 0.60-1.20 per piece at 100-300 pcs, USD 0.35-0.85 at 500 pcs, and USD 0.25-0.55 at 1,000 pcs, depending on color count, plating, and backing. Hard enamel usually adds cost, often moving into roughly USD 0.80-1.60 at smaller quantities and down to about USD 0.45-1.00 at higher volumes. Lead time is commonly 7-12 days for sample or pre-production approval and 15-25 days for mass production after approval, with packaging complexity and peak season extending that window.
Those ranges are not interchangeable with large-format badges or complex multi-piece sets. A 30 mm single-sided soft enamel pin with one backer card and one butterfly clutch sits in a very different cost band than a 45 mm hard enamel piece with epoxy, double posts, custom backing card, and individual polybagging. If the buyer wants a firm quote, the quote has to include the real build spec, not just the artwork file.
| Order element | Common commercial range | Why it matters |
|---|---|---|
| MOQ | 100-300 pcs per design | Controls setup cost and feasibility |
| Soft enamel FOB | USD 0.25-1.20 per piece | Depends on size, plating, and color count |
| Hard enamel FOB | USD 0.45-1.60 per piece | Adds polishing and firing cost |
| Sample lead time | 7-12 days | Allows tooling and approval |
| Mass lead time | 15-25 days after approval | Standard production window |
| AQL baseline | 2.5 major / 4.0 minor | Commercial inspection starting point |
- Lock size, tolerance, and finish in millimeters and microns, not adjectives.
- Approve one physical master sample plus a written spec sheet.
- Tie the packing method to the plating finish and transit risk.
- Separate major defects from minor defects before production starts.
- Require first-article checks before the full run continues.
Before production starts, ask for one approved reference set that includes the physical sample, a photo sheet, and the written spec. That bundle becomes the control point for reorders, disputes, and QC comparison. If the order matters to your brand, it should be documented in a way the shop floor can actually use.
What to do next: send your supplier a spec sheet that names the failure you want to avoid, not just the look you want. If you already have artwork, ask for a production-feasibility review before tooling, then compare the factory’s suggested simplifications against your brand priorities. That one step usually prevents more rework than any late-stage inspection ever can.
Have a project? Send your artwork and target quantity and we’ll reply with a detailed quotation within 12 working hours.
Ready to get this made?
Send your sketch, target quantity and ship-date. Detailed quotation in 12 hours.


