Edge Quality Specs That Prevent Burrs, Snags and Returns
Why Edge Quality Fails After a Good Sample
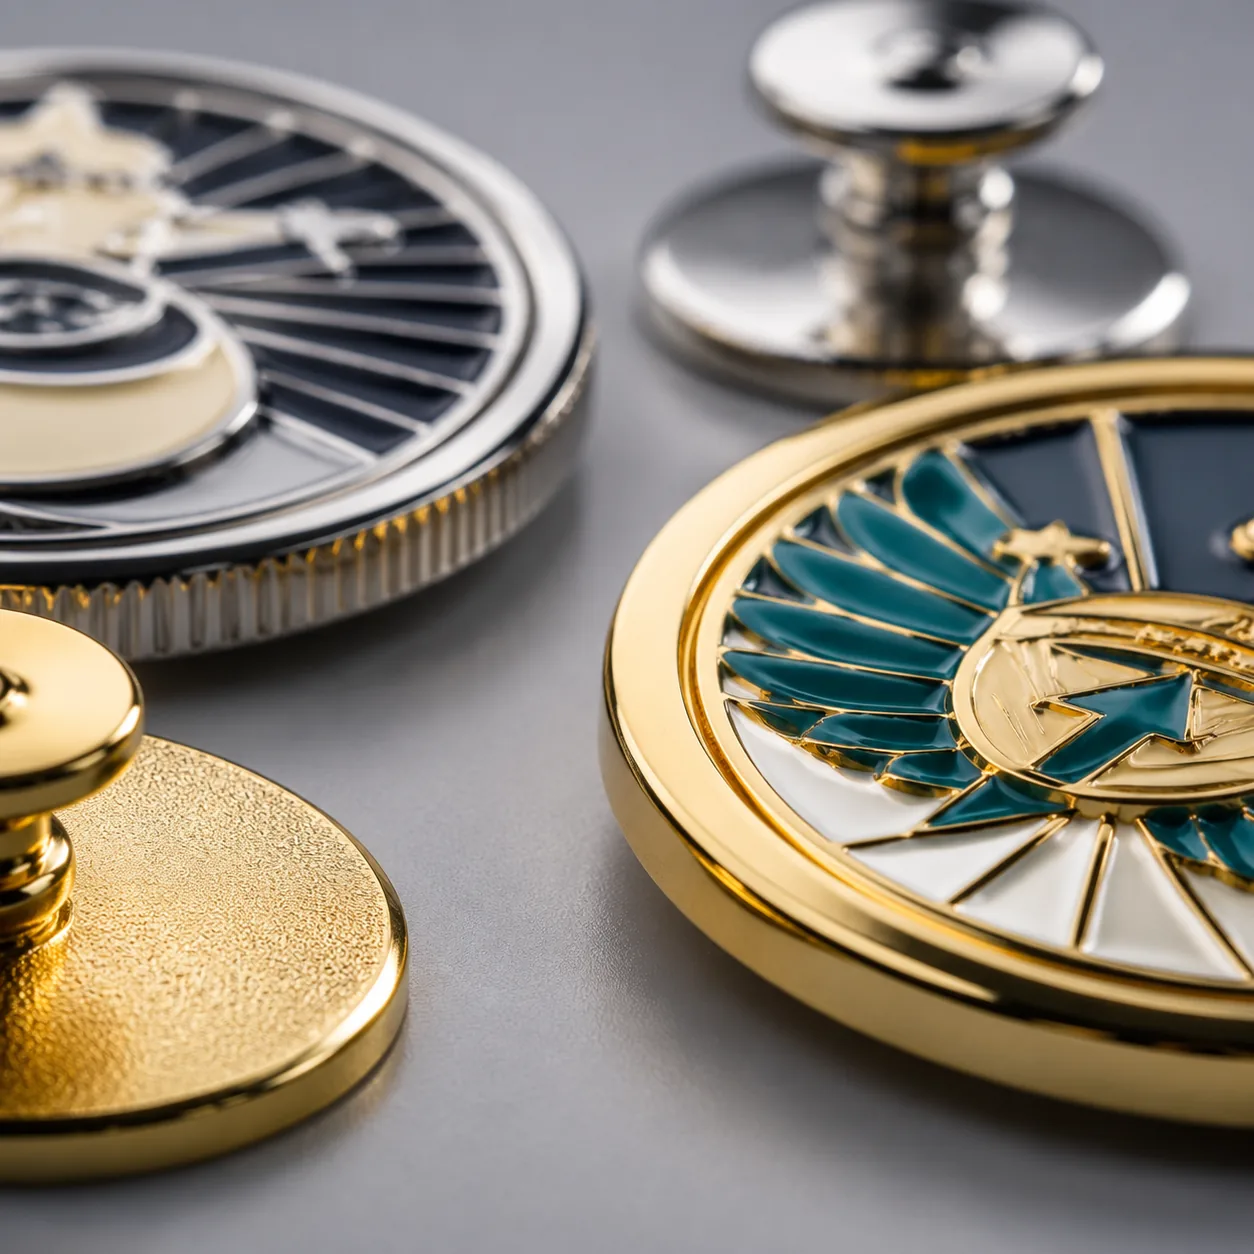
Edge defects usually appear late in the buying cycle. The artwork is approved, enamel colors match the Pantone target, plating looks bright under a light box, and the packing line is already running. Then a pin catches on a scarf, a keychain hole has a razor-like burr, or a challenge coin rim feels rough enough to scratch a phone. For wearable pins, brooches, keychains, magnets and coins, edge quality is not a cosmetic preference. It affects safety, retail feel, complaint rates and whether the buyer can confidently reorder.
The main problem is vague language. “Smooth edge,” “polished well” and “no sharpness” are not inspection criteria. A die-struck brass pin, zinc alloy die-cast keychain, etched stainless tag and stamped iron badge all generate burrs in different locations. If the RFQ does not define burr height, edge radius and touch areas, the factory will quote against its normal finishing standard, which may be acceptable for giveaways but not for apparel retail or children’s merchandise.
Edge control should be specified before tooling and plating. Plating can brighten a surface, but it cannot safely round a sharp 90-degree profile. The cost of prevention is usually a few cents per piece; the cost of correction after plating can include stripping, re-polishing, re-plating, re-sorting and delayed shipment.
Where Burrs Form on Metal Merchandise
Burrs form where metal is cut, sheared, pierced, drilled, trimmed or separated from a mold. On soft enamel pins, the common risk points are the outer profile, internal cutouts, pin post weld area, raised metal dividers and any sharp brand geometry such as stars, lightning bolts or lettering. On keychains, the highest-risk zones are jump ring holes, bottle opener mouths, split ring slots, cast parting lines and thin internal windows.
Manufacturing route changes the defect type. Die-struck iron, brass or copper parts often show a compression burr on the back edge after blanking, especially where die clearance is too large or the outline has inside corners below 0.5 mm radius. Zinc alloy die-cast parts may carry flash along the parting line, normally 0.05 to 0.20 mm before trimming and sometimes higher on worn molds. Laser-cut stainless pieces can have accurate geometry but a sharp vertical edge; chemical etching can leave a crisp edge that needs brushing or tumbling if the item is handled often.
Plating thickness is too small to solve geometry problems. A common decorative stack for pins and keychains is 3 to 6 microns of copper, 5 to 10 microns of nickel, and 0.03 to 0.10 microns of gold, imitation gold, black nickel or other top finish. Even a thicker 0.2-micron gold topcoat does not convert a sharp edge into a safe radius. The base metal must be deburred, radiused and polished before the final finish.
Measurable Edge Specs Buyers Can Use
A practical specification has three parts: maximum burr height, minimum edge radius and a touch-performance test. For standard promotional metal items, set touchable outside-edge burrs at less than 0.05 mm. Allow up to 0.10 mm only in non-touch decorative recesses where the burr cannot contact skin, fabric, packaging film or phone surfaces. Anything above 0.10 mm is usually detectable with a fingernail and is likely to snag.
For wearable items, specify a minimum outside edge radius of 0.15 mm. Use 0.20 to 0.30 mm for brooches, scarf pins, uniform badges and children’s products. For challenge coins, 0.10 to 0.20 mm is normally sufficient on the rim because the item is handled rather than worn. For bottle opener keychains, use 0.20 to 0.40 mm on grip areas while keeping the functional opener edge defined enough to work.
Avoid a blanket “large radius everywhere” instruction. Hard enamel pins often use raised metal dividers only 0.25 to 0.35 mm wide. Over-polishing can flatten those dividers, reduce enamel separation and expose copper under nickel or gold plating. The better instruction is to mark risk zones: no sharp touch edges on the outside profile, back edge, ring hole, post area, brooch hinge, catch and functional cutouts; controlled crispness is acceptable on protected decorative relief.
| Product type | Recommended edge specification | Tighten when |
|---|---|---|
| Soft enamel pin | Outside burr <0.05 mm; outside radius 0.15-0.25 mm; internal non-touch recesses <0.10 mm | Retail apparel, scarves, knitwear, children’s ranges |
| Hard enamel badge | Outside burr <0.05 mm; polished flush face; outside radius 0.15-0.20 mm | Fine jewelry-style plating or premium backing cards |
| Zinc alloy keychain | Parting flash removed; grip radius 0.20-0.40 mm; ring-hole burr <0.05 mm | Bottle opener, carabiner, spinner or moving hardware |
| Challenge coin | Rim burr <0.05 mm; rim radius 0.10-0.20 mm; reeded edge free of hanging burrs | Coin will be pocket-carried with phones or keys |
| Brooch | Fabric-contact edges radius 0.20-0.30 mm; no burr near hinge, catch or pin stem | Silk, wool, knitwear, uniforms or gift retail |
| Metal fridge magnet | Back-edge burr <0.05 mm; magnet seating flat within 0.20 mm | Painted appliances or sliding use on whiteboards |
Process Controls That Actually Reduce Burrs
For die-struck pins, badges and coins, the most important controls are die clearance, blanking direction, die wear and polishing time. A dull blanking die can create burrs above 0.10 mm even if the design has not changed. For repeat orders above 5,000 pieces, ask the supplier to confirm die condition and provide a fresh edge check rather than relying only on the previous approval photo.
For cast zinc alloy keychains and 3D badges, trimming and tumbling do most of the work. A normal vibratory tumbling cycle runs 30 to 90 minutes depending on part size, relief depth and media type. Ceramic media cuts faster and reaches shallow curves; plastic media is gentler on raised logos but may leave flash in slots below 1.2 mm. Narrow openings, bottle opener mouths and ring holes still need manual touch-up because media does not reliably reach every contact edge.
For stainless steel, brass and iron parts made by laser cutting or chemical etching, add a defined deburring operation such as brushing, barrel polishing, belt sanding or edge-break tumbling. This commonly adds 1 to 3 production days and about USD 0.03 to 0.12 per piece on small tags, charms and plaques. For thicker parts above 3.0 mm or complex openwork, manual finishing may add USD 0.08 to 0.20 per piece.
Cost, MOQ and Lead-Time Reality
Edge control should be quoted as a production requirement, not handled as a complaint after shipment. For common 25 to 35 mm enamel pins, many factories accept MOQ 100 pieces, with FOB China pricing around USD 0.45 to 1.20 per piece depending on size, base metal, plating, enamel count, backing card and packaging. Adding a defined burr limit, cloth drag test and extra edge sorting usually adds USD 0.02 to 0.08 per piece on simple designs.
For 40 to 60 mm zinc alloy keychains, typical MOQ is 100 to 300 pieces. Basic FOB pricing often falls around USD 0.80 to 2.20 per piece with split ring hardware, while thicker 3D relief, antique plating, epoxy, rotating parts or bottle opener functions can push pricing higher. Tight edge control around functional cutouts, hinge points or ring holes commonly adds USD 0.05 to 0.18 per piece because trimming, tumbling and inspection time increase.
Normal timing for custom metal merchandise is about 2 to 3 days for artwork confirmation, 5 to 8 days for tooling, 5 to 7 days for pre-production samples and 12 to 22 days for mass production after approval. If a burr issue is found before plating, correction may add only 1 to 3 days. If it is found after plating and enamel fill, correction can add 5 to 10 days and may damage enamel, antique contrast or plated edges.
| Order condition | Typical MOQ tier | FOB edge-control cost impact | Lead-time impact |
|---|---|---|---|
| Simple enamel pin, 25-35 mm | 100-499 pcs | USD 0.02-0.05/pc for defined deburring and touch check | 0-1 day |
| Retail pin or brooch | 500-2,999 pcs | USD 0.03-0.08/pc for tighter radius and 100% touch sorting | 1-2 days |
| Cast keychain with ring hole and cutout | 300-1,999 pcs | USD 0.05-0.15/pc for trimming, tumbling and hole inspection | 1-3 days |
| Challenge coin with reeded edge | 100-999 pcs | USD 0.04-0.12/pc for rim polishing and edge sorting | 1-2 days |
| Complex openwork badge | 300-3,000 pcs | USD 0.08-0.20/pc for manual finishing of internal cuts | 2-4 days |
Inspection: Touch Tests, Gauges and AQL
Photos do not prove edge safety. A bright nickel or gold edge can look clean and still feel sharp against skin. Inspectors should combine visual review with touch checks, a fingernail drag test, cotton cloth drag test and measurement on suspect points. A 10x loupe, digital microscope, burr gauge, caliper or optical profile comparator can verify whether raised flash exceeds the agreed 0.05 mm or 0.10 mm limit.
For general promotional orders, use ANSI/ASQ Z1.4 or ISO 2859-1 sampling at general inspection level II unless the buyer has a stricter internal standard. A common AQL setup is critical defects 0, major defects 1.5 and minor defects 4.0. Any edge that can cut skin, tear fabric, scratch a phone, damage packaging film or stop hardware from moving should be treated as critical. Burrs above the agreed limit on touch areas, visible untrimmed flash and rough plating caused by poor sanding should be treated as major defects.
For higher-risk products, add 100% touch sorting on the defined zones even if the shipment also passes sampled AQL. This is especially useful for brooches, children’s pins, bottle opener keychains, coins with reeded rims and openwork badges. Keep one signed physical sample with the supplier and one with the buyer so reorders can be checked against the same tactile standard, not a screen image.
- Approve the sample by hand, not only by photo or video.
- State burr limits in millimeters for outside edges, ring holes and cutouts.
- Mark touch areas, fabric-contact areas and functional edges on the drawing.
- Use AQL level II with critical defects 0 for injury-risk edges.
- Add 100% touch sorting for brooches, children’s items and bottle opener keychains.
- Retain signed samples at both supplier and buyer sites for reorder comparison.
Design Choices That Prevent Edge Risk
The cheapest burr is the one never created. Avoid inside corners below 0.5 mm radius on stamped pins and below 0.8 to 1.0 mm on thicker cast keychains. Avoid narrow slots below 1.2 mm when the part thickness is 2.5 to 4.0 mm because polishing media and hand tools cannot reach consistently. If a logo requires sharp internal shapes, consider printing, epoxy doming or etched stainless steel instead of thick die-cast openwork.
Keep metal bridges strong enough to survive polishing. For small pins, use at least 0.8 mm bridge width; for larger badges and keychains, use 1.0 to 1.2 mm or more. Thin bridges bend during polishing, create uneven plating coverage and may expose copper or nickel after final buffing. Fine raised lines in hard enamel should generally stay at 0.25 mm minimum, with 0.30 to 0.35 mm preferred for stable plating and enamel separation.
Hardware placement is another common source of sharpness. A jump ring hole should leave at least 1.2 mm of metal wall on small keychains and 1.5 to 2.0 mm on heavier pieces above 25 g. Pin posts should not be welded directly beside thin borders or tight cutouts, because finishing around the post base is difficult and trapped burrs can remain near solder. For magnets, keep the back shell flat within 0.20 mm so the magnet seats evenly and does not rock or scrape painted surfaces.
When to Tighten the Spec, and When Not To
Not every order needs premium finishing. A low-cost event pin worn once on a lanyard may not need the same 0.20 mm radius, cloth drag test and 100% hand sorting as a retail brooch sold for apparel use. If the part is small, rounded, simple and packed on a backing card, normal polishing plus an outside burr limit below 0.05 mm is often enough.
Be careful with antique finishes, matte textures and detailed 3D relief. Excessive polishing can remove dark antique contrast from recesses, soften sculpted texture or reduce the height of lettering. In these cases, specify “no sharp touch edges” while protecting approved relief texture and antique contrast. A physical pre-production sample is more reliable than trying to judge this balance from a rendering.
The wrong compromise is deleting edge requirements to save a few cents. The better compromise is to tighten only the real contact zones: outside outline, back edge, ring hole, pin post area, brooch hinge and catch, bottle opener mouth, reeded coin rim and any fabric-contact surface. That keeps cost controlled while addressing the defects users actually feel.
For the next RFQ, add a short edge-quality block to the technical file: base metal, thickness, touch areas, maximum burr height, minimum edge radius, finish type, sample approval requirement and AQL level. For a standard wearable pin, a practical starting point is: outside and fabric-contact edges free of sharp burrs, burr height below 0.05 mm, minimum outside radius 0.15 mm, no snagging during cotton cloth drag test, AQL level II with critical 0, major 1.5 and minor 4.0. For keychains and coins, add separate requirements for ring holes, rims and functional cutouts.
Have a project? Send your artwork and target quantity and we’ll reply with a detailed quotation within 12 working hours.
Ready to get this made?
Send your sketch, target quantity and ship-date. Detailed quotation in 12 hours.


