Edge Quality Specs for Custom Metal Pins, Coins and Keychains
Why Edge Quality Fails After Artwork Approval
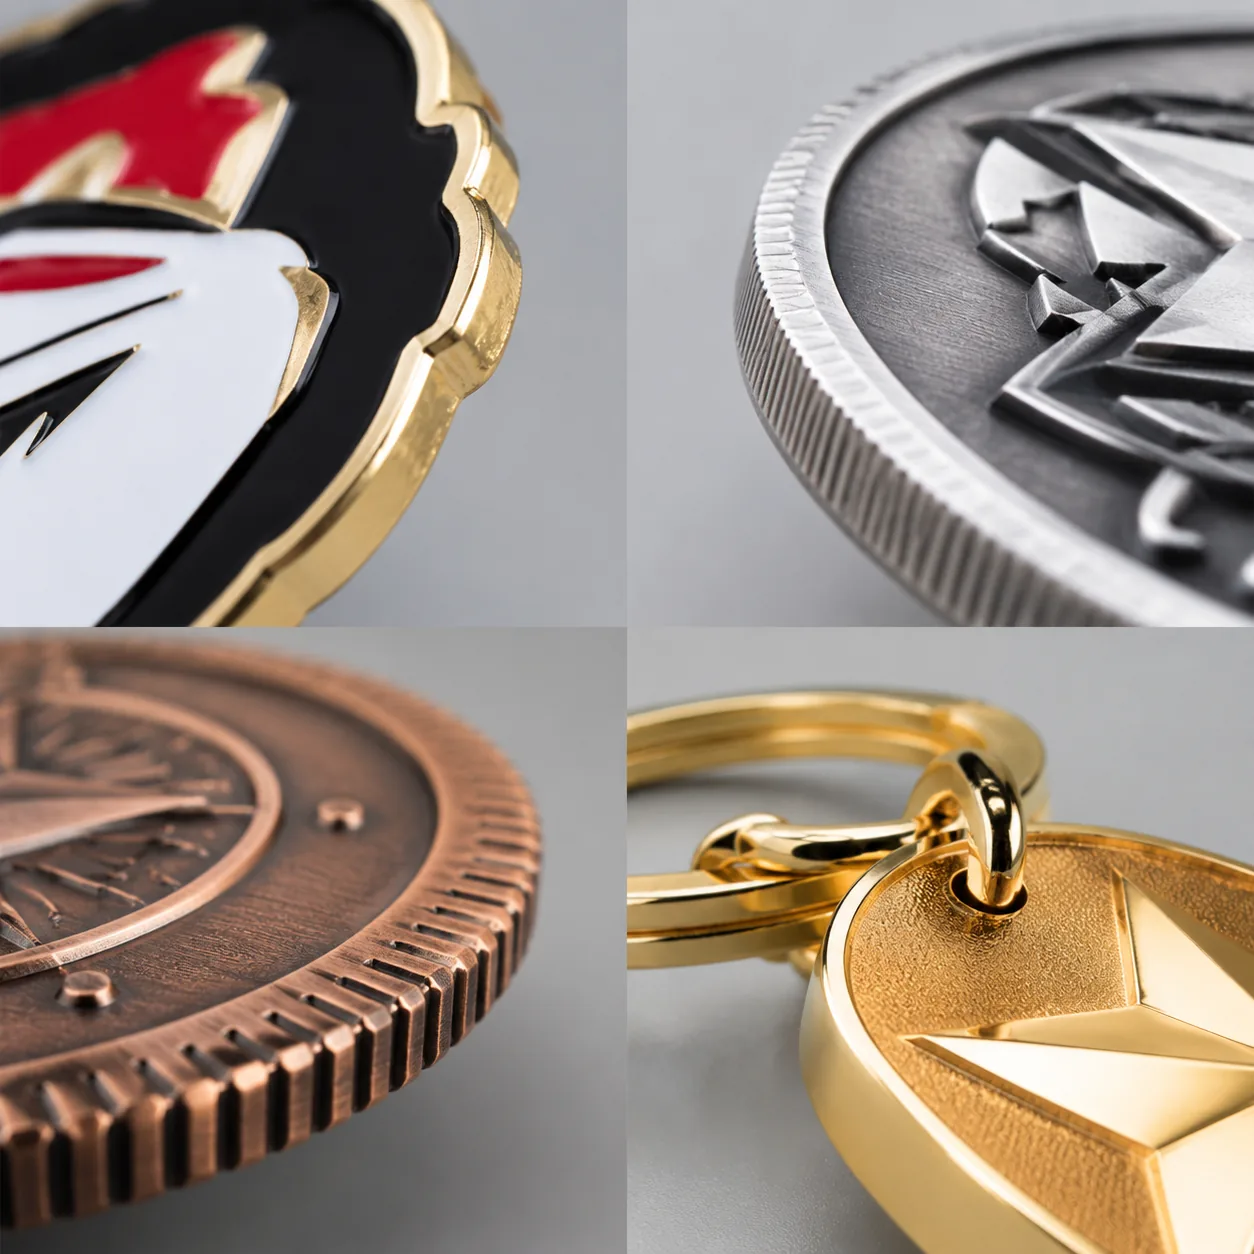
A custom pin, coin or keychain can match the approved Pantone colors and still fail in the user’s hand. The most common late-stage complaints are sharp die-struck rims, hook burrs inside cutouts, rough plating nodules on corners, and ring holes that scrape or jam hardware. These issues rarely show in front-facing sample photos, but they affect safety, perceived value and packing performance.
Edge quality matters most on products handled repeatedly: challenge coins, bottle opener keychains, zipper pulls, uniform badges, brooches, magnets and children’s promotional items. A rough brooch edge can pull fabric threads. A sharp coin rim can cut a polybag or scratch adjacent pieces in bulk packing. A burr inside a keychain hole can remove plating from a split ring after a few rotations.
The practical fix is to specify the edge, not just the artwork. A reliable RFQ should define burr height, edge radius or bevel, cutout width, hole chamfer, polishing process, plating thickness range and inspection criteria. At ZheCraft, these points are reviewed before tooling because edge defects are much cheaper to prevent in the mold, trim die and polishing route than to repair after plating.
Map Edge Zones Before Quotation
Do not treat every edge on the product the same. Outer perimeters, internal cutouts, ring holes, raised coin rims, recessed enamel borders and back-side cavities have different process risks. A supplier may polish a 40 mm outer badge edge well, but leave a 2.0 mm inner cutout rough because a buffing wheel cannot reach it without rounding the artwork.
For most pins and badges, use drawing tolerances of ±0.20 mm for parts under 40 mm and ±0.30 mm for 40 to 70 mm parts. For coins and heavier keychains, ±0.30 mm is common unless the product must fit a holder, tray or mechanical accessory. These dimensional tolerances do not control sharpness. A 35 mm enamel pin can be within size tolerance and still have a knife-like 0.05 mm unbroken stamped edge.
A simple zone system improves quoting and inspection. Zone A should cover hand-contact outer edges and functional rims. Zone B should cover visible cutouts, slots and hooks. Zone C can cover hidden back features that must be clean but do not require premium hand polish. This avoids over-polishing fine front details while still controlling the edges users actually touch.
| Edge Zone | Typical Location | Recommended Spec | When To Tighten |
|---|---|---|---|
| Zone A | Outer perimeter, coin rim, keychain body edge | Burr ≤0.03 mm; radius or break edge 0.15–0.30 mm | Retail coins, daily-use keychains, bulk-packed metal items |
| Zone B | Cutouts, bottle opener slot, lanyard hook opening | Burr ≤0.05 mm; no hook burr visible at 30 cm | Openwork designs, apparel contact, children’s products |
| Zone C | Back recesses, logo cavities, non-contact relief | Burr ≤0.08 mm; no loose flakes or plating spikes | Epoxy backs, magnets, premium presentation packaging |
| Attachment Holes | Jump ring holes, chain holes, screw holes | Chamfer 0.10–0.20 mm per side; smooth after plating | Rotating hardware, split rings, plated chains |
Set Measurable Burr, Radius and Tolerance Limits
A burr is the raised lip left by stamping, trimming, casting, drilling, chemical etching or tool wear. Writing “no burrs” is not enough because it creates a subjective standard. For commercial custom metal products, practical mass-production limits are usually ≤0.03 mm on premium hand-contact edges, ≤0.05 mm on normal visible edges and ≤0.08 mm on hidden non-contact areas.
For soft enamel pins, an outer-edge burr limit of ≤0.05 mm is normally acceptable if the edge is polished and plated evenly. For challenge coins, which users often roll between fingers, specify ≤0.03 mm on both front and back rims. For keychains and zipper pulls, the attachment hole should be chamfered before plating; otherwise the ring can crack plating or expose base metal during assembly.
Edge radius should be called out separately from burr height. For 1.2 to 2.0 mm enamel pins, a light broken edge or 0.10–0.20 mm radius usually feels clean without softening metal lines. For 3.0 to 5.0 mm coins, a 0.15–0.30 mm break edge on both faces prevents a sharp rim while preserving a premium square profile. For heavy keychains over 4.0 mm thick, a bevel width of 0.30–0.60 mm may be more reliable than a small radius.
Measurement can stay practical. Use a 10x loupe for burr visibility, a fingertip drag test for Zone A edges, a cotton snag test for apparel-contact badges and a retained edge-comparator sample from the approved pre-production run. For severe burr disputes, a calibrated optical comparator or digital microscope can verify burr height in microns.
Match Edge Finish to Manufacturing Method
Different production methods create different edge risks. Die-struck brass or iron pins usually need perimeter trimming and buffing. Zinc alloy die-cast keychains often show parting lines that require filing before tumbling. Chemically etched stainless steel or brass badges can have sharper edges, especially at 0.8 to 1.2 mm thickness. Laser-cut stainless can show heat tint or a micro-burr if the cut parameters are not tuned.
The smoothest-looking edge is not always the best specification. Heavy polishing can round logo points, thin enamel dams and reduce the crispness of raised metal borders. A square coin edge can look more premium than a fully rounded edge, but it still needs a small break edge so it does not feel sharp. The correct finish depends on thickness, user contact and how much detail is near the perimeter.
| Product | Typical Thickness | Best Edge Treatment | Typical FOB Impact |
|---|---|---|---|
| Soft enamel pin | 1.2–1.8 mm | Light perimeter polish; 0.10–0.20 mm edge radius | Usually included; +$0.01–$0.03/pc for complex shapes |
| Hard enamel pin | 1.2–2.0 mm | Flat face polish plus light broken edge | Included on simple shapes; extra sorting may add +$0.02–$0.05/pc |
| Challenge coin | 3.0–5.0 mm | Beveled, reeded or rope rim with 0.15–0.30 mm break edge | Rim tooling often +$30–$80; unit +$0.03–$0.10/pc |
| Zinc alloy keychain | 2.5–5.0 mm | Tumble, hand-polish outer edge, chamfer ring hole | +$0.03–$0.12/pc depending on cutouts |
| Etched badge | 0.8–1.2 mm | Chemical deburr or light mechanical deburr; optional epoxy dome | +$0.02–$0.06/pc if hand deburring is required |
As a baseline, simple enamel pins often run about $0.45–$1.20 FOB per piece at 500–1,000 pcs, depending on size, plating and back attachment. Challenge coins commonly range from $1.80–$4.50 FOB at 300–1,000 pcs. Custom metal keychains usually fall around $0.80–$2.80 FOB. Edge-intensive designs sit at the higher end because polishing time and inspection time increase with every cutout, point and hole.
Control Polishing, Tumbling and Plating Sequence
Many edge defects come from the process sequence, not from a single careless operator. If a part is polished before all holes are punched or drilled, the later operation can create a fresh burr. If tumbling is too aggressive, raised text and narrow enamel dams lose definition. If plating is applied over a rough edge, the coating can build nodules that feel like grit.
A typical decorative plating stack for pins, coins and keychains may include copper strike, nickel and final finish. Total decorative thickness is often 5–10 microns, with nickel commonly 3–6 microns before gold, silver, black nickel or antique finish. Gold flash for promotional items may be only 0.03–0.10 micron over nickel, while higher-wear items may need thicker gold or protective lacquer. Thicker plating does not hide burrs; it can enlarge them.
Finish choice changes the risk profile. Antique plating traps dark oxide in burrs and can make rough areas look dirty. Bright nickel and gold reveal polishing waves because reflection highlights uneven rims. Black nickel can wear faster on sharp high points because coating coverage is thinner at edges. For any high-contact product, require a post-plating hand-feel check, not only pre-plating deburring.
For epoxy-coated pins or magnets, edge preparation must happen before epoxy. A sharp or dirty edge can prevent clean dome flow and create a visible meniscus defect. For bottle opener keychains, test the opener slot after plating because plating buildup and burrs can change the functional edge and make the slot feel rough against the user’s finger.
Specify Cutouts, Ring Holes and Openwork Details
Cutouts are the highest-risk area on shaped pins and keychains. A 1.5 mm internal gap may look clean in vector artwork, but tooling, casting flow or chemical etching can leave a rough inner wall. For enamel pins and badges, specify a minimum cutout width of 2.0 mm. For keychains thicker than 2.0 mm, use 2.5 mm or more unless the supplier confirms the finishing method.
Internal corner radius also matters. A minimum 0.30 mm inside radius improves tool life and reduces burr formation in brass, iron and zinc alloy. Sharp inside corners are possible, but they increase tooling cost and often require slower hand finishing. If the artwork requires a sharp visual corner, ask the factory to confirm whether it will be cut, cast, etched or simulated with recessed enamel color.
For hardware holes, match the hole to the actual attachment. Small split ring holes are commonly 3.0–4.0 mm diameter; larger keychains often use 4.0–5.0 mm. The distance from hole edge to product edge should normally be at least 2.0 mm for zinc alloy and 2.5 mm for thinner brass or stainless steel. Less material can crack, bend or distort during ring assembly.
- Set normal minimum cutout width at 2.0 mm for badges and 2.5 mm for thick keychains.
- Specify internal burr limits separately from outer-edge burr limits.
- Use a 0.30 mm minimum inside corner radius unless the artwork requires a sharp corner.
- Chamfer ring holes 0.10–0.20 mm per side before plating.
- Keep enamel fills at least 0.30 mm away from punched or drilled holes.
- Request 3x–5x close-up sample photos of cutouts and holes before mass production.
Define AQL Defects and Production Lead Times
Inspection needs defect grades because not every edge mark should reject a shipment. A smooth polishing line on the back of a giveaway pin may be minor. A hook burr that catches fabric, scratches skin, punctures a polybag or prevents a split ring from rotating is major. For children’s items or retail premium coins, sharp edges may be treated as critical depending on the compliance requirement and market.
A practical default for B2B promotional orders is ANSI/ASQ Z1.4 general inspection level II, AQL 1.5 for major defects and AQL 4.0 for minor cosmetic defects. For premium retail or safety-sensitive orders, tighten major defects to AQL 1.0 or require 100% sorting for sharp edges and loose metal flakes. The inspection checklist should include fingertip drag along Zone A, cotton cloth snag for apparel-contact items, ring rotation for keychains and polybag puncture checks for bulk packing.
| Issue | Suggested Grade | Acceptance Rule | Likely Cause |
|---|---|---|---|
| Sharp outer edge | Major | Fails fingertip drag test or feels cutting | Insufficient break edge after trimming |
| Hook burr in cutout | Major | Visible at 30 cm or catches cloth | Punch wear, poor internal deburring |
| Plating nodule on rim | Minor or major | Major if sharp; minor if cosmetic only | Rough base edge before plating |
| Polishing wave | Minor | Visible at 30 cm but smooth to touch | Uneven hand buffing pressure |
| Ring hole damage | Major | Ring jams, plating flakes or hole cuts hardware | No chamfer or assembly after plating damage |
Lead time impact is manageable when edge requirements are specified before tooling. Simple enamel pins usually need 7–10 days for sampling and 12–18 days for production after sample approval. Coins, openwork badges and multi-process keychains often need 10–14 days for sampling and 18–28 days for production. If sharp edges are discovered after plating, rework can add 4–10 days and may still leave uneven finish because polishing through plating can expose base metal.
MOQ affects cost control. At 100–300 pcs, factories have limited room to build custom polishing fixtures, so hand deburring may add more per piece. At 500–1,000 pcs, a dedicated fixture or extra inspection step is easier to justify. At 5,000 pcs and above, small edge defects become a statistical certainty unless the golden sample, tooling maintenance and AQL criteria are locked before mass production.
Approve a Physical Edge Standard Before Mass Production
Before approving production, handle the sample the way the end user will handle it. Roll the coin between fingers, attach the keychain to a real split ring, pin the brooch on similar fabric, slide the magnet into its packaging and inspect cutouts under angled light. If the edge feels questionable at sample stage, mass production will not improve unless the process is changed and resampled.
Send the factory an edge-quality note with the artwork file, not after the mold is cut. Include edge zones, burr limits, radius or bevel width, hole chamfer, plating finish, packing method and AQL standard. If the order includes mixed items, such as pins, coins and keychains in one kit, define edge requirements per item instead of applying one vague sentence across the full set.
The most useful control is a signed golden sample. Keep one approved physical sample with your team and one sealed sample at the factory. Mark whether it represents color only, edge feel only or full production approval. That prevents reorders from drifting when a new polishing worker, die set or plating batch is used.
- Mark outer edges, cutouts, rims and holes as separate inspection zones on the drawing.
- Use measurable limits such as burr ≤0.03 mm for premium hand-contact edges.
- Confirm radius, bevel or reeded rim details before tooling starts.
- Approve close-up photos of internal cutouts and ring holes before bulk production.
- Classify sharp edges, hook burrs and ring-hole damage as major defects.
- Retain a signed golden sample so reorder hand feel stays consistent.
Have a project? Send your artwork and target quantity and we’ll reply with a detailed quotation within 12 working hours.
Ready to get this made?
Send your sketch, target quantity and ship-date. Detailed quotation in 12 hours.


