Edge Finishing Specs for Custom Metal Giveaways
Why Good Metal Giveaways Still Fail in Hand
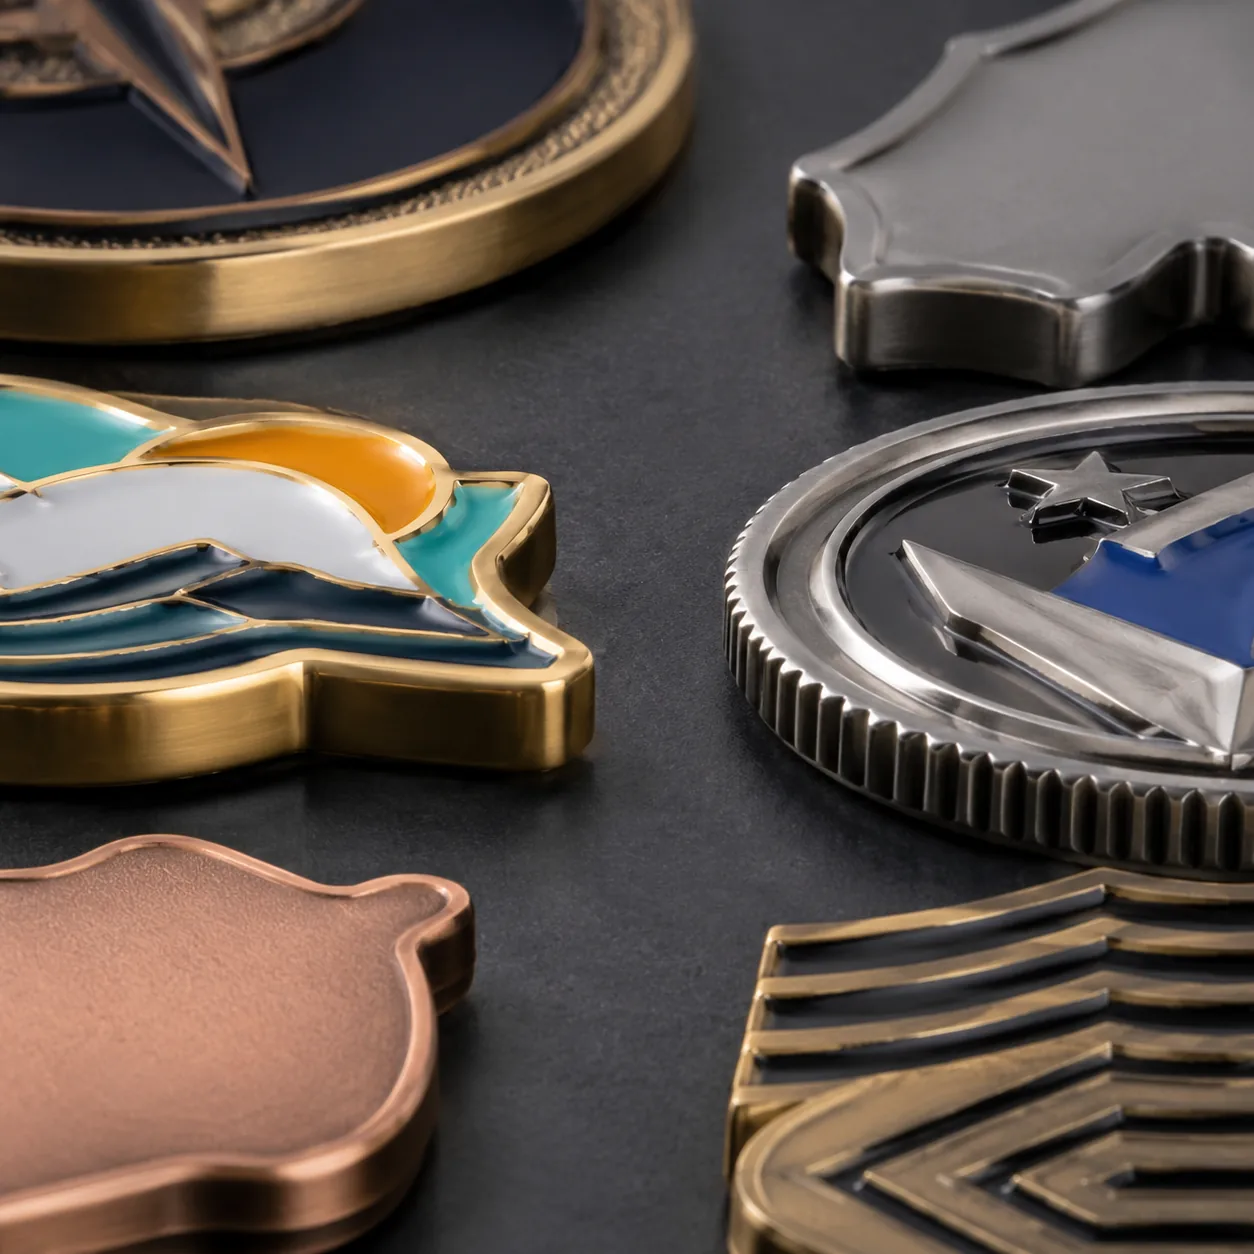
A custom metal giveaway can look acceptable in a front-view photo and still fail in use. The common complaints are practical: enamel pins snag scarves, keychains scratch phone cases, fridge magnets chip at the rim, bottle openers feel abrasive, and challenge coins have a cutting edge around the perimeter. These are not usually artwork problems. They are edge-control problems that were not defined clearly in the RFQ, sample approval, and final inspection checklist.
For zinc alloy, brass, iron, and stainless promotional parts, a safe commercial target is a small, controlled radius on exposed handling edges, consistent polishing, and no loose burrs after plating. A practical default is R0.15-R0.30 mm on worn pins and badges, R0.20-R0.40 mm on pocket-carried keychains and coins, and no burr or raised projection above 0.05 mm after finishing. If the item is worn on fabric, handled by children, packed loose with other metal parts, or placed against painted surfaces, the edge requirement should be treated as a functional specification, not a cosmetic preference.
The solution is not simply “polish more.” Over-polishing can thin plating on corners, flatten raised detail, widen enamel cells, and soften brand shapes. Good edge finishing defines which edges must be comfortable, which artwork details must stay crisp, which functional edges must keep their geometry, and how the factory and buyer will inspect the result.
Where Sharp Edges Enter the Process
Edge risk starts with the production route. Stamped brass or iron parts often show shear marks and rollover, especially above 1.5 mm thickness. Die-cast zinc alloy can leave parting-line flash, gate scars, ejector marks, and small fins around openwork. Photo-etched brass or stainless can produce clean but crisp edges. Laser-cut stainless may carry heat-affected burrs unless it is brushed, tumbled, or electropolished afterward.
Geometry matters as much as material. A 30 mm round coin with a continuous rim is easy to deburr consistently. A 45 mm openwork badge with 12 internal windows, 1.2 mm bridges, and a 1.5 mm base thickness is harder because tumbling media may not reach every internal corner evenly. Acute internal V-corners, narrow bridges, jump-ring holes near the outside edge, and raised rim concepts all increase the chance of snag points.
Plating can make a borderline edge worse. Decorative nickel, copper, black nickel, gold flash, antique brass, and antique copper build more visibly on peaks and corners than in recesses. Typical promotional plating is about 3-8 microns total for nickel or copper-nickel systems, with gold flash commonly around 0.05-0.10 microns over nickel unless a thicker layer is specified. If a burr remains before plating, the plated burr becomes harder, more abrasive, and more likely to flake during handling or packing.
Set Radius and Burr Limits by Product Type
Not every metal edge should receive the same finish. A challenge coin should feel substantial and smooth in the hand, so a bevel or rounded rim is usually desirable. A hard enamel pin may need crisp front metal lines to preserve artwork, so the outside perimeter, back edge, and hardware area should be softened while fine front details are protected. A bottle-opener keychain needs comfortable outside edges but cannot have the opener mouth rounded until it loses function.
Use measurable language wherever possible. For most promotional metalwork, “no sharp edges” should be replaced with a target radius, a maximum burr height, and the surfaces included. If the factory cannot measure every edge radius in production, the numeric target still guides tooling, tumbling media, polishing pressure, and inspection judgment.
| Product type | Typical thickness | Recommended edge specification | Tighten or protect when |
|---|---|---|---|
| Soft or hard enamel pin | 1.2-2.0 mm | Outer perimeter R0.15-R0.25 mm; exposed back edge deburred; burrs under 0.05 mm | Tighten for scarves, uniforms, schools, or child-facing use; protect fine metal separators |
| Brooch or fashion badge | 1.5-2.5 mm | Outer and back perimeter R0.20-R0.30 mm; no sharp weld halo around hardware | Tighten for thin fabric; avoid aggressive tumbling on plated or polished front detail |
| Challenge coin | 2.5-4.0 mm | Beveled rim or R0.25-R0.50 mm on both faces; no rim burr after plating | Tighten for pocket carry; protect sharp relief only where it is part of the approved design |
| Metal keychain | 1.5-3.0 mm | R0.20-R0.40 mm on handled edges; no burr at jump-ring hole or split-ring contact point | Tighten for phone accessories; maintain bottle-opener mouth and hole dimensions |
| Fridge magnet or magnetic badge | 0.8-1.5 mm metal shell | No exposed sharp shell edge; magnet or backing seated within 0.20 mm of metal edge | Tighten for painted appliances, laptops, lockers, and retail cards |
| Openwork badge or cutout pin | 1.2-2.0 mm | Internal burrs under 0.05 mm; no snag in cotton wipe test; avoid over-rounding bridges | Protect bridges below 1.2 mm and internal corners that define the logo |
Choose Finishing Processes With Known Trade-Offs
Hand filing is useful for samples, visible gate marks, and isolated acute points, but it is slow and operator-dependent. It can correct a few risky corners before plating, yet it is not a stable primary process for 1,000-piece repeat orders unless the work instruction and inspection standard are clear. For production lots, manual finishing should be reserved for defined zones or used as a supplement after mechanical deburring.
Vibratory tumbling is the most common pre-plating deburring route for zinc alloy, brass, and iron blanks. Ceramic or resin media can remove small burrs and soften edges in 20-90 minutes depending on part hardness, thickness, media size, compound, and desired hand feel. Light tumbling is efficient for general pins and badges. Extended tumbling improves pocket feel on coins and keychains, but it can bend bridges below about 1.0-1.2 mm, trap media in narrow cutouts, or soften relief if the cycle is too long.
Buff polishing improves the visual finish of rims, raised surfaces, and shiny plated products. It is less effective inside narrow recesses and can round high relief more than intended. For antique coins, heavy pre-polishing may reduce the contrast between raised and recessed areas. A light deburr before plating plus a controlled post-antique wipe often gives better definition than mirror polishing the whole blank.
| Finishing method | Best use | Typical added lead time | Typical FOB cost impact |
|---|---|---|---|
| Light vibratory tumble | General burr removal before plating on pins, badges, and small charms | 0-1 day when planned in the route | USD 0.01-0.04 per small pin or charm |
| Extended tumble | Softer pocket feel on coins, keychains, and thicker cast parts | 1 day | USD 0.03-0.08 per piece, weight-dependent |
| Manual edge filing | Samples, gate marks, acute local points, and post-tooling corrections | 1-3 days for production lots | USD 0.03-0.15 per piece, complexity-dependent |
| Buff rim polishing | Shiny nickel, gold, black nickel, and premium coin rims | 1-2 days | USD 0.04-0.20 per piece, size-dependent |
| Post-plating touch-up | Minor snag points found late in inspection | 1-4 days with higher scrap risk | Avoid where possible; may expose base metal or alter color |
Design Rules That Reduce Burr Risk Before Tooling
The lowest-cost edge fix is a design adjustment before tooling. Internal V-corners below 30 degrees should be avoided unless they are essential to the logo. A 0.20-0.30 mm internal radius is usually invisible to end users but gives dies, molds, tumbling media, and plating better access. For openwork zinc alloy badges, keep bridges at least 1.2 mm wide; for stamped brass or iron, 1.5 mm is a safer lower limit when the part must be tumbled.
Jump-ring holes need enough wall thickness to survive deburring and use. On small zinc alloy keychains, keep at least 1.5 mm from the hole edge to the outside edge. For heavier coins, bottle openers, or 3.0-4.0 mm thick parts, use 2.0 mm or more. Thin hole walls distort during polishing and can plate unevenly, creating roughness where the split ring rotates.
Back hardware also affects edge quality. A pin post welded too close to the perimeter can block polishing and create a sharp weld halo. As a working rule, keep pin posts at least 5 mm from the nearest outside edge where the layout allows. Keep brooch bars, magnetic discs, and adhesive pads inside the finished outline so they do not create a raised scratch point on fabric, retail cards, refrigerators, or laptops.
- Add R0.20 mm minimum radius to internal cutout corners where the artwork allows.
- Avoid openwork bridges below 1.2 mm on zinc alloy and below 1.5 mm on stamped brass or iron.
- Keep jump-ring holes at least 1.5-2.0 mm from the outside edge based on part weight and thickness.
- Place welded posts, brooch bars, and magnets far enough from the perimeter to allow polishing access.
- Mark bottle-opener lips, coin relief, and fine enamel separators as protected functional or cosmetic geometry.
- Approve a physical sample for hand feel and snag risk, not only a front-view artwork photo.
RFQ Language That Factories Can Quote and Inspect
A useful RFQ separates radius, burr limit, surfaces, timing, and inspection method. A strong default clause is: “All exposed handling edges to be deburred before plating; target R0.20-R0.30 mm where artwork allows; no burr or sharp projection above 0.05 mm after plating; cotton wipe or finger slide test must not snag.” This gives the factory a process target and gives inspection teams a reject basis.
For mixed-function products, split the requirement by zone. A bottle-opener keychain may state: “Outside perimeter R0.25-R0.40 mm; jump-ring hole free of burrs; opener mouth to retain approved sample geometry and not be over-rounded.” A hard enamel pin may state: “Outer perimeter and back edge R0.15-R0.25 mm; front metal separators to remain crisp; no burrs around post weld or clutch area.” A coin may state: “Rim bevel 0.30-0.50 mm both faces; raised relief protected from flattening; no plated burrs on reeded or scalloped edge.”
The RFQ should also specify whether the edge requirement applies before and after plating. Best practice is pre-plating deburring with final inspection after plating. Post-plating polishing should be treated as a corrective action, not the main process, because it can expose base metal at high points or create color inconsistency on black nickel, antique brass, antique copper, dyed lacquer, and two-tone finishes.
Inspection Plan, AQL, and Defect Classification
Edge quality should be checked at three points: pre-production sample, in-process blanks before plating, and final packed goods. For buyers who cannot inspect on site, the pre-production sample is the strongest control. Request close-up video showing a fingertip or cotton cloth moving along the outside edge, internal cutouts, back hardware area, jump-ring hole, and rim. Still photos rarely reveal snag points unless lighting is unfavorable.
For final inspection, AQL General Inspection Level II with Critical 0, Major 2.5, and Minor 4.0 is a practical baseline for normal promotional shipments. Any edge that can cut skin, tear fabric, scratch a normal-use surface, or damage retail packaging should be classified as major. For children’s items, school wear, or direct skin-contact products, a cutting edge should be treated as critical. Minor defects can include slight roughness that is not visible at normal viewing distance and does not snag cloth or scratch the agreed test surface.
| Inspection point | Sample size or method | Acceptable result | Reject condition |
|---|---|---|---|
| Pre-production sample | 3-5 pieces from production-intent tooling | Approved hand feel; no visible flash; no cotton snag | Any sharp outer edge, plated burr, or blocked polishing area on approved sample |
| Before plating | Factory in-process check; 100% visual for obvious flash on blanks | Gate marks and flash removed before surface finishing | Die flash, raised burrs, trapped media, or distorted bridges |
| Final inspection | AQL Level II; Critical 0, Major 2.5, Minor 4.0 | No injury risk, no snagging, no scratch risk on exposed edges | Cutting edge, burr above 0.05 mm, sharp jump-ring hole, or scratched packing card |
| Packed carton check | Random retail packs, inner bags, and bulk bags | No metal-on-metal abrasion caused by sharp rims | Loose parts damaging plating, polybags, magnets, or printed cards |
MOQ, Lead Time, and Price Trade-Offs
Edge finishing is inexpensive when it is planned into the route and expensive when discovered after plating. For simple enamel pins at 500-1,000 pieces, normal light deburring is often included in a professional FOB quotation. Special hand finishing usually adds USD 0.03-0.10 per piece. For heavier challenge coins, bottle openers, and keychains, extended tumbling or rim polishing typically adds USD 0.05-0.20 per piece depending on weight, rim style, and plating finish.
MOQ affects process stability. At 100-300 pieces, factories may rely more on manual handling because the batch is too small to optimize tumbling media, fixture setup, and cycle time. At 500-5,000 pieces, deburring can be standardized more reliably, but only if the radius and burr requirements are known before quotation and sample approval. Adding a stricter edge specification after sample sign-off commonly adds 2-5 production days; if parts need remaking or replating, the delay can reach 7-10 days.
The practical brief is short: classify how the item will be used, mark the risky edges on the artwork, define radius and burr limits, and approve hand feel on a physical sample. For many pins, badges, coins, magnets, and keychains, the default is: exposed handling edges deburred, R0.20-R0.30 mm where artwork allows, no burr above 0.05 mm after plating, and no snag in cotton wipe or finger slide testing. Tighten that standard for fabric wear, children’s use, phone accessories, and painted-surface contact; relax it only where crisp detail or functional geometry is essential.
Have a project? Send your artwork and target quantity and we’ll reply with a detailed quotation within 12 working hours.
Ready to get this made?
Send your sketch, target quantity and ship-date. Detailed quotation in 12 hours.


