Edge Finishing Specifications for Metal Pins, Coins and Keychains
Why Edge Finish Fails Even When Artwork Looks Approved
Most edge complaints appear after the buyer has already approved artwork and color proofs. A lapel pin can match the Pantone callout but still scratch a backing card. A challenge coin can have clean front relief but show dark plating residue around the rim. A keychain can pass a front-face photo review and still feel sharp at the split-ring hole. The reason is simple: artwork approval controls the visible design, while edge finishing controls user contact, plating coverage and handling durability.
For custom metal giveaways, edge quality is influenced by die clearance, stamping pressure, casting gates, CNC trimming, tumbling media, hand polishing, plating build-up and final assembly. A 30 mm soft enamel pin, a 55 mm zinc alloy keychain and a 45 mm challenge coin should not use the same edge standard just because they share the same finish. The edge specification should be a separate line item in the RFQ and production sheet, not an assumption hidden inside “good quality.”
The commercial impact is small per piece but large when discovered late. Adding a 0.25 mm safe-touch radius, double-side polishing and tighter inspection may add USD 0.01-0.06 FOB per piece on a pin or keychain, but correcting sharp edges after plating is slow and risky. Re-polishing can remove plating at high points, expose base metal and create color mismatch. Define the edge before sample tooling so the factory can quote the correct process, lead time and inspection method.
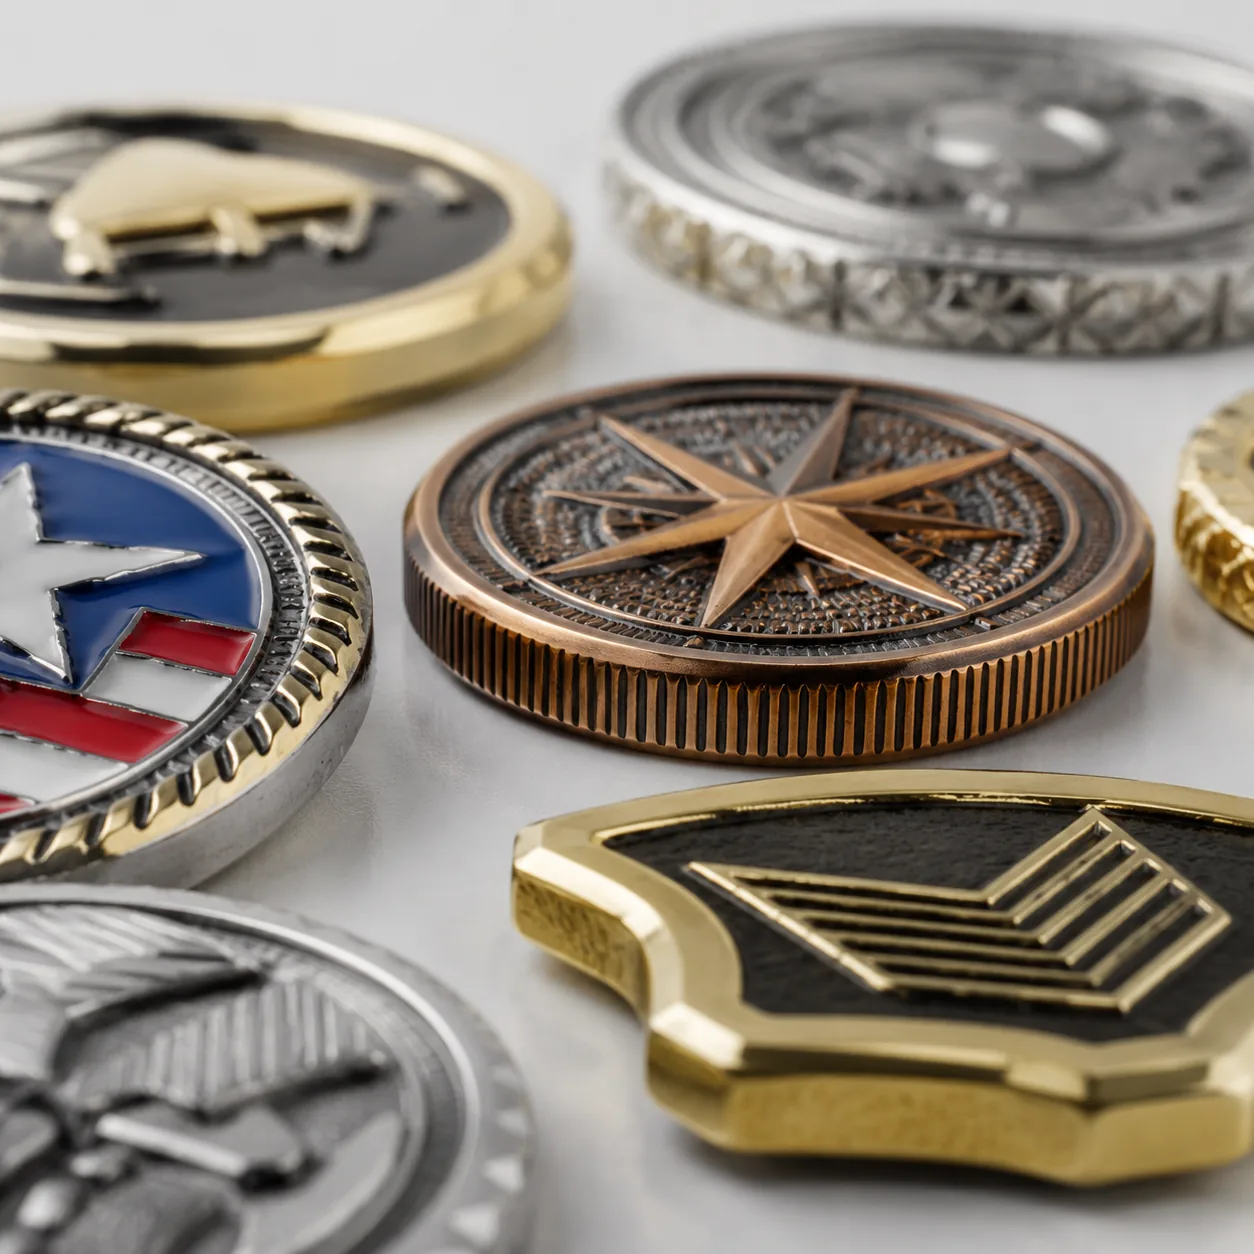
Specify Geometry Before Polish Level
Edge geometry is the physical shape of the perimeter: square edge, softened radius, bevel, raised rim, rope edge, reeded edge or custom relief edge. Polish level is the surface smoothness after that geometry exists. A square stamped edge can be polished bright and still feel sharp if the corner radius is too small. Conversely, over-polishing can blur a logo silhouette, reduce raised-line height and shrink small details by 0.05-0.20 mm.
For lapel pins under 40 mm, a practical safe-touch outer radius is 0.15-0.25 mm after polishing. For keychains handled daily, specify 0.25-0.40 mm on the outer perimeter and internal cutouts where the artwork allows it. For challenge coins, a 0.8-1.5 mm bevel on a 3.0-4.0 mm thick body gives a substantial feel without creating a knife-like rim. For thin 1.2 mm iron badges, avoid heavy rounding because it can make the part look worn and reduce the apparent thickness.
Keep artwork clearances realistic. Text, enamel cells and fine borders placed too close to the perimeter are easily damaged during deburring and plating. For stamped pins, keep at least 0.6 mm between text strokes and the outer edge; for cast zinc alloy items, use 0.8 mm or more because gate removal and hand polishing require extra stock. Internal bridges below 0.8 mm on 1.2 mm iron can bend during tumbling, while zinc alloy openwork usually needs 1.0-1.2 mm minimum bridge width for stable casting and plating.
| Product type | Practical edge specification | Avoid when | Typical FOB impact |
|---|---|---|---|
| Soft enamel pin, 20-35 mm | 0.15-0.25 mm softened outer radius; deburr before plating; polish both faces | Avoid heavy rounding if enamel cells are within 0.5 mm of the edge | Included to +USD 0.01/pc at 1,000 pcs |
| Metal keychain, 35-60 mm | 0.25-0.40 mm safety radius; smooth split-ring hole; no burrs on internal cutouts | Avoid thick bevels on 1.2 mm iron because the edge may look thin | About +USD 0.02-0.06/pc depending on hand polishing |
| Challenge coin, 40-50 mm | 3.0-4.0 mm body; 0.8-1.5 mm bevel, raised rim or reeded edge | Avoid deep reeding on rush orders because tooling and plating need more control | About +USD 0.05-0.18/pc at 500 pcs |
| Brooch badge, 30-55 mm | Soft back perimeter; smooth pin-seat and solder area; cotton snag test | Avoid rough cast backs on fabric-contact products | About +USD 0.02-0.08/pc |
| Fridge magnet badge, 40-70 mm | Back edge deburred before magnet assembly; 0.20 mm minimum softened edge | Avoid large bevels that reduce magnet contact area | About +USD 0.01-0.05/pc |
Match the Edge Process to the Base Metal
Iron, brass, zinc alloy and stainless steel do not finish the same way. Iron is cost-effective for stamped pins and badges from 0.8-1.5 mm thick, but the stamping shear can leave a burr on the exit side if die clearance or die wear is not controlled. Brass stamps cleaner and polishes faster, making it suitable for premium pins, badges and coins, but raw material cost is higher and MOQ is often less flexible.
Zinc alloy is common for 2D and 3D keychains, thick badges, bottle openers and complex openwork designs. It casts well, but the parting line, gate mark and overflow must be removed before polishing and plating. The RFQ should state that gate marks cannot remain visible on the user-facing perimeter and that repaired zones must pass plating adhesion after tape test. A shiny sample can still fail in use if the edge repair was porous or contaminated before electroplating.
Stainless steel is strong and corrosion-resistant, but it is harder to stamp, drill and mirror-polish. A 1.0-1.5 mm stainless keychain blank may be laser cut, tumbled and brushed, but deep enamel cells and bright decorative plating are usually easier on iron, brass or zinc alloy. If a buyer requests a mirror edge on stainless, confirm whether the supplier will use mechanical polishing, electropolishing or both. Electropolishing can smooth micro-burrs, but it will not correct a poor laser-cut profile or a large burr left at a hole.
Deburring Standards That Prevent Cuts and Snagging
Deburring is a safety and usability control, not a cosmetic upgrade. Burrs commonly occur on the back side of stamped pins, inside split-ring holes, around openwork cutouts, at brooch pin seats and near cast gate removal points. A burr of only 0.05 mm can catch cotton fibers, scratch neighboring pieces in bulk packing or feel sharp when the user slides a finger across the rim.
A practical promotional-product standard is: no continuous burrs visible at 30 cm under 600-800 lux white light, and no sharp burr detectable by fingertip wipe along any outer or inner edge. For apparel-contact items, add a cotton snag test: wipe clean cotton fabric across the perimeter, pin seat and back face; reject pieces that pull fibers. For keychains, rotate the split ring through the hole after plating; the ring should move freely without scraping plating nodules or exposing base metal.
Dimensional tolerance should allow real finishing work. For stamped pins and badges, use outer profile tolerance of ±0.15 mm for simple shapes and ±0.20 mm for complex outlines. For cast zinc alloy keychains and openwork pieces, ±0.20-0.30 mm is more realistic. Tightening an irregular promotional item to ±0.05 mm often creates sorting cost without improving fit or safety. Control critical holes separately: a small keychain split-ring hole is commonly 2.5-3.0 mm, while heavier pieces usually need 3.5-4.0 mm after plating.
- State that all outer edges, internal cutouts and hardware holes must be deburred before plating.
- Require split-ring holes to be smooth on both faces, with no plating nodules blocking rotation.
- Use fingertip wipe and cotton snag checks for pins, brooches and lanyard badges that touch fabric.
- Set outer profile tolerance separately from logo, text and hardware-hole tolerance.
- Request side-view and macro photos of the worst edge areas on the pre-production sample.
Control Polishing, Plating Thickness and Adhesion Together
Polishing and plating cannot be specified separately. Polishing changes the geometry; plating adds thickness and can build up at corners. If polishing is too light, plating highlights tool marks and burrs. If polishing is too aggressive, raised borders, small text and coin relief lose definition. For standard nickel, gold, black nickel, copper or brass-effect finishes on enamel pins and badges, a typical decorative plating target is 3-5 microns. Local corner build-up may be higher, especially on raised rims.
For keychains and coins that receive heavier handling, specify 5-8 microns where budget allows. This does not make the product scratch-proof, but it improves wear life compared with very thin decorative plating. Antique silver, antique brass and antique copper finishes require a different control point: the recess is darkened chemically and then relieved by polishing. A coin can look premium when the bevel is bright and consistent, but cheap when black residue remains unevenly around the rim or inside reeded edges.
Adhesion matters as much as thickness. A practical inspection package for plated promotional metal parts is cross-hatch or tape test on representative flat areas, visual check for blistering at high-stress edges and rub testing on handled zones. For nickel-free requirements, confirm the actual finish stack and test method before quoting; nickel-free plating often increases cost by USD 0.03-0.10/pc and can add 2-4 production days because pretreatment and bath control are less forgiving.
High-Risk Designs Need Edge Notes on the Drawing
Some shapes require explicit edge instructions on the technical drawing, not just a general quality note. Bottle-opener keychains need a working lip that contacts metal caps. The opener edge should be smooth enough to handle but defined enough to function. A practical minimum is 2.0-2.5 mm metal thickness at the opener lip, no enamel within 1.0 mm of the functional contact area and polished contact edges with no plating flake after use testing.
Openwork pins and badges need internal-edge control. A 1.0 mm gap may fill with plating, polishing compound or enamel overflow, so use 1.2 mm minimum open cutout width for stamped iron and 1.5 mm for cast zinc alloy when the hole must remain visibly clean after plating. Thin script logos should avoid unsupported bridges below 0.8 mm on stamped iron and below 1.0 mm on zinc alloy unless the supplier confirms a stronger thickness or altered mold construction.
Brooches require extra control on the back because the user may never inspect it until fabric is damaged. For a 45 mm brooch on medium-weight fabric, specify a smooth back perimeter, pin stem diameter of about 0.8-1.0 mm, hinge and catch aligned within ±1.0 mm and no sharp solder overflow. For magnets, deburr before magnet assembly so the adhesive pad sits flat; a raised burr can reduce bonding area and create rocking on the refrigerator surface.
| Risk area | Minimum practical specification | Inspection method | Common failure |
|---|---|---|---|
| Internal cutout | 1.2 mm stamped iron; 1.5 mm cast zinc alloy | Pin gauge or approved-sample comparison | Blocked hole or rough inner wall |
| Split-ring hole | 2.5-3.0 mm for small keychains; 3.5-4.0 mm for heavy pieces | Ring rotation test after plating | Ring jams, scratches plating or exposes base metal |
| Pointed logo corner | 0.20 mm softened tip where artwork allows | Fingertip wipe plus 30 cm visual check | Sharp point bends, scratches packaging or catches fabric |
| Coin rim | 0.8-1.5 mm bevel on a 3.0-4.0 mm coin | Caliper plus side-view comparison | Uneven antique residue or thin rim plating |
| Brooch back | No cotton snag; smooth solder and pin-seat zone | Cotton snag test and fabric trial | Fabric pull, user complaint or return |
Sampling, AQL and In-Process Checks
Edge defects are rarely uniform across a batch. Polishing wheels wear, operators change technique, tumbling media loads vary and parts at different rack positions may receive different plating exposure. For orders above 1,000 pieces, ask for in-process photos or short videos after raw forming, after deburring and after plating. For complex cutouts, bottle openers, thick coins and brooches, request side-view sample photos before approving mass production.
Use AQL categories that separate safety from cosmetics. For standard promotional orders, a practical final inspection plan is AQL 1.5 for critical defects such as sharp burrs that can cut skin, broken pin backs, blocked functional holes or exposed wire; AQL 2.5 for major defects such as visible gate marks, plating burns, dark rim stains or rough cutouts; and AQL 4.0 for minor edge marks not obvious at 30 cm. For children’s products, apparel retail, licensed merchandise or premium membership programs, tighten the plan and allow more sorting time.
Define the viewing condition in the purchase order: 30 cm viewing distance, 600-800 lux white light, unaided eye, front/back/side checked for 3-5 seconds per piece. Safety checks should include touch, not only sight. Add fingertip wipe, cotton snag and ring-rotation tests where relevant. If the order uses individual polybags, cards or velvet boxes, include a packing abrasion check because a rough rim can damage neighboring plated parts before the carton reaches the customer.
- Critical defect: any edge that can cut skin, snag cotton, block hardware function or expose base metal severely.
- Major defect: visible gate mark, plating burn, dark rim stain, rough cutout or sharp split-ring hole.
- Minor defect: slight polish direction variation or tiny edge mark not obvious at 30 cm.
- Suggested AQL: 1.5 critical, 2.5 major and 4.0 minor for standard promotional orders.
- For retail or child-facing orders, confirm tighter AQL and budget for extra sorting time.
Cost, MOQ, Lead Time and RFQ Wording
Edge finishing should be priced with the product, not negotiated after the sample fails. For a 30 mm stamped soft enamel pin, MOQ commonly starts at 100-300 pcs, with FOB pricing around USD 0.45-1.20/pc depending on thickness, colors, plating, backing and packing. Standard deburring and polishing are usually included, while extra hand polishing on complex outlines may add USD 0.01-0.04/pc and 1-2 production days.
For zinc alloy keychains at 500 pcs, FOB pricing commonly ranges from USD 0.80-2.20/pc depending on size, thickness, hardware and finish. Extra gate removal, internal cutout polishing or nickel-free plating can add USD 0.03-0.12/pc. Challenge coins at 100-300 pcs have higher setup impact: a bevel, rope edge or reeded edge may add USD 20-80 in tooling or setup cost and 2-4 days to sampling. At 1,000 pcs and above, the per-piece impact falls, but inspection time still needs to be planned.
Normal sample timing is 7-12 days for stamped pins and badges, and 10-15 days for cast zinc alloy keychains or coins with special rims. Mass production is typically 12-20 days after sample approval for standard orders, or 20-30 days when thick plating, antique finishing, hand polishing or retail packing is required. Rush orders increase edge risk because polishing and plating checkpoints are the first steps people try to compress.
A clear RFQ line is enough to prevent many disputes: all outer and inner edges deburred before plating; 0.15-0.25 mm safe-touch radius for pins or 0.25-0.40 mm for keychains where artwork allows; no sharp burrs by fingertip wipe; cotton snag test for apparel-contact items; plating 3-5 microns standard or 5-8 microns for heavy-handling products; inspect to AQL 1.5 critical, 2.5 major and 4.0 minor. ZheCraft can quote this as a controlled specification, making samples easier to approve and reorders easier to match.
Have a project? Send your artwork and target quantity and we’ll reply with a detailed quotation within 12 working hours.
Ready to get this made?
Send your sketch, target quantity and ship-date. Detailed quotation in 12 hours.


