Custom Pin Spec Sheet: What Each Line Item Really Means
Start With The Drawing, Not The Price
When a buyer asks for a quote on 5,000 pins, the biggest risk is not unit price. It is whether the supplier and buyer are describing the same part. A complete spec sheet turns a rough concept into a manufacturable product and is the fastest way to prevent quote gaps, sample churn, and production rework. For custom enamel pins, brooches, badges, keychains, and similar metal giveaways, the drawing is not just artwork; it is the contract for size, build, finish, color, attachment, and packing.
The cleanest RFQs define every line item in one place and lock the sample against that same list. If you change thickness after sampling, or treat plating as an afterthought, you usually pay for it later in tooling revisions, plating mismatch, or delayed shipment. The right way to buy is to specify the part as if the factory has never seen your brand before, because many factories will interpret missing details differently.
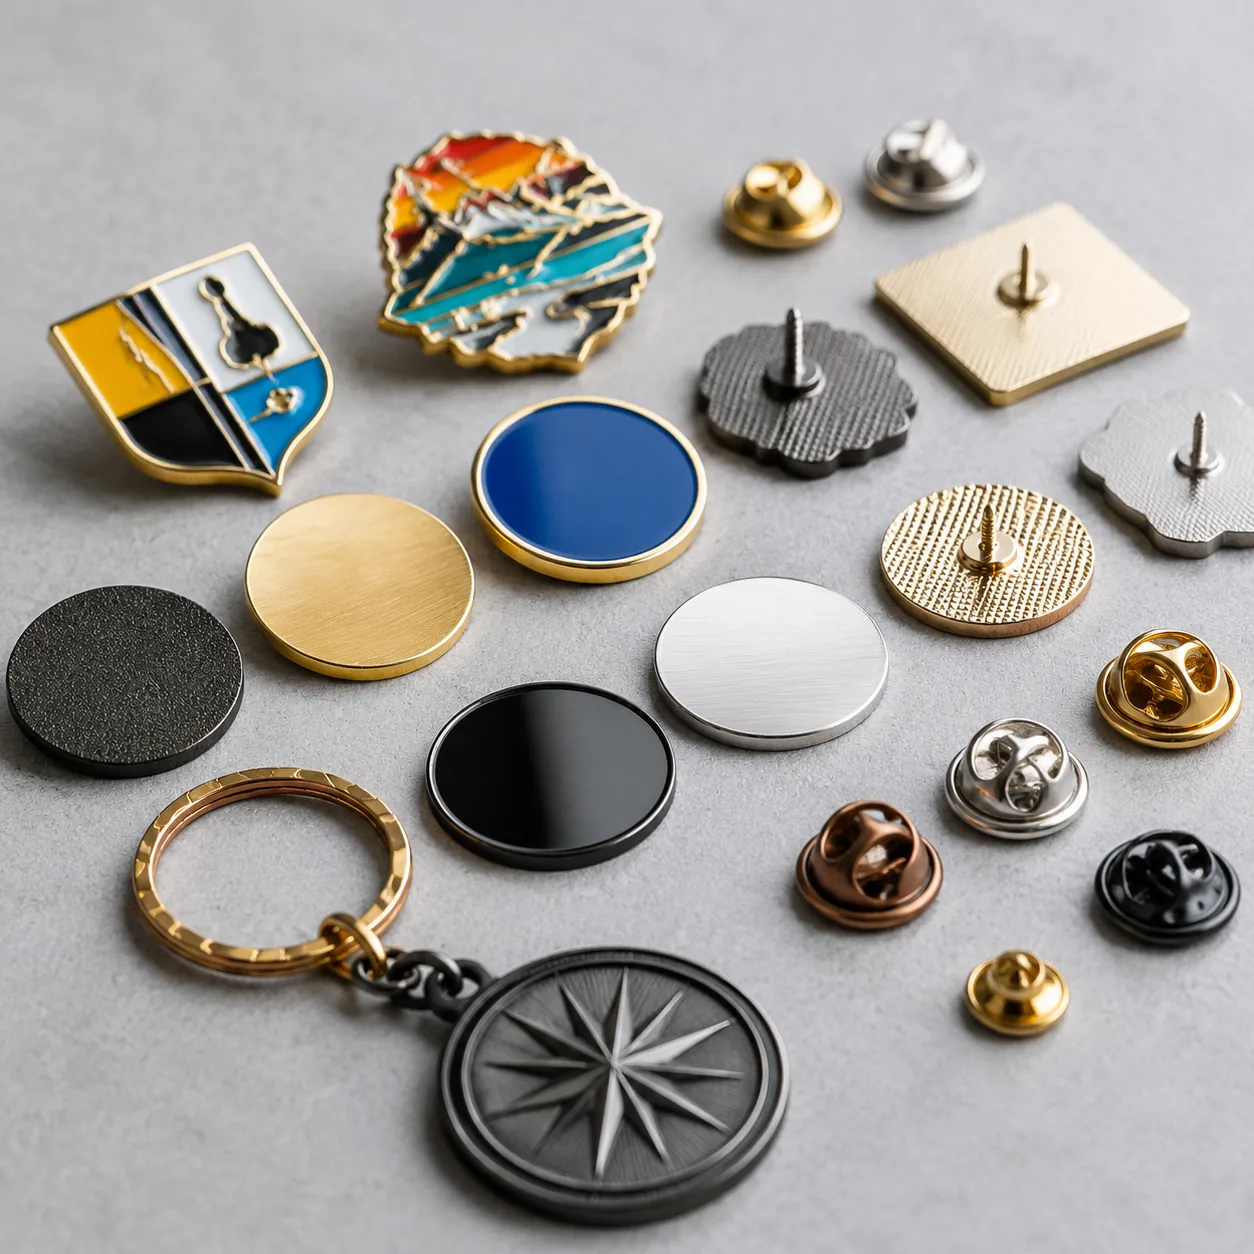
- State the exact product type: lapel pin, brooch, badge, keychain, magnet, or coin.
- Specify finished size, not artwork canvas size.
- Lock the build type: soft enamel, hard enamel, die-struck, cast, or printed.
- Define finish, attachment, packing, and approval method in the same RFQ.
- Ask for a pre-production sample when color, fit, or packaging is brand-critical.
Size, Thickness, And Tolerance
Finished size is the first line item buyers should lock because nearly every cost driver depends on it. A 25 mm pin and a 40 mm pin can look similar on screen, but the larger part needs more metal, more fill, and often more labor. For most custom pins, a common finished size range is 20 to 45 mm. Typical metal thickness is 1.2 to 1.5 mm for soft enamel and 1.5 to 2.0 mm for hard enamel or heavier brooch work. If the design has long arms, deep cutouts, or dense text, ask whether the structure needs added thickness to prevent bending or breakage during polishing and use.
Tolerance matters more than many first-time buyers expect. For small metal promo products, a practical dimensional tolerance is usually ±0.3 mm on simple shapes and ±0.5 mm on more complex outlines. That tolerance should be referenced to the finished metal edge, not the digital artwork. If the pin must fit a display-card slot, a presentation box insert, or a companion item in a set, define the mating dimension separately. That is how you avoid a quote that looks correct but fails at assembly.
| Spec line item | Typical buyer-safe range | Why it matters |
|---|---|---|
| Finished size | 20–45 mm for most pins | Drives tooling, cost, and wearability |
| Metal thickness | 1.2–1.5 mm soft enamel; 1.5–2.0 mm hard enamel | Controls rigidity and edge feel |
| Dimensional tolerance | ±0.3 mm simple; ±0.5 mm complex | Prevents fit and alignment issues |
| Minimum edge clearance to cutouts | 0.25–0.4 mm | Reduces breakage and deformation |
| Minimum text height | 1.0–1.2 mm | Keeps small copy legible after plating and fill |
For very fine artwork, ask the factory to confirm the narrowest line width before tooling. In many factories, practical line widths below 0.20 mm risk poor fill, weak walls, or enamel bleed. A safer target for mixed-detail pins is 0.30 mm minimum line width and 0.40 mm minimum enamel pocket width. If the design includes tiny logo text or hairline borders, have the supplier mark which elements will be simplified before sampling rather than discovering it after the mold is cut.
Metal Build And Plating Callout
The metal callout should say more than zinc alloy or brass. It should tell the factory what the part must survive and what the buyer wants the surface to look like after handling, transport, and shelf time. Zinc alloy is usually better for 3D shapes, thicker relief, and lower tooling stress on larger runs. Brass is often better for crisp lines, sharper hard-enamel walls, and cleaner plating appearance when the design is detail-heavy. For small-run premium pins, brass also tends to hold edges better during polishing, which matters when the artwork includes fine lettering or thin borders.
Plating should be specified by color and finish, and for premium programs, by process control expectations. Decorative plating on pins is usually measured in a very thin range, roughly 0.03 to 0.08 microns of actual deposit for standard appearance work, depending on the process and metal. In practice, appearance is driven more by base-polish quality, bath consistency, and top-surface handling than by chasing extra thickness. Gold, nickel, black nickel, antique brass, antique copper, and matte finishes all behave differently under fingerprints, oxidation, and edge polishing. If the customer expects a luxury feel, define the finish texture and buffing level together with the plating color.
- Use brass when the artwork has fine line detail and crisp enamel walls.
- Use zinc alloy when the design needs 3D relief, depth, or lower tooling stress.
- Call out polished, matte, antique, or sandblasted finish separately from plating color.
- For premium programs, request a plating control sample before mass production.
- Avoid mixing highly reflective plating with tiny text unless contrast is tested on a sample.
A practical plating note is to specify whether the visible surface should be mirror polished, semi-polished, brushed, or antique-washed. A mirror gold pin can look dramatically different from a brushed gold pin even if the color name is the same. If your program has multiple SKUs, keep the finish code consistent across the range so buyers can reorder without re-approving the appearance from scratch. For most promotional pin jobs, a polished nickel or polished gold finish is the safest default because it is visually forgiving and easy to match between lots.
Enamel, Fill Depth, And Surface Feel
Enamel is where many buyers over-focus on color and under-specify geometry. Soft enamel leaves recessed lines visible, which is useful for tactile detail and lower cost. Hard enamel is polished flush for a smoother premium surface. If the design contains small lettering, thin borders, or brand marks that must remain readable after polishing, hard enamel is usually the safer route, but it can reduce the visual depth some campaigns want. For budget campaigns or more graphic styles, soft enamel is usually more economical and forgiving.
Fill depth should be written down because it directly changes appearance and durability. A common soft-enamel fill leaves the color about 0.3 to 0.5 mm below the metal line. Hard enamel is typically filled, fired, and polished flush, with the final surface controlled to a much tighter feel than soft enamel. If a buyer wants a smoother fingertip feel without the full cost of hard enamel, some factories can improve fill consistency and topcoat polishing, but that should be confirmed on sample. The point is simple: do not ask for a premium feel while leaving fill depth undefined.
If the design has ultra-fine detail, ask the supplier to confirm the narrowest line width and the minimum enamel compartment size before tooling. In many factories, practical line widths below 0.2 to 0.25 mm risk poor fill, weak walls, or enamel bleed. A safer production target for mixed-detail pins is often 0.3 mm minimum line width and 0.4 mm minimum enamel pocket width, though the exact limit depends on the tooling method and shape. For hard enamel, also ask whether the final polish will remove any metal border height; a border that starts at 0.25 mm may end up visually thinner after polishing than the artwork suggests.
Color depth also matters. Opaque enamel usually gives the strongest brand match, while translucent, glitter, glow, and UV-reactive finishes need their own acceptance rules. If your artwork uses special effects, specify the effect first and the Pantone target second. That prevents a factory from matching the hue but missing the visual behavior.
Color Specification And Acceptance
Color is not just Pantone codes. It is the combination of target color, substrate color, enamel type, lighting, and acceptance tolerance. A strong spec sheet lists the Pantone reference, the finish it will be viewed under, and whether the factory should match the sample or the Pantone swatch if they differ slightly. For brand programs, buyers should state whether slight variation between production batches is acceptable, because enamel color can shift across batches even when the code stays constant.
A practical acceptance method is to define one golden sample and one tolerance rule. For example, the first-off sample may be matched against a signed master sample under neutral white light, and mass production is accepted if the visual match stays consistent across the batch. If the artwork uses translucent, glitter, glow, or metallic effects, the color spec should say that effect first and hue second. Otherwise a factory can technically match the code and still miss the intended appearance. For critical brand colors, ask for a target delta-E range of no more than 1.5 to 2.0 from the approved master under D65 light, if the supplier can measure it.
| Color item | What to specify | Common mistake |
|---|---|---|
| Pantone reference | Exact code and finish context | Giving only a brand color name |
| Acceptance standard | Golden sample or Pantone swatch | Not stating which one wins |
| Lighting | Neutral white light or D65 | Checking under mixed showroom lighting |
| Effect type | Solid, translucent, glitter, glow | Leaving special effects implied |
| Batch variation | Allowed delta-E or visual limit | Assuming every run will match perfectly |
If you do not have a master sample yet, ask the factory to produce one against the Pantone target and mark it as the approval standard. That sample should be stored with the purchase order so both sides know what “match” means on reorder. For international buyers, the safest language is: match the signed master under D65 light, with no visible shift in daylight and no major deviation from the approved batch. That is clearer than saying “looks close enough.”
Attachment, Backing, And Wear Risk
The backing is often where real-world returns begin. Butterfly clutch, rubber clutch, safety pin, magnet, or brooch pin each solve a different use case, and the wrong choice can make a good design unusable. For garments with heavier fabric or where rotation must be limited, a brooch pin or anti-rotation backing is usually better than a standard butterfly clutch. For light promo wear or fast giveaway use, a standard clutch can be fine, but it should still be specified by type and quantity per item.
If the product will move through events, retail, or repeated handling, the backing and attachment should be tested as part of approval, not assumed. A magnetic backing can protect fabric, but may not hold on thick coats or structured bags as well as buyers expect. A brooch pin gives better spread and stability on fabric, but it is less suitable for very small pins. This is why the spec sheet should state the application before the attachment, not the other way around. If the pin will be worn on knitwear, ask for a longer post and a wider clutch to reduce pull-through risk.
- State whether the item is for apparel, bags, lanyards, display cards, or packaging only.
- Define one or two backing types if the design needs both retail and event versions.
- Ask for anti-rotation features when the design has a long vertical shape.
- Use magnetic backings only when fabric damage must be minimized.
- Confirm pin-post position on asymmetrical designs before tooling release.
For common apparel pins, a post length of 9 to 12 mm is typical, while heavier badges may need a larger backing pad or dual posts to stop spinning. If the design is wide or top-heavy, ask the factory to recommend a second post before sampling. It is easier to adjust post placement on a drawing than to remake a finished tool because the badge twists on a jacket lapel.
Packing, Presentation, And Carton Logic
Packing is not a cosmetic extra; it affects scuffing, logistics cost, and the buyer’s receiving experience. A standard bulk pack in polybags is cheapest, but it offers the least protection and the least presentation value. Backing cards, individual OPP bags, velvet pouches, paper boxes, and blister packs all change labor time and carton density, so they should be listed as separate line items. If the buyer needs kitting across multiple items, the spec should also define the sequence of assembly and the acceptable mix rate for each carton.
For most pin programs, a backing card is the most common retail presentation upgrade because it adds brand space and protects the finish from rubbing. But it also adds print cost, insertion labor, and carton volume. If the item is going into event mailers, ask the factory to quote both bulk and carded packing so the buyer can compare landed cost honestly. Bulk polybag packing is often the lowest-cost option, while carded packing can add about USD 0.08 to 0.25 per piece depending on print coverage, card stock, and hand assembly. A simple one-color card on 350 gsm stock will usually sit at the low end; a full-color printed card with lamination and die-cut hanging hole lands higher.
Carton logic should also be stated. A common export carton target for small pins is 200 to 500 pieces per inner carton, with outer carton weights kept near 12 to 18 kg for easier handling, but the final count depends on packing style and item size. If you need retail-ready units, ask the factory to confirm pack-out count, master carton dimensions, and whether the shipment includes spare units for damage allowance. If the order is fragile or plated in a high-gloss finish, request sleeve separators or tray inserts to reduce rub marks in transit.
A strong packing spec also says whether cartons must be drop-tested, barcoded, or labeled for distribution centers. If the buyer sells through retail or fulfillment channels, that detail matters as much as the pin itself. Many delays come from carton labels, not from the decoration process.
What To Check Before Mass Production
Before mass production, the buyer should check the sample against the same line-by-line spec sheet used for quoting. If the sample looks good but the dimensions, plating tone, or pin-post location are off, the final batch will likely repeat the same issue at scale. The cleanest approval process is one written approval per critical line item, not a vague okay on the whole piece. That may sound strict, but it is faster than arguing over a batch after plating and packing are finished.
- Verify finished size, thickness, and cutout clearances with a ruler or caliper.
- Check plating tone under neutral light, not just showroom light.
- Confirm color against the signed master sample and the Pantone target.
- Test the backing on the actual garment or material it will be used with.
- Review packing count, card alignment, and carton labels before shipment.
For quality control, ask the supplier which inspection standard they use. AQL 2.5 for major defects and 4.0 for minor defects is a common production benchmark for decorative metal goods, but the actual level should be agreed in writing. If the design is brand-critical or event-dated, some buyers tighten acceptance to AQL 1.5 for majors. Also ask for a pre-shipment report with photos, count verification, and at least one dimensional check per batch lot. If plating tone or color is the main risk, request a light-box photo set from the same sample batch so you can compare across devices more reliably.
A useful approval habit is to separate cosmetic and functional defects. Cosmetic issues include small color drift, polishing marks, or minor plating haze. Functional issues include loose posts, weak clutches, broken cutouts, or enamel that lifts after handling. If the PO does not separate those categories, disputes get messy fast.
Pricing, Lead Time, And Next Steps
As a quoting benchmark, many custom lapel pins land around USD 0.45 to 1.20 FOB per piece at 1,000 pieces, USD 0.28 to 0.85 at 5,000 pieces, and USD 0.18 to 0.55 at 10,000 pieces, depending on size, plating, enamel type, and packaging. Typical sample lead times are 5 to 8 days, while mass production often runs 12 to 20 days after sample approval. For plated hard-enamel pins with carded packing, add roughly 2 to 5 days of packing and final QC time. The cheapest quote is rarely the best one; the best quote is the one that already understands your spec.
Use MOQ and price together, not separately. A simple 25 to 30 mm soft-enamel pin may be available at a 100-piece MOQ, but the per-piece FOB price is often significantly higher than at 1,000 or 5,000 pieces because setup and plating losses are spread across fewer units. By contrast, premium hard-enamel or 3D relief parts may start at 300 to 500 pieces depending on mold complexity and post-finishing. Always ask whether the MOQ is per design, per colorway, or per plating finish, because suppliers do not always count those the same way.
| Order tier | Typical MOQ | Typical FOB range per piece | Typical lead time after approval |
|---|---|---|---|
| Sample / prototype | 1–3 pcs | USD 20–60 total sample fee | 5–8 days |
| Small run | 100–300 pcs | USD 0.45–1.20 | 12–18 days |
| Mid run | 1,000 pcs | USD 0.28–0.85 | 12–20 days |
| Larger run | 5,000 pcs | USD 0.18–0.55 | 15–22 days |
| High-volume run | 10,000+ pcs | USD 0.15–0.40 | 18–25 days |
The next move is simple: turn your current artwork into a one-page spec sheet with only the items the factory must not guess. Start with product type, size, thickness, metal, plating, enamel style, color target, backing, packing, MOQ, and approval standard. Then ask the supplier to quote directly against that sheet and to mark any missing data before sampling. If you already have a sample, use it to create the master reference and lock that as the approval standard.
If you are buying from China for the first time, the safest approach is to request a production-feasible drawing review before paying tooling. The goal is not to write a long brief; it is to eliminate every guess the factory would otherwise make on your behalf.
Have a project? Send your artwork and target quantity and we’ll reply with a detailed quotation within 12 working hours.
Ready to get this made?
Send your sketch, target quantity and ship-date. Detailed quotation in 12 hours.


