Custom Pin Spec Sheet: 12 Fields Buyers Must Lock
Why a pin order fails before tooling
Most pin orders do not fail in the press shop; they fail in the first email. If the buyer leaves size, metal, plating, fill style, backing, and inspection rules open, the factory fills the gaps with default assumptions. That is how a quote looks low at first and then rises after artwork review, sample corrections, and “unexpected” tooling changes.
A spec-sheet approach prevents that by turning each decision into a line item. For custom enamel pins, the buyer should not ask for “1,000 pins” in the abstract. They should request a defined build with a measured size, a named base metal, a stated thickness, a finish standard, a color process, and an acceptance target. That makes quotes comparable across suppliers and usually cuts sample loops from three or four rounds to one or two.
Typical production economics reflect how many variables are locked early. For a 25-38 mm soft enamel pin, common MOQs are 100-300 pieces for sample-to-small-batch orders, 300-500 pieces for standard production, and 1,000+ pieces for better unit pricing. Typical lead times are 5-7 days for art proof and mold prep, 10-15 days for pre-production samples, and 15-25 days for mass production after approval. FOB pricing for standard custom pins often falls around USD 0.38-1.25 per piece at 500-1,000 units, depending on size, color count, plating, backing, and packaging.
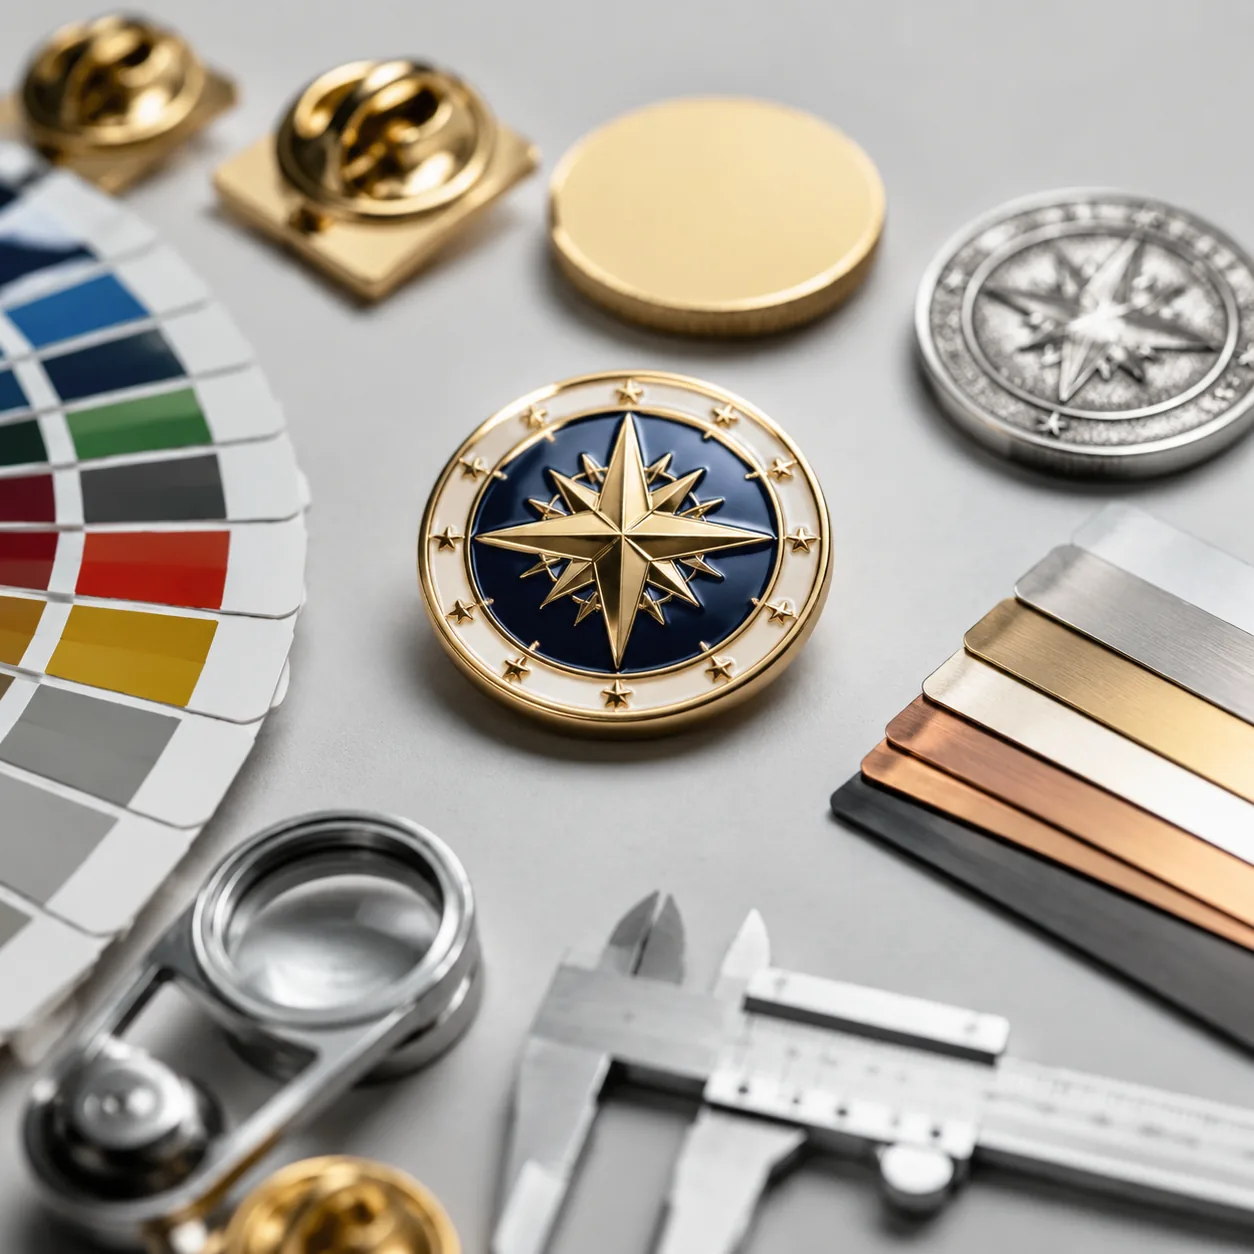
Line 1-3: size, thickness, and metal build
Start with dimensions because every downstream cost depends on them. The most common working sizes for lapel pins are 25 mm, 32 mm, 38 mm, and 50 mm. Below 25 mm, fine text and small cutouts become hard to hold cleanly; above 50 mm, wearability drops and the mold usually needs heavier reinforcement. For jacket lapels and conference giveaways, 25-38 mm is the safest range. For retail merch, 32-50 mm is common when the artwork needs stronger shelf presence.
Thickness should be written explicitly, not implied. Standard soft enamel or die-struck pins usually sit at 1.2-1.5 mm, while zinc alloy cast pieces with deeper relief often run 1.5-2.0 mm. Thin badge-style pins can go down to 1.0 mm, but below that they feel flimsy and are more prone to bending at the post. If the design has raised text or multiple levels, include the minimum raised line width and recess depth so the factory can judge whether the detail is manufacturable.
Metal choice should match the geometry. Zinc alloy is the better default for 3D forms, cutouts, uneven relief, or any design with complex edges. Iron is usually the lower-cost option for flatter stamped pins with simpler outlines. Brass is less common for budget pins but can be used when sharper stamped detail or a more premium metal look matters. If the design uses fine line art, call out a minimum visible line width of 0.25-0.30 mm, a recessed color pocket depth of 0.3-0.6 mm, and a cutout width no smaller than 1.0 mm to reduce breakage and fill bleed.
| Spec line | Common buyer range | Practical note |
|---|---|---|
| Size | 25-50 mm | 25-38 mm is the most versatile range for wearability and cost |
| Thickness | 1.2-1.8 mm | 1.0 mm is light; 2.0 mm is better for premium relief or larger pieces |
| Metal | Zinc alloy / iron / brass | Zinc alloy suits 3D detail; iron suits cost-sensitive flat stamping |
| Minimum line width | 0.25-0.40 mm | Below 0.25 mm, mold lines and enamel fill become unreliable |
| Recess depth | 0.3-0.6 mm | Too shallow risks color washout; too deep raises polishing risk |
| Cutout width | 1.0 mm or above | Narrower cutouts increase tooling wear and breakage |
Line 4-6: plating, finish, and surface control
Plating is where many buyers lose clarity because they ask for a color word instead of a surface spec. “Gold” can mean bright gold, antique gold, matte gold, or brushed gold, and those finishes do not wear or photograph the same way. For most custom pins, decorative electroplate thickness is commonly around 0.05-0.15 microns on the visible surface layer, while abrasion-resistant topcoats or e-coats are specified separately when the product needs better wear retention. If the supplier cannot measure and report plating consistently, ask for a visual standard plus an approved reference sample instead of a thickness promise it cannot verify.
Write the finish as both a visual and functional requirement. Bright nickel is popular for clean corporate pins because it reads crisp and hides light handling marks better than mirror gold. Antique nickel or antique brass is useful when you want engraved detail to stand out. Brushed and sandblasted finishes reduce glare, while polished finishes create a more premium shine but show micro-scratches sooner. If the pin will be handled daily, sold in retail, or worn on dark fabrics, state whether the recessed areas must remain darkened or be fully plated so the factory does not over-polish the contrast away.
For outdoor or long-term use, ask for corrosion-aware finishing rather than decorative-only plating. A clear protective coat can improve appearance retention, but it should be confirmed early because it changes both cost and surface feel. Typical FOB impact for finish upgrades is modest on larger runs, but on small orders it can add USD 0.05-0.20 per piece depending on plating complexity, coating, and packaging requirements.
- Specify plating by standard name: bright nickel, antique gold, matte black nickel, brushed brass, and so on.
- State whether the surface should be glossy, matte, brushed, sandblasted, or antique.
- Confirm if recessed areas must remain darkened or be fully plated.
- Use an approved sample when the finish is subjective, especially for brand colors.
- Request corrosion-aware finishing when the pin will be worn frequently or stored long term.
Line 7-8: color method and fill level
Color spec is where revisions pile up because buyers describe tone instead of process. Hard enamel and soft enamel differ in feel, polishing, and how tightly the color boundary holds. Soft enamel is generally the better choice for sharper small details because the metal lines stand proud and separate adjacent colors more clearly. Hard enamel is the better choice when the buyer wants a flat, polished face with a more jewelry-like finish. Both can look premium, but the spec must say which surface profile is required.
A usable color spec includes the number of colors, Pantone references, finish level, and fill target. For example: “5-color soft enamel, Pantone 186 C, 286 C, 123 C, black, and white, with color fill 0.1-0.2 mm below the metal line.” Or: “4-color hard enamel, fully polished flush, no visible color pooling.” Those details matter because the same artwork can be produced with different visual heights, and the buyer should not discover that difference only after the sample arrives.
If the design contains tiny text or adjacent color breaks, add a minimum text size and border rule. A practical floor is 1.0-1.2 mm text height for legible enamel on a 25-32 mm pin, though larger logos can tolerate more. Tiny gradients should be avoided altogether; pins are line-and-fill products, not print products. If the artwork relies on photo realism, the better answer is usually offset printing, epoxy dome printing, or a different product type.
| Color spec | Soft enamel | Hard enamel |
|---|---|---|
| Surface finish | Textured / recessed color | Flat / polished color |
| Line feel | Metal stands proud | Metal and enamel can finish level |
| Best use | Small details, badges, promos | Retail, prestige, gift sets |
| Typical fill height | 0.1-0.2 mm below metal line | Polished flush to the metal |
| Risk | Dust in recesses | Polish loss on very small elements |
| Typical FOB impact | Lower | Usually USD 0.05-0.15 higher per piece at small volumes |
Line 9-10: attachment, backing, and fit
The back of the pin should be specified as carefully as the front. A butterfly clutch is the low-cost default and works well for most light pins, but it can twist on wider pieces and can feel weak on heavier cast designs. A rubber clutch is gentler on fabric but can loosen over time. A deluxe locking clutch improves security for retail or uniforms, while a magnetic back avoids piercing fabric but adds cost and reduces holding force. For pins above about 35 mm, or any top-heavy design, backing choice affects rotation more than most buyers expect.
If the pin will sit on suit jackets, uniforms, knitwear, or bags, define the use case and the holding requirement. A 25 mm soft enamel badge usually works with one post and a butterfly clutch. A 38-50 mm cast pin may need two posts to keep it level, especially if the artwork is wider than it is tall. If the design must never rotate, say so. If the post position matters for symmetry, give the allowable tolerance; a practical target is ±1 mm on post placement, with tighter control needed for paired or mirrored pieces.
The backing standard also affects perceived quality. Military-style clutch backs, locking pin backs, and rubber clutches all signal different use cases. For retail or premium corporate gifting, ask the factory to confirm the post diameter, usually 0.8-1.0 mm, and the post length, commonly 8-12 mm depending on thickness and backing type. That helps prevent fit problems on thick fabrics or when packing boards are specified later.
- Use a single post only when the pin is small and balanced.
- Use two posts for wide, heavy, or top-heavy designs.
- Ask for post-placement tolerance when symmetry matters.
- Specify whether the backing must be anti-scratch or fabric-safe.
- Confirm the post diameter and length if the pin will be worn on thicker garments.
- Request locking clutches for retail, uniforms, or higher-value pieces.
Line 11-12: artwork limits and inspection targets
A good spec sheet includes what the factory is allowed to reject. That sounds strict, but it prevents arguments later. If the logo has hairline gaps, tiny dots, or thin separators, set a minimum visible line width, the smallest acceptable cutout, and the color variance limit. Then attach an approved sample or a signed digital proof so the supplier has one reference point instead of guessing at brand intent.
Inspection should be tied to the design risk, not treated as a generic checkbox. For most visual pin orders, AQL 2.5 is a normal acceptance level for major defects, with AQL 4.0 sometimes used for minor cosmetic checks on lower-cost promotional runs. Retail programs and premium brand work often need tighter internal controls on plating blemishes, dust specks, misaligned fill, and scratches. If the order is for a repeat program, lock the golden sample, Pantone references, plating standard, and backing position together before mass production starts.
Tolerance language matters. A practical line-item spec might read: “No broken enamel, no exposed burrs, no color bleed beyond metal lines, and no visible plating pits at arm’s length of 30 cm under neutral light.” That is better than saying “good quality,” because it gives the factory a testable standard. If you expect reorders, confirm whether the previous approved sample becomes the master reference for future batches.
| Control item | Specify this | Why it matters |
|---|---|---|
| Minimum line width | 0.25 mm or above | Reduces broken mold lines and enamel bleed |
| Smallest cutout | 1.0 mm or above | Improves tooling life and prevents breakage |
| Color tolerance | Pantone reference plus approved sample | Prevents subjective color disputes |
| Inspection level | AQL 2.5 for major defects is common | Sets lot acceptance rules clearly |
| Post position | Nominal location plus allowable shift | Prevents leaning and bad fit |
| Visible defect rule | No issue visible at 30 cm under neutral light | Makes cosmetic acceptance measurable |
Buyer checklist for a clean RFQ
The fastest RFQ is not the shortest one; it is the one that leaves no room for guesswork. If you are quoting across multiple factories, every supplier should receive the same input pack in the same order so the numbers are comparable. That pack should read like a spec sheet, not a creative brief. The more complete the RFQ, the less likely you are to pay for repeated sampling or last-minute tooling edits.
- State exact size in mm, not approximate inches.
- Declare metal type, thickness, and finish standard.
- List color count, Pantone numbers, and whether the surface is hard or soft enamel.
- Specify backing type, post count, post diameter, and any anti-rotation need.
- Attach one approved reference image and one vector file.
- Define acceptable inspection level and sample approval rule.
- Note packaging only if it affects cost, display, or retail presentation.
- Flag nickel-free, child-safe, outdoor-use, or compliance requirements up front.
- Ask the supplier to confirm every line item before tooling starts.
What to do next
Take one existing design and rewrite it as a production spec before requesting a new quote. If you cannot define the size, finish, color method, backing, and inspection standard in one page, the order is not ready for tooling. Once those fields are locked, ask the factory to return a line-by-line confirmation table with dimensions, plating, enamel type, attachment, AQL, MOQ, lead time, and FOB price before you approve the sample.
At ZheCraft, we use this same line-item method for custom enamel pins, keychains, badges, and challenge coins because it reduces sample churn and makes reorder control easier. The practical next step is simple: send your artwork, then request a spec confirmation table before production begins.
Have a project? Send your artwork and target quantity and we’ll reply with a detailed quotation within 12 working hours.
Ready to get this made?
Send your sketch, target quantity and ship-date. Detailed quotation in 12 hours.


