Custom Patch Border Failures: Factory Specs That Prevent Fraying, Curling, and Delamination
1. Match the Border to the Patch Geometry
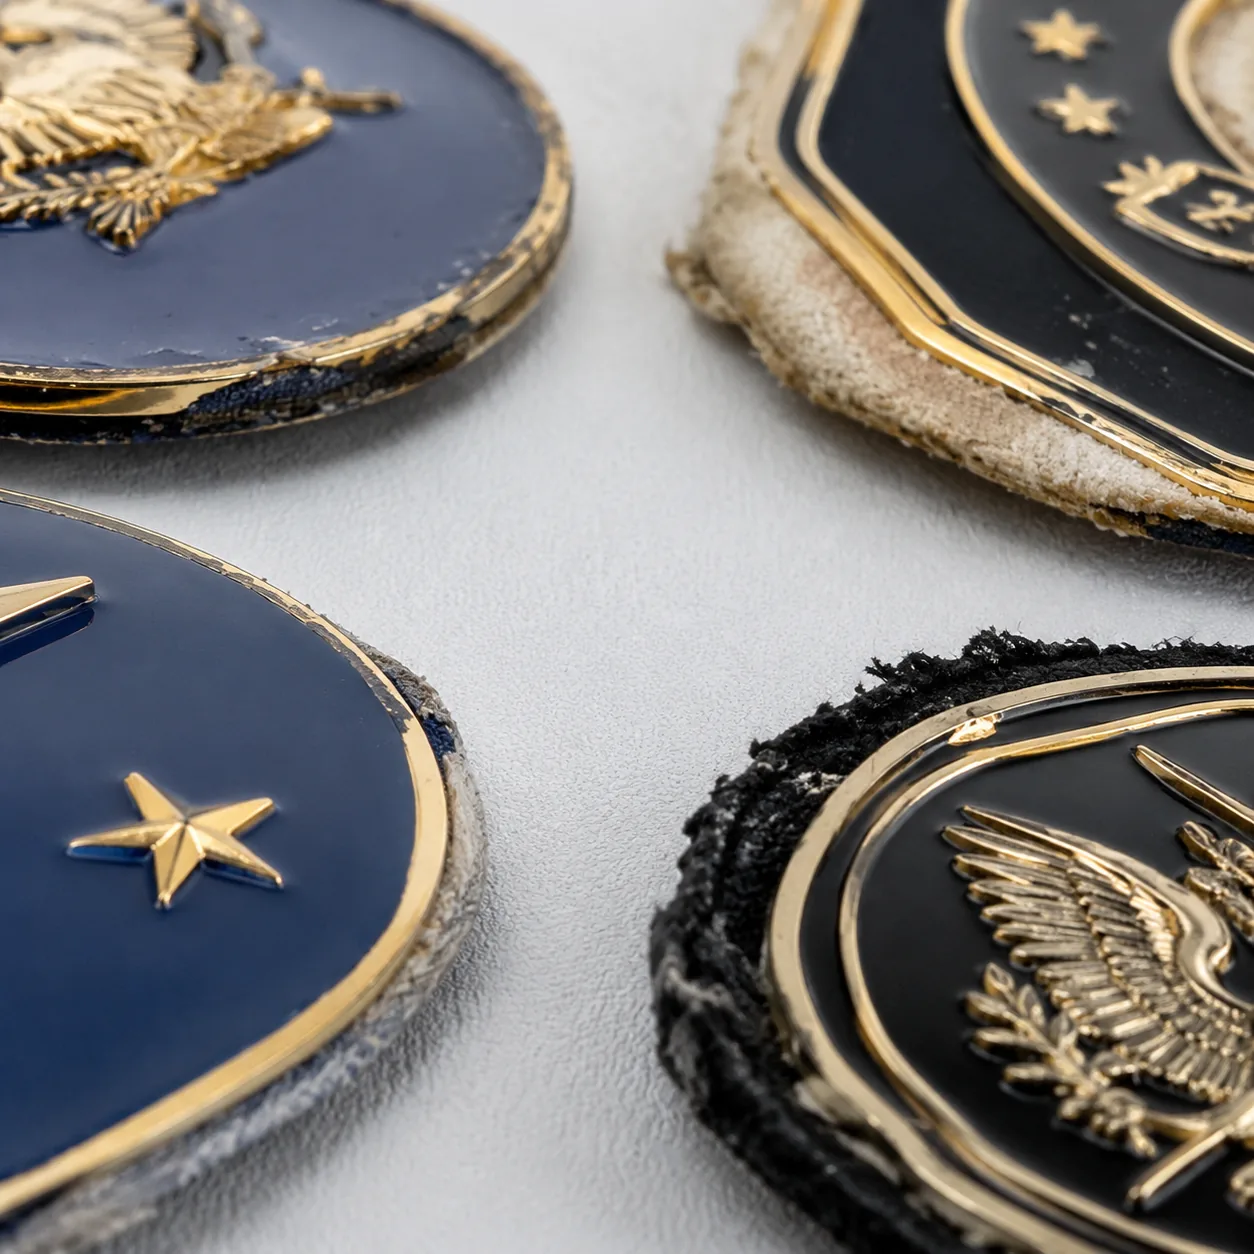
Most border failures start before sewing. A merrow border is an overlock stitch designed for a continuous outside path with enough fabric for the thread to grip. It works well on circles, ovals, rectangles with rounded corners, tabs, shields, and simple badges. It is a poor fit for map outlines, mascot heads, flame shapes, letter-shaped patches, deep V cuts, internal notches, and corners tighter than a 3 mm radius. At those points the thread bridges across the gap instead of wrapping the substrate, then lifts during packing, washing, or repeated handling.
For embroidered and woven patches, write the merrow requirement as a measurable construction spec: 2.5 to 3.5 mm border width, 95% minimum thread coverage, no skipped overlock loops, and finished border height no more than 0.8 mm above the patch face when the patch must sit flat on uniforms. Use finished size tolerance of ±1.0 mm for patches under 80 mm and ±1.5 mm for 80 to 150 mm patches. Any outside point narrower than 4 mm, notch deeper than 3 mm, internal hole below 6 mm, or corner radius below 3 mm should trigger factory engineering review before sampling.
Do not force merrow onto artwork that needs a different edge. A 75 mm police shield can use a 3 mm merrow border reliably. A 75 mm animal-head logo with ears, teeth, and fur points should move to a 1.8 to 2.2 mm satin stitch edge, a laser-cut woven edge, or a molded PVC rim. The approved proof should show the actual stitch or cut path, not only a sales rendering, because production operators follow the technical path created during digitizing.
2. Control Heat-Cut Edges by Material and Cutting Allowance
Heat-cut edges are useful for small woven logos, detailed silhouettes, and patches where a sewn border would cover fine artwork. The process seals synthetic yarns by melting the edge. It is not equally suitable for cotton-rich twill, blended canvas, unstable felt, or loosely woven bases. Cotton chars rather than seals, and low polyester content leaves loose fibers that appear after carton rubbing or the first wash.
Specify 100% polyester twill, polyester woven base, or polyester felt when fray resistance is critical. Allow 1.0 to 1.5 mm of cut allowance outside the design thread, with exposed base fabric after cutting limited to 0.5 mm maximum. For woven patches under 50 mm, hold cutting tolerance to ±0.5 mm. For embroidered patches from 50 to 120 mm, use ±1.0 mm. Require no loose yarn longer than 1.5 mm after ten light finger rubs around the full perimeter.
Light colors need a stricter approval standard because heat marks show even when the edge is sealed. White, cream, pale yellow, and silver-grey patches should be inspected under D65 light at 60 to 80 cm viewing distance. If brown or grey cutting halos are visible, switch to satin stitch, merrow, or a folded-edge construction. A sewn edge often adds USD 0.03 to 0.10 FOB per piece on common 50 to 90 mm patches, but it prevents retail claims when the patch is sold on apparel, club blazers, or premium headwear.
| Edge type | Best application | Failure risk | Factory spec to write |
|---|---|---|---|
| Merrow border | Round, oval, shield, and rectangular uniform badges | Lifting at sharp points or narrow notches | 2.5-3.5 mm width; 3 mm minimum corner radius; ±1.0 mm size tolerance under 80 mm |
| Satin stitch edge | Detailed shapes needing a sewn finish | Needle gaps on tight curves or dense corners | 1.5-2.5 mm stitch width; 0.5-1.0 mm edge tolerance; no skipped stitches |
| Heat-cut edge | Woven logos and small irregular silhouettes | Fraying, scorch marks, or exposed base fabric | Polyester base; 1.0-1.5 mm cut allowance; loose yarns under 1.5 mm |
| Molded PVC rim | Outdoor, tactical, and waterproof patches | Heavy hand feel, mold cost, and loss of fine detail | 0.8-1.2 mm raised rim; 2.0 mm minimum wall width; ±0.3 mm molded detail tolerance |
3. Prevent Curling by Balancing Backing Film and Stitch Density
Curling is usually a stack-up problem, not a simple glue defect. Dense embroidery shrinks the base fabric, backing film adds stiffness, and heat activates tension unevenly. A 120 mm patch with 85% stitch coverage and thick heat-seal film behaves very differently from a 45 mm woven badge with a thin backing. If the bill of materials only says “iron-on backing,” the factory may choose a film that bonds strongly but curls the corners.
Specify adhesive film thickness by patch size and weight. Use 80 to 100 microns for light woven patches and embroidered patches under 60 mm. Use 100 to 130 microns for most 60 to 100 mm embroidered patches. Reserve 130 to 160 microns for large, heavy, or tactical patches where bond strength is more important than flexibility. On dense embroidery above 75% coverage, ask for a flatness trial before approving a thicker film.
Common heat-press conditions are 150 to 165 degrees Celsius for 12 to 18 seconds at medium pressure, but the garment substrate controls the result. Cotton twill and cotton-poly uniforms usually bond predictably. Nylon, waterproof-coated polyester, leather, softshell, and stretch fabrics often need lower temperature, longer dwell, perimeter stitching, or a non-heat backing. After pressing, cool the patch flat for at least 30 minutes and check corner lift with a 1.0 mm feeler gauge. Patches wider than 100 mm should be tested on the actual garment panel before bulk production.
4. Specify Adhesive to Avoid Bleed, Yellowing, and Delamination
Glue bleed can pass a photo sample and fail after heat, carton pressure, or warehouse storage. The symptoms are yellowing, shiny spots, darker areas, or a greasy halo on the face fabric. The risk is highest on white twill, pastel woven backgrounds, sublimated fabric, and thin felt. Typical causes are excessive adhesive weight, low-grade film, high lamination pressure, and stacking hot pieces before the adhesive stabilizes.
For white or light-color fronts, specify clean white or clear adhesive film, no visible bleed-through under D65 light, and no yellowing after a 24-hour rest at 20 to 25 degrees Celsius. Keep heat-seal film at 80 to 100 microns unless a bond test proves that thicker film is required. For black tactical patches, 120 to 160 microns can be acceptable because appearance risk is lower and bond strength may be the priority. Require the lamination test on production fabric and thread, not leftover sample material.
Price pressure often shows up in adhesive quality. A 70 mm embroidered patch at 500 pieces may range from USD 0.55 to 1.20 FOB depending on stitch coverage, border, backing, thread count, and packing. Saving USD 0.05 by using aggressive low-grade adhesive is a poor trade if the patch is attached to premium apparel or a uniform program with replacement penalties. Adhesive grade, film thickness, lamination pressure, and cooling method should be written into the purchase specification.
5. Build Hook Backing for Peel Resistance
Hook-and-loop patches usually fail in two ways: the hook sheet separates from the patch body, or the hook surface loses grip after repeated removal. Separation points to weak lamination, limited bonding area, no perimeter stitching, or a hook layer cut too close to thin edge details. Grip loss points to low-density hook material on heavy patches, outdoor gear, or patches that are removed daily.
For morale, tactical, police, and outdoor patches, specify hook thickness of 1.0 to 1.5 mm, full-surface lamination, and edge stitching 1.5 to 2.0 mm from the visible patch edge. For patches over 80 mm wide or heavier than 12 g, require stitching through the patch and hook layer instead of adhesive-only lamination. The hook layer should normally be inset 0.5 to 1.0 mm from the visible edge to prevent a sharp hand feel on sleeves, bags, and plate carriers.
The hook outline should be simplified for irregular shapes. Thin hook points peel first and add little grip area. A practical factory test is three firm peel cycles from a standard loop panel, followed by inspection for lifting, edge whitening, or adhesive split. For tactical programs, add a 24-hour room-temperature rest after lamination before testing; freshly laminated samples can look stronger than production pieces that have cooled and relaxed.
- Confirm backing type: sew-on, heat-seal, pressure-sensitive adhesive, hook, loop, magnetic, or no backing.
- State the receiving surface: washable uniform, dry-cleaned blazer, coated fabric, leather, luggage, plate carrier, or retail apparel.
- For hook patches over 80 mm or 12 g, require full lamination plus perimeter stitching.
- For iron-on patches, approve temperature, dwell time, pressure, cooling time, and receiving fabric before bulk production.
- For light-color fronts, require no glue bleed after lamination, heat pressing, and 24-hour rest.
- For dense embroidery above 75% coverage, require corner lift under 1.0 mm after cooling.
6. Digitize Artwork for Thread, Not for Print
A patch is not a sticker. Thread has diameter, tension, direction, and minimum turning radius. Fine outlines, tiny letters, narrow gaps, and artwork placed too close to the edge often become uneven after digitizing. The factory can improve stitch paths, but it cannot make embroidery hold detail smaller than the thread system allows.
For embroidered patches, keep minimum text height at 5 mm for simple block letters and 6 to 7 mm for serif, script, or condensed letters. Minimum embroidered line width should be 0.8 mm. Minimum woven line width can be 0.4 to 0.5 mm depending on yarn count and patch size. Keep at least 1.0 mm clearance between critical artwork and a border stitch, or 1.5 mm on patches over 100 mm with dense embroidery. Avoid long single-direction fill areas; alternating stitch direction reduces puckering and edge distortion.
Choose construction by the logo requirement. Embroidery suits bold marks, classic uniform patches, and designs where raised texture is valued. Woven construction suits small text, thin crests, and event badges with fine symbols. Sublimation suits gradients, photographic elements, and very small artwork, but it has a flatter hand feel and relies on the base fabric’s edge control. PVC suits waterproof raised designs and outdoor use, but mold wall thickness limits fine text. If the logo needs readable text below 5 mm, woven or sublimated construction should be reviewed before embroidery is approved.
7. Inspect Edge Durability, Not Only Front Appearance
Many inspections focus on the face: logo shape, color, stains, loose threads, and packing. Border failures need handling tests. A patch can look perfect in an approval photo and still shed yarns, curl, delaminate, or expose sharp backing after flexing. The inspection plan should separate appearance defects from structural defects.
For bulk inspection, use ANSI/ASQ Z1.4 or ISO 2859-1 sampling with General Inspection Level II unless the brand requires a tighter plan. A practical AQL setup is critical defects 0, major defects 2.5, and minor defects 4.0. Treat sharp exposed backing, wrong backing, severe delamination, wrong size beyond tolerance, wrong logo color, unsafe pin attachment, and incorrect magnet polarity as critical or major defects depending on end use. Minor thread ends under 2 mm may be trimmed, but repeated loose border threads indicate a process defect.
A useful QC routine includes size measurement, edge rub, flexing, backing peel, color comparison, flatness check, and packing review. Measure length and width against the approved sample using ±1.0 mm tolerance under 80 mm and ±1.5 mm for larger patches unless tighter limits are specified. Rub the full edge ten times with light finger pressure. Flex the patch five times face-in and five times face-out. Peel hook or adhesive backing three times on sampled pieces. Pack flat in inner polybags of 50 to 100 pieces and avoid over-compression of merrow, PVC, and thick embroidered borders.
| QC item | Typical acceptance spec | Reject when |
|---|---|---|
| Size and shape | ±1.0 mm under 80 mm; ±1.5 mm above 80 mm | Patch is outside tolerance or visibly distorted |
| Border security | No opening after 10 light rubs around the edge | Thread bridge opens, base fabric shows, or yarns fray |
| Flatness | Corner lift under 1.0 mm after 30 minutes cooling | Corners curl enough to catch on packaging or garment |
| Backing bond | No separation after three peel cycles | Hook, adhesive, heat-seal, or loop layer separates |
| Color match | Approved thread, yarn, PVC, or print shade under D65 light | Logo color visibly mismatches the signed sample |
| Packing | Flat stacks of 50-100 pieces per inner bag | Borders are crushed, bent, heat-marked, or permanently curled |
8. Lock Cost, MOQ, Lead Time, and the Golden Sample
A factory cannot price or control a patch accurately from a logo file alone. Send a technical brief with finished size, construction, edge type, backing, base material, thread or Pantone references, artwork clearance, use environment, packing method, inspection standard, and restricted chemical requirements. If the edge type is uncertain, ask the factory to mark risky outline areas and recommend merrow, satin, heat-cut, or PVC construction before sampling.
For budgeting, simple embroidered patches at 1,000 pieces commonly run USD 0.35 to 0.85 FOB per piece. Dense embroidered patches with hook backing are often USD 0.65 to 1.50 FOB. Woven patches usually range from USD 0.25 to 0.75 FOB. PVC patches typically range from USD 0.70 to 1.90 FOB, plus tooling of USD 40 to 120 depending on mold size, color separation, and raised detail. Retail carding, individual polybags, barcode labels, or special cartons can add USD 0.03 to 0.20 per piece.
Typical MOQ is 100 to 300 pieces for trial orders, 500 pieces for stable bulk pricing, and 1,000 pieces or more for better unit cost. Normal timing is 1 to 3 days for artwork review, 3 to 7 days for a physical sample after proof approval, and 10 to 18 days for mass production after sample sign-off. Complex PVC molds, multiple backing trials, imported thread colors, or peak-season embroidery capacity can extend bulk lead time to 20 to 25 days. The safest control point is one approved pre-production sample made with the exact border, backing, thread, lamination, and packing. Keep that piece as the golden sample for production, final inspection, and reorders.
Have a project? Send your artwork and target quantity and we’ll reply with a detailed quotation within 12 working hours.
Ready to get this made?
Send your sketch, target quantity and ship-date. Detailed quotation in 12 hours.


