Custom Metal Promo Failures: Specs That Stop Rework
Vague briefs fail before tooling starts
Most rework on custom metal promo goods starts before the first die is cut. A buyer says “same as sample,” “premium,” or “good quality,” and the factory has to infer thickness, plating stack, enamel depth, backing, and inspection limits. That may be acceptable for a one-off prototype, but it fails in repeat production, where every ambiguity becomes scrap, delay, or a second sample round.
For enamel pins, challenge coins, badges, keychains, fridge magnets, metal bookmarks, and lanyard hardware, the issue is rarely that the part looks bad in a photo. The deeper problem is that dimensional, finish, and assembly requirements were never written down, so the line optimizes for speed instead of repeatability. A complete spec sheet usually prevents the most expensive failure mode: late clarifications. In practice, those clarifications often add 3 to 7 days, one extra sample cycle, and 1% to 5% scrap on the first run when the factory has to reinterpret the brief.
A usable brief should name the product family, size target, finish family, attachment type, artwork count, and the acceptable defect level. For example: a 38 mm soft-enamel lapel pin in antique nickel with double butterfly clutch, 0.25 mm minimum line width, 0.3 mm enamel recess depth, and AQL 2.5 major / 4.0 minor. That is enough for a factory to quote, tool, and inspect without guessing.
Geometry defects come from missing tolerances
Dimensional mistakes are often blamed on the die, but the root cause is under-specified geometry. If overall length and width are not controlled, the supplier may still produce a part that is technically close and yet unusable because a clasp sits crooked, a pin back misaligns, or an insert no longer fits the package cavity. On small metal items, a 0.2 to 0.3 mm shift is easy to miss on screen and obvious in hand.
Separate cosmetic dimensions from functional ones. Overall outline can often hold to ±0.3 mm on stamped or die-cast items, while hole positions, clasp seats, magnet pockets, and moving-part clearances should be tighter at ±0.15 to ±0.2 mm when assembly depends on them. For cutouts and thin bridges, specify minimum line width, not just the finished shape. A practical floor is 0.25 to 0.3 mm for soft-enamel-style work and 0.4 mm or more if the piece will be heavily polished, antique plated, or handled often.
| Feature | Typical buyer spec | Why it fails when omitted |
|---|---|---|
| Overall outline | ±0.3 mm for small metal items | Part looks correct but packaging or assemblies do not fit |
| Hole / clasp position | ±0.15–0.2 mm | Hardware misaligns or rotates |
| Minimum web thickness | 0.3–0.4 mm | Thin bridges bend or break in polishing |
| Raised relief height | 0.2–0.5 mm | Design loses depth or traps plating defects |
A concrete example: a 35 mm badge with a center cutout may look fine at proof stage, but if the web between two letters is drawn at 0.2 mm and polishing removes another 0.1 mm, the bridge can collapse during finishing. The fix is not “be careful.” It is to write the minimum wall thickness, the allowed polish removal, and the final tolerance into the drawing before tooling starts.
Finish defects are usually process defects
A mirror-bright sample can hide a weak plating spec. If the plating stack is not defined, a supplier may use a thin decorative flash that passes visual inspection but tarnishes in humid storage or during sea freight. For most promotional metal goods, buyers should specify both finish type and thickness. Decorative nickel flash below 0.1 micron is cosmetic only; more durable decorative nickel or gold is usually 0.3 to 0.5 micron, with a clear topcoat or lacquer if corrosion resistance matters.
Finish language also needs to define texture, because “shiny” is not a process instruction. Use mirror polish when the design has broad open areas and you can tolerate minor swirl marks. Use brushed or sandblasted finishes when you want to hide tooling marks and fingerprints. For antique finishes, define the recess-darkening level and the allowed contrast range, because two operators can produce visibly different results from the same bath if the target is only described as “darker.”
Typical FOB pricing for common promo metal goods varies by size, finish, and quantity, but budget ranges help buyers quote accurately. Small soft-enamel pins at 1.25 to 1.5 inches often land around USD 0.35 to 1.20 FOB at 500 to 1,000 pcs. Die-struck coins or medallions commonly sit around USD 0.90 to 3.50 FOB at 300 to 1,000 pcs, depending on weight, antique finish, and edge treatment. Sample lead time is usually 7 to 12 days; mass production is commonly 12 to 25 days after approval, with faster lanes available only when tooling is already confirmed.
Color fill fails for three predictable reasons
Enamel, epoxy, and printed color problems usually trace back to geometry, viscosity, or cure control. If the recess is too shallow, the fill floods the metal edge and leaves a dirty border. If it is too deep, the fill sinks after curing and creates a low, uneven surface. A practical spec is to define fill depth relative to wall height, with many buyers targeting a final surface about 0 to 0.2 mm below the rim for soft enamel and nearly flush after polishing for hard enamel.
Color mismatch is another common failure, and it is rarely solved by saying “match Pantone.” The buyer should identify the exact color system, whether the reference is wet, cured, or printed artwork, and the allowable delta if the factory uses a spectrochecked mix. For multi-color art, approve one master chip before mass fill and reject any area where color bleeds more than 0.15 mm over the metal border or leaves exposed metal larger than 0.2 mm inside the intended color zone.
- Define whether the reference is wet ink, cured fill, or final polished surface.
- State acceptable overfill or underfill in millimeters, not just the color name.
- Require one sealed golden sample for each SKU and finish combination.
- Specify gloss, satin, or matte after curing; do not assume the factory will infer it.
- Reject visible pinholes, fisheyes, or exposed metal in filled areas beyond the written limit.
A concrete example: a 40 mm soft-enamel pin with six colors should not use the same fill spec as a flat printed keychain. The pin may need 0.25 to 0.35 mm recess depth and a final polish that leaves the enamel slightly domed or flush, while a printed keychain should define ink density, clearcoat thickness, and abrasion resistance instead of recess depth. If the artwork includes very fine type, keep the smallest open counter area above 0.4 mm or the letters will close during fill and polish.
Attachment failures happen in use, not on inspection
A product can pass visual inspection and still fail in the field because the back hardware was chosen for comfort instead of retention. Butterfly clutches, rubber clutches, magnetic backs, brooch pins, split rings, lobster clasps, swivel hooks, and safety backs all behave differently under pull force, fabric thickness, and repeated handling. A lapel pin for a trade-show badge may be fine with a standard butterfly clutch, but a heavier coin-style badge usually needs a stronger back or it will spin and sag.
The key is to specify use case, not just hardware names. If the item is worn on thin polyester, thick wool, a backpack strap, or used outdoors, say so because attachment choice changes with load and fabric. As a rule, anything above about 15 to 20 g should be checked for rotation and pull-off behavior, and daily-use products should be sampled with the exact backing rather than “similar” hardware. For magnet backs, define pull force in grams if possible; for pin posts, define post length and base diameter instead of assuming the supplier will choose correctly.
Reasonable production targets vary, but a common pin post tolerance is ±0.2 mm on length, with clutch fit checked by manual insertion and a simple shake test. For clasped goods, specify ring gauge and opening diameter. A 2.0 mm split ring is not a substitute for a 1.5 mm ring if the item carries weight, and a 12 mm lobster clasp can look acceptable while still failing a bag-pull test because the spring force is too low. A typical production quote for standard butterfly clutch pins is lowest in the MOQ 300 to 500 pcs range; magnetic or double-post hardware usually adds USD 0.03 to 0.15 per piece at low volume because of higher labor and assembly control.
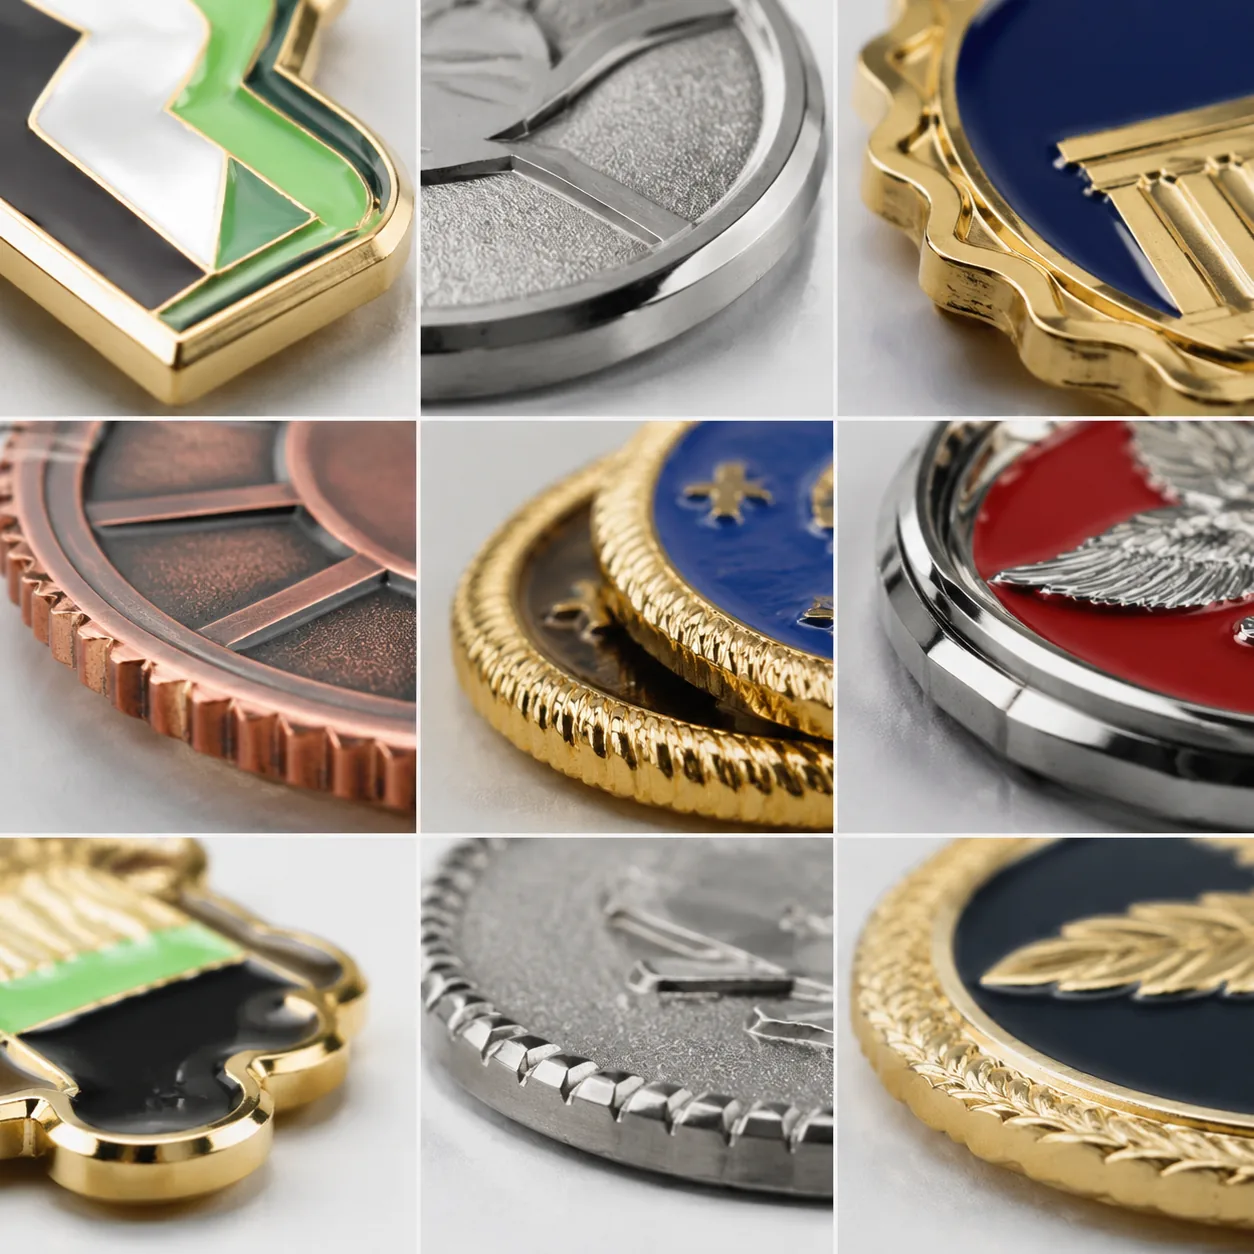
Burrs, plating flaws, and rubbing are functional defects
A rough edge is more than a comfort issue. Burrs can cut fabric, collect corrosion, and create false rejects when packaging rubs against the part in transit. The fix is not simply more polishing, because excessive polishing can round off text, flatten relief, and open up holes in enamel walls. The buyer should specify acceptable edge condition, especially around badge backs, pin posts, and coin rims where the hand touches the item most.
Good QC language should distinguish a safe edge from a polished edge. An outside contour may allow a faint parting line if it does not snag a cotton glove, while contact points should have no sharp flash or burr greater than 0.05 to 0.1 mm. If the design includes antique plating, expect some pooling in recesses and do not reject every dark line as a defect unless the darker areas exceed the agreed artwork boundary by more than 0.2 mm.
Keep plating tolerance realistic. Decorative chrome, nickel, or gold on promo goods is thin compared with industrial functional plating, so the goal is consistency, not extreme thickness. If the order will be handled often, specify a clear lacquer or topcoat, a salt-spray expectation if available, and whether slight tone variation between lots is acceptable. For repeat orders, record the reference part code and plating bath date so the second run matches the first run instead of the memory of the first sample.
| Failure mode | Best spec to write | When not to use |
|---|---|---|
| Scuffed finish | Individual bag + divider | If item is low-value and matte |
| Bent pin post | Rigid inner tray | If product is very thin and flat |
| Chipped enamel | No metal-to-metal contact | If design is intentionally distressed |
| Carton crush | Double-wall outer carton | For very light parcels only |
Packing damage looks like product damage
Many “defects” are actually packaging failures that happened after final inspection. Bare metal parts rub against each other, plating gets micro-scratched, enamel edges chip, and hard corners punch through thin polybags when cartons vibrate in transit. That is why carton specs, inner tray layout, and bag thickness matter even for small promotional goods.
A practical packing spec should define individual bag thickness, divider use, inner box count, and outer carton stacking strength. For plated goods with glossy surfaces, request anti-scratch separation such as OPP bags plus paper inserts, or blister trays for higher-value sets. A 0.03 to 0.05 mm OPP bag is usually enough for light items, while heavier or sharper pieces need inserts or a molded tray. If the shipment will move by sea, do not rely on loose bulk packing unless the finish is intentionally rugged, because even a 1% to 2% rub rate can become a large claim after arrival.
A useful carton note is to define not only the pack count but also the unit weight target and drop risk. For example, 200 badges in a master carton may be fine if each is separately sleeved, but the same 200 loose pieces will create edge wear and debris. If the carton will be palletized, ask for corner protection and a compression target rather than assuming the shipper will choose enough protection for a long voyage.
For high-gloss parts, a simple rule helps: if the surface can show fingermarks, it can usually show transit scuffing too. In that case, ask for one part per polybag, desiccant if the route is humid, and a carton drop standard written into the packing brief rather than left to the freight forwarder.
Inspection rules need numbers, not opinions
QC breaks down when inspectors are told to judge by eye alone. A better approach is to define the AQL level, sample size, and reject categories, then tie those categories to measurable defects. For many promotional metal goods, buyers use AQL 2.5 for major defects and AQL 4.0 for minor defects, but lower-value giveaway items may tolerate a looser minor standard while retail-ready pieces often need tighter cosmetic control.
The defect list should separate critical issues from cosmetic ones. Critical defects include missing parts, broken attachments, wrong plating color when brand color is essential, sharp edges, and failed moving parts. Minor defects can include tiny polish marks, slight texture differences, or very small color variation that does not affect use, but only if those limits were written before production started. If a defect can trigger a return, safety concern, or client complaint, it belongs in the major or critical bucket.
A simple inspection matrix works better than vague language: critical defects are zero tolerance, major defects are capped by AQL, and minor defects are capped by a visible reference standard. If the order is large, sample by lot and by colorway instead of only checking finished cartons. A 5,000-piece order with mixed finishes can pass a carton-level check and still hide one bad bath or one misassembled hardware batch if the inspection plan is too broad.
For factories that support it, ask for an in-process report at first article, mid-run, and final inspection. That is especially useful when the order contains multiple platings, multiple backings, or mixed artwork versions. The best time to catch a wrong pin back or mismatched color is not after boxing, when rework requires opening every carton.
What to lock before production begins
Build one spec sheet per SKU with dimensions, plating type, fill style, attachment, packing, and inspection rules written in measurable terms. Approve a golden sample before mass production, and make sure that sample matches the final tooling, not a hand-finished prototype that cannot be repeated. If the item is for a campaign or retail launch, lock the spec at least 10 to 15 days before the shipment window so there is time for one correction round and one re-approval if needed.
For common custom metal promo products, sensible MOQ tiers are usually 100 to 300 pcs for simple repeat items, 300 to 500 pcs for plated or enamel work, and 500 to 1,000 pcs for mixed-color or multi-component assemblies. Lower MOQs are possible, but unit prices often rise sharply because setup, plating bath prep, and packing labor dominate the cost. At 300 pcs, a simple soft-enamel pin may still price around USD 0.80 to 1.80 FOB; at 1,000 pcs, the same design may fall closer to USD 0.35 to 0.90 FOB depending on size, finish, and attachment.
The safest next step is to request a sample against a written checklist rather than a visual “okay.” Use exact dimensions, plating thickness, attachment choice, fill depth, packing method, and defect limits. That is the simplest way to reduce rework without overengineering the order, and it keeps both the buyer and the factory aligned on what “good” actually means.
Have a project? Send your artwork and target quantity and we’ll reply with a detailed quotation within 12 working hours.
Ready to get this made?
Send your sketch, target quantity and ship-date. Detailed quotation in 12 hours.


