Custom Metal Giveaways Spec Sheet: Line-by-Line Buyer Guide
Why a spec-sheet format cuts rework
Most rework in custom metal giveaways starts the same way: a buyer approves a decent-looking sample, then the mass-production quote quietly changes the build. The problem is usually not the artwork. It is that the order never had a complete line-by-line spec, so the factory filled in missing details with its own defaults. If you are buying pins, coins, keychains, badges, magnets, or lanyard hardware at scale, you need one document that controls the variables suppliers interpret differently unless you define them.
A spec sheet is better than a loose brief because it forces decisions on substrate, build method, thickness, finish, tolerance, attachment, packing, and inspection. It also makes quotes comparable. One supplier may price a 1.2 mm iron pin; another may quote 1.5 mm zinc alloy and call both “standard.” In practice, that is not the same product. For repeatable orders, the best buyers lock the build line by line before sampling, not after. That usually saves one sample round and removes most hidden upcharges.
For most promotional metal items, a basic production order with artwork only can still work, but it is risky once the design includes enamel, moving parts, or premium plating. A formal spec sheet is the difference between a pretty sample and a shipment that repeats that sample at 1,000 to 50,000 pieces without drift. It also gives procurement a single reference for reorders, which matters when the same design comes back six months later under a different buyer.
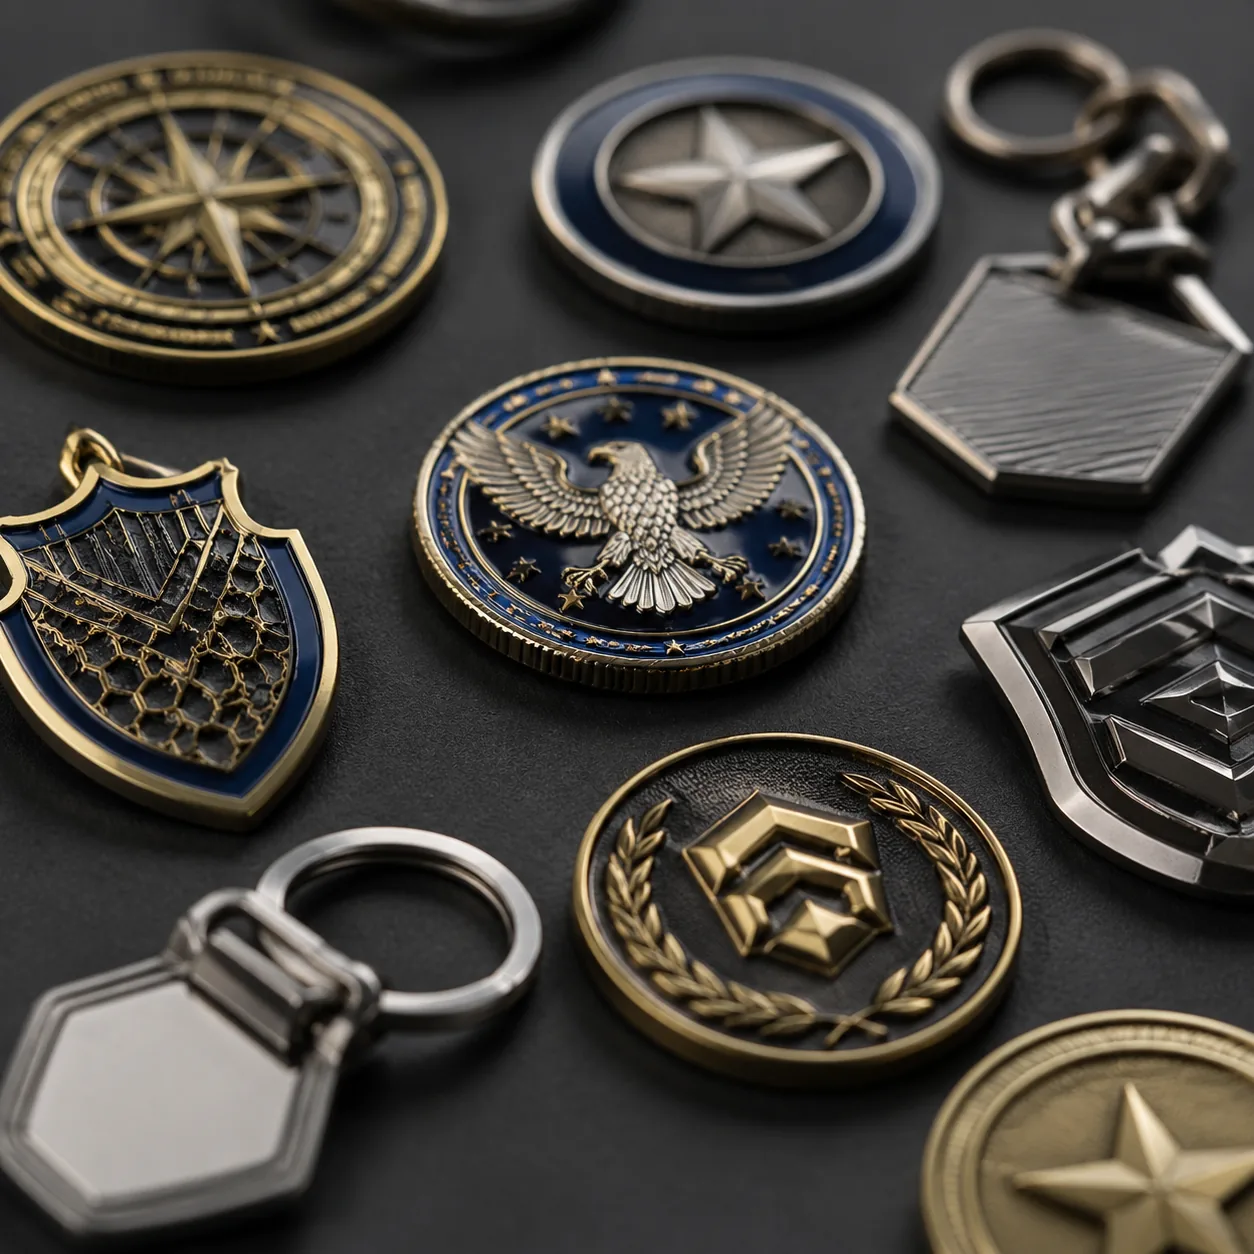
Base metal and build method
The first line on the sheet should be the base metal, because it drives tooling, weight, surface quality, and cost. The common choices are iron, zinc alloy, brass, and stainless steel. Iron is usually the lowest-cost option for stamped flat products. Zinc alloy is the safer choice for complex cast shapes. Brass gives cleaner edges and a more premium feel. Stainless steel is used when corrosion resistance or a brushed industrial look matters more than decorative plating.
You should also specify the build method, not just the metal. A vague “metal” line lets a supplier choose the easiest process for its own equipment, which may not match your design. For example, a flat lapel pin can be stamped and die-struck from iron or brass, while a 3D coin, molded keychain, or sculpted bottle opener usually needs zinc alloy die casting. Laser cutting is more common for thin steel or brass tags, while etching works well for fine linework on flat pieces. If the design has undercuts, deep relief, or openwork, zinc alloy is usually the safer choice because casting handles geometry better than stamping.
Cost varies by metal, size, finish, and order quantity, but buyers often need a practical starting point. At 1,000 to 3,000 pieces, FOB China pricing for simple flat pins may land around USD 0.20 to 0.55 each in iron, USD 0.35 to 0.80 in brass, and USD 0.45 to 1.10 in zinc alloy, excluding shipping and special packaging. At 5,000 pieces and above, unit prices usually fall by 10% to 25% depending on tooling and plating complexity. Brass and zinc alloy generally carry higher tooling and polishing costs than iron.
| Base metal / build | Typical use case | Practical trade-off |
|---|---|---|
| Iron / stamped | Flat pins, badges, simple keychains | Lowest cost, but edge feel and plating consistency are less premium |
| Zinc alloy / die cast | 3D coins, molded keychains, complex shapes | Best for detail, but tooling and unit weight are higher |
| Brass / stamped or etched | Premium pins, coins, fine linework | Cleaner edges and better feel, but usually costs more than iron |
| Stainless steel / laser cut or stamped | Outdoor or wear-heavy items | Corrosion resistant, but decoration options are narrower |
Thickness, size, and weight
Thickness should never be left as “standard” because standard means different things across factories. For enamel pins, 1.2 mm to 1.5 mm is common for light products, while 1.8 mm to 2.0 mm gives a more substantial feel. Challenge coins often sit around 2.5 mm to 4.0 mm depending on diameter and edge style. Keychains and badges commonly range from 1.5 mm to 3.0 mm depending on whether the item must resist bending. If the product is meant to feel premium in hand, weight is often more important than plating color.
Write thickness as a nominal figure plus tolerance. For many manual or semi-automatic metal lines, +/- 0.2 mm is realistic on thin items and +/- 0.3 mm is more typical on heavier cast products. If you need tighter control, ask the supplier to confirm the measuring point and instrument. A part described as 1.50 mm can still vary if one factory measures over plating and another measures base metal only. The same issue applies to overall size, where +/- 0.3 mm is common for small items under 50 mm and +/- 0.5 mm is more realistic for larger or irregular shapes.
Weight also affects function. A heavy brooch-style pin with a weak clutch can sag or rotate. A thick coin with soft packaging can pick up edge nicks. If the quote is given by grams, ask whether that number includes plating, epoxy, printed inserts, or attached hardware. A 2.8 mm zinc alloy coin with antique plating may weigh 10 to 18 g depending on diameter; a 40 mm flat iron badge may sit closer to 6 to 12 g. Those differences affect both feel and freight.
Surface finish and plating
Plating needs to be written as a process requirement, not a marketing label. Common finishes include nickel, black nickel, antique silver, antique brass, gold, rose gold, and matte black. For most plated promo metal items, the question is not which color looks best in a rendering, but which one hides handling marks, tolerates wear, and fits the brand under real lighting. Bright polished nickel looks sharp but shows scratches sooner. Antique finishes hide small surface defects better and are often the safer choice for mass giveaways.
If you need durability, specify the finish stack rather than only the color. Decorative flash layers are often very thin, while more durable decorative plating is typically built thicker. In buyer terms, a decorative nickel or brass finish may be in the roughly 0.03 to 0.08 micron visual range for flash effects, while heavier wear-oriented decorative layers can be specified higher depending on the process and cost target. If the item will be handled often, ask for a wear expectation in writing, such as salt-spray performance, rub resistance, or color stability after repeated handling. Otherwise, a finish that looks perfect at approval can still age badly in distribution.
For premium giveaways, ask for a finish sample under the same light temperature you will use for sign-off. Warm showroom light can make antique brass look richer than it will in office or retail light. Likewise, matte black can read as premium on a render and look gray if the coating is too thin. If the product is branded for a specific campaign, state whether slight tonal variation between production lots is acceptable or not. That single sentence prevents a lot of arguments later.
Fill, texture, and relief
For colored enamel items, the fill method and line profile matter as much as the color itself. Soft enamel leaves raised metal lines proud of the fill, while hard enamel is polished flush after filling, which changes both appearance and cost. Buyers should specify whether the artwork must sit flush, whether edge ridges are acceptable, and whether recessed areas should be glossy, matte, or textured. For fine artwork, a practical minimum line width is usually 0.20 to 0.30 mm, with gaps of at least 0.25 to 0.35 mm depending on size and process. If the lines are thinner than that, enamel bleed and plating bridging become much more likely.
Relief depth should also be stated. A shallow relief of about 0.20 to 0.40 mm can look clean on small badges and pins, while coins or cast items often use 0.50 to 1.20 mm of relief for stronger contrast. Too much depth traps dirt and complicates polishing; too little makes the design look flat. Texture should be specified separately from relief because a sandblasted field and a polished field behave very differently under plating. If you want a premium coin, call out whether the background is sandblast, spun, cross-hatched, or mirror-polished.
A good rule is to define the decoration in production language, not marketing language. Example: “Soft enamel, black fill, polished nickel border, minimum line width 0.25 mm, background sandblast, raised logo 0.6 mm above field.” That is more useful than “premium enamel with nice detail.” It gives the factory a measurable target and gives QC something to inspect against.
- State whether the fill is soft enamel, hard enamel, printed, or no fill
- Specify minimum line width and minimum gap width in millimeters
- Define whether surfaces must be polished, matte, sandblasted, or brushed
- Confirm if recessed areas may show plating variation or polishing marks
- Call out deep-cut areas that affect cleaning, polishing, or enamel flow
Attachment and hardware
The attachment line is where many low-cost orders fail after they pass visual approval. For pins, the choice between butterfly clutch, rubber clutch, deluxe clutch, safety pin, or magnet backing should be driven by garment type and item weight, not habit. A light 20 to 25 mm lapel pin can use a standard butterfly clutch. A heavier brooch or badge often needs a deluxe clutch, two clutches, or a magnet back to prevent rotation and fabric damage.
For keychains and badge accessories, split rings, lobster clasps, swivel hooks, ball chains, and screw-backs each have different durability and user behavior. A common split ring size is 25 mm to 30 mm outer diameter, while ball chains typically range from 2.4 mm to 3.2 mm wire diameter depending on load and use case. If the item will be worn on thin fabric, say so explicitly. That can change whether a sharp pin post is acceptable or whether a broader brooch-style safety pin is better. For repeated wear, ask the factory to confirm pull-force expectations and opening-cycle assumptions instead of assuming all hardware is equal.
Hardware should also be specified by material and finish. For example, if the body is antique brass, the clutch should not arrive in bright silver unless you are intentionally mixing finishes. If the order is a premium gift set, insist on matching plating across the body and accessory unless the design calls for contrast. Buyers often miss this detail and end up with a visually inconsistent product that still passes basic inspection.
Tolerances, fit, and assembly
Tolerance is where a good-looking sample can still become a bad mass order. For most custom metal giveaways, outline acceptable variation in thickness, overall dimension, hole placement, and hardware alignment. A realistic dimensional tolerance for many manual metal products is often +/- 0.3 mm for smaller items and +/- 0.5 mm for larger items, but the exact number should reflect design complexity and tooling. If two parts must fit together, the clearance should be written, not assumed.
This matters especially for moving parts, layered parts, and multi-piece assemblies. A loose tolerance can create rattling, while a tight one can cause assembly rejects or scratches. If your item has enamel-to-metal alignment, backstamp placement, or a magnet insert, ask the factory to define the measurement reference point. Without that, one supplier may measure from the outer edge and another from the centerline, which makes the same spec look different on paper and in production. For simple assemblies, a visible gap over 0.20 mm is often enough to look sloppy, so define the maximum gap if the edge quality matters.
If your design has a pin post, screw post, or riveted hinge, specify the position tolerance separately from the overall outline. A 0.2 mm hole shift can change how a pin hangs on fabric or how a keychain sits on a ring. For multi-part products, ask for a pre-assembly test sample before bulk production. That is especially important when the order mixes metal with resin, printed card inserts, or magnets, because each material brings its own fit variation.
| Spec line | Good wording | Risk if omitted |
|---|---|---|
| Overall size | 40 mm maximum, +/- 0.3 mm | Factory may stretch or shrink the outline |
| Thickness | 1.5 mm nominal, +/- 0.2 mm | Weight and feel can drift between batches |
| Hole position | Centerline, +/- 0.2 mm | Hardware may sit crooked or bind |
| Assembly fit | No visible gap above 0.2 mm | Parts can wobble or separate |
Inspection, packaging, and sample sign-off
The last lines of the sheet should control what happens after production, because a perfect part in bulk can still arrive damaged or inconsistent. Ask for inspection under a clear AQL target, commonly AQL 2.5 for major defects and AQL 4.0 for minor defects on many promo orders, unless the product is unusually critical. If the order is more cosmetic or gift-oriented, some buyers use AQL 1.5 for major defects on premium items, but that should be agreed before production starts. The factory should also know whether cartons are retail-ready, bulk-packed, or set-packed with backing cards, polybags, tissue, and inserts. Packaging affects scratches, plating wear, and landed cost more than many buyers expect.
Use sample control like a rule, not a preference. State which sample is authoritative: artwork proof, pre-production sample, golden sample, or approved mass-production reference. If the item includes plating, enamel, printed text, or mixed hardware, ask for signed sample approval or photo-confirmed approval before bulk starts. If color is important, specify whether the sample is judged under D65 daylight, office white light, or retail lighting. That prevents disputes when a “match” looks different under another lamp.
A practical MOQ for custom metal giveaways often starts around 100 to 300 pieces for simple stock-tool designs, 300 to 500 pieces for custom-logo pins and keychains, and 500 to 1,000 pieces for more complex cast or multi-process items. Lead times usually run 10 to 15 days for sampling and 18 to 35 days for mass production after sample approval, depending on plating, tooling, and packing complexity. Rush orders are possible, but they often cost 10% to 30% more and reduce inspection room. If the supplier cannot quote lead time in days, the order is probably not yet fully specified.
At the quote stage, ask for FOB pricing by tier so the economics are clear. A practical structure might be 300 pcs, 500 pcs, 1,000 pcs, and 5,000 pcs. That lets you see whether the tooling amortization is reasonable and whether a reorder will actually improve unit cost. For example, a simple 30 mm soft-enamel pin might quote at USD 0.48 to 0.78 FOB at 1,000 pieces and drop to USD 0.32 to 0.55 at 5,000 pieces, while a 3D zinc alloy coin may sit around USD 1.20 to 2.80 FOB depending on diameter, relief, and edge treatment.
What to do next
Build your RFQ in this order: base metal, build method, size, thickness, finish, fill, tolerance, hardware, inspection, packing, and sample sign-off. If any line is unclear, resolve it before sampling, not after. The fastest way to compare suppliers is to send the same spec sheet to each one and then compare how much each quote assumes versus how much it confirms in writing.
If you are planning a new pin, coin, badge, keychain, or magnet order, start with a one-page spec and keep the same structure for reorders. That gives your factory a stable reference and gives procurement a clean way to compare pricing across seasons. A well-written sheet does not just reduce rework; it also exposes which suppliers can actually manufacture to a repeatable standard. If you want, ZheCraft can help turn your product idea into a production-ready spec sheet so the first sample is much closer to the final shipment.
Have a project? Send your artwork and target quantity and we’ll reply with a detailed quotation within 12 working hours.
Ready to get this made?
Send your sketch, target quantity and ship-date. Detailed quotation in 12 hours.


