Custom Enamel Pin Failures: Specs That Prevent Rework
Why pin jobs fail after artwork is approved
Most custom pin orders do not fail at the drawing stage; they fail when the factory tries to translate a neat vector file into metal, color, and assembly. Buyers often approve artwork, then assume the rest is routine, but the actual risks appear in line widths, cavity depth, plating build, and how parts fit after curing. If those details are not locked early, the sample can look acceptable while the mass run drifts into rejects, especially when multiple variants share one tool.
The core problem is that pin production has several hidden tolerance stacks. A line that seems fine on screen may become too thin in stamping, a color field may shrink after polishing, or a post may land too close to an edge and weaken the attachment. The safest RFQ is not the most creative one; it is the one that tells the factory exactly which failures are unacceptable and how to measure them.
- Lock the metal build first: die-struck, soft enamel, hard enamel, or printed insert.
- Specify the narrowest legal-looking line width and smallest readable text height.
- State whether edge polish can slightly change silhouette or must stay within a hard tolerance.
- Define which defects are cosmetic only and which are rejectable at AQL.
Line breakage and fill creep
The first visible failure is usually line breakage: outlines that disappear in small areas, separate during polishing, or collapse around sharp corners. This happens when the design has too many tight turns, when recessed channels are too narrow for the fill material, or when the factory has to scale the art down to meet the requested size. In enamel work, the cure is not just “make it bigger”; it is to set a minimum line width and minimum cavity width that match the chosen size and finish.
For most small lapel pins under 25 mm, a practical minimum for raised metal lines is 0.25 mm, with safer production around 0.30 mm if the artwork has multiple intersections or cutouts. For hard enamel, the cavity between raised lines should usually stay at least 0.40 mm wide to allow proper fill and sanding; for soft enamel, slightly tighter cavities can work, but only if the color count is low and the design is not overloaded with tiny islands. If your art depends on hairline details, consider printed or laser-engraved alternatives instead of forcing enamel to behave like offset print.
| Failure mode | Typical cause | Spec to lock | When to avoid the build |
|---|---|---|---|
| Broken outlines | Lines below tooling limit | Min raised line width 0.25–0.30 mm | Tiny logos, micro text, fine filigree |
| Color bleed | Overfilled narrow cavities | Min cavity width 0.40 mm for hard enamel | Dense art with adjacent small color cells |
| Lost detail | Downscaling a crowded design | Final size and detail density cap | Designs needing readable text under 1.2 mm high |
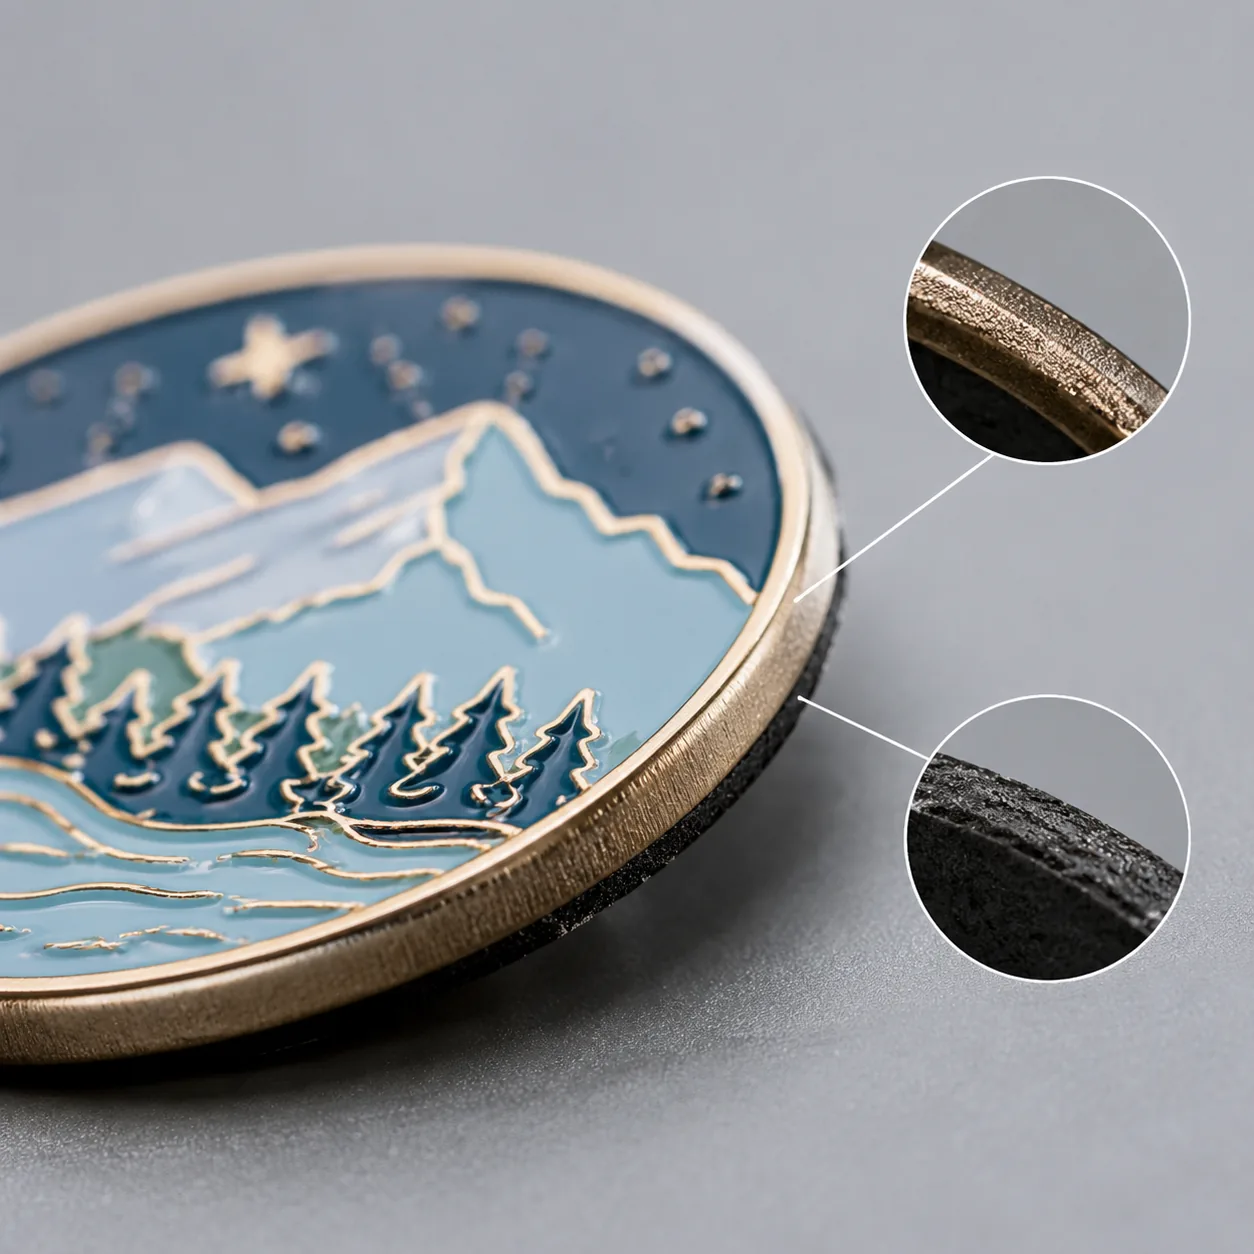
Plating defects that only show up after polishing
Plating problems are rarely about color preference alone; they are usually a thickness, coverage, or surface-prep issue. Thin deposits, poor activation, or over-polishing can leave edge wear, pinholes, dull patches, or color shift between batches. For buyers, the key spec is not just the plating color name, but the minimum thickness, the acceptable sheen, and whether recessed zones must be fully covered or may show tool marks.
In practical production, most decorative pin plating is measured in microns, and under-specifying thickness is a common source of tarnish complaints. A typical decorative target is around 0.08–0.12 microns for standard plating appearance, while heavier wear targets may be higher depending on finish and budget; if the item will be handled often or exposed to sweat, nickel underlayers and surface sealers deserve explicit mention. ZheCraft usually recommends clarifying whether the piece is display-grade or wear-grade before choosing plating, because the cost and failure risk are not the same.
- Name the exact plating finish and expected sheen: bright, matte, antique, or two-tone.
- Ask for a minimum thickness target, not just a color descriptor.
- State whether exposed base metal at edges is acceptable after polishing.
- Require a photo of a plated pre-production sample under neutral lighting.
Enamel fill failures: shrinkage, bubbles, and low spots
Enamel fill defects tend to appear only after curing and sanding, which is why they surprise buyers who approved a wet sample or digital proof. Common issues include pinholes from trapped air, shrinkage after bake, low fill in large areas, and uneven doming between colors. These defects are more likely when the factory tries to force multiple colors into narrow cells or uses a fill depth that is too shallow for the final polish.
The useful spec here is fill level relative to the metal rim. For soft enamel, buyers usually want a slight recessed feel below the raised metal, while hard enamel should be sanded flush to a smooth surface. If the artwork has wide color fields, ask the supplier to confirm whether one or two fills will be used; for larger enamel areas, a second fill pass often reduces sink marks and post-bake shrinkage. When the design contains gradients or translucent effects, accept that visual variation will be higher and set a tighter approval sample standard.
Attachment failures: posts, clutches, and rotation
A visually perfect pin still becomes a return if the backing system bends, spins, or tears fabric. Attachment failures usually come from using a post that is too short for the pin thickness, placing the post off-center, or selecting a clutch that does not match the wearer’s fabric. Single-post pins can rotate more easily on soft garments, while dual-post layouts improve stability but require stricter alignment control during assembly.
For standard lapel pins, a post diameter of about 1.0 mm to 1.2 mm is common, but the real spec that matters is the pull-through resistance of the complete backing system. Butterfly clutches are economical, rubber clutches are softer on fabric, and magnetic backs avoid puncture damage but reduce holding force on thicker garments. If the product is intended for uniforms, backpacks, or heavy outerwear, ask for an anti-rotation layout and define whether a pin stop, flat post, or dual-post system is required.
| Backing type | Best use | Main risk | Spec to request |
|---|---|---|---|
| Butterfly clutch | General promotions | Can loosen over time | Minimum insertion friction and retention check |
| Rubber clutch | Sensitive fabrics | Lower long-term grip | Retention test after repeated removal |
| Magnetic back | No-needle garments | Lower holding force on thick cloth | Minimum pull force on stated fabric thickness |
Surface damage and scratch marks during packing
Many buyers focus on production defects and forget that packing can destroy an otherwise good run. Pins rub against each other in bulk packs, plating scratches during transit, and soft enamel edges can chip if cartons allow too much movement. If the packing method is not defined, the factory will usually choose the cheapest safe-seeming option, which may still be too aggressive for polished or high-gloss finishes.
The spec should say whether each pin is bagged individually, card-mounted, or bulk packed, and whether the outer carton uses dividers or trays. For high-gloss or antique finishes, individual polybags plus backing cards reduce rub marks, while bulk packing is usually only acceptable for low-cost giveaways with forgiving surfaces. If the order includes multiple SKUs in one carton, the buyer should state whether mixed packing is allowed or if each design must remain segregated to prevent part-to-part abrasion.
- Use individual bags for polished, epoxy, or mirror-finish pins.
- Add a backing card if the pin face can scratch against the clutch.
- Require inner tray dividers for mixed-SKU shipments.
- Ask for a carton drop standard if the pins have protruding attachments.
A practical spec table by risk level
Not every pin needs the same controls. A 20 mm conference giveaway and a 45 mm collector pin have very different defect exposure, so the cleanest RFQ is one that scales the spec to the actual risk. Below is a simple way to tighten requirements without overpaying for controls you do not need.
| Risk level | Typical job | Must-spec items | Usually overkill |
|---|---|---|---|
| Low | Simple giveaway pin | Size, plating color, backing type, AQL | Dual samples, heavy packing trays |
| Medium | Branded retail pin | Line width, fill level, post layout, carton method | Full wear testing, premium inner boxes |
| High | Collector or resale pin | Hard tolerances, plating thickness, scratch protection, retention tests | Loose visual-only acceptance |
| Critical | Uniform or event-critical pin | Anti-rotation, fabric safety, batch traceability, gold sample control | Bulk pack without segregation |
What to do next before you place the order
Before you issue the PO, turn the design into a failure-prevention sheet rather than a visual brief. List the exact size, minimum line width, fill depth expectation, backing type, plating finish, and packing method, then ask the factory to restate those points in the pre-production sample approval. If the supplier cannot repeat the specs back clearly, that is usually the first warning sign.
For ZheCraft-style production workflows, the safest next step is to request one controlled sample with the final plating and backing already installed, then inspect it for alignment, scratch resistance, and retention before mass production. If you are ordering multiple variants, freeze the shared tool dimensions first and only then allow artwork changes by SKU. That keeps the job from turning into silent rework, which is where most avoidable cost gets lost.
Have a project? Send your artwork and target quantity and we’ll reply with a detailed quotation within 12 working hours.
Ready to get this made?
Send your sketch, target quantity and ship-date. Detailed quotation in 12 hours.


