Custom Brooch QC Failures: Stones, Solder and Plating Specs
1. Stone Settings: Match Fixing Method to Wear Risk
The most frequent brooch claim is not artwork color. It is a missing rhinestone, tilted imitation pearl, or loose glass stone found after carton opening. The root cause is usually not that the factory forgot the stone. It is that the purchase order showed stones in the artwork but did not define the fixing method, cavity tolerance, cure time, or inspection test. The supplier then chooses the fastest construction that meets the target FOB price.
For short-use promotional brooches, glued rhinestones can be acceptable when the product is light, handled briefly, and priced around USD 1.10 to 2.60 FOB at 500 to 1,000 pieces. For retail brooches, museum shops, hotel uniforms, staff accessories, school awards, or boxed gift sets, specify claw, bezel, peg, cup-chain, or recessed-cavity settings for stones above 3 mm. A flat-back stone above 5 mm fixed only to polished plating is a high-risk shortcut unless it sits in a pocket at least 0.25 to 0.35 mm deeper than the glue layer.
Mark stone size, count, setting type, color code, and location on the production drawing. Practical cavity tolerances are ±0.10 mm for stones below 4 mm, ±0.15 mm for 4 to 8 mm stones, and ±0.20 mm for larger decorative stones. For mixed colors or mixed sizes, require a stone map before sampling and allow 1% to 3% spare stones for sorting losses, chipped pieces, and hand-setting rejects.
| Stone feature | Lower-risk production spec | Higher-risk shortcut | PO acceptance limit |
|---|---|---|---|
| 1.5 to 2.5 mm rhinestones | Wax-set or machine-set in drilled cavities | Hand glue on flat plated metal | No missing stones; cavity offset under 0.15 mm |
| 3 to 5 mm glass stones | Four-claw, bezel, or recessed glue pocket | Surface glue only | No movement under fingernail pressure after 24-hour cure |
| 6 to 10 mm focal stone | Bezel wall 0.35 to 0.50 mm plus adhesive support | Two-dot glue fixing | Tilt under 3 degrees from design plane |
| Imitation pearl | Half-drilled pearl on metal peg plus adhesive | Flat-back pearl on polished plating | No visible glue ring at 30 cm |
| Crystal chain border | Soldered cup chain or mechanically locked terminal cups | Decorative chain glued after plating | No lifted end cup after light pull test |
2. Adhesive Control: Define Chemistry, Overflow, and Cure Time
Glue defects are both functional and cosmetic. Weak bonding causes stone loss, but excess adhesive creates cloudy halos, yellow rings under transparent stones, white bloom on plating, or raised ridges around pearls. These defects are most visible on gold-tone plating, black nickel, imitation rhodium, mirror-polished metal, and e-commerce products photographed under hard light.
Do not write only "strong glue" in the RFQ. Specify the adhesive family and the appearance limit. Two-part epoxy is common for hand-set stones and pearls because it gives working time and fills small gaps. UV adhesive can be efficient for clear stones if the factory controls lamp intensity, exposure time, and shadowed areas. Cyanoacrylate is fast, but it can bloom white on plated surfaces and should not be the default for visible retail brooches.
Set measurable overflow limits. Use no more than 0.20 mm visible overflow around opaque stones under 5 mm, no more than 0.10 mm around clear stones under 5 mm, and no visible overflow at 30 cm for pearls or stones above 5 mm. Require at least 24 hours of room-temperature curing at 20 to 25 °C before final packing. For thick epoxy dots or humid workshops, 36 to 48 hours is safer. Packing immediately after setting can transfer uncured adhesive to OPP bags, foam, backing cards, or adjacent stones.
- Name the adhesive type: two-part epoxy, UV adhesive, or buyer-approved equivalent.
- Require no yellowing, white blooming, cloudy halo, or oily residue after full cure.
- Set visible glue overflow limits by stone type and size instead of using "clean" or "neat".
- Add a rub check and fingernail movement check after curing, not immediately after setting.
- Reject sample photos taken before cure because wet glue can look clearer than finished glue.
- Build curing time into the production calendar instead of compressing it before shipment.
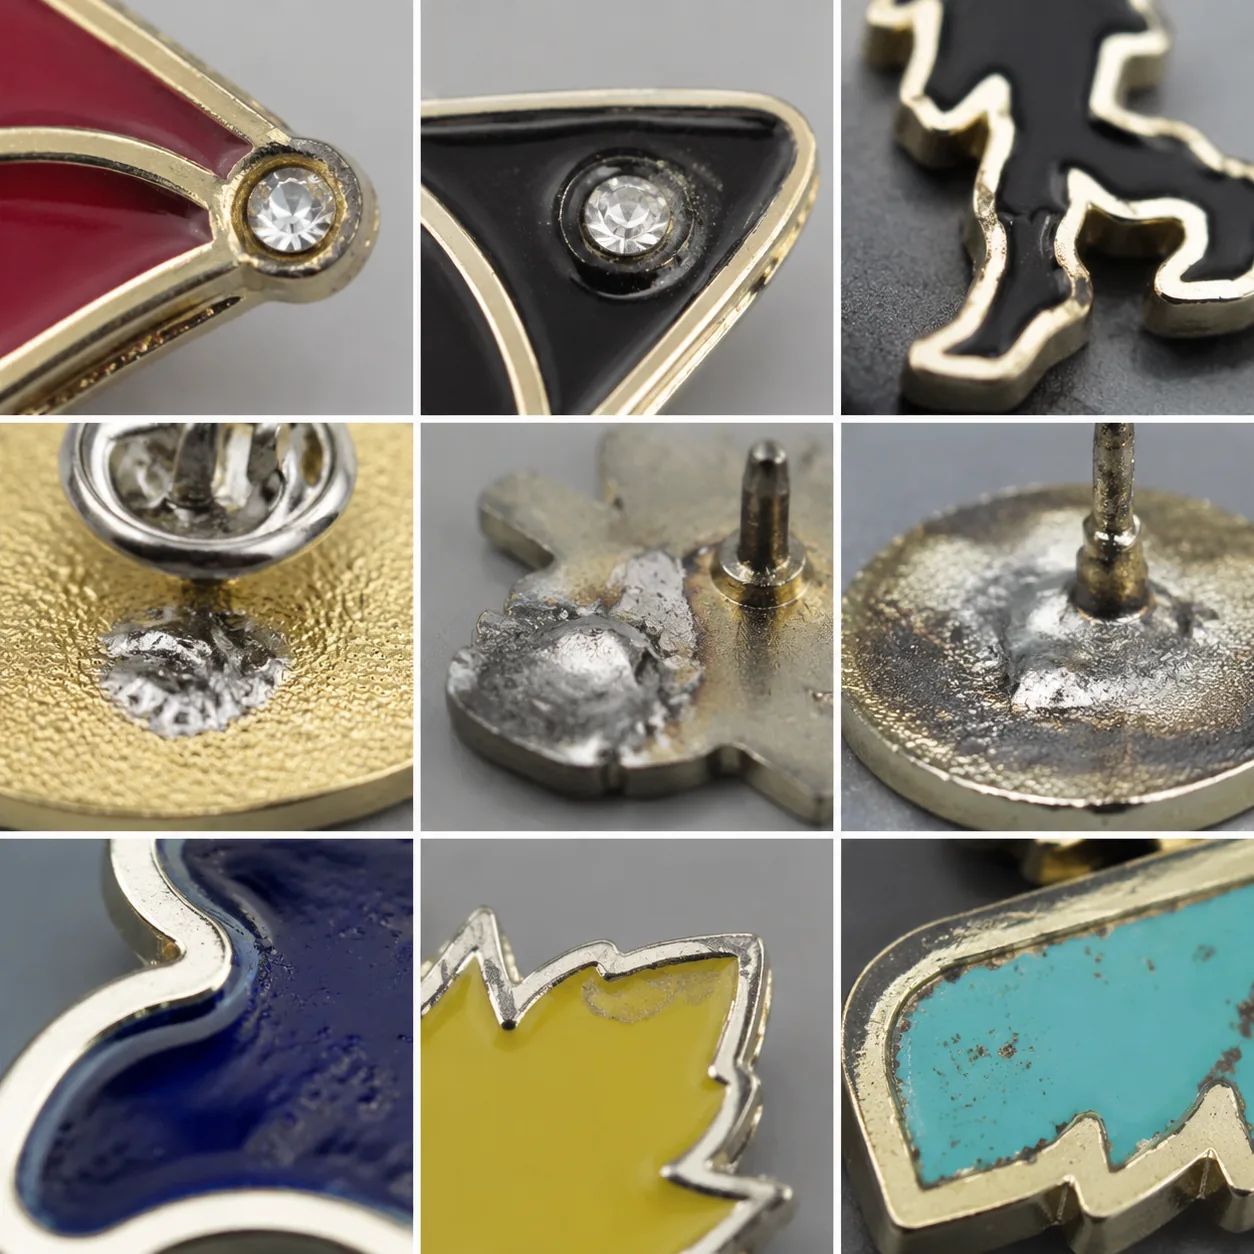
3. Solder and Hardware: Engineer the Back, Not Only the Front
A brooch carries more load than a simple lapel pin. The hinge, catch, decorative chain, pendant charm, cup chain, and stone cups must survive shipping vibration and fabric insertion. A 45 mm zinc alloy stone brooch may weigh 18 to 35 g, while a similar-size soft enamel pin often weighs 10 to 18 g. If the brooch bar is selected like a pin post, the solder joint can crack when the wearer pushes through thick fabric.
For brooch bars, specify solder contact area by finished weight. Use at least 6 x 3 mm for pieces under 15 g, 8 x 4 mm for pieces from 15 to 35 g, and two solder points or a longer bar for pieces above 35 g. A wide brooch above 55 mm should not rely on one short central hinge unless the bar covers enough width to resist rotation. For dangling charms, use jump rings with 0.8 to 1.2 mm wire diameter and a closed gap under 0.15 mm. Thin 0.5 mm rings may pass a photo review but open during a 30-second shake test.
Choose the base process around the mechanical requirements. Stamping is economical for thin line art, shallow relief, flat enamel fields, and 100 to 300 piece test runs. Casting is better for tall relief, thick bezels, deep stone pockets, and multi-level retail designs because it produces integrated seats and reduces small soldered add-ons. For zinc alloy casting, flag wall thickness below 1.2 mm, narrow bridges below 1.0 mm, and unsupported stone walls below 0.35 mm before tooling.
| Component | RFQ spec | Pre-shipment test | Reject condition |
|---|---|---|---|
| Brooch bar hinge | Minimum 8 x 4 mm solder pad for 15 to 35 g pieces | Open-close 20 cycles | Hinge lift, cracked solder, or loose rotation |
| Safety catch | Catch locks and releases smoothly without forcing | Manual pull at 1.5 kg for 10 seconds | Detachment, permanent bend, or unlocked catch |
| Dangling charm ring | 0.8 to 1.2 mm wire; split gap under 0.15 mm | Shake test for 30 seconds | Charm loss or visible ring opening |
| Cup-chain end | Soldered or mechanically locked terminal cup | Light pull along chain direction | End cup lifting or chain separation |
| Pin needle | 0.7 to 1.1 mm diameter; straightness within 0.5 mm | Visual check and fabric insertion | Burr, blunt tip, bent needle, or poor closure |
4. Plating Specs: Control Thickness, Cleaning, and Color Standard
Stone brooches expose plating problems because the eye compares bright metal, glass, enamel, soldered findings, and shadowed recesses in one small object. Common failures include dark stains around stone cups, thin plating on raised edges, black dots in cavities, and color mismatch between the brooch body and attached hardware. These are usually cleaning, activation, solder residue, racking, or base-metal porosity problems, not simple color mistakes.
For low-cost promotional brooches, practical plating thickness is often 0.10 to 0.25 microns for gold-tone flash plating and 0.15 to 0.30 microns for nickel, black nickel, or imitation rhodium. For retail or repeated-wear brooches, specify 0.30 to 0.50 microns where budget allows, especially on raised areas, edges, and brooch bars. Thicker plating will not hide poor polishing, pits, dirty solder, or casting porosity, so the PO should also define the pre-plating surface standard: no visible pits at 30 cm on the front face and no trapped polishing compound in cavities.
If nickel-free plating is required, state it at RFQ stage because the plating stack, test method, and cost change. Nickel-free construction is relevant for apparel, EU-facing gift programs, museum shops, children’s accessories, and jewelry-style retail ranges. For a one-day corporate event badge, standard plating may be acceptable if destination regulations and labeling requirements allow it.
Approve a signed physical sample or plating chip, not only a photo. Digital images shift gold, rose gold, and black nickel under different light sources. During inspection, check color at 30 cm under daylight-equivalent light, then inspect recesses, soldered areas, and back hardware at closer distance for stains, exposed base metal, or polishing residue.
5. Wearability: Prevent Fabric Damage and Forward Tilt
A brooch can look acceptable on an inspection table and still fail in use if the needle is too thick, too short, too blunt, or placed below the center of gravity. Buyers often discover this only after uniforms show pulled threads or a decorative brooch tilts forward on lightweight shirts. The defect is both a hardware-selection issue and a balance issue.
For normal apparel brooches, a 0.7 to 0.9 mm needle is common. A 1.0 to 1.1 mm needle may be stronger for coats, felt, bags, and heavy knits, but it can leave visible holes in silk, satin, lightweight polyester, and fine woven uniforms. Usable needle length matters. A 50 mm brooch with only 18 mm of usable needle length may rotate, while a 25 to 32 mm usable length gives better support.
Place the brooch bar above the center of gravity on tall pieces and, where the design allows, make it cover 45% to 65% of the brooch width. Define a tilt test using fabric close to the final application. On 180 gsm cotton poplin, the finished brooch should hang with less than 10 degrees of forward tilt after 30 seconds. On 350 gsm wool blend, the angle may be less strict, but the pin must still close securely without forcing and without permanent bending.
- State the use case: shirt, coat, cap, scarf, bag, display card, or decorative gift only.
- Set maximum finished weight, such as under 18 g for shirt wear and under 35 g for coat wear.
- Specify needle diameter, usable needle length, catch type, and brooch bar length.
- Require a tilt test on fabric that matches the buyer’s application.
- Use two attachment points for heavy, wide, or off-balance designs.
- Avoid magnetic backs for pacemaker-risk environments, high-vibration use, or thick winter coats.
6. AQL Plan: Separate Critical, Major, and Minor Defects
Many buyers write "inspect to AQL 2.5" and stop there. That is not enough for a brooch with stones, soldered hardware, sharp metal, and skin-contact plating. A missing stone, a sharp burr, and a tiny plating speck should not be judged under the same cosmetic rule. The inspection plan must define critical, major, and minor defects according to product risk.
A practical setup is AQL 0 for critical defects, AQL 1.5 for major defects, and AQL 2.5 or 4.0 for minor cosmetic defects depending on the price tier. Critical defects include exposed sharp wire, broken needles, insecure small parts on child-facing items, incorrect nickel-free construction when specified, or any safety issue that can injure the wearer. Major defects include missing stones, loose brooch bars, wrong plating color, obvious glue halos, cracked enamel, failed pull test, or hardware that does not close.
For economy FOB prices below USD 1.50, demanding retail-jewelry cosmetics will either raise the price or create a high reject rate. For FOB prices from USD 3.50 to 8.00 and above, especially boxed stone brooches, tighter cosmetic sorting is realistic and should be included in the quotation. Inspection should include top, middle, and bottom cartons because compression and humidity damage often appear unevenly.
| Defect type | Recommended class | Acceptance rule |
|---|---|---|
| Missing stone or pearl | Major | Reject if visible on any finished piece |
| Loose stone after rub test | Major | Reject if movement is detected by fingernail or tweezer touch |
| Sharp burr on back or pin | Critical | Hold lot for rework if repeated |
| Wrong plating finish | Major | Reject if different from approved sample or signed color chip |
| Glue overflow under 0.20 mm on opaque stone | Minor | Accept only if not visible at 30 cm |
| Incorrect nickel-free construction when specified | Critical | Hold shipment until material or test evidence is confirmed |
| Crushed retail box | Major | Reject if presentation or protection is affected |
7. Packing: Stop Scratches After Final Inspection
Stone brooches are often damaged after inspection because raised stones, brooch bars, chains, and dangling parts rub against neighboring pieces. A thin OPP bag may work for flat enamel pins, but it is often insufficient for rhinestones, imitation pearls, polished gold plating, or boxed retail sets. Packing damage appears as hairline scratches, bent needles, loose stones, scuffed cards, or crushed gift boxes.
For basic bulk packing, specify one brooch per OPP bag plus tissue, pearl cotton, or a 1 to 2 mm foam separator between layers. For retail orders, use a 300 to 400 gsm backing card, flocked card, EVA insert, or molded tray if the brooch has tall stones. Test gift boxes with the actual brooch height. A brooch that stands 12 mm high inside a box with 15 mm internal height has only 3 mm of clearance, which is too little for courier compression unless the insert prevents movement.
Keep outer cartons around 12 to 15 kg gross weight for mixed stone brooches. Use five-layer corrugated export cartons, reinforced tape, and desiccant for sea shipments or humid seasons. If the order combines brooches with coins, keychains, patches, or other metal goods, use separate inner cartons rather than mixing weights in one master carton. For courier shipments, add a 60 to 80 cm carton drop check and recheck stones, catches, cards, and boxes afterward.
8. Approval Checklist: Lock Specs Before Tooling and Bulk Production
A reliable brooch order starts with a failure-mode RFQ, not only artwork and quantity. The RFQ should include dimensions, target weight, base metal, stone map, setting method, plating thickness, backing hardware, adhesive requirement, packing method, inspection level, and destination compliance requirements. The same document should drive the sample, quotation, production drawing, and final inspection checklist.
Typical MOQs depend on construction. Simple stamped metal or enamel brooches may start at 100 to 300 pieces. Stone-heavy brooches, mixed-color rhinestone layouts, nickel-free plating, and boxed retail sets commonly start at 300 to 500 pieces because purchasing, sorting, hand-setting, plating control, and packing time are higher. Sample lead time is usually 7 to 12 days after artwork confirmation, or 10 to 15 days for cast pieces with complex stone pockets. Mass production is commonly 18 to 28 days after sample approval, and 25 to 35 days for heavy stone-setting, nickel-free plating, or custom retail packaging.
FOB pricing also needs a realistic range. Small promotional brooches may run USD 1.10 to 3.00 at 500 to 1,000 pieces. Mid-range enamel or stone brooches commonly fall around USD 3.00 to 5.50. Larger retail brooches with many stones, thicker plating, special backs, or gift boxes can reach USD 5.50 to 9.50 or more. The same front artwork can move between these tiers depending on metal thickness, setting method, plating thickness, inspection level, and packing.
- Send vector artwork with marked dimensions, stone sizes, plating finish, and back hardware position.
- Approve a physical pre-production sample, not only factory photos or 3D artwork.
- Define critical, major, and minor defects before deposit or tooling release.
- Confirm MOQ, sample lead time, production days, packing method, and FOB price tier in writing.
- Require curing, pull, tilt, plating, and carton checks before shipment.
- Keep one signed approval sample with the factory and one with the buyer for dispute control.
Have a project? Send your artwork and target quantity and we’ll reply with a detailed quotation within 12 working hours.
Ready to get this made?
Send your sketch, target quantity and ship-date. Detailed quotation in 12 hours.


