Cast vs Stamped Metal Pins: Which Build Should You Buy?
The real buying decision: flat graphic control or dimensional relief
Most pin projects do not fail because the artwork file is bad. They fail because the buyer selects the wrong manufacturing process for the geometry. A flat stamped build will not convincingly reproduce sculpted depth, while an over-modeled cast build can make a clean logo look heavy, soft, and more expensive than it needs to be. The choice affects tooling cost, unit price, approval speed, batch consistency, weight, and even how the pin sits on fabric.
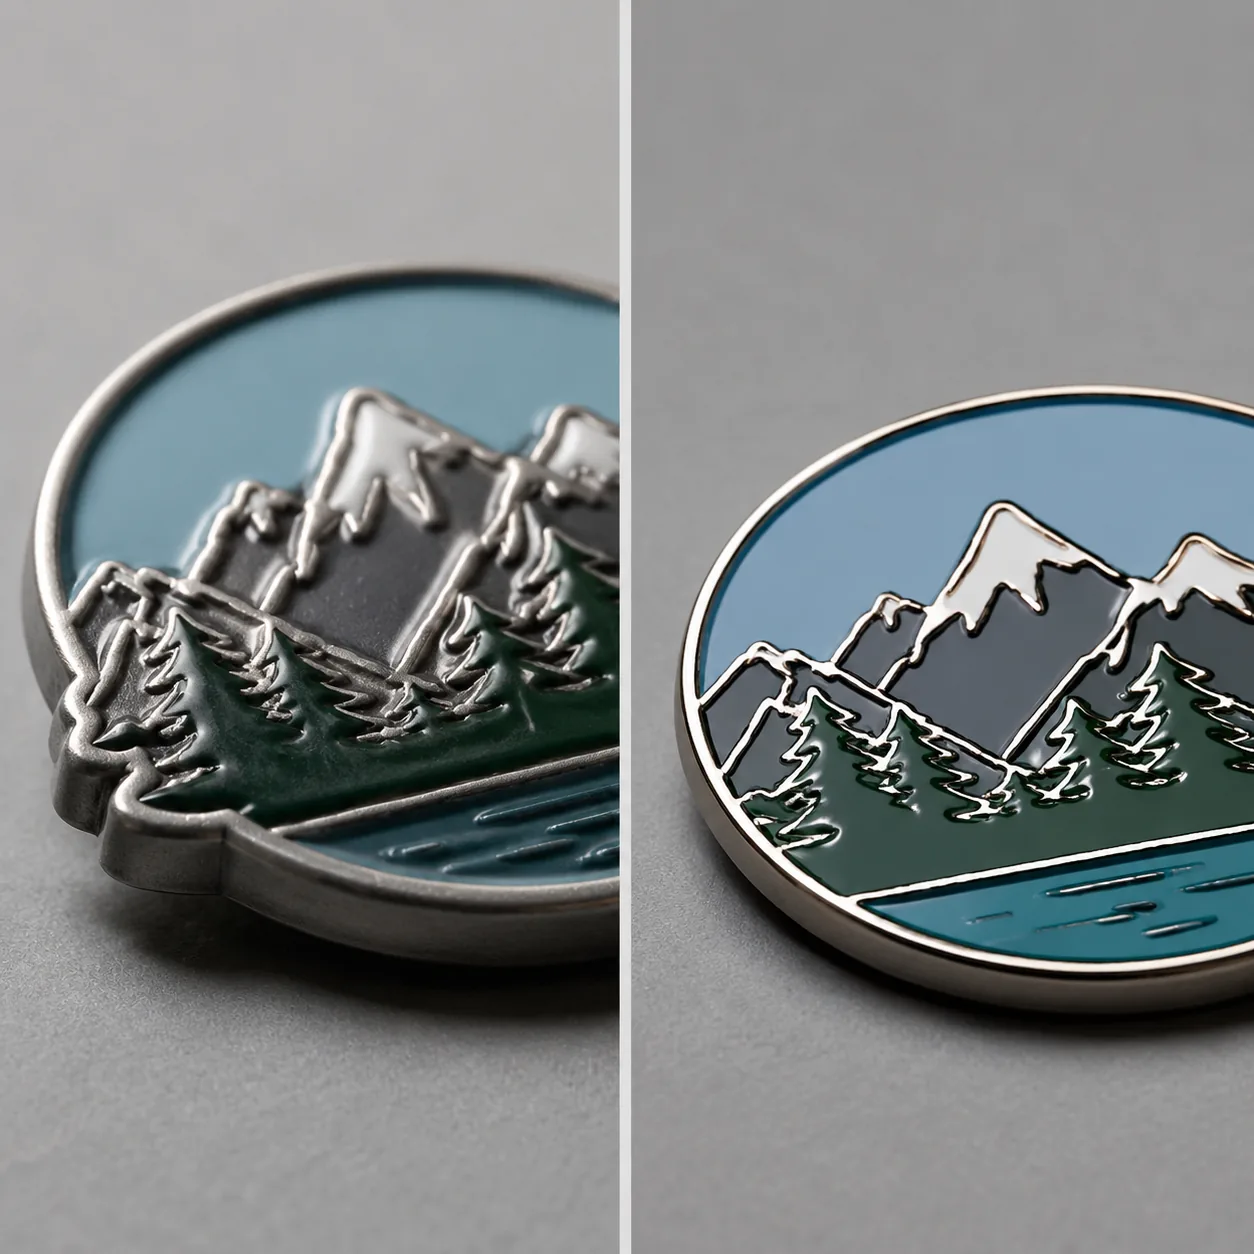
The two standard metal pin constructions are stamped metal and cast metal. Stamped pins start from sheet metal and are formed by pressing and cutting, so they are flatter, crisper, and usually faster to tool. Cast pins are made from a mold, typically zinc alloy, so they can carry raised relief, recessed backgrounds, curved forms, and more organic shapes. In practice, the decision is not about which is better; it is about which build matches the visual language, budget, and wear requirements of the project.
As a rule of thumb, stamped work is strongest when the design is mostly 2D and the priority is edge precision. Cast work is strongest when depth, contour, and tactile presence matter more than exact flatness. If the silhouette is doing most of the design work, stamped usually wins. If the interior surfaces and shadows are doing the work, cast usually wins.
Side-by-side spec table for fast quoting
| Spec | Stamped metal pin | Cast metal pin |
|---|---|---|
| Typical thickness | 0.8–1.2 mm | 1.5–3.0 mm |
| Practical minimum visible line width | 0.25–0.30 mm | 0.35–0.40 mm |
| Typical relief height | Low relief only; usually under 0.3 mm | 0.5–1.5 mm common; higher on large pieces |
| Typical weight for a 30 mm pin | 3–5 g | 5–9 g |
| Tooling type | Steel die + cutting die | Zinc alloy mold |
| Typical tooling cost | USD 60–180 | USD 120–350 |
| Typical MOQ | 100–300 pcs | 100–300 pcs |
| Unit FOB at 500 pcs | USD 0.45–1.20 | USD 0.70–1.80 |
| Unit FOB at 1,000 pcs | USD 0.35–0.95 | USD 0.55–1.55 |
| Typical lead time | 10–18 days | 14–24 days |
| Best use case | Corporate logos, event giveaways, clean outlines | Mascots, commemorative emblems, premium merch |
Use the table as a first filter, not the final answer. A stamped pin can still look premium if the silhouette is strong, enamel is cleanly partitioned, and the edge tolerance stays within about ±0.2 mm on simple shapes. A cast pin can still look cheap if the relief is overworked, walls are too thin, or plating pools in recessed areas. Process discipline matters as much as build type.
When stamped metal is the better buy
Stamped metal is the safer choice when the artwork is mostly 2D: logos, simple icons, text, outlined mascots, and badge shapes with limited internal detail. Because the part starts from sheet metal, the factory can hold tighter edge control and keep the profile flatter. That matters for lapel pins, conference badges, retail packaging inserts, and any item where thickness affects presentation or shipping density.
Stamped construction also keeps cost down when you need a pilot run or a quick-turn marketing piece. If the design is new, untested, or likely to change after the first approval round, the lower tooling burden reduces risk. A simple stamped logo is commonly quoted at 100 pcs MOQ, with sampling plus mass production in about 10–14 days for straightforward jobs. On uncomplicated 25–35 mm designs, FOB pricing often lands around USD 0.35–0.65 per piece at 1,000 pcs and USD 0.45–0.80 at 500 pcs, depending on plating, enamel count, and backing choice.
The limitation is dimensionality. Stamped pins do not reproduce deep facial features, layered texturing, or strong beveled surfaces well. Buyers sometimes try to compensate with heavier polishing or epoxy domes, but those treatments do not create relief; they only change the surface finish. For a design that depends on shadow and depth, a stamped version will usually read flatter than expected, especially under bright retail lighting or on camera.
Stamped parts also have geometry limits that are easy to overlook during quoting. Long thin bridges can twist during pressing, tiny internal cutouts can close up during polishing, and very narrow enamel cells can flood. If a logo has type thinner than about 0.3 mm, or a free-standing detail smaller than 0.5 mm, the supplier should confirm whether the lines need to be widened before tooling.
- Choose stamped metal for clean logos, text, and line art.
- Choose stamped metal when tooling cost needs to stay under USD 200.
- Choose stamped metal when the pin must sit flat on clothing or packaging.
- Avoid stamped metal for undercuts, layered relief, or sculptural characters.
- Avoid tiny bridge sections and thin cutouts that can warp during pressing or polishing.
When cast metal is the better buy
Cast metal is the right answer when the buyer wants the pin to feel like a miniature object rather than a flat badge. Zinc alloy casting allows raised faces, recessed backgrounds, rounded edges, and more complex contours that read better from arm’s length and on camera. That makes it especially effective for mascot pins, collector-style merchandise, commemorative emblems, and premium retail pieces where perceived value matters.
The trade-off is process control. Casting brings shrinkage risk, and if the design has narrow bridges, tall relief on a small base, or overly fine surface texture, details can soften after mold fill, polishing, and plating. Cast pieces also weigh more. A 30 mm cast pin commonly lands around 5–9 g, and larger badge-style pieces can exceed 12 g, which may require a stronger clutch, double posts, or a magnet if the garment is delicate.
For small cast badges, a practical minimum wall thickness is 0.8–1.0 mm, with visible raised details ideally no thinner than 0.3 mm after finishing. Recesses should be designed to stay readable after plating; bright nickel and polished gold reveal more defects than antique brass or antique silver, which are more forgiving in shadowed areas. If a buyer wants maximum depth, the right question is not only can you cast it, but will the relief survive polishing and plating cleanly?
Cast work is also the better route when the design relies on tactile differentiation. A raised nose, stepped helmet ridge, or carved emblem border gives the piece a visual hierarchy that a flat process cannot match. The improvement is most obvious on larger pins above 35 mm, where the extra surface area allows the relief to separate cleanly without the piece feeling crowded.
Tooling, MOQ, lead time, and FOB price: what changes your budget
Tooling is where the wrong build choice often becomes expensive. Stamped metal needs a die set, so the tool path is simpler and usually cheaper. Cast metal requires a mold and more model work to manage fill, shrink, and relief transitions. For one-time campaigns or artwork still under revision, stamped construction usually gives the lowest-risk starting point. For repeat programs, cast tooling may justify itself after multiple reorders if the design truly needs depth.
MOQ is often similar on paper, but commercial quoting shifts by complexity. A simple stamped logo can be viable at 100 pcs, while a cast mascot with two plating tones and a custom back stamp is more comfortably quoted at 300 pcs or more to keep the unit price competitive. Lead times also differ: stamped parts often move faster through sample approval and production, while cast parts may need an extra 3–5 days if the first sample requires mold correction.
| Buying scenario | Better build | Why |
|---|---|---|
| Simple logo lapel pin for a sales team | Stamped | Lower tooling, crisp geometry, flatter wear profile |
| Mascot badge for retail merchandising | Cast | Depth and sculpted features carry the character |
| Conference giveaway with tight budget | Stamped | Cheaper tooling and usually lower FOB |
| Premium collector pin with dimensional effects | Cast | Better visual weight and perceived value |
| Reorder of an existing flat design | Stamped | Fast repeatability if the die is already locked |
| Custom commemorative emblem with layered relief | Cast | More convincing dimensional read |
For quote comparison, ask for pricing at 300 pcs and 1,000 pcs, not just at MOQ. In many factories, a 30–35 mm stamped pin in one enamel color may land around USD 0.45–0.80 FOB at 500 pcs and USD 0.35–0.65 at 1,000 pcs, while a comparable cast piece may sit around USD 0.75–1.20 FOB at 500 pcs and USD 0.55–1.00 at 1,000 pcs. Exact pricing depends on size, plating family, back stamp, post type, finish level, and packing spec.
If you need a practical sourcing target, these are common commercial ranges: stamped tooling at USD 60–180 with 100–300 pcs MOQ; cast tooling at USD 120–350 with 100–300 pcs MOQ. Sample approval is often 5–7 days after artwork confirmation for stamped pieces and 7–10 days for cast pieces, with mass production following in 5–12 additional days depending on plating queue and packing requirements.
What the spec sheet must state: details, tolerances, plating, and finish
Most rework is preventable with a better specification sheet. For stamped metal, define minimum line width, enamel partition width, overall thickness, outside dimension tolerance, and whether the edge should be polished smooth or left with a sharper die-cut character. A practical tolerance for small pins is usually ±0.2 mm for simple silhouettes and ±0.3 mm for more complex cutouts, assuming the artwork does not have long thin spans that distort during polishing or plating.
For cast metal, specify relief height, minimum recessed depth, and the expected surface texture before plating. Bright nickel, polished silver, and polished gold show every ripple and sink mark; antique finishes and sandblasted recesses hide small imperfections better. If the program includes multiple SKUs, keep plating families consistent across them, because stamped and cast parts can look visually different even when the plating name is identical on paper.
Plating language should be concrete. Instead of gold, state imitation gold, antique gold, or polished gold. Instead of nickel, state bright nickel, black nickel, or antique nickel. If the factory offers nickel-free or lead-free compliance, request it in writing. For market-sensitive orders, ask for the base alloy and confirm whether the pins meet low-lead requirements for the destination market.
You should also define enamel and surface targets in measurable terms. Standard soft enamel fill is typically recessed 0.3–0.5 mm below the metal line, while hard enamel can be polished flush to within about ±0.05–0.10 mm after finishing. If the project needs a matte back, request it explicitly; if you need a logo back stamp, specify depth and placement so it does not distort the attachment area.
- State whether the front should be flat, domed, or fully relief.
- State minimum visible line width: 0.25–0.30 mm stamped, 0.35–0.40 mm cast.
- State acceptable size tolerance: typically ±0.2 to ±0.3 mm on small pins.
- State plating finish clearly: bright nickel, black nickel, imitation gold, antique brass, etc.
- State back finish: polished, matte, sandblasted, or with logo back stamp.
- State attachment type early: butterfly clutch, rubber clutch, safety pin, magnet, or double-post.
Quality risks and inspection targets by build type
Stamped metal defects usually show up as burrs, uneven edge height, cut-line distortion, and enamel overflow in narrow compartments. The most common causes are artwork that is too fine for the chosen thickness, or bridge sections that are too narrow to hold shape during pressing and polishing. For production control, many buyers use AQL 2.5 for major appearance defects and AQL 4.0 for minor cosmetic issues, but the key is to define rejectable conditions before mass production starts.
Cast metal defects are different. Inspect for incomplete fill, pitting, sink marks, rounded relief edges, and weight inconsistency across the batch. A good cast sample should read clearly at a normal viewing distance of 30–50 cm, with the main raised features visibly separated from the background. If recessed areas trap polish residue or plating debris, the part can look rough even when the front photo looked acceptable under studio light.
For either build, request first-article approval against a written spec sheet, not just a reference image. That sheet should list thickness, size tolerance, line width, plating code, enamel colors, back finish, attachment type, and packaging. If you need batch consistency across multiple pin runs, ask for a pre-production sample under neutral daylight or color-balanced inspection lighting so surface defects are not hidden by glossy photography.
A practical inspection plan for importers is to check 100% of the first 20–30 pieces for visual matching, then apply AQL sampling to the balance of the order. For premium retail pieces, buyers often add a 1.0 mm no-burr edge requirement, a clutch retention check, and a simple bend test on double-post designs to reduce returns from broken hardware.
How to choose fast, quote correctly, and avoid rework
If the design is flat, graphic, and the run is still being tested, start with stamped metal. If the design is sculptural, character-driven, or meant to feel collectible, cast metal is usually the better fit. When the same artwork could go either way, decide using three questions: how visible is the detail at arm’s length, how much does weight matter on the intended garment, and how much tooling risk can the program absorb?
If you are sending an RFQ, do not ask only for metal pins. Ask for both stamped and cast quotes on the same artwork, then compare tooling, unit price at 300 pcs and 1,000 pcs, lead time, and sample risk side by side. If possible, include a reference image plus a dimensioned vector file, and ask the supplier to confirm whether any linework should be widened or simplified before sampling. Small geometry changes often save more money than a last-minute redesign.
A useful sourcing checklist is to lock the manufacturing path before you approve cosmetics. Once you have chosen stamped or cast, keep the pin size, thickness, and attachment stable through sampling. Changing all three at once usually resets tooling assumptions and can add several days to the schedule.
- For flat brand logos: request a stamped quote first.
- For mascots or dimensional emblems: request a cast quote first.
- Ask for pricing at 300 pcs and 1,000 pcs, not just MOQ.
- Ask the factory to confirm thickness, line width, and tolerance before sampling.
- Approve a written spec sheet before mass production, not after the sample arrives.
Have a project? Send your artwork and target quantity and we’ll reply with a detailed quotation within 12 working hours.
Ready to get this made?
Send your sketch, target quantity and ship-date. Detailed quotation in 12 hours.


