Brooch Pin vs Lapel Pin: Which Spec Fits Your Program?
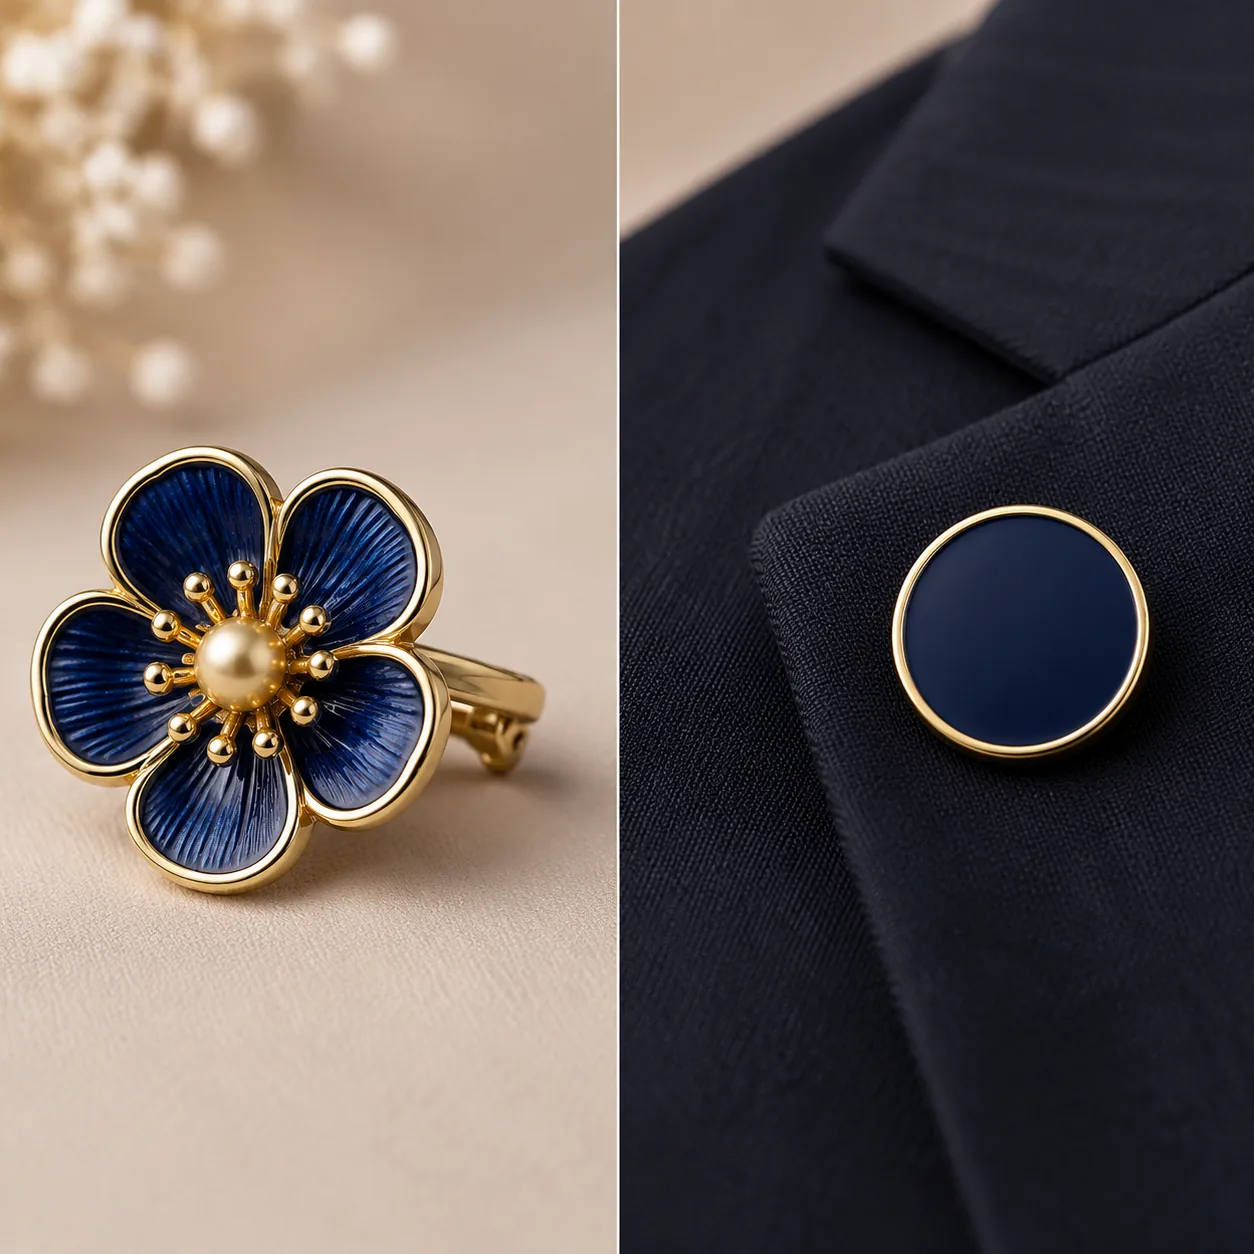
The real choice is function, not label
Buyers often say “pin” when they actually need two different products: a brooch pin for larger, decorative wear, or a lapel pin for compact branding on jackets, blazers, and uniforms. The wrong choice usually shows up after sampling as sagging, rotation, scratched plating, or artwork that is too small to read cleanly. The right decision starts with garment load, visibility, and attachment performance, not with the logo alone.
In factory terms, the split is practical. Brooch-style pieces usually run 35-60 mm, with fashion or statement items sometimes reaching 70 mm, and they often need stronger post layout or a dual-post build if the body is heavy. Lapel pins are typically 18-32 mm, with 35 mm as a realistic ceiling for everyday wear, and are optimized for a low profile, clean front presentation, and efficient daily use. If you choose based on how the item will move on fabric, the rest of the spec becomes much easier to lock down.
For custom metal production from a Yiwu factory such as ZheCraft, both formats can be made as die-struck, soft enamel, or hard enamel. The meaningful difference is not decoration method but how much surface, weight, and backing support the application can tolerate without looking crooked or feeling cumbersome.
Side-by-side spec range
Use this comparison before requesting quotes. The ranges below reflect common production realities for custom metal pins, not fine jewelry fabrication. Exact values vary by mold geometry, plating family, and artwork complexity.
| Spec | Brooch pin | Lapel pin |
|---|---|---|
| Typical size | 35-60 mm; fashion pieces may go to 70 mm | 18-32 mm; 35 mm is usually the practical ceiling |
| Typical thickness | 1.5-2.5 mm | 1.2-2.0 mm |
| Usable line width | 0.25-0.35 mm standard; 0.20 mm only with fine tooling | 0.25 mm preferred; below 0.25 mm becomes crowded fast |
| Front detail tolerance | ±0.15-0.20 mm | ±0.10-0.15 mm |
| Weight target | 8-20 g; above 12-15 g usually needs stronger support | 3-10 g; above 8-10 g check backing hold |
| Best backing | Dual post, military clutch, or safety-pin style | Butterfly clutch, rubber clutch, or magnet |
| Common plating | Nickel, black nickel, gold, antique brass | Nickel, gold, black nickel, antique silver |
| MOQ tier | 300-500 pcs standard; 200 pcs possible for repeat tooling | 500 pcs standard; 300 pcs possible on simple repeats |
| Sample lead time | 12-18 days | 10-15 days |
| Mass production lead time | 18-25 days | 15-22 days |
| FOB price range | USD 0.85-3.20 per pc | USD 0.35-1.80 per pc |
| Main risk | Rotation, sagging, over-weight feel | Tiny artwork, weak attachment, plating scuff |
| Best use | Ceremonial wear, women’s accessories, premium gifts | Uniform branding, promotions, simple retail SKUs |
Where brooch pins win
Brooch pins make sense when the piece is meant to be read as an accessory, not just a logo carrier. The larger canvas allows layered silhouettes, raised relief, mixed plating, cutouts, dangling elements, and more legible typography. If the brand wants the item to feel like a fashion object or collector piece, brooch format gives you room to build perceived value without squeezing the artwork into a small field.
The main trade-off is weight management. Once the finished piece goes above roughly 10-12 g, a single standard butterfly clutch can start to tilt on soft fabric, especially on blazers, knitwear, or scarves. For pieces over 12-15 g, dual posts with 25-28 mm spacing are usually the safer spec, or a higher-friction fastening option if the garment is delicate. The real failure mode is not loss; it is rotation and wearer annoyance.
Brooch work is also less forgiving on cost. Larger die area increases tooling exposure, and the extra plating surface adds cost and handling time. A sculptural 50 mm brooch with two-tone plating will almost always cost more than a flat 25 mm lapel pin, even when the decoration count is similar. If the artwork is tiny or purely typographic, brooch format is usually the wrong answer.
Where lapel pins win
Lapel pins are the better procurement choice when consistency, speed, and cost matter more than visual drama. A simple logo in 20-25 mm can be read cleanly, die-struck or stamped, and worn every day without pulling the garment. For events, sales teams, hotels, clubs, and internal recognition programs, this is usually the most efficient format.
The advantage is control. Smaller pins can hold tighter line work, use thinner profiles, and ship with lower breakage risk because there is less leverage on the backing. In production, a 20-25 mm lapel pin at 1.2-1.5 mm thickness with one post is often the sweet spot for repeat orders, especially when the buyer wants stable color matching and predictable pricing across multiple branches.
The weakness is visible space. If the artwork includes long words, detailed mascots, or multiple small color blocks, a lapel pin can become cramped fast. Once the minimum legible line width drops below about 0.25 mm, the quote may still be possible, but the finished piece often looks busy or requires simplification. For soft enamel especially, too many small compartments can make the fill uneven.
Backing, plating, and wear are not cosmetic details
Backing choice should follow garment weight and daily handling, not preference. Butterfly clutches are low cost and work well for light lapel pins under about 8-10 g, but they can loosen with frequent use. Rubber clutches are more comfortable and slightly more forgiving. Magnets avoid fabric piercing, but they add cost and are not suitable for thick coats, heavy brooches, or windy outdoor wear.
Plating should be selected for appearance, abrasion resistance, and the brand context. For general promotional use, nickel plating is the most common neutral silver tone; gold and antique brass are chosen when the brief calls for a warmer or more premium look. Decorative metal pins are often specified with plating thickness around 0.08-0.12 μm for the visible finish layer, while higher-durability requests may ask for a thicker top coat or an added clear protective layer. If the item will be handled often or stored in humid conditions, ask about anti-tarnish packaging and salt-spray expectations.
Tolerance matters too. A pin that is beautifully plated but cut with poor edge control still feels cheap in hand. For custom enamel pins, buyers should confirm edge polish, recess consistency, post alignment, and surface flatness before bulk approval. As a working target, many factories aim for a post-center tolerance within ±0.20 mm and visible edge burrs kept below 0.05 mm after polishing. A well-balanced 25 mm lapel pin with correct post placement often looks more premium in use than a flashy brooch that rotates on the jacket.
Artwork and line detail change the answer
If the logo relies on small text, brooch format gives you more room to breathe, but only if the size increase is real. In practice, a 10 percent bump in overall size rarely solves a legibility issue. Useful gains usually begin around 30-35 mm, with strokes no thinner than 0.25 mm for standard stamping and 0.20 mm only when the factory is confident in fine tooling and controlled filling.
For lapel pins, simplification is often the better strategy. Remove unnecessary internal borders, avoid stacking too many enamel colors, and keep tiny enclosed areas to a minimum, especially for soft enamel. Hard enamel can tolerate a cleaner, flatter look, but it also tightens the visual margin because the surface is polished flush and any proportion issue becomes more obvious.
A practical rule: if the finished pin will be under 25 mm, avoid multiple words, tiny date lines, and nested outlines. If the design must include all of those elements, move up to brooch scale or simplify the layout before tooling. A proof at actual size is essential; what looks balanced on screen may feel crowded once reduced to 22 mm. For an exact approval, ask the supplier to place the art on a 1:1 template and confirm minimum stroke width, negative-space gaps, and text height before mold cutting.
Production cost and MOQ reality
For standard custom metal work, brooch pins generally carry higher tooling and unit cost because the surface area, plating exposure, and packing needs increase together. A simple lapel pin may land around USD 0.35-1.80 FOB depending on size, color count, post count, and backing, while a brooch-style piece commonly falls in the USD 0.85-3.20 range. The gap widens when the design includes dual posts, moving parts, or mixed finishes.
MOQ also tends to split along complexity. Simple lapel pins can sometimes be run at 300-500 pcs if the shape is standard and the design is already proven, while brooch pieces often start more comfortably at 500 pcs because setup effort is harder to recover at low volume. If the order includes multiple SKUs, it is usually smarter to standardize the base construction and vary only the artwork or plating color.
Lead time follows the same logic. A clean lapel pin sample may be ready in 10-15 days, with mass production in another 15-22 days. Brooch versions may need 12-18 days for sampling and 18-25 days for bulk. If you are working to an event date, choose the simpler form unless there is a strong brand reason not to. For urgent repeat orders, ask whether the factory can reuse an existing mold; that can cut sample time by several days and reduce setup charges.
How to choose in practice
The fastest way to decide is to score the product against five questions: how large is the logo, how heavy will the item be, how often will it be worn, how formal is the setting, and how sensitive is the budget. If three or more answers point toward visual presence and premium perception, brooch is probably the right direction. If three or more point toward low-cost distribution, daily wear, and standard uniform use, lapel pin is usually the safer choice.
- Choose brooch pin when the piece needs to look like an accessory, not just branding.
- Choose lapel pin when daily wear, budget control, and low profile matter most.
- Use dual posts if the item is wide, heavy, or prone to rotation.
- Avoid tiny text if the finished size will be under 25 mm.
- Ask for an actual-size artwork proof before approving tooling.
One practical warning: do not force a brooch specification just to make a small logo feel premium. If the design is too small to benefit from the larger format, you are paying for extra metal surface and handling without getting better readability. In those cases, a refined lapel pin with better plating and cleaner presentation often performs better in the field.
What to do next
If you already have artwork, send the supplier the intended wear context, target size, expected weight, preferred backing, and preferred finish along with the design. Ask for two quotes on the same logo: one in lapel-pin format and one in brooch format, both with the same plating family and backing assumptions. That comparison usually makes the right choice obvious within one round.
If you are sourcing through ZheCraft, the most efficient next step is a spec check before sampling: size, thickness, post count, backing type, plating finish, intended fabric use, and acceptance criteria for line width and polish. That lets the factory flag rotation risk, suggest a better attachment, and keep the sample closer to approval on the first pass. For most programs, the decision comes down to whether you need a compact branding tool or a wearable statement piece.
Have a project? Send your artwork and target quantity and we’ll reply with a detailed quotation within 12 working hours.
Ready to get this made?
Send your sketch, target quantity and ship-date. Detailed quotation in 12 hours.


