Brooch Pin Specs That Prevent Sagging, Rotation and Fabric Damage
Why brooches fail even when the front artwork looks correct
A brooch can match the approved artwork and still fail in use. The common problems are nose-down sagging, rotation, opened catches, snagged knitwear and permanent holes in shirts or uniforms. These are not usually enamel or logo problems. They come from an incomplete mechanical specification: weight, center of gravity, pin span, attachment strength, rear clearance and the garment fabric were not controlled together.
For procurement teams buying staff badges, retail merchandise, hotel uniform pins or event gifts, these failures become returns even when color, plating and packaging pass inspection. A 45 mm zinc alloy brooch that weighs 32 g may sit acceptably on a wool coat but pull a cotton polo out of shape. A wide horizontal logo may rotate on one short pin even if the solder joint is strong. The RFQ must therefore define the attachment system as part of the product, not as a generic accessory.
| Failure mode | Typical root cause | Practical control point |
|---|---|---|
| Brooch tips forward | Center of gravity too far below pin line | Keep center of gravity within 5-8 mm of attachment line on pieces over 35 mm |
| Brooch rotates | Single short pin on wide or asymmetric shape | Use bar pin or two pins when width exceeds 40-45 mm |
| Fabric tears | Heavy item or oversized pin stem on light fabric | Keep shirt brooches under 12 g and use 0.8-1.0 mm stem |
| Catch opens | Short engagement or weak safety catch | Require 4-6 mm locked engagement and cycle test |
| Visible holes | Dense metal brooch on thin woven fabric | Use lighter stamped construction or magnet where safety rules allow |
Start the spec with garment type and target weight
The first engineering input is not the brooch diameter; it is the garment. For shirts, scarves, thin event T-shirts and silk-look uniforms, specify a finished weight of 6-12 g, metal thickness of 1.0-1.5 mm for stamped brass or iron, and a smooth rear face with minimal protrusions. Avoid thick cast relief, heavy stones and bottom-hanging elements unless a magnet or support card is part of the design.
For blazers, hotel uniforms and medium-weight jackets, a more useful range is 25-50 mm overall size, 1.5-2.5 mm metal thickness and 12-28 g finished weight. Wool coats, felt hats and ceremonial sashes can tolerate 25-45 g, but only when the attachment span is long enough and the back does not have sharp solder overflow. Above 30 g, the brooch should be treated as a load-bearing assembly and tested on the actual fabric.
Large size does not always improve branding. On soft fabric, an oversized brooch tilts away from the viewer, reducing the visible logo area and making the product look cheaper. If the artwork requires strong visibility on a light garment, a thinner stamped brooch, woven patch, PVC badge or embroidered emblem may perform better than a heavy cast metal piece.
- State the target garment and fabric weight in the RFQ, not only the brooch size.
- Set both target weight and maximum approved weight, for example target 10 g and maximum 12 g.
- Require a wear photo on comparable fabric before approving production.
- For pieces wider than 45 mm, review bar pin or dual-pin options before tooling.
- Reject samples that sag more than 10 degrees after 30 minutes on the intended garment.
Control balance before tooling is cut
Weight distribution matters as much as total weight. A 38 mm brooch at 16 g can wear well if the pin line sits near the center of gravity. A 14 g brooch can still tip forward if most of the mass is in a lower pendant, thick lettering, rhinestone cluster or sculpted flower. For most commercial brooches, the pin line should pass through or slightly above the visual center. If the visual center is more than 8-10 mm below the pin line on a 40 mm design, expect outward tipping on soft fabric.
Ask the supplier to estimate weight before tooling from CAD volume and material density. Brass is about 8.4-8.7 g/cm3, iron about 7.8 g/cm3, and zinc alloy about 6.6-7.1 g/cm3. Zinc is less dense than brass but cast zinc parts are often thicker, so finished weight can still be higher. A 50 mm cast zinc brooch at 3.0 mm average thickness can exceed 30 g unless the back is hollowed or the profile is reduced.
Useful design corrections include moving the hinge and catch lower, extending the attachment span, hollowing the rear cavity, reducing relief height, changing from cast zinc alloy to stamped brass, or splitting one large motif into two linked sections. These changes are inexpensive before production tooling is approved and expensive after a golden sample has been signed.
| Overall size | Recommended finished weight | Typical attachment span | Notes |
|---|---|---|---|
| 20-30 mm | 6-10 g | 16-22 mm | Suitable for shirts if edges are rounded |
| 30-40 mm | 10-18 g | 22-28 mm | Common corporate and retail size |
| 40-55 mm | 18-28 g | 28-38 mm | Use bar pin for horizontal or asymmetric shapes |
| 55-70 mm | 28-45 g | 38 mm or dual support | Wear trial required; avoid light garments |
| Over 70 mm | Case-specific | Dual pin, bar or stitched support | Treat as fashion hardware, not a standard lapel pin |
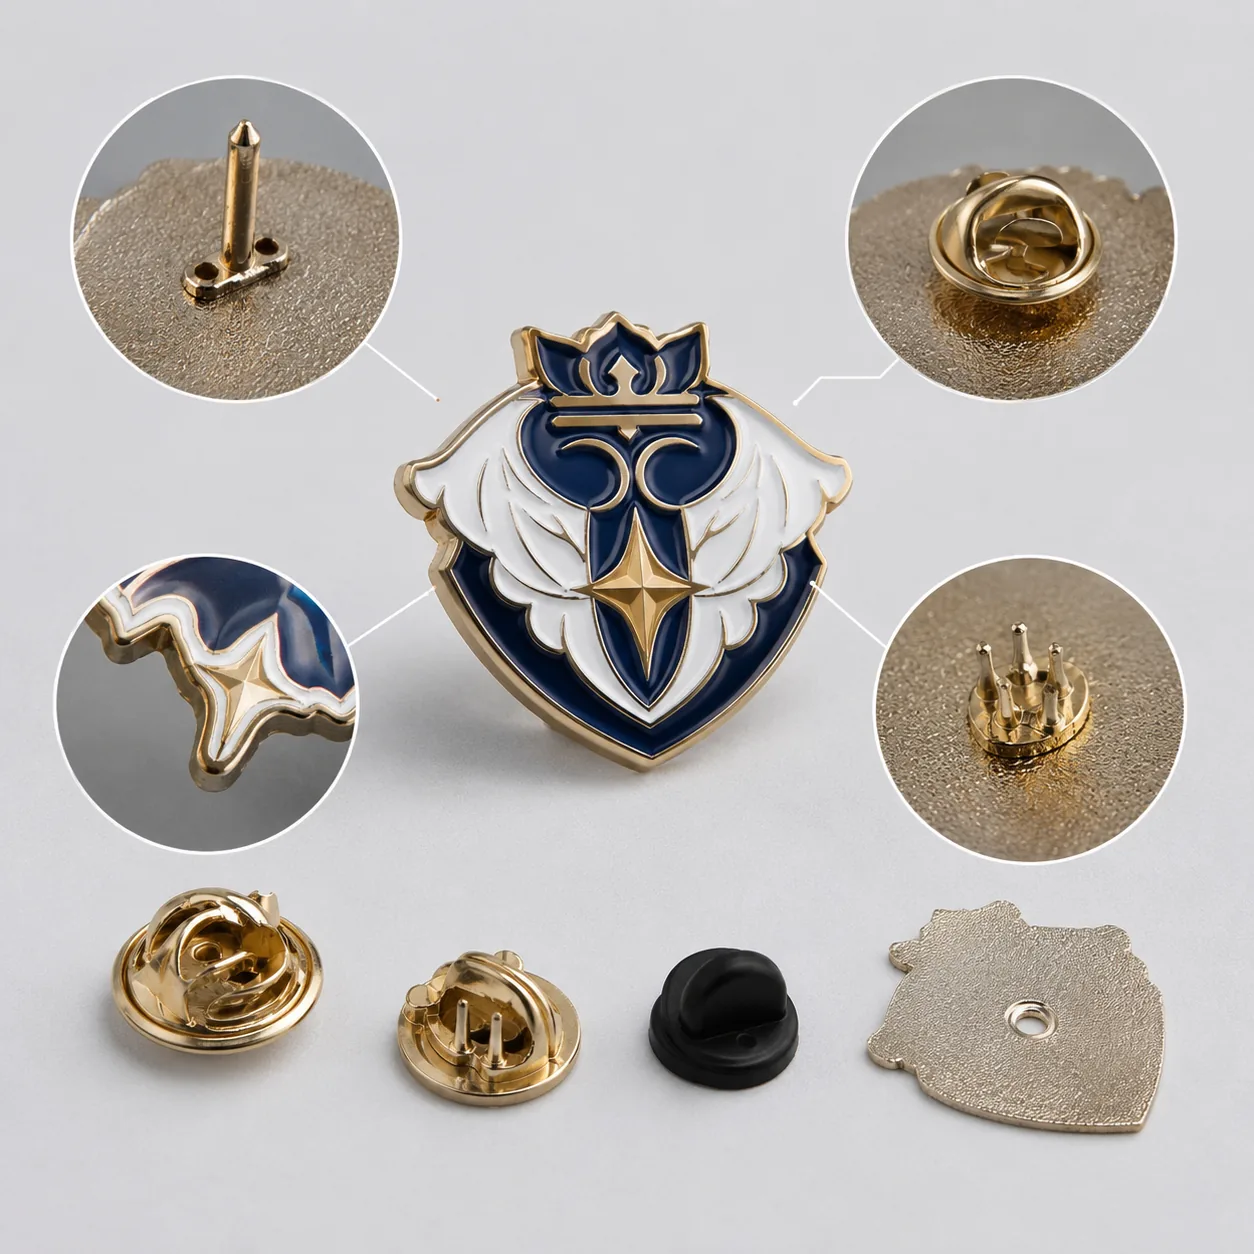
Choose the backing by fabric, safety risk and retention need
A standard brooch safety pin is suitable for many 25-55 mm pieces on jackets, coats and backing cards. Typical pin stem diameter is 0.8-1.1 mm, with an 18-35 mm usable pin length and a rotating safety catch soldered, brazed or riveted to the rear. For light garments, keep the stem near 0.8-0.9 mm; for heavier uniform pieces, 1.0-1.2 mm may be acceptable if the fabric is dense.
A bar pin gives a longer support line, usually 25-40 mm, and is better for name brooches, horizontal logos and shapes that would rotate around one point. Two nail pins with clutches reduce rotation but create two holes and slow down fitting. Rubber clutches are comfortable but can loosen over repeated use; metal butterfly clutches hold better but may scratch delicate liners if poorly finished.
Magnets avoid fabric puncture but are not a universal upgrade. They add 3-7 mm rear thickness, increase unit cost and require safety warnings for children and users with medical devices. Common decorative brooch magnets use N35-N42 grades, often 10-15 mm diameter per magnet. Stronger magnets improve hold but can pinch fabric, crack brittle enamel if snapped together, and complicate air freight documentation in some shipping lanes.
Screw backs are appropriate when loss prevention matters more than convenience, such as ceremonial uniforms, caps and security badges. Use M2-M3 threads with a smooth nut or rubber cap. They are slow for retail customers and can damage fabric if overtightened, so they should not be the default for promotional brooches.
| Backing type | Best use | Typical specification | Main trade-off |
|---|---|---|---|
| Safety pin with catch | Fashion brooches and coat badges | 0.8-1.1 mm stem; 18-35 mm pin length | Can sag if placed too high |
| Bar pin | Horizontal logos and 35-60 mm badges | 25-40 mm bar; two solder points | Higher cost and larger rear profile |
| Two nail pins | Small rigid anti-rotation badges | 0.9-1.2 mm posts; 8-10 mm length | Two visible puncture points |
| Magnet pair | Delicate fabric and VIP gifts | N35-N42; 10-15 mm magnets | Safety warnings and added thickness |
| Screw back | Uniforms and high-retention use | M2-M3 thread; capped nut | Slow fitting and fabric compression |
Specify pin span, solder pads and rear clearance
The hinge-to-catch span is a controlled dimension, not a detail to leave to the factory. A 40 mm round brooch normally needs 24-30 mm between hinge and catch. A 55 mm horizontal brooch usually needs 32-38 mm or a bar pin. When the support span is too short, the piece rotates, lifts at the edges and concentrates stress around the puncture hole.
Solder pad geometry should be visible on the technical drawing. For zinc alloy cast backs, reserve a flat pad of at least 5 x 8 mm for each hinge or catch location. For bar pins on pieces over 35 mm wide, use two solder points, each with clean metal contact and no enamel, texture or recessed logo under the joint. On stamped brass or iron, the rear area should be flat enough for consistent welding without heat marks telegraphing through the plated front.
Rear clearance affects packaging and damage rates. A safety pin assembly generally adds 4-7 mm behind the brooch. A magnet back can add 3-6 mm, and a screw back may require 6-10 mm including the nut. If the gift box insert or retail card is designed before the sample is measured, the pin may press against the lid, bend in transit or tear the card slot.
- Lock hinge-to-catch span in millimeters on the approved drawing.
- Keep solder pads flat and free of enamel, sand texture or deep engraving.
- Allow 4-7 mm rear clearance for safety pins and up to 10 mm for screw backs.
- Specify two solder points for bar pins on pieces over 35 mm wide.
- Reject sharp solder overflow, raised gate marks or exposed wire ends that can abrade fabric.
Material, plating and edge finish affect wearability
Stamped brass is a strong choice for premium brooches requiring clean edges, moderate weight and reliable plating. Typical thickness is 1.2-1.8 mm. Stamped iron is cost-effective for simple shapes but needs good plating coverage and corrosion control, especially for humid markets. Zinc alloy is best for 3D relief and sculpted fashion shapes, usually 2.0-4.0 mm thick, but weight and rear smoothness must be controlled.
Decorative plating should be specified by finish and thickness. Budget flash gold may be only 0.03-0.05 microns and can wear quickly on high-touch items. A more durable decorative gold layer is commonly 0.1-0.3 microns over nickel or copper underplate. Nickel or copper underlayers are often 3-5 microns depending on base metal and finish. If the product may touch skin for long periods, specify nickel-free or low-nickel compliance separately; do not assume gold, silver or black nickel finishes are skin-safe by default.
Edges need measurable limits. For adult apparel, specify a minimum outside corner radius of 0.25 mm; for knitwear, scarves or hospitality uniforms, use 0.5 mm where the shape allows. On cast pieces, require gate removal marks to be polished below 0.1 mm raised height in fabric-contact areas. For epoxy-coated soft enamel, require no overflow beyond the metal rim and no visible bubbles larger than 0.3 mm. Hard enamel or polished metal may be cleaner for brooches used around hair, scarves and loose fibers.
| Construction | Typical thickness | Indicative MOQ | FOB range at 500 pcs |
|---|---|---|---|
| Stamped iron with enamel | 1.2-1.6 mm | 100-300 pcs | USD 0.65-1.25 |
| Stamped brass with enamel | 1.2-1.8 mm | 100-300 pcs | USD 0.95-1.90 |
| Cast zinc alloy 2D relief | 2.0-3.0 mm | 300 pcs | USD 1.10-2.50 |
| Cast zinc alloy 3D relief | 2.5-4.0 mm | 300-500 pcs | USD 1.60-3.90 |
| Magnetic brooch assembly | Base plus 3-7 mm magnet | 300 pcs | USD 1.50-3.80 |
Sampling and QC must test function, not only appearance
A proper brooch sample approval includes front, back, side and worn-angle photos; finished length and width; rear assembly height; finished weight; pin span; and packaging fit. Use tolerances that can be inspected: length and width ±0.2 mm for most enamel brooches, thickness ±0.15 mm, pin span ±0.5 mm and finished weight ±5 percent after the golden sample is approved. Very small parts or hand-polished sculpted designs may need a wider cosmetic tolerance, but functional dimensions should remain fixed.
For attachment strength, specify a simple pull and cycle test. Normal promotional brooches should withstand a 2 kg static pull for 10 seconds without detaching, cracking solder or permanently bending the pin. Heavier uniform brooches may need 3-5 kg, but higher requirements require larger solder pads or a different backing. Open and close safety catches 20 times on inspected samples to check catch tension and alignment.
For mass production, AQL 2.5 for major defects and AQL 4.0 for minor cosmetic defects is a practical starting point. Major defects include wrong backing, detached hinge, loose catch, plating peel, sharp burrs, missing enamel, incorrect logo, cracked epoxy, wrong color family or weight outside the approved range when it affects wear. Minor defects include fine polishing lines, tiny dust specks under 0.2-0.3 mm and backside marks not visible during wear.
- Approve a sealed physical golden sample or a numbered photo set showing all sides.
- Measure at least 13 pieces from a 500-piece lot or follow the agreed AQL plan.
- Test sag angle on the actual garment fabric for uniform or event orders.
- Check pin alignment by placing the brooch on a flat surface and viewing from the side.
- Confirm retail cards, foam inserts and gift boxes do not crush the rear assembly.
MOQ, pricing and lead-time expectations for RFQs
For custom metal brooches, MOQ commonly starts at 100 pcs, but 300-500 pcs is where unit prices become more stable. At 100 pcs, mold, artwork setup and plating minimums dominate the cost. A 35 mm stamped brass enamel brooch may be USD 1.80-3.30 FOB at 100 pcs excluding mold, then fall to USD 0.95-1.90 FOB at 500 pcs depending on color count, plating, backing and packaging. Tooling is commonly USD 50-180 for simple 2D dies and USD 120-350 or more for complex 3D molds.
A realistic schedule is 3-5 days for artwork and engineering confirmation, 7-10 days for tooling and pre-production samples, and 12-20 days for mass production after sample approval. Complex 3D sculpting, nickel-free plating, antique finishing, rhinestone setting or magnet trials can add 3-7 days. Changing from safety pin to magnet after sampling can reset price, packaging design and lead time because rear clearance and balance change.
Packaging should be quoted with the brooch, not added at the end. A polybag is often USD 0.02-0.05, an OPP bag with printed backing card USD 0.05-0.18, and a small gift box USD 0.35-1.20 depending on foam, insert cut and print. For export cartons, specify that brooches cannot be packed under compression that bends pins or snaps magnets together.
Before sending an RFQ, prepare one page with artwork size, garment type, target and maximum weight, material preference, backing type, plating thickness or finish, edge requirements, packaging method, inspection standard and required delivery date. If balance is uncertain, ask for two sample options, such as safety pin versus bar pin, and test both on the final garment for at least 30 minutes. The cheapest quote is only comparable if it controls the same wear performance, attachment strength and fabric risk.
Have a project? Send your artwork and target quantity and we’ll reply with a detailed quotation within 12 working hours.
Ready to get this made?
Send your sketch, target quantity and ship-date. Detailed quotation in 12 hours.


