Adhesive Specs for Custom Magnets, Badges and Nameplates
1. Define the Real Application Surface First
Most adhesive failures on custom magnets, badges and nameplates start with an incomplete RFQ, not a defective tape. “Adhesive backing” is not a specification. A fridge magnet laminated to powder-coated steel, a zinc alloy badge fixed to an ABS event case, and a vehicle emblem applied to painted metal outdoors all need different adhesive behavior. If the factory is not told the surface, it will normally quote a standard double-sided acrylic or PET tape suitable for clean, flat indoor use. That choice may pass a desk inspection and still fail on texture, oil, curvature, low temperature or plasticizer migration.
State the final bonding surface in plain terms: painted steel, stainless steel, ABS, PC, PVC, PP, PE, glass, coated paperboard, leather, fabric, ceramic tile, refrigerator coating or automotive paint. Low-surface-energy plastics such as PP and PE need a different adhesive or primer; many standard acrylic tapes that bond well to metal will show weak peel on PP. For painted surfaces, identify whether the paint is powder coat, baked enamel, UV coating or soft-touch coating, because gloss, roughness and additives change wet-out.
Add service conditions before tape selection: indoor or outdoor use, temperature range, expected service life, cleaning chemicals, and whether removal must be clean. For indoor promotional fridge magnets, a practical baseline is 5 to 40 C and 6 to 24 months. For outdoor badges or appliance nameplates, use at least -10 to 60 C and specify UV exposure. For automotive exterior use, do not describe the item as “car grade” unless the buyer supplies its qualification standard; a promotional acrylic foam tape test is not equivalent to OEM automotive validation.
For adhesive areas larger than 30 x 30 mm, curved backs, outdoor use or unknown plastics, we ask for the actual substrate, a customer-supplied sample panel or at minimum close photos with material notes. Tape selection can change FOB cost by USD 0.02 to 0.20 per piece, but discovering the wrong tape after plating, printing or magnet assembly usually means rework, rejected backs or full scrap.
2. Choose the Adhesive Family by Use Case
Acrylic foam tape is the safest general-purpose option for rigid metal badges, nameplates, emblem backs and magnet assemblies. It conforms to small unevenness, has good aging resistance and handles moderate thermal expansion between metal and plastic. Common thicknesses are 0.4, 0.6, 0.8 and 1.1 mm. For zinc alloy or brass parts from 1.2 to 3.0 mm thick, 0.8 mm is the usual starting point because it fills minor back variation without making the product look bulky. Use 0.4 to 0.6 mm when the back is machined or stamped flat and the profile must stay slim.
PET carrier double-sided tape is thinner and cleaner at the edge. Typical total thickness is 0.08 to 0.20 mm, with 0.125 mm common for flat acrylic labels, paperboard inserts and smooth plastic trims. It is cost-effective for light items under 10 to 15 g, but it has little gap-filling ability. Do not use it on cast metal backs with ejector marks, recessed logos, sandblasted texture, plating beads or curvature greater than 0.3 mm over a 50 mm span.
Rubber-based tape gives strong initial tack and low cost for short indoor campaigns. It can work on paper, cardboard and some plastics where immediate grip matters more than long service life. The weakness is aging: heat, UV and plasticizer migration can reduce holding strength within weeks. For metal products intended to last beyond 3 months, we avoid rubber-based adhesive unless the buyer confirms temporary indoor use and accepts limited storage life.
Magnetic sheet with pressure-sensitive adhesive is a separate construction, not just “tape plus magnet.” Flexible ferrite sheet is commonly 0.4, 0.7 or 1.0 mm thick. For printed fridge magnets under 15 g, 0.4 mm may be enough. For metal-shell magnets above 20 g, 0.7 mm or discrete ferrite/neodymium magnets are safer. Adding thicker adhesive cannot compensate for insufficient magnetic pull.
| Adhesive construction | Typical thickness | Best application | Avoid when | Typical FOB impact |
|---|---|---|---|---|
| Acrylic foam tape | 0.4 to 1.1 mm | Metal badges, emblems, rigid nameplates, magnet assemblies | Removable use, very thin packaging, dirty surfaces | USD 0.05 to 0.20 per pc |
| PET carrier tape | 0.08 to 0.20 mm | Flat acrylic, coated paperboard, smooth plastic labels | Cast backs, rough plating, curved parts, heavy badges | USD 0.01 to 0.06 per pc |
| Rubber-based tape | 0.10 to 0.30 mm | Short indoor promotions on card, paper or selected plastics | Outdoor use, heat, UV, long storage, premium metal goods | USD 0.01 to 0.04 per pc |
| Adhesive magnetic sheet | 0.4 to 1.0 mm | Fridge magnets, printed magnets, light metal-shell magnets | High pull-force requirements or non-ferrous target surfaces | USD 0.03 to 0.14 per pc |
3. Control Bond Area, Setback and Flatness
Adhesive performance is partly chemistry and partly geometry. For badges under 50 mm wide, specify adhesive coverage of at least 60 percent of the usable back area unless pins, screws, magnets, recesses or legal marks reduce the space. For die-cast badges above 25 g, increase coverage to 70 to 85 percent or use two balanced strips to resist rotation. Tall vertical nameplates should have adhesive close to the top and bottom edges, not one small patch in the center.
Edge setback should be controlled on the drawing. A 0.5 to 1.0 mm setback is practical for most die-cut tape on metal parts. If tape runs exactly to the edge, adhesive can squeeze out under packing pressure and attract dust. If the setback is too large, the part may show a visible shadow gap, lose peel resistance and lift at corners. For thin aluminium or stainless nameplates, keep the setback consistent around the perimeter so the plate does not rock during installation.
Write back flatness as a measurable tolerance. For adhesive-backed metal badges and nameplates, a practical production target is within 0.20 mm over any 50 mm length after plating, enamel fill and baking. For larger nameplates above 100 mm, use a total bow limit such as 0.40 mm over the full length unless the application surface is flexible. Zinc alloy die-cast parts may have draft, ejector marks and sink. A recessed adhesive pocket of 0.20 to 0.40 mm can locate the tape and protect the edge, but sharp pocket walls can cut foam tape during compression, so specify a small radius or softened edge.
The tape should not bridge deep cavities. If a logo, QR code or serial recess is molded into the back, keep adhesive clear of that feature or level the area. Trapped air pockets reduce wet-out and can create bubbles after heat exposure. For transparent acrylic nameplates, also check that the adhesive color and bubble pattern will not be visible from the front.
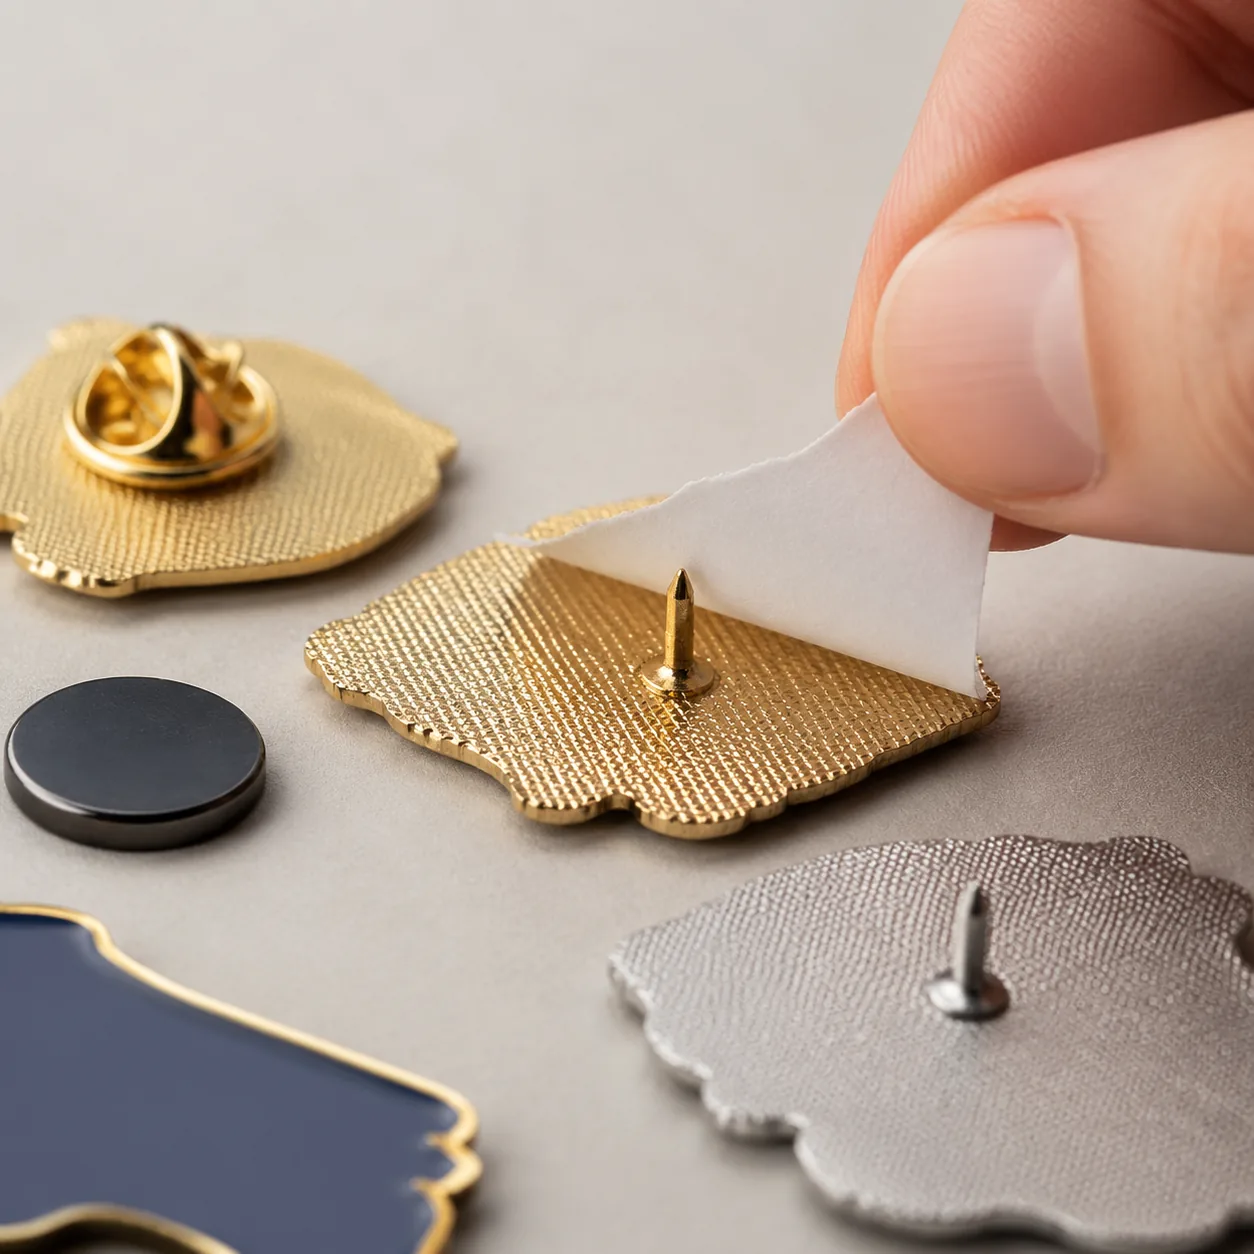
4. Specify Liner, Peel Tab and Assembly Direction
The release liner controls how easily the end user can install the product. Clear PET liner looks clean in samples but can be hard to see when staff are applying hundreds of badges at an event. White or yellow paper liner is easier to identify and lower cost, but it can tear on small die-cut shapes below 15 mm and can absorb moisture during humid storage. Red film liner is useful when the buyer wants fast visual confirmation that the adhesive backing is present.
Specify liner material, liner overhang and peel direction. A 1 mm overhang is enough for many retail items, while a 2 to 3 mm tab is better for 25 to 80 mm badges handled by staff wearing gloves. For very small labels, a split liner is usually better than a tiny side tab because it reduces fingernail damage and keeps the adhesive edge clean. For long narrow nameplates, a center split liner can help installers align one end before removing the rest.
Assembly direction matters whenever the back has a QR code, serial number, magnet pocket, logo stamp or anti-rotation feature. If the adhesive is oval, D-shaped or made from two strips, lock the orientation in the back-view drawing. The liner tab should not cover a barcode that warehouse staff must scan, and tape strips should not block screw holes or molded alignment bosses. For repeat orders, photograph the approved back assembly and keep it in the golden sample file.
- State liner type: white paper, yellow paper, red film, blue film or clear PET.
- Specify liner overhang: flush, 1 mm standard, or 2 to 3 mm easy-peel tab.
- Lock tape orientation on the back-view drawing for non-round and split-tape parts.
- Reject exposed adhesive, wrinkled liner, oil marks, dust, edge lift or off-center tape over tolerance.
- Test liner removal with gloves if the product will be installed on site during events.
- For retail packs, confirm the liner will not stick to polybags, backing cards or foam trays.
5. Set Peel, Shear and Aging Requirements
A useful adhesive specification includes test values, not only a brand name. For most promotional metal badges and nameplates, use 180-degree peel strength on stainless steel or painted metal as the baseline. A practical range is 8 to 18 N per 25 mm after 24 hours at 23 C and 50 percent RH, depending on tape type and surface. Foam tapes may show lower initial peel but stronger long-term hold after dwell time. PET tapes may feel sharp at first but fail if the back is not flat.
Pressure and dwell time should be included in the assembly instruction. Many acrylic adhesives need firm pressure, typically 10 to 15 seconds by roller or press, to wet the surface. They continue building bond strength for 24 to 72 hours. If the item will be applied immediately after unpacking and loaded vertically, tell the factory. We may recommend higher initial-tack acrylic, larger bond area or an instruction card that tells users to clean the surface, press firmly and wait before loading.
For vertical applications, add a static shear test. A common buyer-level check is 500 g load for 24 hours at 23 C with slip under 1 mm. For heavier nameplates, test at two to four times the part weight or use a defined load such as 1 kg for 24 hours. For outdoor or long-storage orders, add basic aging: 24 hours at 60 C, 24 hours at 0 C, and 24 hours at 90 percent RH, followed by visual inspection and peel comparison. For industrial or vehicle programs, 72 hours at 70 C plus UV exposure is a more realistic screen, but the buyer should provide the formal standard if certification is required.
| Test item | Practical specification | Pass condition | Use when |
|---|---|---|---|
| 180-degree peel | 8 to 18 N per 25 mm after 24 h dwell | No clean release from product back; peel remains consistent | Most adhesive-backed metal and plastic items |
| Static shear | 500 g for 24 h at 23 C | Slip under 1 mm; no liner-side adhesive transfer | Vertical badges, emblems and nameplates |
| Heat aging | 60 C for 24 h | No bubbling, adhesive flow, liner lift or edge ooze | Summer shipping, hot warehouse storage |
| Humidity aging | 90 percent RH for 24 h | No edge whitening, paper liner swelling or tack loss | Coastal delivery, paper liners, retail storage |
| Cold check | 0 C for 24 h, then room recovery | No cracking, liner separation or brittle adhesive | Winter distribution and cold storage |
| Application trial | Approved customer surface, 24 h dwell | Peel and shear meet sample approval | Unknown paint, plastics, coatings or textured surfaces |
6. Match Adhesive to Magnets, Plating and Surface Finish
Adhesive-backed magnets have two performance interfaces: adhesive-to-product and magnet-to-target. A strong adhesive does not help if the magnet is too weak for the product weight or if the target surface is stainless steel, aluminium or plastic. Flexible ferrite sheet is economical but has limited pull force. For premium metal-shell fridge magnets above 20 g, use 0.7 to 1.0 mm ferrite sheet or discrete magnets positioned to prevent tipping. For name badges worn on clothing, a magnetic clasp system is different from a fridge magnet and should be specified by magnet grade, magnet count and back plate size.
Plating and polishing affect adhesion. Highly polished nickel, gold, chrome and black nickel can be slick, and polishing compound residue, oil or fingerprints sharply reduce wet-out. For adhesive zones, specify clean, dry, no wax, no silicone oil and no anti-rust oil before tape application. If the back is hidden, avoid paying for mirror polishing under the adhesive. A controlled matte, brushed or lightly textured back can improve bond consistency and reduce cosmetic rejects.
Decorative plating thickness on zinc alloy, brass or iron badges is commonly 3 to 8 microns for the visible finish, often over a nickel underlayer. For adhesive-backed outdoor nameplates, corrosion resistance may matter more than brightness on the back. If the adhesive covers the full back, confirm whether plating must extend under the tape for corrosion protection or whether a masked/controlled finish is acceptable. Do not allow loose enamel residue, plating burrs or black oxide dust in the adhesive area; these become a weak boundary layer.
Packing pressure is another hidden variable. Foam tape can take a compression set if heavy cartons sit in a hot warehouse. For bulky metal badges, use divider cards, trays or alternating orientation so liner tabs do not dent neighboring parts. For magnetic products, keep parts from snapping together during transit, because impact can shear the adhesive before the buyer opens the carton.
7. Quote MOQ, Lead Time, Price and Inspection as Line Items
Adhesive choice affects MOQ because factories and tape converters stock only certain widths, thicknesses and liner types. Standard PET tape on simple enamel pins, acrylic labels or small badges may be possible from 100 to 300 pieces. Standard acrylic foam tape is usually practical from 300 to 500 pieces if the shape is rectangular or can be cut from stocked rolls. Branded foam tape, custom die-cut adhesive shapes, split liners and non-standard colors usually push MOQ to 500 to 1,000 pieces because a cutting die, knife file or digital cutting setup is required.
Normal lead time for adhesive-backed custom metal items is 12 to 18 production days after artwork approval for 300 to 1,000 pieces, excluding international shipping. Add 2 to 4 days for testing on a customer-supplied surface and 5 to 7 days for a physical pre-production sample using the exact tape, liner and packing method. If plating, enamel curing or UV printing is involved, adhesive should be applied only after the back is clean and fully cured. Same-day adhesive assembly followed by immediate ocean shipment is risky for high-value nameplates because the tape has not completed dwell and the cartons may face heat and compression.
FOB Yiwu or Ningbo price depends on size, metal, finish and packaging, but the adhesive can still change margin. A 40 mm zinc alloy badge with standard PET tape may be USD 0.55 to 1.20 per piece at 500 pieces. A 55 mm enamel badge with 0.8 mm acrylic foam tape is often USD 0.90 to 1.80. An 80 mm zinc alloy or aluminium nameplate with foam tape, plating and individual bagging may be USD 1.40 to 3.80. Custom adhesive cutting, surface testing and printed installation cards can add USD 30 to 120 setup or USD 0.02 to 0.10 per piece.
Inspection should separate cosmetic issues from functional adhesive defects. Use AQL 2.5 for major defects and AQL 4.0 for minor defects unless the buyer has a stricter standard. Major defects include missing tape, wrong tape type, adhesive on the wrong side, exposed adhesive, contaminated liner, tape offset over 1.0 mm, liner lift over 3 mm, failed peel/shear check or adhesive covering QR codes, screw holes or magnet pockets. Minor defects include liner scuffs, small color variation, tab length variation within 1 mm, and tape offset from 0.5 to 1.0 mm when function is unaffected.
8. RFQ Template for a Factory-Ready Adhesive Spec
Send more than front artwork. A factory-ready RFQ needs a back-view drawing with adhesive outline, tape thickness, liner direction, edge setback, product weight target and application surface. Include indoor or outdoor rating, service temperature, expected service life, permanent or removable use, and any cleaning or surface-preparation instruction the end user will receive. If the buyer controls the final surface, send a sample panel so the tape can be tested before mass production.
For first production, request one assembled adhesive-backed sample and one unassembled back sample. The unassembled sample lets the buyer inspect back flatness, plating residue, recess depth and tape shape before these details are hidden by the liner. For reorders, lock the adhesive family, thickness, liner color, tape layout, inspection limits and packaging method in the golden sample record. Purchasing should not be able to approve a cheaper tape just because the front artwork looks the same.
A complete RFQ line is: adhesive-backed zinc alloy badge, 55 x 38 x 2.0 mm, target weight under 28 g, indoor painted steel application, 0.8 mm acrylic foam tape covering at least 70 percent of back area, 0.8 mm edge setback, back flatness within 0.20 mm over 50 mm, white paper liner with 2 mm peel tab facing down, 180-degree peel 8 N per 25 mm minimum after 24 hours, static shear 500 g for 24 hours with slip under 1 mm, AQL 2.5 major and 4.0 minor. With those details, the factory can quote the correct tape, flag surface risks before tooling and avoid attractive parts that fail after delivery.
Have a project? Send your artwork and target quantity and we’ll reply with a detailed quotation within 12 working hours.
Ready to get this made?
Send your sketch, target quantity and ship-date. Detailed quotation in 12 hours.


