Adhesive Bonding Specs for Custom Magnets and Badges
Why Badge Backs Fail After Approval
A magnet badge can pass artwork approval, plating inspection and retail packing checks, then fail after one trade show or a few weeks in a warehouse. The visible part still looks acceptable, but the magnet, brooch plate, rubber pad or steel backing disk separates from the product. In most cases the cause is not simply “bad glue.” The root cause is an incomplete bonding specification.
Custom metal badges, enamel pins converted to magnets, souvenir fridge magnets and glued brooch fittings all use the adhesive joint as a structural feature. That joint must resist shear, peel, heat, carton compression, plating residue, hand oil and repeated handling. If the RFQ only says “add magnet” or “glue pin on back,” the factory must choose the adhesive, surface preparation, fixture pressure, cure time and test method without knowing the service conditions.
Bonding risk rises when one project combines plated zinc alloy, soft enamel, epoxy coating, rubber magnets, retail cards and mixed metal accessories. A safer buying process defines the bonding stack before sampling, verifies it with destructive tests, then repeats the same adhesive and cure conditions in bulk production. Photos alone are not enough because a clean-looking joint can still have poor adhesion at the plated surface.
Common Bonding Locations and Load Limits
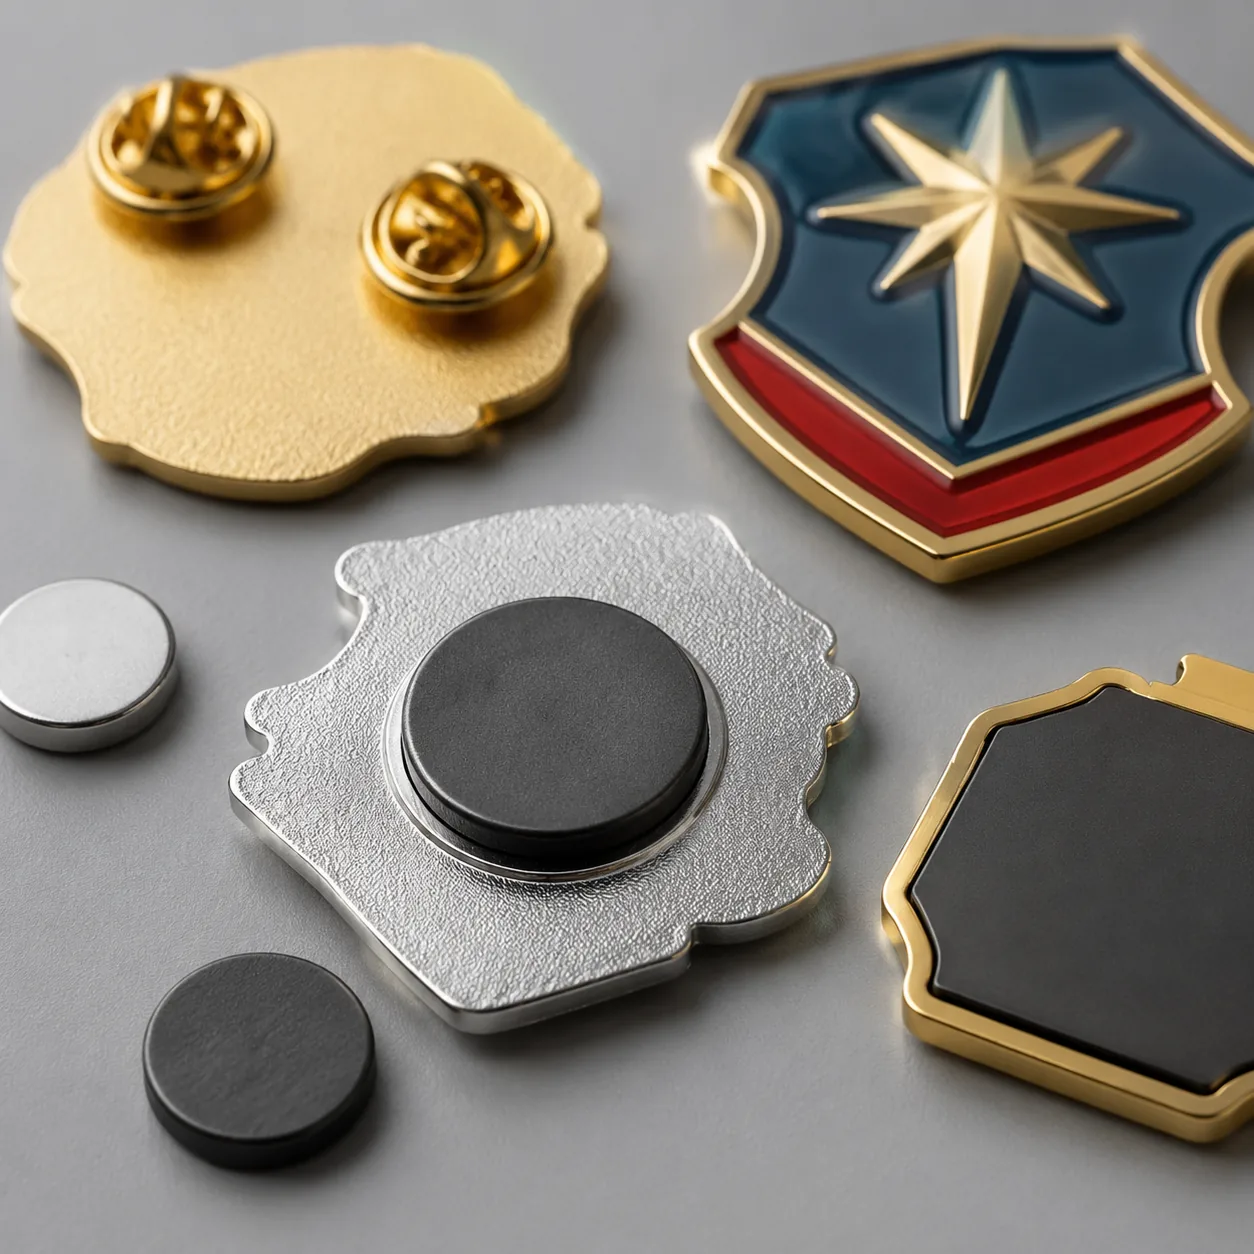
Adhesive is used on more than fridge magnets. Typical applications include brooch pin plates on zinc alloy badges, neodymium magnets on enamel badges, steel plates for magnetic name badges, rubber magnets laminated to metal fronts, acrylic charms with metal fittings, and decorative bottle-opener magnets. Bond areas may range from a 6 mm diameter magnet to a 45 mm by 25 mm steel plate.
The load direction is the main design issue. A flat fridge magnet normally sees shear when it sits on a refrigerator, but peel when the user lifts it from a corner. A brooch plate on a 45 mm badge sees peel and twisting when fabric moves. A magnetic name badge worn through a jacket sees shear, peel and sliding force. Adhesives usually perform much better in flat shear than in peel, so a wider, flatter joint is more reliable than a small high-strength dot of adhesive.
As a practical limit, avoid small bonded contact areas on heavy metal parts. For zinc alloy or iron badges above 35 g, specify either a brooch plate at least 18 mm by 6 mm or two neodymium magnets of 10 mm to 12 mm diameter. For pieces above 55 g, discuss soldering, rivets, screws, molded recesses or mechanical encapsulation instead of relying only on adhesive.
| Use Case | Typical Bond Area | Recommended Adhesive | Practical Limit | Avoid When |
|---|---|---|---|---|
| Rubber magnet to metal front | At least 60% of back area | 0.2-0.5 mm foam PSA or epoxy | Best below 80 g indoors | Outdoor heat, corner-only contact or oily coating |
| Neodymium magnet to plated badge | 8-15 mm diameter per magnet | Two-part epoxy | One magnet best below 45 g | Heavy badges worn through thick fabric |
| Brooch plate to zinc alloy badge | 18 x 6 mm to 30 x 8 mm | Epoxy; solder plus adhesive for high load | Glue-only best below 50 g | Premium brooches needing long wear life |
| Steel plate for magnetic name badge | 25 x 8 mm to 45 x 12 mm | Epoxy or acrylic structural adhesive | Needs flat bonding zone | Curved backs without fixture pressure |
| Acrylic charm to metal fitting | 10 x 10 mm or larger | UV adhesive or clear epoxy | Decorative load only | Load-bearing keychain joints |
Select Adhesive by Load, Heat and Surface
The three common adhesive families are pressure-sensitive adhesive, two-part epoxy and acrylic structural adhesive. Pressure-sensitive adhesive is fast, clean and low cost, but it needs broad flat contact and firm assembly pressure. Two-part epoxy gives better gap filling and stronger adhesion to rough metal, but it needs mix control, cure time and clean surfaces. Acrylic structural adhesive can handle impact and mixed materials well, but odor, open time and compatibility with paint or plastic must be checked before bulk production.
For indoor fridge magnets under 50 g, a 0.2 mm to 0.5 mm foam pressure-sensitive adhesive can be suitable if the magnet covers most of the back and finished goods are stored below 40 degrees Celsius. For metal badges, challenge coin magnets, brooch plates and small neodymium magnets, two-part epoxy is normally safer. A practical production spec is a 100:100 or 2:1 mix ratio by weight, 0.10 mm to 0.30 mm wet bond line, fixture pressure for 30 to 60 minutes, handling cure after 4 to 8 hours and full cure for at least 24 hours before packing.
Fast-setting adhesive is not automatically better. Five-minute epoxy can help rework or small samples, but some grades become brittle after heat cycling. Slow-cure epoxy often gives higher final strength, but it consumes curing racks and delays packing. For rush orders, confirm that cure time is included in the quoted lead time. Packing too early can trap solvent or amine odor in polybags and reduce final bond strength.
| Adhesive Type | Typical Use | FOB Add-On | Cure or Dwell Time | Key Control Point |
|---|---|---|---|---|
| Foam PSA tape | Rubber magnets, flat light badges | USD 0.03-0.08/unit | 24 hours dwell before stress | Apply pressure 5-10 seconds; avoid dust and oil |
| Two-part epoxy | Neodymium magnets, brooch plates | USD 0.05-0.18/unit | 24 hours full cure at 20-25°C | Mix ratio, bond-line thickness and fixture pressure |
| Acrylic structural adhesive | Steel plates, mixed metal/plastic | USD 0.08-0.25/unit | 8-24 hours depending grade | Check odor, open time and coating compatibility |
| UV adhesive | Clear acrylic decorative joints | USD 0.05-0.15/unit | Seconds under UV plus post-cure | Only works where UV reaches the bond line |
Specify the Surface, Not Just the Glue
Most bonding failures start at the surface. Nickel, gold, black nickel, antique brass, epoxy dome coating and painted backs can carry polishing compound, release agent or fingerprints. Adhesive bonds poorly to oil and mirror-smooth plating even when the badge looks clean. A correct specification defines the bonding zone, roughness, flatness and cleaning method.
Where appearance allows, request an unpainted or lightly roughened bonding zone hidden under the accessory. A recessed back cavity 0.2 mm to 0.4 mm deep helps locate the fitting and protect the adhesive edge from peel. For epoxy bonding, target surface roughness of Ra 1.6 to 3.2 microns is usually more reliable than mirror polish. Flatness across the bonded area should be held within ±0.15 mm for small plates and ±0.25 mm for larger rubber magnets.
Decorative plating thickness on badges is commonly 3 to 8 microns for nickel, gold-tone or black nickel finishes, with flash precious-tone finishes sometimes thinner unless specified. Thicker plating does not guarantee stronger bonding. In fact, a smooth plated surface can reduce adhesion unless it is cleaned and abraded. For repeat orders, masking the bonding area during finishing or designing a recessed raw-metal island is more consistent than asking operators to sand every piece by hand after plating.
- Define the bonded part: magnet, brooch plate, steel disk, rubber pad, acrylic layer or accessory fitting.
- State finished product weight in grams and use condition: refrigerator, garment, bag, retail card, outdoor display or child-facing item.
- Specify minimum bonding area in millimeters, not only the accessory size.
- Require surface cleaning before adhesive: IPA wipe, lint-free drying, abrasion patch or plasma treatment for difficult plastics.
- Set bond-line target: typically 0.10-0.30 mm for epoxy and near-full contact for PSA tape.
- Require fixture pressure during cure so magnets and plates do not float, slide or tilt.
- Set minimum cure before packing: 24 hours for most epoxy, longer below 18°C or in high humidity.
- Add heat aging if cartons ship by sea, sit in summer warehouses or face temperatures above 35°C.
Design the Joint Before Sampling
A good adhesive joint is broad, flat, centered and protected from peel. For a 40 mm enamel badge converted to a magnet, one 12 mm neodymium magnet may hold on a steel surface, but it can twist if the user slides the badge sideways. Two 10 mm magnets spaced 18 mm to 24 mm apart often perform better because they reduce rotation and spread stress across the badge back.
For brooch plates, avoid placing a narrow 18 mm bar on a curved, stamped or recessed back unless the contact is fully supported. Raised lettering, backstamps and concave die-cast surfaces create uneven bond lines. Epoxy can bridge a controlled 0.3 mm gap, but pressure-sensitive adhesive normally needs near-full contact. If a backstamp is required, reserve a clear flat island for the fitting before the mold or die is approved.
For rubber magnets laminated to metal fronts, avoid designs where the magnet stops just 1 mm from the edge and the user can peel from a corner. Full-back coverage is stronger, but a recessed magnet with at least 2 mm of edge protection can also work. For retail fridge magnets, specify total thickness tolerance, often ±0.3 mm, so the finished product sits flat on a backing card and does not bow inside a polybag.
Alignment also matters. For general promotional badges, ±1.0 mm placement tolerance is usually acceptable for a hidden magnet or brooch plate. For retail products with visible backs, specify ±0.5 mm. Edge lift after cure should not exceed 0.3 mm. A tilted magnet may still pass a quick pull test, but it concentrates peel stress and can fail during transport.
Testing: Pull, Peel, Shear and Heat Aging
Visual inspection cannot qualify an adhesive joint. The bond must be tested in the same direction the customer will stress it. A magnet that survives a straight pull may fail when peeled from one edge. A brooch plate that passes at room temperature may loosen after cartons sit in a container or warehouse at 45 to 50 degrees Celsius.
For normal promotional goods, test after a minimum 24-hour cure. For small neodymium magnets up to 12 mm diameter, a common pull-off target is 1.5 kgf to 3.0 kgf for 10 seconds, adjusted by product weight and safety risk. For brooch plates, a 90-degree peel check plus a 5 kgf manual pull for 10 seconds is more meaningful than a quick finger tug. For heavier badges, request a static hanging load equal to at least three times the finished product weight for 24 hours.
Heat aging is useful for sea freight, summer retail programs and stock that may sit in non-air-conditioned warehouses. A practical pre-production test is 48 hours at 50 degrees Celsius, followed by 2 hours at room temperature, then repeat pull or peel testing. For outdoor, automotive or long-term window display use, decorative badge adhesives should not be treated as automotive-grade systems; mechanical retention should be discussed before tooling.
| Test | Suggested Sample Size | Typical Requirement | Reject If |
|---|---|---|---|
| Room-temperature pull | 5 pcs per batch or adhesive setup | No detachment at specified kgf for 10 seconds | Magnet separates or adhesive remains only on one side |
| 90-degree peel | 5 pcs after 24-hour cure | Progressive resistance without sudden release | Edge lifts cleanly under light hand force |
| Heat aging | 5 pcs from pre-production sample | 48 hours at 50°C, cool 2 hours, retest | Soft adhesive, odor, sliding or detachment |
| Packed drop test | 1 inner carton or 10 retail packs | 1.0 m drop on 3 faces and 1 corner | Fittings shift, magnets crack or backs detach |
| Fabric wear simulation | 5 brooch or magnetic badges | Attach/remove 20 cycles on garment fabric | Plate loosens, pin rotates or magnets chip |
Inspection, AQL and Acceptance Criteria
Bonding inspection should be separated from cosmetic inspection. A badge can meet enamel color, plating and printing requirements while failing the bonded accessory requirement. In a purchase order, define cosmetic and functional acceptance separately. A common setup is AQL 2.5 for major cosmetic defects and AQL 1.0 or tighter for functional bonding defects. For safety-sensitive products, detached small magnets or sharp brooch fittings should be classified as critical defects with zero acceptance.
Defect classification depends on the end use. A loose fridge magnet on an adult souvenir is usually a major defect because it causes returns. A detached brooch plate can expose a sharp pin and may become critical. A loose small magnet in a child-facing item is a serious safety concern; glued small magnets are often inappropriate unless the design uses mechanical encapsulation and passes the applicable market tests.
Functional inspection should record adhesive squeeze-out, missing adhesive, wrong magnet polarity, tilted fittings, poor alignment and contamination at the bond line. Magnet polarity matters when the product uses paired magnetic name badge backs; reversed polarity can make the badge unusable even if the glue is strong. For visible backs, also define maximum adhesive overflow, commonly 0.5 mm beyond the fitting edge for standard promo goods and “not visible from normal viewing distance” for retail-grade backs.
Cost, MOQ, Lead Time and RFQ Wording
Adhesive bonding is not expensive by itself, but stronger bonding adds control time. A simple pressure-sensitive rubber magnet on a flat printed or metal piece may add USD 0.03 to USD 0.08 FOB per unit at 500 to 5,000 pieces. Two-part epoxy assembly for small magnets or brooch plates typically adds USD 0.05 to USD 0.18 per unit, depending on fixture time, cure space, reject risk and quantity. Recessed backs, polarity jigs or custom fixture trays add tooling or setup cost, but they reduce hand placement variation.
MOQ is usually driven by the base product rather than the adhesive. Custom metal badges often start around 100 pieces per design, with more stable unit pricing at 300, 500 and 1,000 pieces. Nonstandard magnet sizes, custom steel plates or specialty adhesive tapes may require accessory purchases in 1,000 to 5,000 piece lots. If the project requires a short-shelf-life structural adhesive, expect either a higher minimum or a material surcharge.
Sampling with bonding verification usually takes 7 to 12 days after artwork approval when existing fittings are used, and 12 to 18 days if a recessed back, custom die or special accessory must be tooled. Mass production for 500 to 5,000 pieces is commonly 12 to 22 days after sample approval, plus transit. Add at least 1 working day for epoxy cure before final packing; removing it from the schedule is a common cause of weak joints.
| Quantity Tier | Typical FOB Bonding Add-On | Added Production Time | Manufacturing Note |
|---|---|---|---|
| 100-299 pcs | USD 0.10-0.25/unit | 1-2 days | Higher labor share and more hand setup |
| 300-999 pcs | USD 0.06-0.18/unit | 1-2 days | Common tier for event badges and small retail runs |
| 1,000-4,999 pcs | USD 0.04-0.12/unit | 2-3 days | Fixture jigs recommended for alignment and polarity |
| 5,000 pcs and above | USD 0.03-0.10/unit | 3-5 days | Accessory sourcing, curing racks and QC sampling drive schedule |
A useful RFQ should include front artwork plus a back drawing or photo, finished size, target thickness, estimated weight, accessory type, use environment, retail packing method and whether the item is for adults or children. Specify measurable bonding requirements: bonding area, surface preparation, adhesive type or performance target, cure time before packing, alignment tolerance, pull or peel test, heat-aging requirement and functional AQL. For repeat programs, record magnet size, adhesive grade, fixture method, cure time and inspection criteria in the reorder file so the second order is built like the approved first order.
Have a project? Send your artwork and target quantity and we’ll reply with a detailed quotation within 12 working hours.
Ready to get this made?
Send your sketch, target quantity and ship-date. Detailed quotation in 12 hours.


