A Spec-Sheet for Custom Promo Products: What Each Line Means
Why spec-sheet orders fail
The fastest way to lose margin on a custom promo order is to treat the spec sheet as a formality. Buyers often send a reference photo, a target size, and a logo file, then assume the factory will fill in the gaps correctly. In reality, every blank field becomes a production decision, and every production decision affects tooling, yield, appearance, inspection, and lead time. A strong spec sheet does not just describe the item; it controls the build.
That matters even more when the order spans pins, coins, badges, keychains, magnets, patches, and lanyards. The factory may know the process, but it cannot know your brand risk tolerance, retail standard, or event deadline unless you state it. The best buyer spec is not the shortest one. It is the one that leaves no room for the wrong interpretation.
In practice, the recurring failures are familiar: missing thickness, vague plating names, no tolerance on dimensions, unclear hardware, and color references written in plain English instead of a controlled color system. Those gaps create sample churn, late revisions, and rework, especially when an order mixes metal, soft goods, and printed components. The line-by-line approach below is built to prevent that.
Start with the product identity line
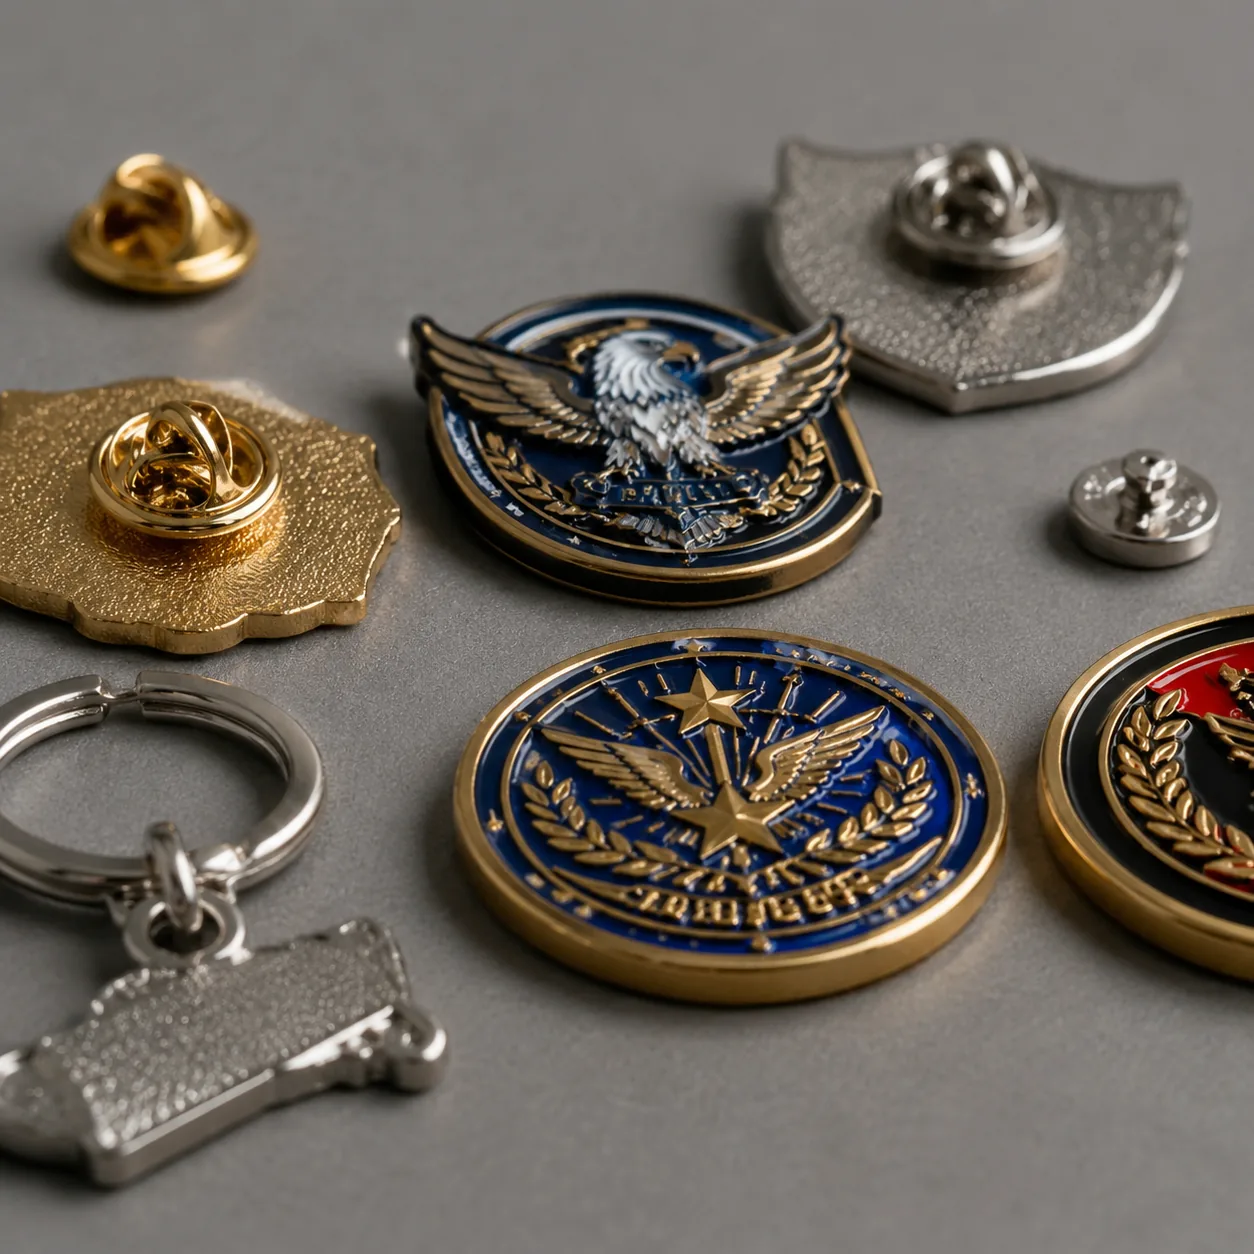
The first line on any spec sheet should define exactly what the item is, not just what it looks like. A “metal badge” can mean a die-struck lapel pin, a name badge with magnetic backing, a soft enamel pin with printed text, or a zinc-alloy brooch with epoxy. If the factory interprets the item differently than you intended, everything downstream changes: tooling, plating, attachment, unit cost, and even packing method.
Use a format like: item type, construction method, finish family, attachment type, and intended use. For example, “zinc-alloy soft enamel lapel pin, butterfly clutch, indoor promotional use” is far more actionable than “custom pin.” If the item will be worn, mailed, handed out, or used outdoors, say so explicitly. That tells the supplier how hard the product has to work and what durability margin to build in.
If you already know the commercial target, include it. A trade-show giveaway may accept a simpler build and a lower unit price, while a retail piece may need tighter finishing, cleaner edges, and better packaging. A clear identity line also helps the factory quote the right MOQ tier and avoid overbuilding a low-cost promo item.
- State the exact product type, not just the category
- Add the intended use: gift, retail, event, staff, or outdoor
- Name the construction method if you already know it
- Specify whether the item must be worn, shipped, or displayed
Dimensions, thickness, and tolerance
A lot of rework starts when buyers give only one dimension. Length and width define the footprint, but thickness defines how the part feels, how it casts, how it presses, and how hardware sits on the back. For metal products, a 0.2 to 0.3 mm shift can change weight and perceived quality. For lanyards and patches, the same issue shows up in width, finished size, border allowance, and stitch density.
For pins and badges, a practical soft-enamel build is often 25 to 40 mm wide with 1.2 to 1.5 mm body thickness for zinc alloy or iron. Challenge coins commonly use 3.0 to 4.0 mm thickness, while a keychain body is usually 2.0 to 3.0 mm depending on the style and number of layers. Flexible goods need their own rules: woven patches may allow a finished size tolerance of +/-1 mm, while printed patches and lanyards usually need a narrower tolerance on critical text placement than on outer dimensions.
Tolerance should be stated on the sheet, not assumed. A good starting point is +/-0.2 mm for small metal parts with fine detailing, +/-0.3 mm to +/-0.5 mm for larger rigid items, and +/-1.0 mm for flexible goods where fabric or stitching moves during production. If your design has cutouts, raised edges, or layered parts, call out the minimum feature size separately. In practice, tiny gaps below 0.25 mm, engraved lines below 0.20 mm, and holes below 0.80 mm often become unstable or fill in during casting or enameling.
For mixed-material products, add the critical dimension that matters most in use. A badge may be nominally 50 x 25 mm, but if the pin post must sit 8 mm from the top edge to stay balanced, that offset is just as important as the overall size. The same logic applies to lanyards, where a 20 mm width may be standard but printed logo placement often needs a 2 to 3 mm safe zone from the seam.
| Spec line | What to state | Typical buyer mistake |
|---|---|---|
| Overall size | Finished width, height, and if needed diameter | Giving only one side of a rectangle |
| Thickness | Body thickness and any raised or embossed height | Assuming the factory knows the feel you want |
| Tolerance | Allowed variation on each critical dimension | Leaving tolerances blank |
| Minimum feature | Smallest line, gap, hole, or cutout | Designing details too fine for the process |
Material and base metal lines
Material choice is where cost, strength, and finish quality begin to diverge. Zinc alloy is flexible for detailed shapes, soft curves, and 3D relief, and it is common for cast items in the 500 to 3,000 unit range. Iron is usually better for simpler stamped profiles and tighter unit cost control, especially at higher volumes. Brass supports sharper edges and a premium feel, but the raw material and processing typically cost more, so it is best reserved for pieces where detail, weight, or wear resistance matters.
Do not write only “metal” or “PVC” if you care about consistent results. For metal items, name the substrate and any compliance requirement, such as lead-free or nickel-release limits for skin-contact wearables. For soft goods, define fabric type, backing, and thread density where relevant. A woven patch may use 50D to 75D polyester yarn, while a printed patch may rely more on backing and edge finish than on thread count. If the product needs to feel rigid, lightweight, premium, or soft-touch, write that in plain terms so the supplier can choose the right process.
Material also drives cost and schedule. As a practical FOB benchmark, simple iron pins often land around USD 0.35 to 1.20 each at 500 to 1,000 pieces, zinc-alloy cast pins around USD 0.60 to 2.50, brass coins around USD 1.80 to 6.00, and woven patches around USD 0.20 to 0.90 depending on size and backing. MOQ tiers also move with process: many factories can quote 100 to 300 pieces for simple soft goods, 300 to 500 for basic metal promo items, and 1,000 plus for more complex plated or multi-part builds. If the order sits below standard MOQ, say that up front because it changes tooling amortization and unit price.
When the order needs a premium finish or repeated handling, include the expected wear profile. A desk item can tolerate a softer substrate and lighter plating. A product clipped to bags, jackets, or keyrings should be specified as abrasion-prone, which helps the factory choose a harder substrate, stronger electroplating, or a protective topcoat.
Finish, plating, and surface texture
Finish is not decoration; it is part of performance. A buyer who says “gold finish” may receive bright gold, antique gold, matte gold, or a weak yellow tone depending on the factory’s default bath and polishing process. For plated metal, specify the finish family and, where possible, the plating thickness. Decorative flash plating is often around 0.03 to 0.05 microns, while more durable decorative plating is commonly 0.08 to 0.15 microns. If the item will be handled often, shipped in bulk, or rubbed against clothing or keys, ask for the higher end of that range.
Separate visible finish from any protective topcoat. Polished nickel, black nickel, antique brass, polished brass, matte black, and antique copper all behave differently in wear and photography. If the product is expected to survive transit abrasion or repeated handling at a trade show, a topcoat or epoxy dome may matter more than the color family itself. A beautiful finish that scuffs in the box is a bad finish for a promotional item.
State surface preference as well: mirror polish, satin, brushed, sandblasted, or antique. These are not interchangeable. A brushed brass item, for example, may hide fingerprints better than mirror polish, while antique finishes can make relief details read more clearly at small sizes. If your design includes raised lines or recessed panels, note whether you want high contrast on the surface or a uniform low-gloss look.
For soft-touch or coated products, define gloss level in concrete terms where possible. A matte finish may mean anything from 5 to 20 gloss units depending on the process. If appearance is critical, ask for a physical sample or reference chip rather than relying on a written label alone.
| Finish choice | Best for | Trade-off |
|---|---|---|
| Polished nickel | Clean corporate look | Shows scratches more easily |
| Antique brass | Vintage or heritage branding | Less bright, more muted |
| Black nickel | Modern premium styling | Can vary slightly by bath |
| Antique copper | Warm, detailed relief | May darken the design |
Color, fill, and print rules
Color is where spec sheets become dangerously vague. Saying “red and blue” gives the factory almost no control over shade, saturation, or contrast. For enamel, PVC, printing, and woven products, the buyer should define the color system, finish level, and whether exact Pantone matching is required or only a close visual match. If the same visual color must match across different materials, say so directly, because matching enamel to thread or plastic to paint is harder than matching within one process.
For enamel pin and badge work, give the Pantone reference, the target gloss level, and any acceptable deviation. A practical production note is that many factories can hold within about Delta E 2 to 3 for printed components, while enamel and dyed textiles may vary more depending on batch and curing. If the artwork uses transparent, glitter, glow-in-the-dark, or gradient effects, label those as special effects rather than standard fills. Otherwise the factory may quote a basic fill process that cannot reproduce the visual you expect.
When artwork includes fine text, gradients, or photo-like shading, say which matters most: sharp legibility or exact image reproduction. Small type below 5 pt, hairline rules below 0.25 mm, and dense gradients often need printing instead of enamel. A good spec sheet prevents the common mistake of asking a casting-and-fill process to behave like offset printing.
If the design uses multiple colors, define the boundary style too. Hard separations, soft fades, and overprint layers behave differently and can change the price by process. The factory should know whether color accuracy or production speed is the priority when there is a trade-off.
- List every color with a reference code
- State whether matte, satin, or glossy appearance is acceptable
- Flag special effects such as glow, glitter, or translucent fill
- Say whether cross-material color matching is required
Hardware, backing, and moving parts
The back of the product matters as much as the front when the item will be worn or used repeatedly. Butterfly clutches, rubber clutches, magnets, brooch pins, safety pins, split rings, lobster clasps, swivel hooks, and ball chains all behave differently. The wrong attachment can make a lightweight badge spin, a heavy pin sag, or a keychain fail in retail use. Hardware should be treated as a specification line, not an afterthought.
For wearable items, state the required attachment style and whether the product must resist rotation, sagging, or fabric damage. For keychains, specify ring diameter, clasp type, and whether the chain or connector must be reinforced. Common ring sizes are 20 to 30 mm for keychains, while wearable magnetic backs are often chosen when clothing damage is a concern. If the design includes moving parts, such as swing charms or spinning centers, write down the joint clearance and motion limit so the part does not arrive loose or noisy.
If you want hidden hardware, premium anti-rotation backing, or extra-strong retention, say so before sampling. Hardware changes can alter both thickness and cost, especially on small items with limited back space. In many cases, the attachment choice affects wear performance more than the artwork itself. A supplier should be able to quote the price impact clearly: for example, a standard clutch may add little or no premium, while magnetic or custom anti-spin hardware can add USD 0.10 to 0.60 per piece depending on size and magnet strength.
For products with suspension points, define whether the load is static or dynamic. A bag charm that swings in transit needs different reinforcement than a display-only item. If the product will be mailed in bulk, ask for hardware that will not scratch adjacent items in the carton.
Below is a practical checklist for hardware lines that should never be left blank:
- Attachment type and exact orientation
- Ring, chain, magnet, or clutch size
- Load or wear requirement, if any
- Rotation resistance or anti-sag requirement
- Hidden hardware or visible hardware preference
Inspection, approval, and release criteria
A spec sheet is incomplete unless it says how the order will be checked. Buyers often focus on appearance and ignore acceptance criteria, but the factory needs measurable rules to sort good units from bad ones. For custom metal products, an AQL framework is commonly used for incoming and final inspection. A practical buyer may request AQL 2.5 for major defects and AQL 4.0 for minor defects, while brand-sensitive retail orders sometimes tighten major defects to AQL 1.0 or 1.5. If the order is for a critical launch, say that too.
Define what counts as a major defect versus a minor one. Examples of major defects include wrong plating color, missing parts, loose hardware, broken pins, off-center printing beyond tolerance, and dimensions outside the agreed limit. Minor defects usually cover small surface marks, slight color shifts within an approved range, or packaging scuffs that do not affect use. If the product has multiple parts, specify whether one bad component fails the whole set or whether partial rework is allowed.
Samples need clear rules as well. State whether the pre-production sample is the approval standard or only a reference. The safest approach is to make the approved sample the golden sample and require mass production to match it within the written tolerances. Also define the number of revision rounds. A common commercial setup is one pre-production sample, one revision if needed, and then mass production release. That structure keeps the schedule under control and avoids endless back-and-forth.
If time matters, write the schedule in days, not hopes. Typical custom promo timelines are about 7 to 12 days for sampling after artwork approval, 12 to 25 days for mass production on simple items, and 25 to 40 days for more complex plated or mixed-material orders. Clear approval gates are what make those numbers believable.
Inspection should also mention packaging condition. If the product is retail-ready, define carton count, polybag requirement, insert card, barcode placement, and whether scuff-free presentation is mandatory. A part can pass dimensional inspection and still fail commercial acceptance if it arrives scratched, mispacked, or mismatched by set.
Turn the sheet into a production tool
If you are preparing a real order, turn the article above into a one-page spec sheet with fixed fields: product identity, size, thickness, material, finish, color, hardware, tolerance, inspection, and approval method. Keep the wording short and numeric wherever possible, because vague language creates avoidable quote differences. When a supplier can read the sheet and quote without asking five follow-up questions, the spec is probably strong enough.
For the next PO, send the supplier the spec sheet together with the artwork, then ask for written confirmation of every critical line before sampling starts. If you are ordering a mixed promo set, make sure the same style rules apply across all items so one component does not drift from the rest. The goal is not perfect paperwork; it is a build that ships right the first time.
A practical release checklist looks like this:
- All dimensions and tolerances confirmed in writing
- Material, finish, and color codes approved
- Hardware type and retention requirements locked
- AQL levels and defect definitions agreed
- Golden sample signed off before mass production
Have a project? Send your artwork and target quantity and we’ll reply with a detailed quotation within 12 working hours.
Ready to get this made?
Send your sketch, target quantity and ship-date. Detailed quotation in 12 hours.


