7 Failure Modes That Ruin Custom Promo Metals
Why good samples still fail in production
A clean pre-production sample proves only one thing: the factory can make one acceptable piece under one controlled setup. It does not prove consistency across a 3,000-piece run with a different brass lot, a fresh plating bath load, a longer cure, or a faster packing line. That is why buyers who approve by appearance alone still get crooked posts, soft edges, weak magnets, color drift, and cartons damaged in transit.
Custom metal promo products fail less because the idea is bad and more because the spec is vague. Pins, coins, badges, keychains, magnets, and mixed-material sets all have predictable weak points. If you define the failure mode up front and put a measurable limit around it, quoting gets cleaner, sampling gets faster, and reorder risk drops sharply. The difference between a good and bad order is usually not taste; it is control.
In practice, the useful question is not “Can you make it?” It is “What will fail first, and what exact number prevents it?” For most small metal promo items, the relevant controls are dimensional tolerance, plating thickness, color standard, adhesion strength, hardware pull force, surface roughness, and pack-out protection. Once those are written down, the sample becomes a true control point instead of a decorative promise.
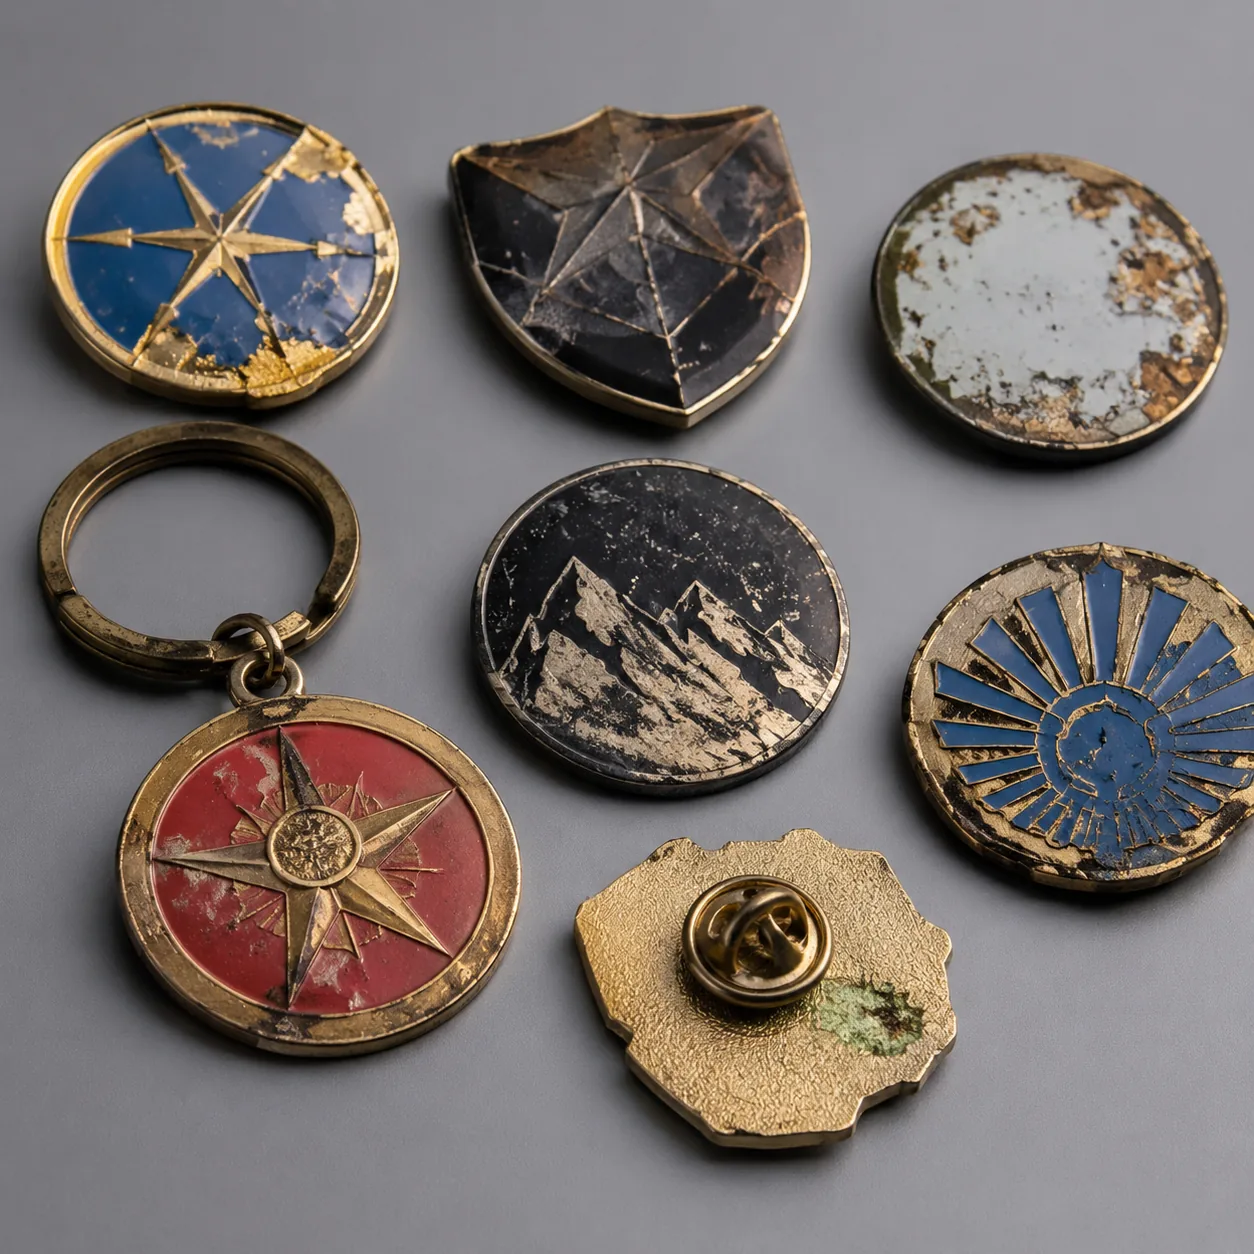
Failure mode 1: geometry drift after tooling
Dimensional drift is the most common early failure. A pin or coin may match the artwork on screen and still come back with a widened border, shallow cutouts, or a logo field that is visibly smaller than intended because the tooling compensated for shrinkage or the part was over-polished. On stamped brass, die-cast zinc, and soft-enamel parts, a practical tolerance for critical visible dimensions is ±0.2 mm; for small pieces under 35 mm, ±0.3 mm is usually the outer limit before the shape starts to look off. For coins and medallions above 40 mm, outer diameter can often sit at ±0.3 to ±0.5 mm, but relief height and rim width still need tighter definition.
The trap is assuming “same size” means “same appearance.” A 30 mm coin with a 1.2 mm rim and a 30 mm coin with a 0.6 mm rim behave differently in tooling, plating, and visual balance. Openwork sections are even more sensitive: if the bridge drops below 0.8 mm, the part can deform during polishing or plating handling; for premium openwork, 1.0 to 1.2 mm is safer. Internal corner radii should also be defined rather than left to the die maker, because tight corners can fill poorly in casting and appear rounded after finishing.
- Specify overall size plus the critical visual zone, not size alone.
- Call out outline tolerance explicitly: ±0.2 mm for small premium items, ±0.3 mm for standard giveaway pieces.
- Set minimum bridge width at 0.8 mm, or 1.0 mm for premium openwork.
- Lock post, clasp, and magnet centerline positions on the drawing before tooling starts.
- Add relief-height tolerance when the design depends on depth, not just outline.
Failure mode 2: plating that looks good on day one
Plating problems often start as a surface issue and end as a durability issue. A bright nickel or gold-tone part can pass first inspection and still tarnish at the edges if the underlayer is thin, the surface prep is uneven, or the bath chemistry drifts during production. Decorative top color layers are typically very thin; on promo metal products, the visible decorative finish is often only 0.03 to 0.08 μm, so the real protection comes from base metal prep, underplate quality, and sealer performance rather than top color thickness alone. If a supplier quotes only a color name, that is not a finish specification.
The practical controls are process controls: base polish quality, underplate consistency, masking around contact points, and batch-to-batch bath management. For skin-contact or high-handling products, ask for an internal tarnish or salt-spray target in hours rather than a vague promise of “good quality.” A workable commercial baseline is 24 to 48 hours of salt spray for low-cost decorative pieces and 72 hours or more for premium programs, though the exact target depends on alloy, sealer, and whether the part has recessed edges or exposed steel hardware. If the supplier cannot explain how they prevent edge burn, black spotting, or thin coverage around posts and magnets, expect returns.
| Plating choice | Where it fails first | Spec to lock |
|---|---|---|
| Gold-tone | Edge darkening and rub-through | Underplate consistency, sealer type, and approved master sample |
| Silver-tone | Tarnish and scratch visibility | Anti-oxidation finish and pack-out handling method |
| Black nickel | Batch color mismatch | Visual standard under D65 light and retained reference sample |
| Antique plating | Over-dark recess fill | Recess depth limit and wipe-back method |
Failure mode 3: color mismatch after curing or fill
Color defects are usually approval defects. Enamel, epoxy, UV print, and dyed textile components can all shift after curing, blending, or exposure to a different light source. The most common mistake is approving a wet-filled sample and then discovering the cured result is one or two shades darker. On translucent fills, the underlying metal finish changes the apparent color even if the formula stays constant. That is why “match the sample” is too loose for production and too risky for reorders.
For hard enamel and soft enamel, the supplier should state whether matching is checked wet, cured, or both. For printed badges and medallions, the process matters: solvent-based ink, UV-cured ink, and screen-cured ink all behave differently on brass, iron, and zinc. If the design uses multiple colors, approve under D65 daylight conditions and state the acceptance band. In commercial production, a practical target is ΔE 2.0 to 3.0 for non-critical brand colors; for strict corporate colors, buyers often require ΔE 2.0 or tighter and a retained master reference. If the item includes translucent fill, the base finish must be approved as part of the color system, not treated as separate.
For mixed-material promo sets, do not assume a printed card, enamel charm, and silicone lanyard can share one color standard. Each material reads differently, and each needs its own reference. If the supplier can only show a photo of a good-looking sample, that is not enough. Ask for a physical retained sample, the exact ink or enamel code, and the light condition used for approval.
- Approve color under D65 light, not just under showroom lighting.
- State whether matching is against wet fill, cured fill, or packed product.
- Approve translucent enamel on the exact base finish that will ship.
- Separate control limits for print, fill, and textile yarn when a set mixes methods.
- Retain one master sample for every colorway and finish combination.
Failure mode 4: mechanical weakness at the attachment point
Most customer complaints come from the hardware interface, not the decorative face. A lapel pin that rotates, a split ring that opens too easily, a badge clip that bends, or a magnet that pulls away from the shell makes the entire product feel low quality. These failures are usually caused by a chain of small mismatches: post diameter versus hole size, weld quality, adhesive cure, spring force, or magnet placement. Looking only at the front artwork misses the part that actually gets used.
The fix is to spec the attachment as a working assembly with measurable limits. For lapel pins, a common usable post diameter is 0.9 to 1.2 mm, with post length matched to backing depth; butterfly clutches should hold a pull force that does not slip in normal wear, while stronger rubber or deluxe clutches are used when the piece is heavier. For keychains, split rings often need a wire diameter around 1.2 to 1.5 mm for everyday promotional use, and swivel clips should be checked for cycle durability rather than just first-action feel. For magnets, define magnet grade, shell recess depth, adhesive type, and placement tolerance, usually within ±0.2 mm on small items, so the piece sits flat and does not spin off-center.
If the item is a badge or medal that will be worn daily, ask for a simple functional test instead of only visual approval. That can be a pull test, a rotation check, or a 10-cycle opening test for moving hardware. The point is not lab certification; it is catching weak assembly before the shipment leaves the factory.
Failure mode 5: surface defects hidden by shine
High gloss hides very little. A polished finish exposes pits, drag lines, die marks, burrs, and bad edge trimming that a satin or antique finish can partially conceal. The counterintuitive problem is that factories sometimes over-polish samples to make them look cleaner, which can erase micro-relief and soften fine text. The result is a sample that looks better than the actual production standard and a run that looks worse than the approved piece.
Finish choice should be based on what the design needs to reveal or hide. If the artwork is bold and the part is simple, a mirror polish can work. If the design includes shallow relief, thin lettering, or small internal cutouts, a brushed or textured finish usually holds definition better and gives QC a clearer read on defects. Where surface control matters, ask for a repeatable roughness target. A light brushed decorative finish often lands around Ra 0.4 to 0.8 μm, while a more visible matte texture can run higher; what matters is consistency, not the exact style name. The supplier should also state how much re-polish is allowed before the text edge begins to collapse.
For fine-line designs, make the allowable polish loss part of the drawing review. A 0.2 mm hairline can disappear quickly if the factory tries to “beautify” the part after casting or stamping. If the design depends on tiny strokes or sharp corners, choose a finish that preserves geometry instead of one that merely looks shiny.
| Finish | Good at hiding | Bad at hiding |
|---|---|---|
| High polish | Minor color variation | Pits, scratches, and edge waves |
| Sandblasted | Minor tool marks | Deep dents and inconsistent blasting |
| Brushed | Minor surface micro-scratches | Uneven grain direction |
| Antique | Small recess defects | Overfilled detail and poor wipe-back |
Failure mode 6: packing damage and carton collapse
A large share of “quality” issues are actually packing issues. Sharp pin points scratch adjacent items, coins scuff under pressure, epoxy domes pick up carton dust, and plated surfaces rub raw when the bag or tray allows movement. Even a well-made product can arrive as a complaint if the pack format is loose, the carton is overfilled, or the outer box fails under stacking. Standard packing is not a spec; it is an assumption.
For retail-ready or gift-ready items, pack-out must be part of the product definition. Specify individual polybag thickness, tray or separator type, inner box count, and outer carton stacking expectation. For metal products, 0.04 to 0.06 mm polybags are common for basic protection, but polished or epoxy-coated items usually need paper inserts, molded trays, or segmented pouches to prevent contact marks. Ask for carton compression or drop expectations if the shipment is export-facing. A simple 60 cm drop test on finished cartons is a useful commercial baseline, while heavier cartons should also be checked for stacking resistance and corner crush protection.
If the items ship as a mixed assortment, treat each SKU as a contact risk. A coin with an antique finish can mark a mirror-polished pin in the same carton, and a loose keychain ring can scratch a soft enamel surface. The fix is not always more packaging; it is better separation. In many programs, a paper divider plus a fitted tray solves more damage than a larger outer box.
- Specify individual protection for each unit, not only carton count.
- Use separators or trays for polished or epoxy-coated surfaces.
- State drop or stacking expectations for export shipments.
- Require packed weight and unit count to be checked on every shipment.
- Separate heavy hardware from soft-finish items inside the same master carton.
Failure mode 7: approval drift between sample and reorder
The most expensive failure is the reorder that no longer matches the approved sample. It happens when the factory quietly changes plating bath, base alloy, enamel supplier, backing hardware, or packing format because the original files were not locked. The replacement may still be “within factory tolerance” but outside the buyer’s brand standard. If the spec lives only in email screenshots, it is not controlled enough for repeat production.
The fix is to freeze the golden sample, the drawing, and the acceptable tolerance band as one production record. Include size tolerance, finish code, artwork version, hardware part number, packing format, and approval photo in the reorder file. For repeat work, many buyers also keep the approved master sample in-house and require the factory to reference that sample before any material substitution. If the supplier cannot reproduce the earlier configuration without asking clarifying questions, you do not yet have a reorderable product. That is why experienced buyers treat samples as records, not souvenirs.
This is also where MOQ and lead time should be tied to the spec, not guessed after quoting starts. A simple pin or coin run may sit at 100 to 300 pcs MOQ with 12 to 18 days lead time after artwork approval; more complex enamel or multi-component sets often start at 500 pcs and 18 to 25 days; custom molding, mixed finishes, or rush packing can push orders to 25 to 35 days. FOB pricing varies by size, finish, and hardware, but a useful planning range is about USD 0.35 to 1.20 per piece for simple hard-enamel pins, USD 0.45 to 1.80 for coins, and USD 0.30 to 1.50 for keychains or badges, with premium plating, inserts, or multi-step assembly lifting the top end. If the quote is far below those ranges, the risk usually shows up later in finish, packing, or consistency.
| Control item | Lock it as | Why it matters |
|---|---|---|
| Artwork | Versioned drawing plus approval image | Prevents silent file changes |
| Finish | Named plating or texture code plus master sample | Prevents shade drift |
| Hardware | Part number or photo reference | Prevents weak backings or clips |
| Pack-out | Unit pack and carton spec | Prevents transit damage |
| Tolerance | Measured acceptable range | Prevents “close enough” disputes |
What to do next
Start by identifying the failure that would hurt the order most: geometry, plating, color, hardware, surface, packing, or reorder drift. Then convert that risk into one measurable control per failure mode. If you are buying a multi-piece promo set, spec each component separately instead of assuming one standard covers all parts. That is the fastest way to reduce sampling surprises and shipment disputes.
A practical next step is to ask your supplier for a one-page production control sheet that lists size tolerance, plating method, color reference, hardware part numbers, test expectations, MOQ, lead time, and packing format. A good control sheet does not just improve QC; it also makes quoting more accurate because the factory prices the actual process instead of an undefined request. At ZheCraft, that is usually the difference between a one-time approval and a repeatable reorder.
Have a project? Send your artwork and target quantity and we’ll reply with a detailed quotation within 12 working hours.
Ready to get this made?
Send your sketch, target quantity and ship-date. Detailed quotation in 12 hours.


