7 Failure Modes That Ruin Custom Metal Giveaways
Why good artwork still ships bad
Most rework on custom pins, coins, keychains, badges, and lanyard accessories does not come from bad design intent. It comes from missing production specs that leave the factory room to interpret color, plating, thickness, tolerances, or assembly in ways that pass a quick glance but fail in use. A buyer can approve artwork and still receive a product that is visually close yet functionally wrong because the critical dimensions were never locked. The job of a production spec is not to make the item prettier; it is to remove ambiguity where defects start.
In metal promotional goods, the smallest omissions usually create the largest costs. A 0.2 mm tolerance gap can cause a tray insert to rattle; a plating thickness left unstated can turn into early wear; a color note without finish condition can make the same Pantone chip look too dark, too dull, or too saturated. At ZheCraft, the cleanest orders are the ones that define the failure points up front: edge sharpness, pin rotation, color bleed, plating wear, or attachment pull-off. The expensive orders are the ones where those risks are discovered after toolmaking or after the first sample.
Failure mode 1: colors change after curing
Color mismatch is not only a Pantone issue. On enamel products, color shift happens when the factory mixes by eye, overfills cells, cures at the wrong temperature, or applies epoxy over a color that was already slightly off. Gloss level also changes perception: the same blue can look darker in a high-gloss finish and lighter in a matte finish under the same light. If no tolerance is stated, many suppliers will treat a close visual match as acceptable.
For hard enamel, specify Pantone Solid Coated references, a flat-polish finish, and a maximum color sink of 0.05-0.10 mm below the metal line after polishing. For soft enamel, allow a defined recess such as 0.15-0.25 mm below the raised metal if that is the intended look. If epoxy doming is required, say so explicitly and note that the dome should not cloud, yellow, or pool at the edges. For repeat orders, retain one golden sample and require comparison under D65 lighting at 45 degrees, not just under warehouse LEDs.
| Risk | Spec that prevents it | Typical control |
|---|---|---|
| Shade drift | Pantone code plus approved master sample | D65 light check, retained golden sample |
| Uneven gloss | Define matte, satin, or high gloss | Visual check at 45 degrees |
| Color sink | State allowable recess depth | 0.05-0.25 mm depending on build |
Failure mode 2: plating wears faster than expected
Plating failures often begin before the product reaches the customer. If the base metal is poorly polished, if oil is not fully removed, or if the coating is too thin for the use case, the finish will break down early. Decorative items that are handled often, such as keychains and badge clips, need a different build than display-only pins. When buyers do not define the wear environment, factories often default to the thinnest acceptable layer to keep cost down.
A practical spec should include the base alloy, plating type, and thickness. For zinc alloy promotional items, common decorative nickel or black nickel plating is often in the 0.1-0.15 micron range, while better wear resistance usually calls for 0.2-0.3 micron nickel with cleaner pre-polish and more consistent cleaning. Antique silver or antique brass can hide fingerprints better than bright mirror finishes, and they are often more forgiving for mass-handled items. If tarnish resistance matters, ask whether the factory uses a clear coat and whether it is UV-stable and salt-spray tested.
Commercially, FOB pricing for basic zinc alloy pins or keychains often starts around USD 0.35-0.80 each at 500 pieces, USD 0.22-0.55 at 1,000 pieces, and USD 0.12-0.35 at 5,000 pieces depending on size, finish, and packaging. Lead time is usually 7-10 days for a repeat order sample, 12-18 days for production after approval, and 18-25 days for complex multi-color or multi-part builds. Bright plating looks premium in photos, but it also shows scratches and fingerprints more readily than antique or satin finishes. If the item will be handled frequently, a more forgiving finish often reduces returns better than a shinier one.
Failure mode 3: edges cut, snag, or deform
Sharp edges are one of the easiest defects to miss in artwork review and one of the most expensive to correct after mass production. Thin die-cast rims, aggressive cutouts, and under-deburred edges can snag fabric, scratch skin, or deform during bag packing. A design can still look correct in a mockup while failing practical handling because the edge geometry was never specified. This is especially common when the artwork uses narrow outer strokes or internal windows.
Buyers should specify edge radius, minimum line width, and minimum bridge width before tooling. For small metal products, a visible line width of at least 0.25-0.30 mm is safer than a designer’s 0.15 mm stroke, which often disappears after plating or polishing. Internal bridges should generally stay above 0.40-0.50 mm for stamped parts and closer to 0.60 mm for more robust wear. If a product includes cutouts, ask the factory to confirm the minimum web thickness and whether any inside corners will be softened to remove burr risk.
- State whether edges must be hand-deburred or machine-finished.
- Require no sharp burrs detectable by a gloved hand.
- Set minimum stroke, gap, and bridge widths in the artwork notes.
- Ask for a sample against fabric or foam before mass production.
- Reject any edge that catches a cotton swab or snag test cloth.
Failure mode 4: assembly works in sample, then loosens in use
Many return claims come from hardware failure, not decoration failure. Butterfly clutches, rubber clutches, magnets, chains, jump rings, lobster clasps, and swivels can all pass an initial pull test and still loosen after repeated use or vibration in transit. On keychains and pins, the failure often traces back to a hole size that is slightly oversized, a ring that is too soft, or a backing component that was not matched to product weight. If the item is heavy, standard hardware may already be under-specified.
The safest way to spec assembly is to define the load, the movement, and the expected user behavior. A lapel pin for heavy jacket fabric needs different retention than one pinned to a presentation card. If a product includes moving parts or multiple links, state whether the hardware must survive repeated rotation, not just one static pull. A practical benchmark is a pin post diameter of about 0.8-1.0 mm for light-duty items and 1.2 mm or more for heavier badges, with backing types selected accordingly. For magnets, specify pull force in grams rather than a vague “strong magnet” note; common small promotional magnets may range from 300 g to 800 g pull force depending on size and build.
| Assembly risk | Buyer spec | QC check |
|---|---|---|
| Clutch loosens | Define backing type and pin post diameter | Pull test plus repeated removal test |
| Ring opens | State wire gauge and closure method | Manual torque check |
| Magnet slips | Define pull force and coating | Lateral slide test |
Failure mode 5: dimensions drift across the set
A single item may look correct while the full promo set becomes unusable because components do not align. This happens when the pin size, backing card slot, coin capsule, box insert, or lanyard hardware are quoted separately without one shared dimensional control. A 0.5 mm error is harmless on one part, but it can block insertion, tilt the display, or make a set look crooked when packed together. The larger the set, the more often this happens.
For multi-item orders, define the critical dimensions that affect fit, not just the outer size. If a badge must sit in a presentation tray, specify both the visible face dimension and the hidden clearance dimension. For foam inserts, a typical usable clearance is 0.2 mm per side for a tight fit or 0.5 mm per side for an easier insert/removal fit. Coin capsules commonly need diameter tolerance within ±0.1-0.2 mm to avoid rattling or binding. Use one master dimension sheet for the entire set and make the supplier confirm every interface dimension before tooling.
This matters even more when the components are produced at different times or by different workshops. The more suppliers involved, the more likely a small mismatch becomes a visible defect. If the order includes a box, insert, and metal item, lock the reference dimensions for all three together instead of treating packaging as an afterthought.
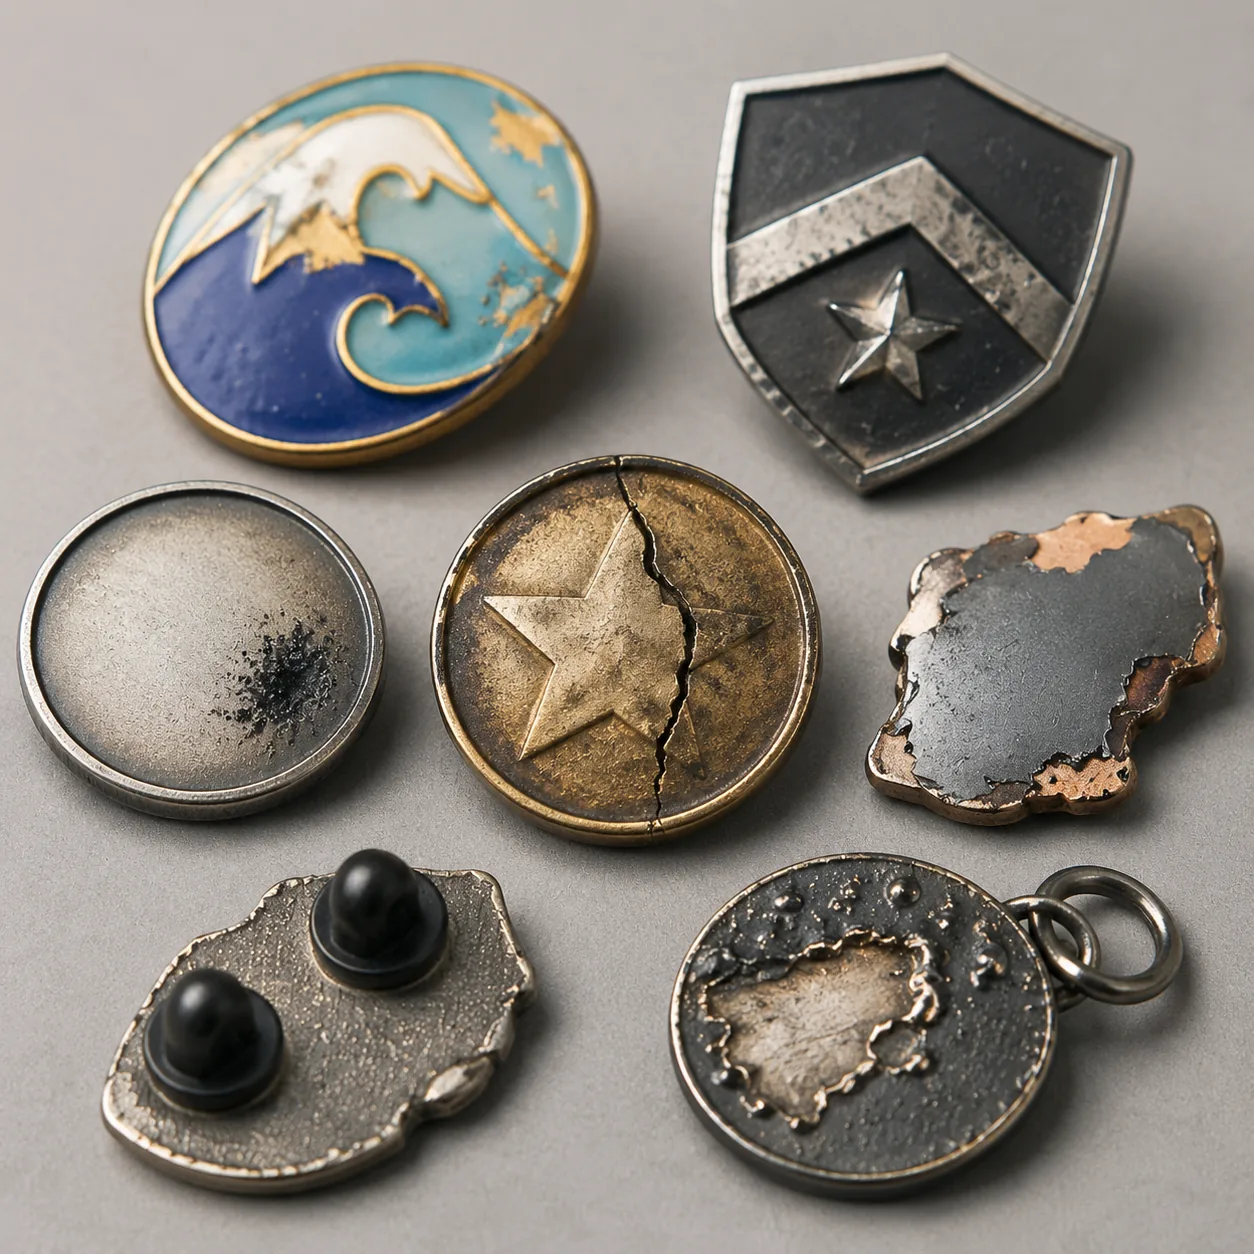
Failure mode 6: surface defects pass until final inspection
Many surface problems are invisible in the first sample photo and obvious only under inspection lighting. Tiny pits, plating pinholes, polishing haze, mold marks, dust inclusion, and enamel contamination can all be masked by standard warehouse light. Buyers sometimes reject a shipment because the defects were not visible to the factory’s casual inspection, even though the same defects would have been caught under a defined AQL process. If you do not state inspection criteria, you are effectively leaving defect acceptance to chance.
A practical QC spec should define the inspection standard, not only the product appearance. For promotional metal goods, a common framework is AQL 2.5 for major defects and AQL 4.0 for minor defects, though the exact number matters less than using the same rule every time. Specify viewing distance, lighting, and the inspection state: loose bulk, packaged, or fully assembled. For polished finishes, request bright raking light because overhead light hides scratches and shallow dents. For enamel goods, add a first-article approval step before the full run so cleaning residue, dust, or color contamination is caught before bulk production.
Surface defects are where sample approval can mislead buyers the most. A pre-production sample may be handled carefully, while bulk production runs faster and exposes polishing variation, incomplete cleaning, or dust contamination. If the order is important, ask for an in-process check at first-off, middle-run, and final packing, not only a final random pull.
Failure mode 7: the item survives shipment but fails the customer’s use case
A product can pass factory inspection and still fail in the field because the use case was never specified. A keychain that looks strong may fail in a bag if the split ring opens under repeated jostling. A badge may arrive intact but sag on thin fabric. A lanyard attachment may hold static weight but tear under dynamic motion. These are not cosmetic defects; they are spec gaps. The product is only “good” if it survives the condition the buyer actually sells into.
This is where buyer-side failure-mode thinking matters most. Define whether the item is for desktop display, garment wear, daily carry, outdoor use, or event handout. Then match the spec to the use case. A one-day conference giveaway can use lighter hardware, while a retail keychain or outdoor badge needs stronger plating, tighter retention, and better corrosion resistance. For humid or outdoor environments, sealed finishes and cleaner base prep matter more than a highly polished look. The right spec often adds a few cents to the unit price but saves far more in returns and rework.
For many buyers, the practical FOB decision point is simple: if the item is under USD 0.50 at 1,000 pieces, the build is usually optimized for short-term promotion; if it climbs into the USD 0.80-1.50 range, you can usually specify thicker hardware, better plating, and tighter finish control. That tradeoff should be intentional, not accidental.
What to lock before you order
Start your next RFQ by listing the failure modes you cannot accept: color drift, sharp edges, loose hardware, dimensional mismatch, visible surface defects, or poor wear performance. Then add one measurable spec for each risk: Pantone code, finish type, edge width, plating type, tolerance, AQL, pull force, and wear requirement. If you already have artwork, mark the critical dimensions directly on the drawing instead of relying on a chat thread or a verbal note.
Before tooling, ask for three things: a golden sample, a QC checklist, and a written statement of which dimensions are locked for reorder. Confirm MOQ tiers as well: many factories will quote 300-500 pieces for simple pins or keychains, 1,000 pieces for better pricing, and 3,000-5,000 pieces for custom packaging or complex multi-part assemblies. That combination catches the problems that cause the most expensive rework and gives you a stable standard for repeat orders.
- Approve one retained master sample for color and finish.
- Lock dimensional tolerances on every fit-critical part.
- Define inspection lighting, AQL level, and viewing distance.
- State hardware pull-force or retention requirements.
- Confirm MOQ, FOB price tier, and production lead time in writing.
Have a project? Send your artwork and target quantity and we’ll reply with a detailed quotation within 12 working hours.
Ready to get this made?
Send your sketch, target quantity and ship-date. Detailed quotation in 12 hours.


