6 Failure Modes That Ruin Custom Promo Orders
Why good artwork still fails in production
Most promo-order rework starts with a spec that looks complete but leaves too much to interpretation. A pin, coin, keychain, patch, or lanyard can pass artwork approval and still fail in bulk if line width, relief depth, plating build, stitch density, color reference, attachment strength, or packing method were never locked. The sample looks fine; the production run drifts.
The factories that ship cleanly do one thing well: they define the failure mode before it appears. That means specifying not only what the product should look like, but what it must survive under handling, heat, abrasion, and transit. For standard metal promo goods, a practical baseline is size tolerance of ±0.3 mm for parts under 50 mm and ±0.5 mm above that, burr height below 0.05 mm, and visual inspection under AQL 2.5 for major defects and 4.0 for minor defects. Decorative plating is usually specified at 0.03-0.05 μm for flash finishes and 0.10-0.20 μm for wear-facing finishes, depending on alloy, polish level, and intended use.
Failure mode 1: the design cannot survive the process
The first failure mode appears when artwork is attractive but not manufacturable at the chosen size. Thin lines collapse during die striking, recessed text fills with enamel, open cutouts warp, and tiny islands break off during polishing. This shows up constantly on enamel pins under 25 mm, where buyers try to keep too much detail in too little area.
Process-aware geometry fixes most of it. For soft enamel pins, keep raised metal lines at least 0.25 mm wide and enamel cells no narrower than 0.30-0.40 mm. For hard enamel, use 0.30-0.35 mm minimum line width because repeated polishing removes margin and can round off fine detail. For coins, visible relief should usually stay above 0.20 mm, and text should not drop below 1.2 mm character height if the piece must be read without magnification. For etched or laser-marked products, specify minimum stroke width and character height, not just the font name.
A useful way to check manufacturability is to ask one question: what is the smallest feature that must survive plating, polishing, stitching, or cutting? If the answer is below the process limit, move the detail to offset printing, UV print, embroidery at a larger size, or a larger format. A good supplier can tell you the thinnest web, bridge, and recessed pocket that tooling will keep, but only if you ask before the die is cut.
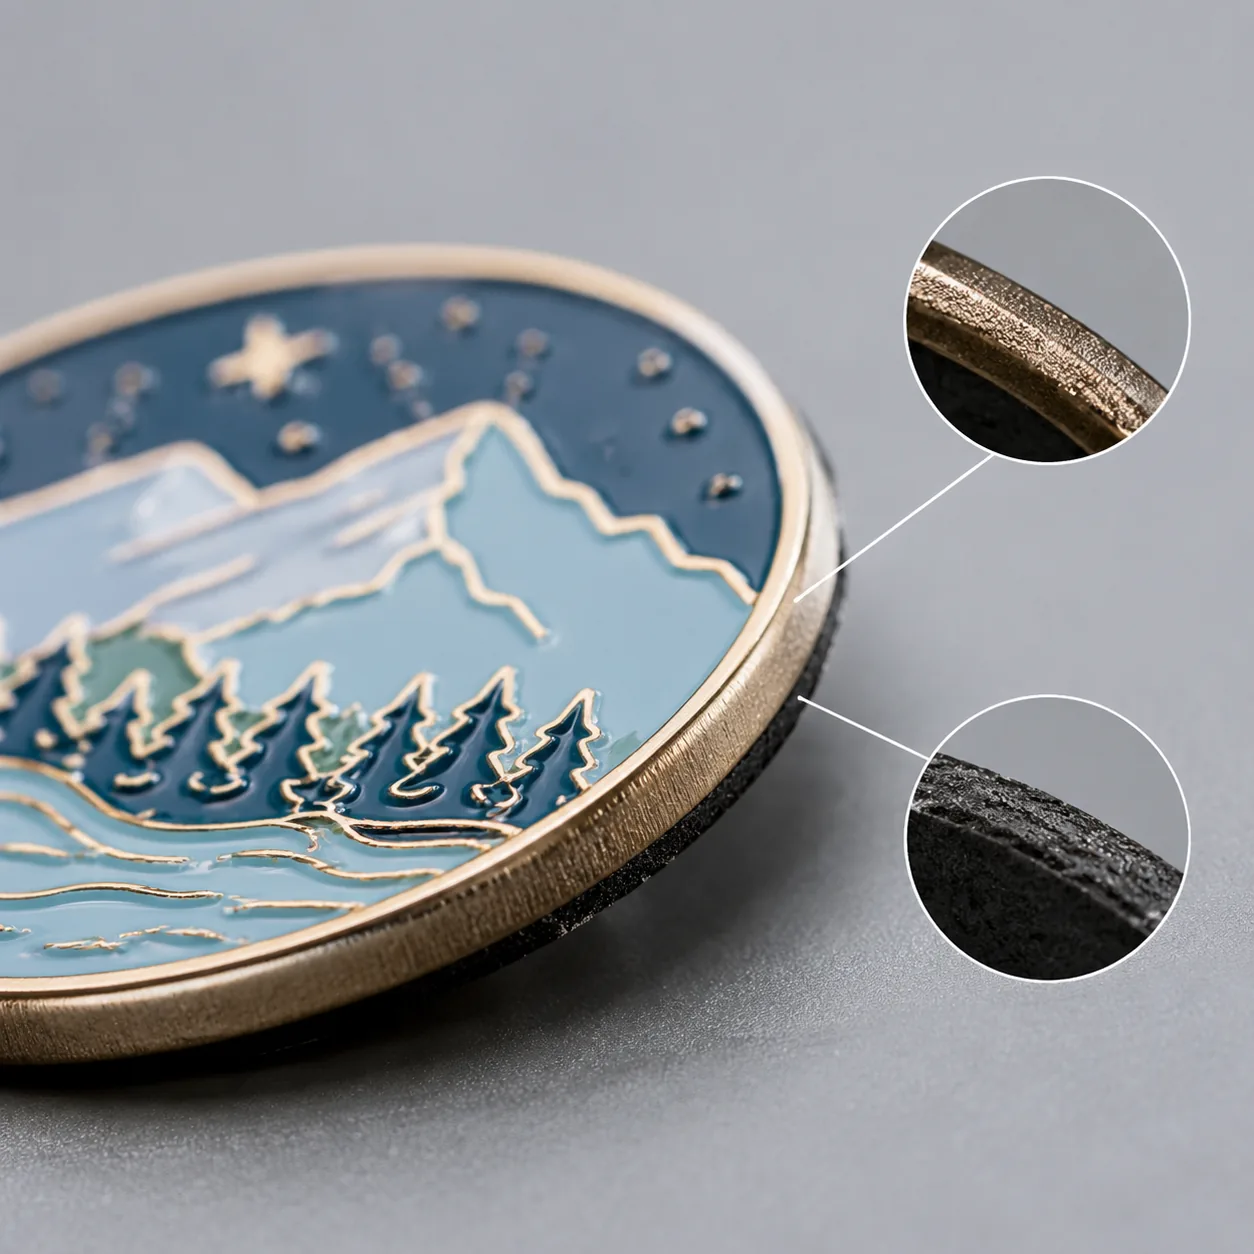
Failure mode 2: the sample hides a plating problem
Plating failures usually surface after the first shipment, because the sample looks good while the bulk run reveals thin deposition, uneven polish, edge burn, or tone mismatch against the intended finish. The usual mistake is calling a finish simply “gold” or “nickel.” That is not enough. Warm gold, antique gold, shiny gold, black nickel, and matte nickel each have different visual density, wear behavior, and pre-polish requirements.
Spec the finish as a system: base metal, plating family, finish level, and exposure risk. For indoor giveaway items that are handled lightly, 0.03-0.05 μm can be acceptable as a visual finish. For items carried daily, request 0.10 μm minimum where the process supports it, and state whether a clear topcoat is required. If you need a polished look on a high-contact product, ask the factory to confirm the plating thickness on exposed faces, not just the bath target.
Also state where variation is allowed. Back sides, deep recesses, and hidden edges will always show process limitations first. If those areas can be slightly duller, note that in the RFQ. That prevents a factory from wasting time chasing perfection in places the end user never sees.
Failure mode 3: color looks right once and wrong forever
Color complaints usually come from ambiguous expectations, not one bad pour. Enamel, printed graphics, thread, and PVC shades shift with lighting, batch mix, substrate color, and gloss level. A buyer may approve a sample under warm office light, then reject bulk production under daylight because the blue reads greener, the red is too translucent, or the black sits closer to charcoal on a textured base.
The fix is to anchor color control to a repeatable reference and define acceptable drift. Pantone remains useful, but only if you also state the viewing condition: daylight, D65 neutral light, or production-line inspection. For hard enamel or soft enamel, ask for a pre-production sample with the exact plating, fill depth, and curing method, then approve it under the same lighting you will use for final sign-off. For printed lanyards or woven patches, ask for a strike-off or lab dip when the brand color is critical.
If the order includes multiple brand colors, separate them by priority. Put the hero color in the critical column and the secondary accents in the standard column. That gives the factory a clear control target and reduces the chance that every color is treated as equally important, which usually produces equally average results.
Failure mode 4: the attachment fails after distribution
A great-looking product becomes a return if it falls off a jacket, spins on a lanyard, snaps at the jump ring, or tears fabric during wear. Attachment failures are often design failures disguised as hardware issues. Butterfly clutches loosen, rubber backs age poorly in heat, weak jump rings open under pull, and thin split rings deform when the item is used as a daily carry object instead of a shelf display.
Specify attachment by load case, not by name alone. For lapel pins, butterfly clutches are fine for standard giveaways, rubber backs help when snag risk matters, and magnets only make sense for low-weight items where fabric damage must be avoided. For keychains, define ring wire diameter, outer diameter, and connector style; a 25 mm split ring with 1.8 mm wire performs very differently from a 20 mm ring with 1.2 mm wire. For heavier charms, upgrade to a lobster clasp or welded ring instead of relying on a light split ring.
If the item will be handled often, ask for pull testing on the assembled unit before mass production. A practical internal threshold is 3-5 kgf for standard lapel-pin backs, 6-8 kgf for light keychain assemblies, and higher if the customer will hang the item from bags or uniforms. The exact number depends on product weight and use case, but the point is to define a test before the factory starts shipping 5,000 pieces.
Failure mode 5: the decoration process is stronger than the product
Some products fail because the decoration method is too aggressive for the substrate. Heavy embroidery can pucker a thin fabric patch, thick resin domes can creep over edges, deep laser engraving can weaken a narrow metal bridge, and high-temperature curing can warp acrylic or soften adhesive layers. This is why one decoration method rarely transfers cleanly across all promo items, even when the artwork is identical.
Match decoration load to base material. Woven patches handle fine detail but need controlled thread density; embroidered patches create texture but need a firmer backing and slightly larger visual elements; PVC patches tolerate bold shapes but not tiny serif text; silicone patches handle deep relief but need mold draft and clean release. For lanyards, define whether the print must remain readable after repeated folding, abrasion, and moisture exposure. For metal, set a maximum fill thickness relative to part thickness so the decoration does not overbuild or crack at the edges.
A useful rule is to keep decorative build below one-third of the thinnest structural wall on the part. If the method pushes beyond that, you are usually buying distortion and early wear along with the artwork. Test that risk on a pre-production sample instead of discovering it in the carton.
Failure mode 6: packaging and logistics create the defect
A surprising number of QC issues are created after production, not during it. Pins rub against each other and scratch plating, coins chip at the rim, keychains tangle and deform, magnets fracture in transit, and lanyards crease in cartons packed too tightly. The product may pass inspection at the factory and still arrive damaged because the packing method never matched the fragility of the item.
Packaging should be specified as a protection system, not an afterthought. Define the inner bag, divider count, tray depth, carton strength, and whether each piece is individually sleeved or bulk packed. For polished metal goods, a soft OPP bag plus tray or compartmented carton usually outperforms loose bulk packaging, even if it adds a small labor cost. In FOB terms, that cost is usually minor compared with rework, chargebacks, or customer returns.
If the product is heavy or sharp-edged, add transit-safe packing requirements. For example, export cartons should typically meet ECT 32 or higher, and fragile inserts should not allow movement greater than 2-3 mm inside the tray. That reduces scuffing during vibration and lowers the chance that one damaged unit ruins the appearance of ten adjacent units.
What to lock before you approve bulk
The easiest way to reduce failures is to convert them into acceptance criteria. A strong RFQ should not only list size and quantity; it should define the most likely failure points and the limits that will be accepted. That gives the factory a target it can actually produce against and gives procurement a clean basis for rejecting off-spec goods without argument.
Use the table as a starting point, then tighten it for your channel. Retail-facing orders usually need tighter finish control, more detailed packing, and lower defect tolerance than internal giveaways. If the order is time-sensitive, ask the supplier to confirm whether tooling, plating, curing, and packing can all be completed inside the stated days before you approve the PO.
- State the exact failure you want to avoid: line collapse, plating rub-off, loose hardware, color shift, stitch pull, or shipping scratch
- Add numerical limits: size tolerance, line width, plating thickness, attachment size, and acceptable color variation
- Require a pre-production sample that matches tooling, finish, and packaging, not just artwork
- Confirm the inspection standard: AQL 2.5 major and 4.0 minor for standard promo goods, or tighter for retail-facing orders
- Define the use case: wear on fabric, pocket carry, display-only, outdoor exposure, or mail distribution
- Specify no-go conditions such as sharp edges, burrs, exposed metal dust, adhesive seepage, loose threads, or carton crush
If you are buying mixed promo items in one campaign, keep the spec language consistent across the set so the factory does not optimize one item and weaken another. ZheCraft often sees better results when buyers send a single control sheet for pins, coins, keychains, patches, and lanyards, then note which dimensions are critical and which are cosmetic. That small discipline prevents the usual last-minute argument over whether a deviation is acceptable.
A practical next step for your RFQ
Before you request quotes, write the order around failure prevention rather than product description. Start with the one defect that would make the shipment unusable, then add the numeric spec that keeps it from happening. If you are unsure which failure mode matters most, choose the most expensive one to correct after shipment: usually plating wear, loose attachments, print mismatch, or packaging damage.
For the next order, send one page with five items only: material, finish, dimensions, tolerance, and the top two failure modes you will not accept. Add a reference photo or approved sample note if needed, and ask the factory to restate those limits in the pre-production confirmation. That single step is often enough to turn a vague quote into a buildable, inspectable order. If you want to tighten it further, the next move is to turn this into a buyer RFQ template for pins, coins, keychains, patches, and lanyards.
Have a project? Send your artwork and target quantity and we’ll reply with a detailed quotation within 12 working hours.
Ready to get this made?
Send your sketch, target quantity and ship-date. Detailed quotation in 12 hours.


