5 Production Failures That Break Custom Metal Promo Orders
Why custom metal promo orders fail at the handoff points
Custom metal promo products usually do not fail because one spec was obviously wrong. They fail at the handoff points: artwork to tooling, tooling to plating, plating to assembly, assembly to packing, and packing to transit. A pin may look perfect in CAD, then lose legibility after die sinking; a coin may pass a one-piece sample, then show batch variation once polishing and plating ramp up; a keychain may survive inspection, then arrive scratched because the inner pack allowed metal-on-metal contact. The symptom shows up at the customer end, but the cause is usually upstream and cumulative.
The most reliable way to control these orders is to write the RFQ around measurable failure modes instead of vague quality language. For pins, badges, coins, keychains, magnets, patches, and lanyards, the critical variables are minimum line width, minimum gap, fill depth, plating thickness, attachment strength, dimensional tolerance, and packing protection. If the spec names the defect to avoid, the numeric limit, and the inspection method, the supplier can quote and produce against something testable rather than interpretive.
- Define the defect, the limit, and the inspection method in the PO
- Approve 1:1 artwork and a physical master sample before tooling release
- Lock finish, hardware, and packing as part of the product spec
- Require first-article inspection before mass production starts
- Use batch-level acceptance criteria instead of one-piece visual approval
Failure mode 1: artwork is too fine to survive tooling and fill
The most common early failure is an artwork-to-tooling mismatch. Tiny text, narrow bridges, deep negative spaces, and sharp internal corners often look clean on screen but become unstable in die making, stamping, casting, or enamel filling. In practice, soft enamel and hard enamel designs usually need a minimum visible line width of about 0.25 to 0.30 mm, but 0.35 mm is safer for repeatable fill. Internal gaps below 0.30 mm often close during plating or fill, and text under about 1.2 mm in height becomes hard to read once finish and relief are applied. For very small logos, the real risk is not only loss of detail; it is broken mold walls, flashing, and inconsistent cavity fill.
The fix is to review manufacturability before the tool is cut. Ask the factory to mark every feature below minimum line width, minimum gap, or minimum text height on a 1:1 vector proof. For stamped metal badges and coins, specify a relief depth that matches the design intent, typically 0.20 to 0.40 mm for moderate contrast, and require the supplier to confirm the smallest raised and recessed features. If the artwork depends on hairline outlines to carry brand identity, it needs simplification before quotation, not after sample rejection. A cheap-looking sample is often just a design that was never made for the process.
| Design feature | Practical spec target | Why it matters |
|---|---|---|
| Line width | 0.25-0.30 mm minimum; 0.35 mm preferred | Prevents fill bridging and weak tooling walls |
| Text height | 1.2-1.5 mm minimum | Keeps letters readable after plating and polishing |
| Internal gap | 0.30-0.40 mm minimum | Avoids enamel bleed and cavity closure |
| Relief depth | 0.20-0.40 mm | Creates visible contrast without overcutting |
| Corner radius | No knife-edge internal corners | Reduces flash and die wear |
- Send a 1:1 vector proof with all critical dimensions labeled
- Flag any feature under 0.35 mm for redesign review
- Require the supplier to confirm smallest raised and recessed details
- Approve one clean master sample before bulk tooling release
- Reject artwork that depends on hairline lines for brand recognition
Failure mode 2: plating and surface prep hide defects until volume starts
A polished sample can hide poor base preparation. If the die surface is not properly finished, or if polishing is inconsistent before electroplating, the final part may reveal scratches, pitting, dull patches, or edge burnishing that the sample never showed. Buyers often specify only the visible finish—gold, nickel, black nickel, antique brass, matte silver—but omit the substrate preparation and thickness standard that determines whether the finish will look uniform. That is a problem because the same finish can look elegant on a smooth, well-prepped substrate and uneven on a rough or over-buffed one.
For decorative promo metal, finish spec should include both substrate preparation and plating thickness. Flash decorative plating is often around 0.03 to 0.05 microns and is mainly visual; more durable decorative layers are commonly in the 0.10 to 0.20 micron range, while higher-wear applications may need the supplier to state the deposit target and test method rather than assume thickness alone is enough. For polished surfaces, ask for a roughness target or a signed reference piece, not just "mirror finish." Typical QC should include adhesion, coverage, and visual consistency under neutral light, because plating defects often cluster at edges, recesses, and contact points.
For many custom orders, FOB pricing shifts with finishing complexity and scrap risk. A simple stamped lapel pin at 1,000 pieces may land around USD 0.35 to 0.85 FOB per piece, while a more complex plated and polished coin can move into the USD 1.20 to 3.50 FOB range depending on size, enamel, and packaging. The spread is not only labor; it reflects how much variance the finish adds to rework, rejection, and inspection time.
| Finish risk | What goes wrong | What to specify |
|---|---|---|
| Flash plating | Looks fine on sample, wears quickly | Minimum thickness, wear expectation, and photo reference |
| Antique finish | Pools in recesses and darkens unevenly | Approved contrast level and recess depth |
| Mirror finish | Shows scratches and polishing marks | Surface polish grade and scratch acceptance limit |
| Matte finish | Looks patchy if blasting is uneven | Blast texture standard and gloss target |
- State plating thickness in microns, not just color name
- Approve a signed finish reference under neutral light
- Define scratch acceptance and edge burnish limits
- Request a roughness or polish standard for mirror finishes
- Specify where appearance matters most: face, edge, or recess
Failure mode 3: color matching is treated as a guess instead of a controlled standard
Color problems are one of the fastest ways to reject a sample that is otherwise mechanically sound. Enamel, printing, epoxy dome overlays, woven thread, and silicone all reflect light differently, so the same Pantone reference can drift across substrates. A shade that looks close on a hard enamel pin may feel too warm on printed packaging or too dark under epoxy. The problem gets worse when a campaign includes multiple items that are supposed to read as one system but use different decoration methods.
The spec has to define both the color target and the acceptance method. For enamel and printed items, require a Pantone reference plus one signed physical master sample reviewed under D65 or equivalent neutral white light. If the order mixes materials, state whether the match must be exact, close, or process-optimized, because those are different approval standards. A practical tolerance band for decorated promo work is often judged visually rather than by instrument only, but the PO should still define the reference sample, viewing light, and rejected conditions. Otherwise the factory can honestly claim it matched the code while the buyer still sees a mismatch.
For direct printing or epoxy doming, ask for a first-article color range of no more than 1 to 2 visible shade steps from the master under the agreed light source. For multi-item sets, require the supplier to present the whole set together so the mismatch can be judged as a system, not one piece at a time.
- Provide a physical color master, not only a Pantone code
- State viewing light: D65 or equivalent neutral white
- Require batch comparison against the signed sample, not only the artwork file
- Separate acceptance rules for metallic, translucent, and matte finishes
- Reject approvals made under warm showroom lighting only
| Decoration method | Typical color risk | Control point |
|---|---|---|
| Hard enamel | Slight hue shift after firing | Approve against signed master after cooling |
| Epoxy dome | Color darkens under lens effect | Specify accepted visual shift under D65 |
| Silk screen | Ink density varies by pass count | Lock ink film and drying process |
| Woven textile | Threads blend into background shade | Use physical thread chart and shade band |
| Multi-item set | Pieces do not read as one family | Approve the set together under one light source |
Failure mode 4: hardware and attachment strength fail after handling
A product can pass cosmetic inspection and still fail in the field if the attachment system is weak. This shows up as butterfly clutches that loosen, keychain split rings that spread, magnets that drop through fabric, or brooch backs that rotate and snag clothing. These failures are expensive because they appear as returns, lost items, or damaged garments, not as obvious production rejects. If the item is used at events, retail checkout, or in transit kits, hardware reliability matters as much as surface appearance.
The spec should name both the hardware type and the performance target. For lapel pins, define backing style, post diameter, and a pull-resistance target. For keychains, specify ring wire gauge and a minimum opening force. For magnets, require the magnet grade, coating, and a minimum pull force measured on a defined steel substrate and thickness. As a practical example, a small promotional magnet should not be approved on appearance alone; it should be tested on the actual substrate it will encounter, with the acceptance criterion written in grams-force or newtons rather than "strong enough."
For a 25 mm lapel pin, a common acceptable tolerance on outer diameter is about ±0.2 mm, with clutch alignment checked visually and by pull test. For keychains, a ring wire gauge around 1.0 to 1.2 mm is typical for lighter promotional use, but a heavier SKU may need thicker wire and a stronger split-ring spec. If the order includes wearable hardware, require anti-rotation or anti-snag features where appropriate, especially for fabric-heavy event use.
| Hardware type | Typical failure | Better spec |
|---|---|---|
| Butterfly clutch | Loosens in transit or repeated wear | Define post size, clutch type, and pull test method |
| Rubber clutch | Softens grip under heat or dust | State temperature and retention expectation |
| Split ring | Opens or deforms with use | Specify wire gauge and opening resistance |
| Magnet back | Drops through fabric or thick garments | Specify magnet grade and minimum pull force |
- Define the load case: wear, transit, or display
- Specify pull force in newtons or grams-force
- Lock post diameter, ring gauge, and magnet grade
- Test the actual substrate, not a generic steel plate
- Require anti-rotation features for high-use wearable items
Failure mode 5: packaging lets good parts get damaged in transit
Packaging is not only branding; it is a quality-control step. A polished pin or keychain can leave the factory clean and still arrive scratched if parts rub inside the carton, bounce in a blister, or compress against each other during freight. The damage often appears after transit because the packaging spec did not control part-to-part contact, carton compression, or moisture exposure. High-gloss plating, epoxy domes, printed cards, and soft enamel finishes are especially vulnerable to abrasion.
The right approach is to treat packaging as protection first and presentation second. State whether each unit is individually bagged, carded, or tray-packed; define carton quantity; and specify inner separation materials and void-fill limits. For export orders, ask for a packing structure that prevents metal contact and limits movement under normal handling. A simple rule is that polished or plated items should not be allowed to touch each other or unprotected printed cards inside the same pack. If the order is mixed, isolate the heaviest part so it cannot mark lighter pieces.
Lead time is also affected by packaging complexity. A plain polybagged order may ship in 12 to 18 days after sample approval, while carded retail packaging with custom inserts can take 18 to 30 days. Typical MOQ tiers also shift by process: many custom lapel pins start around 100 to 200 pieces, molded keychains around 200 to 300 pieces, and custom coins around 50 to 100 pieces for higher-value programs. The packaging choice should match the production volume, because forcing premium retail packaging onto a low-MOQ order can raise unit cost without improving quality enough to justify it.
- Use individual protection for polished or plated items
- Separate hard metal parts from printed cards or soft finishes
- Specify carton fill ratio and internal void control
- Require drop and compression protection for export cartons
- Add moisture control when shipments cross humid routes
| Packaging format | Typical MOQ fit | Typical lead time | FOB impact |
|---|---|---|---|
| Plain polybag | Low to medium volume | 12-18 days after sample approval | Lowest |
| Carded retail pack | Medium volume | 18-30 days after sample approval | Moderate |
| Tray-packed set | Higher risk or premium items | 20-35 days after sample approval | Higher |
| Mixed kit with inserts | Campaign sets and bundles | 25-40 days after sample approval | Highest |
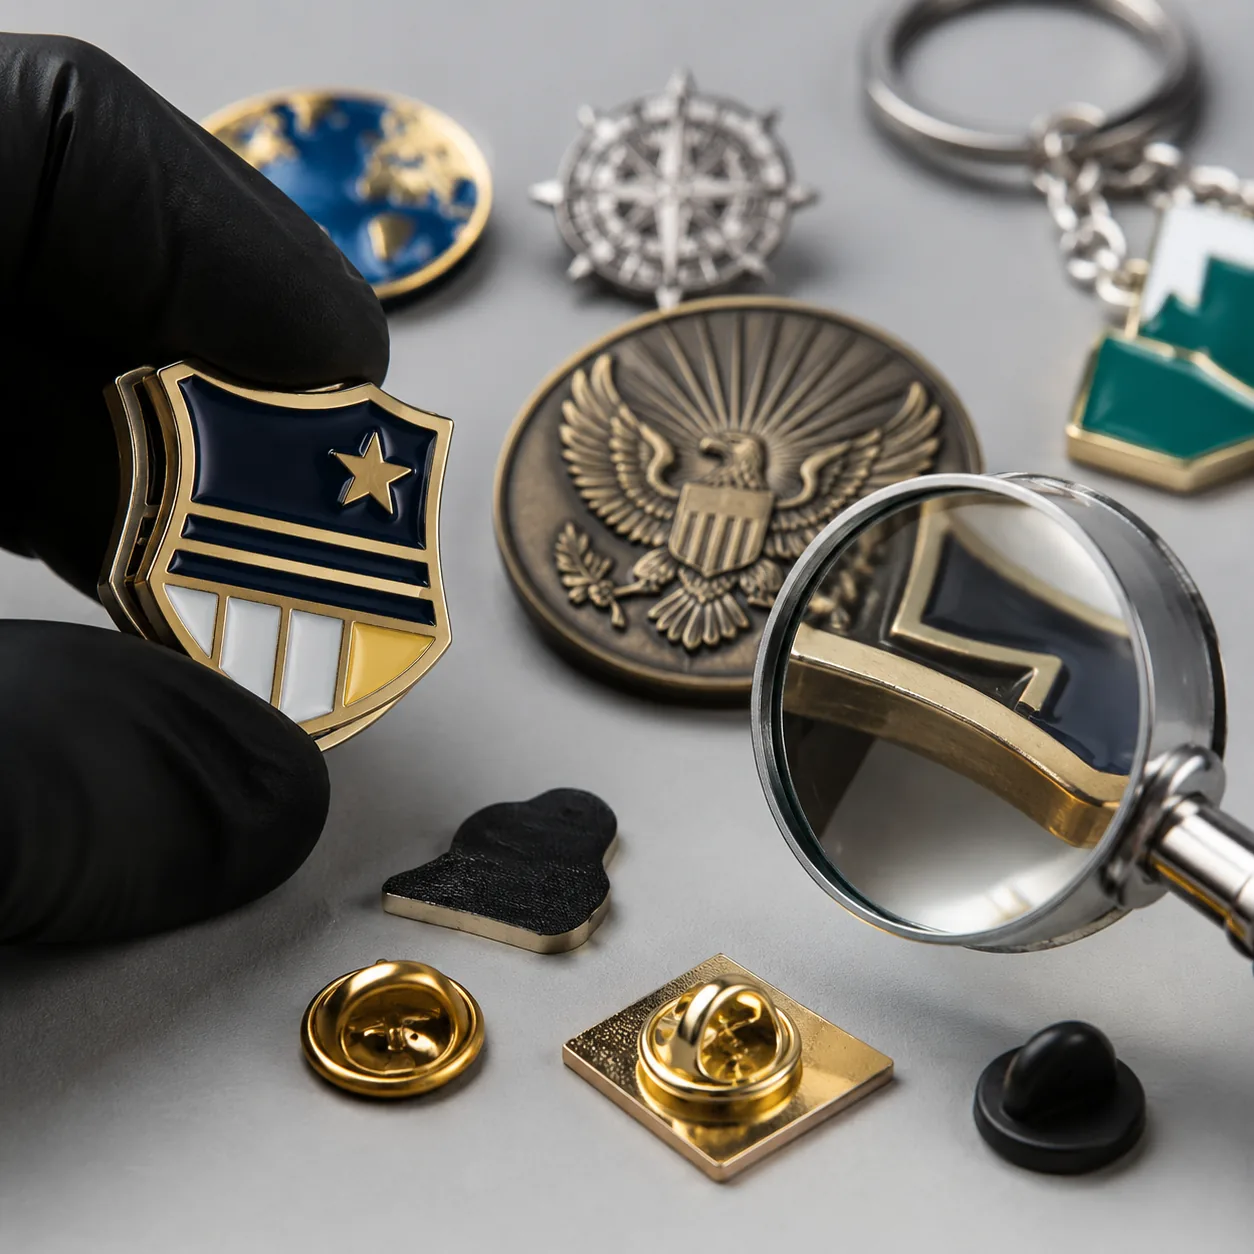
How to inspect the sample so the same defect does not repeat
A sample should be inspected as a process prediction, not as a display object. Check it under the same lighting, at the same viewing distance, and with the same handling method that end users will experience. Measure edge burrs, plating uniformity, fill height, back hardware alignment, and any points where the product can snag, twist, or wear through. If the sample looks good only because it was hand-selected from a better-than-average batch, it is not a reliable approval sample.
Use a short approval record and attach it to the PO. Record the exact finish name, thickness target, artwork revision, hardware type, carton method, and any deliberate exceptions. If the supplier only passes by sorting out weak pieces, the process is still unstable. A good sample is one the line can reproduce at order quantity without special handling or extra labor.
- Inspect under neutral light and magnification where needed
- Measure thickness, diameter, and critical gaps on the sample
- Check for hidden burrs around cutouts and sharp edges
- Verify attachment pull and rotation resistance
- Write the approved sample ID on the PO and artwork file
| Inspection item | Method | Typical acceptance note |
|---|---|---|
| Thickness | XRF or calibrated gauge | Meet stated micron target within agreed tolerance |
| Dimensions | Caliper or template | Keep critical size within ±0.2 mm unless otherwise stated |
| Color | Visual match under D65 | Match signed master; reject warm-light approvals |
| Hardware pull | Defined force test | Meet stated grams-force or newtons |
| Packing | Drop and rub check | No part-to-part contact in final pack |
What to do on the next RFQ
Start by listing the two failures you cannot accept: cosmetic drift, weak hardware, color mismatch, scratching, tooling simplification, or packaging damage. Then convert those risks into measurable specs: minimum line width, plating thickness, pull force, packaging method, tolerance, and acceptance method. That gives the supplier a production target instead of a vague quality expectation.
For the next RFQ, send one vector artwork file, one physical color or finish reference if available, one packing expectation, and one signed approval rule. Ask the factory to respond with manufacturability risks before quoting, not after sample approval. If the supplier cannot explain the failure modes in numbers, it probably cannot control them in production.
Have a project? Send your artwork and target quantity and we’ll reply with a detailed quotation within 12 working hours.
Ready to get this made?
Send your sketch, target quantity and ship-date. Detailed quotation in 12 hours.


